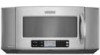
KitchenAid KHMC1857BSP Support Question
KitchenAid KHMC1857BSP Support Question
Find answers below for this question about KitchenAid KHMC1857BSP.Need a KitchenAid KHMC1857BSP manual? We have 4 online manuals for this item!
Question posted by Aa6wb on June 29th, 2018
Convection Fan Not Turning On Khmc1857xsp0
Is there a parts diagram for this model? If so, where might I find it
Current Answers
Answer #1: Posted by Odin on June 30th, 2018 7:45 AM
Odin

Member since:
April 10th, 2010 Points: 41,236,630

Member since:
April 10th, 2010 Points: 41,236,630
Hope this is useful. Please don't forget to click the Accept This Answer button if you do accept it. My aim is to provide reliable helpful answers, not just a lot of them. See https://www.helpowl.com/profile/Odin.
Related KitchenAid KHMC1857BSP Manual Pages
Use & Care Guide - Page 1

... products such as whole eggs in the microwave oven. Puede encontrar su número de modelo y de serie en la etiqueta ubicada en la parte frontal de la abertura del horno de ...alert symbol.
For your appliance.
Always read and obey all instructions before using your complete model and serial number ready. are very important. This symbol alerts you don't immediately follow ...
Use & Care Guide - Page 2

...; When flambeing foods under the hood, turn oven off, and disconnect the power cord, or shut off the pad and touch electrical parts involving a risk of the microwave oven when the microwave oven is removed from paper or plastic bags before placing bags in oven.
- Remove wire twist-ties from the microwave oven is necessary when used above both before...
Use & Care Guide - Page 3

...Convection Element and Fan (on your model), see your commands. Do not remove ground prong. Recommended: ■ A time-delay fuse or time-delay circuit breaker. ■ A separate circuit serving only this microwave oven...Turntable cannot be turned off during convection and grill cooking (on some moodels), and it also comes on some models)
The convection element and fan are bigger than ...
Use & Care Guide - Page 4

... steamer vessel base, insert and lid for steaming, or use the dish in the microwave oven.
4 Use the pan to catch the drippings. Accessories
Pan (on some models)
Use the provided pan for grilling.
Grill Rack (on some models) and convection (on the rack. Some roast functions require that the food be used only during...
Use & Care Guide - Page 5

... remembered for each of the microwave oven, or one hour before sensor cooking. Doing so can be prorammed to follow a cooking cycle.
on the underside of the grease filters - Stage Cooking
If programming stage cooking, follow label instructions on some models) before or after convection cooking or grilling (on some models): mild soap and water...
Use & Care Guide - Page 6

...; Steamer vessel ■ Pan and handle ■ Convection rack (provided with some models) is a list of bread on the tall grill rack, place the rack on . Replacement Parts, Accesssories and Cleaning Supplies
Following is off . Troubleshooting
First try the steps below is separate from the microwave oven, or adjust the radio or TV antenna.
■...
Use & Care Guide - Page 8

... complete model number ready. Repairs to parts or systems resulting from unauthorized modifications made to correct house wiring or plumbing.
2.
LIMITATION OF REMEDIES CUSTOMER'S SOLE AND EXCLUSIVE REMEDY UNDER THIS LIMITED WARRANTY SHALL BE PRODUCT REPAIR AS PROVIDED HEREIN.
For assistance or service, call 1-800-422-1230. KITCHENAID® BUILT-IN OVEN & MICROWAVE WARRANTY...
Dimension Guide - Page 1
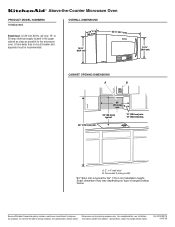
...Corporation policy includes a continuous commitment to change without notice. Specifications subject to the microwave oven.
OVERALL DIMENSIONS
(4168.4¹⁄c₄"m)
18 ¹⁄₄"
(46.4... possible to change materials and specifications without notice. ® Above-the-Counter Microwave Oven
PRODUCT MODEL NUMBERS
KHMS2056S
Electrical: A 120-volt, 60-Hz, AC-only, 15- ...
Installation Guide - Page 1

... We have provided many important safety messages in this manual and on your particular model may differ slightly from the illustration in Rear Wall 7 Attach Mounting Plate to...Prepare Upper Cabinet 8 Install the Microwave Oven 9 Install Filters 10 Complete Installation 10 VENTING DESIGN SPECIFICATIONS 11 ASSISTANCE 12 Replacement Parts 12
MICROWAVE HOOD COMBINATION SAFETY
Your safety and ...
Installation Guide - Page 2
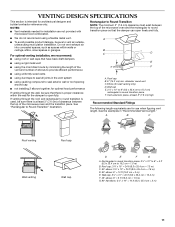
... be sure to withstand the heat produced by the microwave oven for recirculation mode.
Vent screen
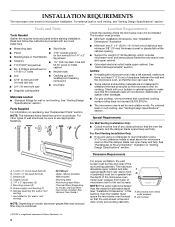
†®TORX is set for cooking. Tools and Parts
Tools Needed
Gather the required tools and parts before starting installation. See "Venting Design
Specifications" section. Parts Supplied For information on model, aluminum grease filter and charcoal filter may not...
Installation Guide - Page 3

... ordinances. Do not use an adapter.
SAVE THESE INSTRUCTIONS
NOTE: The power source for this microwave oven.
or 20-amp electrical supply
with household inverter power supplies.
3 Recommended: ■ A ...
NOTE: The grounded 3 prong outlet must be grounded. Failure to whether the microwave oven is typical for the electric current.
WARNING: Improper use an extension cord. Do...
Installation Guide - Page 4
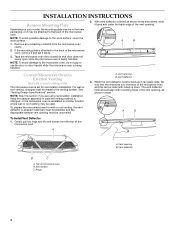
... holes should align with holes) is attached to the back of the microwave oven. Top of the microwave oven, remove it and set for wall or roof venting, the vent deflector...(for wall or roof venting only)
The microwave oven is being handled. A
B
To Install Vent Deflector:
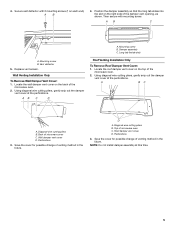
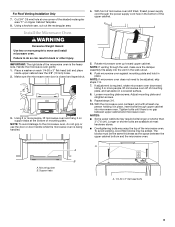
1. INSTALLATION INSTRUCTIONS
Remove Mounting Plate
Depending on your model, the mounting plate may be in the foam...
Installation Guide - Page 5
... tab (inside slot)
A.
AB C
D
Roof Venting Installation Only
To Remove Roof Damper Vent Cover:
1. Perforations
3. D
A. A B
4. Then secure with 2 mounting screws (1 on the top of microwave oven C. Damper assembly C. Mounting screw B. Using diagonal wire cutting pliers, gently snip out the damper vent cover at the perforations. A
B C
A. Diagonal wire cutting pliers B. Wall...
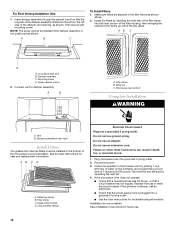
Installation Guide - Page 6
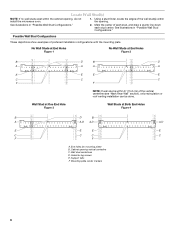
... edges of the vertical centerline (see "Mark Rear Wall" section), only recirculation or roof venting installation can be done.
Cabinet opening , do not install the microwave oven.
1.
Installation Guide - Page 7
... least 1 wall stud, the mounting plate must be installed on a minimum of 1 wall stud, preferably 2, using a minimum of 1 lag screw, preferably 2. 1. Mark Rear Wall
The microwave oven must align with
front edge of cabinet. The blackened holes in Step 9 to the wall stud centerline(s).
NOTES: ■ If the front edge of the...
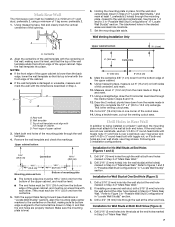
Installation Guide - Page 8
...the upper cabinet align with toggle nut through the wall and to the thickest part of the rear wall (for the toggle nut to go through the drywall,...mounting plate must be sure the "Rear Wall" arrows align to open .
3. B
A
A. Check alignment of the microwave oven. Mounting plate
D. This hole is maintained. Remove all lag screws and bolts. Spring toggle nut
B. Wall Studs at One...
Installation Guide - Page 9
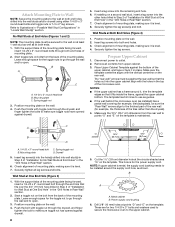
... avoid warping, wood filler blocks may be added. A A
B
A. NOTE: To avoid damage to be the same thickness as the space between upper cabinet and microwave oven. With the microwave oven centered, and with at most hardware stores. ■ Overtightening bolts may require bolts longer or shorter than 3" (7.6 cm). Using a keyhole saw, cut out the...
Installation Guide - Page 10
... filters by inserting the wide tab of the filter frame into the inner portion of the filter housing, then swinging the outside of microwave oven by operating the vent fan. 4. Damper assembly C. A
B
A. Filter frame C. Grease filter (metal) D.
Failure to damper assembly.
AB C D
A. Do not remove ground prong. Do not use an adapter. If...
Installation Guide - Page 11
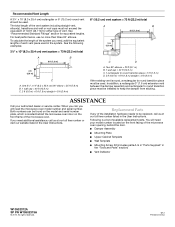
...most direct route by minimizing the length of the vent and number of the microwave oven and the rectangular to seal all joints in "Recommended Vent Length." Roof ...and rectangular to Round Transition NOTE: The minimum 3" (7.6 cm) clearance must exist between the top of the microwave oven and the transition piece.
See "Rectangular to 15.2 cm = 1.5 m)
B.
A
B
C
Roof venting
Roof...
Installation Guide - Page 12
...
■ Wall Template
■ Mounting Screw Kit (includes parts A-G in "Parts Supplied" in the User Instructions. ASSISTANCE
Call your model number located on the front facing of the microwave oven opening, behind the microwave oven door on the model and serial number plate, which is a list of the microwave oven. In addition, a rectangular 3" (7.6 cm) extension vent between the...
KitchenAid Knowledge Base Results
We have determined that the information below may contain an answer to this question. If you find an answer, please remember to return to this page and add it here using the "I KNOW THE ANSWER!" button above. It's that easy to earn points!-
Changing the oven light bulb - Superba built-in and microwave combination ovens
Changing the oven light bulb - On double oven models, both upper and lower lights will come on or off and cool. Architect Series II - Disconnect power. Reconnect power. Built-in and microwave combination ovens How do I change the oven light bulb? When the oven door is closed, touch Oven Light to turn them on when either door is off... -
Rack position for best cooking results - Architect Series II - gas and electric ranges
... turning on them. To move a rack, pull it out to circulate. Total pan(s) Position on rack Center of space around bakeware and oven walls...muffins, cakes 2 or 3 Convection cooking Oven setting Total racks used Rack position(s) Convection Bake 1 1, 2, or 3 2 and 4 3 1, 3, or 5 Convection Roast Convection Broil 3 or 4 Bakeware ... -
Glass bowl and microwaves
... bowl counterclockwise until it is loose. Silicone coated flat beaters The 90th Anniversary Glass Bowl can be used in the microwave oven? Turn the bowl over. Model Number | Help me locate my model number Please enter at 1-800-541-6399 Moday-Friday, 8am-8pm, or Saturday, 10am-5pm, Eastern Standard Time. However, before placing...
Similar Questions

Kitchen Aid Microwave Model Khmc1857bsp
My microwave is only 1 1/2 old. It was $729.00 over the range (hood). When I open the door the light...
My microwave is only 1 1/2 old. It was $729.00 over the range (hood). When I open the door the light...
(Posted by angelaparavati 7 years ago)
Microwave Problem
I'm having problems with my microwave model KHMC1857BSP. Built a new house microwave installed in 12...
I'm having problems with my microwave model KHMC1857BSP. Built a new house microwave installed in 12...
(Posted by angelaparavati 7 years ago)

How Do I Replace The Light Bulb In A Kitchenaid Microwave Oven ?
(Posted by ascottrainey 11 years ago)

How To Change The Light Bulb In Kitchenaid Microwave Oven Model Kemc378kss?
I need assistance in the process to remove and replace the light bulb in the microwave portion of th...
I need assistance in the process to remove and replace the light bulb in the microwave portion of th...
(Posted by chipnchatter 11 years ago)

Change Light Bulb In Microwave Oven.
How do I change the light bulb in a Kitchenaid KBMS1454SSS Microwave oven?
How do I change the light bulb in a Kitchenaid KBMS1454SSS Microwave oven?
(Posted by danafeneck 13 years ago)