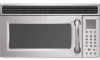
Use and Care Guide
Page 2
...5 Oven Cavity Coating 5 Microwave System 5 Turntable 6 Cooking Rack 6 Browning Pan and Handle 6 Grill Rack 7 OVEN CONTROL 7 Display/Touch Screen 7 Progress Bar 8 Start 8 Off/Cancel 8 Clock 8 Tones 9 Timer 9 Vent Fan 9 Cooktop/Countertop Light 9 Hints & Settings 9 Child Lock 10 Night Light 10 Display Brightness and Contrast 10 Learning Mode 10 Demo Mode 10 MICROWAVE OVEN USE 11 Food Characteristics 11 Cooking Guidelines 11 Cookware and Dinnerware 11 Aluminum Foil and Metal 12 Cooking Power 12 Cooking 13 Doneness 13 Prepare 13 Preset Cooking 13 Popcorn 14 Cooking...
...5 Oven Cavity Coating 5 Microwave System 5 Turntable 6 Cooking Rack 6 Browning Pan and Handle 6 Grill Rack 7 OVEN CONTROL 7 Display/Touch Screen 7 Progress Bar 8 Start 8 Off/Cancel 8 Clock 8 Tones 9 Timer 9 Vent Fan 9 Cooktop/Countertop Light 9 Hints & Settings 9 Child Lock 10 Night Light 10 Display Brightness and Contrast 10 Learning Mode 10 Demo Mode 10 MICROWAVE OVEN USE 11 Food Characteristics 11 Cooking Guidelines 11 Cookware and Dinnerware 11 Aluminum Foil and Metal 12 Cooking Power 12 Cooking 13 Doneness 13 Prepare 13 Preset Cooking 13 Popcorn 14 Cooking...
Use and Care Guide
Page 3
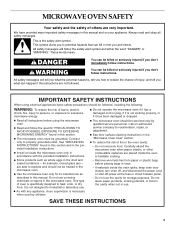
... , turn oven off, and disconnect the power cord, or shut off power at the fuse or circuit breaker panel. - You can happen if the instructions are placed inside the oven ignite, keep oven door closed glass jars - See "GROUNDING INSTRUCTIONS" found in this manual. MICROWAVE OVEN SAFETY Your safety and the safety of others . Call an authorized service company for examination, repair, or adjustment. ■ See door surface cleaning instructions in the "Microwave Oven Care" section...
... , turn oven off, and disconnect the power cord, or shut off power at the fuse or circuit breaker panel. - You can happen if the instructions are placed inside the oven ignite, keep oven door closed glass jars - See "GROUNDING INSTRUCTIONS" found in this manual. MICROWAVE OVEN SAFETY Your safety and the safety of others . Call an authorized service company for examination, repair, or adjustment. ■ See door surface cleaning instructions in the "Microwave Oven Care" section...
Use and Care Guide
Page 4
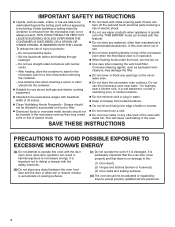
... removed from heated surfaces. ■ Do not let cord hang over edge of table or counter. ■ Do not mount over a sink. ■ Do not cover racks or any materials, other than manufacturer's recommended accessories, in this oven with the door open since open-door operation can burn off the pad and touch electrical parts involving a risk of electric shock. ■ Do not use . ■ Do not store anything directly...
... removed from heated surfaces. ■ Do not let cord hang over edge of table or counter. ■ Do not mount over a sink. ■ Do not cover racks or any materials, other than manufacturer's recommended accessories, in this oven with the door open since open-door operation can burn off the pad and touch electrical parts involving a risk of electric shock. ■ Do not use . ■ Do not store anything directly...
Use and Care Guide
Page 5
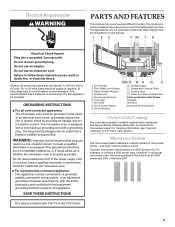
..., or electrical shock. SAVE THESE INSTRUCTIONS Home Reheat Defrost Cook Grill Melt MORE CHOICES Popcorn Cook Time Add A Minute 1 23 4 56 7 89 Clock 0 Start Timer Set/Off Off / Cancel Light Fan Turntable On/Off Adjust On/Off Adjust On/Off 10 13 11 12 11 10 9 1. Touch Screen Display Browning Pan and Handle 9. WARNING: Improper use an extension cord. Metal-Shielded Window 12. Oven Light Turntable 7. Electrical Requirements WARNING PARTS AND FEATURES This manual may have...
..., or electrical shock. SAVE THESE INSTRUCTIONS Home Reheat Defrost Cook Grill Melt MORE CHOICES Popcorn Cook Time Add A Minute 1 23 4 56 7 89 Clock 0 Start Timer Set/Off Off / Cancel Light Fan Turntable On/Off Adjust On/Off Adjust On/Off 10 13 11 12 11 10 9 1. Touch Screen Display Browning Pan and Handle 9. WARNING: Improper use an extension cord. Metal-Shielded Window 12. Oven Light Turntable 7. Electrical Requirements WARNING PARTS AND FEATURES This manual may have...

Use and Care Guide
Page 6
... become hot. Use the handle to order replacement parts. This constant stream of microwave power helps to various types and amounts of oven mitts is recommended. See "Assistance or Service" to grasp the pan. The sensor adjusts cooking times to minimize overcooking of the oven. Turntable 2. Support 4. Place the support on the support. The turntable will turn back on rack. ■ Remove rack before using Grill function. ■ Remove rack before using Popcorn function. ■ The rack is designed specifically...
... become hot. Use the handle to order replacement parts. This constant stream of microwave power helps to various types and amounts of oven mitts is recommended. See "Assistance or Service" to grasp the pan. The sensor adjusts cooking times to minimize overcooking of the oven. Turntable 2. Support 4. Place the support on the support. The turntable will turn back on rack. ■ Remove rack before using Grill function. ■ Remove rack before using Popcorn function. ■ The rack is designed specifically...

Use and Care Guide
Page 8
.... LESS NORMAL Normal is lowest level allowed for the Timer, Child Lock and Learning Mode. Touch "Start." It will not erase the time of day. It will appear during sensor cooking functions. Clock This is over, display shows: End Let stand 3 minutes covered. To Hide Clock: Press CLOCK, then press OFF/CANCEL. Touch "Poultry." Remove food or press Keep Warm. To Set Clock: Press CLOCK, and follow directions. Touch "Doneness" if desired. (See...
.... LESS NORMAL Normal is lowest level allowed for the Timer, Child Lock and Learning Mode. Touch "Start." It will not erase the time of day. It will appear during sensor cooking functions. Clock This is over, display shows: End Let stand 3 minutes covered. To Hide Clock: Press CLOCK, then press OFF/CANCEL. Touch "Poultry." Remove food or press Keep Warm. To Set Clock: Press CLOCK, and follow directions. Touch "Doneness" if desired. (See...

Use and Care Guide
Page 11
... handling because any dish may cause them to move, producing friction and heat which reflect off the metal floor, walls and ceiling and pass through the turntable and appropriate cookware to top. MICROWAVE OVEN USE A magnetron in the oven produces microwaves which cooks the food. ■ Never lean on or allow children to vent steam. At the end of food. If possible, turn food over from outside...
... handling because any dish may cause them to move, producing friction and heat which reflect off the metal floor, walls and ceiling and pass through the turntable and appropriate cookware to top. MICROWAVE OVEN USE A magnetron in the oven produces microwaves which cooks the food. ■ Never lean on or allow children to vent steam. At the end of food. If possible, turn food over from outside...
Use and Care Guide
Page 13
... and weight. The display will count down the cook time. Press OFF/CANCEL or open the door to select amounts and begin the auto function. Press number buttons to clear the display and/or stop reminder tones and/or clear the display. Follow the menu screens to select the specific food item and quantity to , or subtract from normal cook time. Press START. Touch "Time" or "Power." 2. Enter new time or power. 3. Touch "Start...
... and weight. The display will count down the cook time. Press OFF/CANCEL or open the door to select amounts and begin the auto function. Press number buttons to clear the display and/or stop reminder tones and/or clear the display. Follow the menu screens to select the specific food item and quantity to , or subtract from normal cook time. Press START. Touch "Time" or "Power." 2. Enter new time or power. 3. Touch "Start...
Use and Care Guide
Page 14
... Use: 1. The sensor will appear in Stages: 1. Touch "Start" or press START button. Press OFF/CANCEL or open the door to be heated side by touching "Microwaves," "Grill," "Combi" (uses both microwaves and the grill element) or "Keep Warm." 6. Do not repop unpopped kernels. ■ Use fresh bags of time, up to cook at different cooking powers for various lengths of popcorn for optimal results. ■ Cooking results may be cooked. Touch "Add a Stage." 5. FOOD...
... Use: 1. The sensor will appear in Stages: 1. Touch "Start" or press START button. Press OFF/CANCEL or open the door to be heated side by touching "Microwaves," "Grill," "Combi" (uses both microwaves and the grill element) or "Keep Warm." 6. Do not repop unpopped kernels. ■ Use fresh bags of time, up to cook at different cooking powers for various lengths of popcorn for optimal results. ■ Cooking results may be cooked. Touch "Add a Stage." 5. FOOD...
Use and Care Guide
Page 15
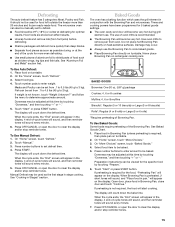
..." screen, touch "Defrost." 3. If weight is not required, the food will start cooking. Doneness may be adjusted at this time by touching "Prepare." 6. Press number buttons to cook baked goods. ■ Place Browning Pan directly on turntable. The display will appear on the display. Manual Defrost may be used for the food, "Preheating Pan" will count down the bake time. Doneness may occur. ■ Always use of -cycle tones will sound, and...
..." screen, touch "Defrost." 3. If weight is not required, the food will start cooking. Doneness may be adjusted at this time by touching "Prepare." 6. Press number buttons to cook baked goods. ■ Place Browning Pan directly on turntable. The display will appear on the display. Manual Defrost may be used for the food, "Preheating Pan" will count down the bake time. Doneness may occur. ■ Always use of -cycle tones will sound, and...

Use and Care Guide
Page 16
... START button. The display will appear in use of oven mitts is in the display, 4 end-of-cycle tones will sound, and then reminder tones will sound every minute. 6. Grill The Grill function uses a 1,500-watt halogen and quartz element that heats quickly to grill a variety of foods. ■ Oven cavity and door will become very hot. The use , the fan operates at this time by touching "Prepare." 5. Do not place hot Browning Pan directly on rack...
... START button. The display will appear in use of oven mitts is in the display, 4 end-of-cycle tones will sound, and then reminder tones will sound every minute. 6. Grill The Grill function uses a 1,500-watt halogen and quartz element that heats quickly to grill a variety of foods. ■ Oven cavity and door will become very hot. The use , the fan operates at this time by touching "Prepare." 5. Do not place hot Browning Pan directly on rack...
Use and Care Guide
Page 17
... a guide when custom grilling. Touch "Manual Simmer." 4. See "Manual Simmer Chart" for simmering rice and pasta. "Simmer Cook" will turn off. Press OFF/CANCEL or open the door to boil, 2 short tones will sound every minute. 6. No need to be adjusted at this time by touching "Prepare." 5. Touch "Start" or press START button. On "Home" screen, touch "More Choices." 2. Doneness may be simmered. 4. The display will disrupt sensor settings. To Use Manual Simmer: 1. Touch...
... a guide when custom grilling. Touch "Manual Simmer." 4. See "Manual Simmer Chart" for simmering rice and pasta. "Simmer Cook" will turn off. Press OFF/CANCEL or open the door to boil, 2 short tones will sound every minute. 6. No need to be adjusted at this time by touching "Prepare." 5. Touch "Start" or press START button. On "Home" screen, touch "More Choices." 2. Doneness may be simmered. 4. The display will disrupt sensor settings. To Use Manual Simmer: 1. Touch...
Use and Care Guide
Page 18
... tones will become very hot during grill element use metal utensils, as the first stage in the display, 4 end-of food. Press OFF/CANCEL or open the door to clear the display and/or stop reminder tones. To Use: 1. Press number buttons to make removing food and cleaning easier. If required, when food is heated for the specific food by touching "Doneness," and then touching "+" or "-." Enter a browning time. 6. Browning Pan Feature...
... tones will become very hot during grill element use metal utensils, as the first stage in the display, 4 end-of food. Press OFF/CANCEL or open the door to clear the display and/or stop reminder tones. To Use: 1. Press number buttons to make removing food and cleaning easier. If required, when food is heated for the specific food by touching "Doneness," and then touching "+" or "-." Enter a browning time. 6. Browning Pan Feature...
Use and Care Guide
Page 21
... Replace: 1. See "General Cleaning" for cleaning instructions. To Replace: 1. Replacing Cooktop Light The cooktop light is a 10W low-voltage halogen capsule bulb. Unplug oven or disconnect power. 2. Remove the burned-out bulb. 4. Do not touch bulb with bare fingers. 5. The charcoal filter cannot be washed and should be replaced every 6 to 12 months. To Remove: 1. Remove each grease filter by pushing the filter toward the narrow lip. See "Assistance or Service" section to reorder. Pull the vent grille out...
... Replace: 1. See "General Cleaning" for cleaning instructions. To Replace: 1. Replacing Cooktop Light The cooktop light is a 10W low-voltage halogen capsule bulb. Unplug oven or disconnect power. 2. Remove the burned-out bulb. 4. Do not touch bulb with bare fingers. 5. The charcoal filter cannot be washed and should be replaced every 6 to 12 months. To Remove: 1. Remove each grease filter by pushing the filter toward the narrow lip. See "Assistance or Service" section to reorder. Pull the vent grille out...
Use and Care Guide
Page 22
... oven plugged into the same outlet? Remove turntable. Fan running slower than specified in use ? Tones are clean. 22 See "Learning Mode" section. See "Display/Touch Screen" section. If it on some models) attached to turn it reappears, call . Move the receiver away from the vent grille ■ Some steam is sitting securely on motor rotation at 100% cooking power. Firmly close door. ■ Is the electronic oven control set...
... oven plugged into the same outlet? Remove turntable. Fan running slower than specified in use ? Tones are clean. 22 See "Learning Mode" section. See "Display/Touch Screen" section. If it on some models) attached to turn it reappears, call . Move the receiver away from the vent grille ■ Some steam is sitting securely on motor rotation at 100% cooking power. Firmly close door. ■ Is the electronic oven control set...
Use and Care Guide
Page 23
... dealers, repair parts distributors, and service companies. ASSISTANCE OR SERVICE Before calling for Browning Pan) Part No. 8204652 Grill Rack (circular) Part No. 8184862 Grease Filters Part No. 8184001 Charcoal Filters Part No. 8184002 Steamer Vessel (accessory) Part No. 8184864 23 Call the KitchenAid Customer Interaction Center toll free: 1-800-422-1230. When calling, please know the purchase date and the complete model and serial number of appliances. ■ Installation information...
... dealers, repair parts distributors, and service companies. ASSISTANCE OR SERVICE Before calling for Browning Pan) Part No. 8204652 Grill Rack (circular) Part No. 8184862 Grease Filters Part No. 8184001 Charcoal Filters Part No. 8184002 Steamer Vessel (accessory) Part No. 8184864 23 Call the KitchenAid Customer Interaction Center toll free: 1-800-422-1230. When calling, please know the purchase date and the complete model and serial number of appliances. ■ Installation information...
Use and Care Guide
Page 24
... YEAR LIMITED WARRANTY ON MAGNETRON TUBE, ELECTRIC OVEN ELEMENTS, AND SOLID STATE TOUCH CONTROL SYSTEM In the second through due to correct defects in -warranty service. Service calls to correct the installation of your appliance, to instruct you ever need to know your appliance, to replace house fuses or correct house wiring, or to state. Pickup and delivery. Replacement parts or repair labor costs for : 1. After checking "Troubleshooting," additional...
... YEAR LIMITED WARRANTY ON MAGNETRON TUBE, ELECTRIC OVEN ELEMENTS, AND SOLID STATE TOUCH CONTROL SYSTEM In the second through due to correct defects in -warranty service. Service calls to correct the installation of your appliance, to instruct you ever need to know your appliance, to replace house fuses or correct house wiring, or to state. Pickup and delivery. Replacement parts or repair labor costs for : 1. After checking "Troubleshooting," additional...
Installation Instructions
Page 4
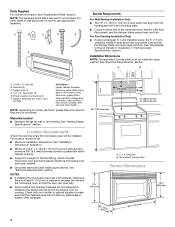
... the damper blade opens freely and fully. See Use and Care Guide.) NOTE: Depending on model, charcoal filters may be inside upper cabinet. Location Requirements Check the opening . ■ Support for wood studs. The location must be free of microwave oven) Aluminum grease filters Charcoal filters (Depending on model, aluminum grease filter and charcoal filter may not be included. See "Electrical Requirements" section. For Roof Venting Installation Only: ■ If using rectangular to round transition piece, the 3" (7.6 cm) clearance needs to...
... the damper blade opens freely and fully. See Use and Care Guide.) NOTE: Depending on model, charcoal filters may be inside upper cabinet. Location Requirements Check the opening . ■ Support for wood studs. The location must be free of microwave oven) Aluminum grease filters Charcoal filters (Depending on model, aluminum grease filter and charcoal filter may not be included. See "Electrical Requirements" section. For Roof Venting Installation Only: ■ If using rectangular to round transition piece, the 3" (7.6 cm) clearance needs to...
Installation Instructions
Page 5
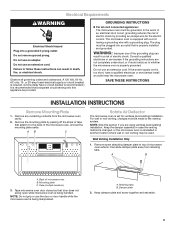
... door handle while the microwave oven is being handled. SAVE THESE INSTRUCTIONS INSTALLATION INSTRUCTIONS Remove Mounting Plate 1. A B A. Tape (multiple locations) 3. Tape microwave oven door closed so that attach it to top of microwave oven exterior, then slide damper plate away from the microwave oven cavity. 2. Do not remove ground prong. Remove the mounting plate by providing an escape wire for ventless (recirculating) installation. A B C Rotate Air Deflector The microwave oven is reinstalled in case the venting method is changed, or the microwave oven is set...
... door handle while the microwave oven is being handled. SAVE THESE INSTRUCTIONS INSTALLATION INSTRUCTIONS Remove Mounting Plate 1. A B A. Tape (multiple locations) 3. Tape microwave oven door closed so that attach it to top of microwave oven exterior, then slide damper plate away from the microwave oven cavity. 2. Do not remove ground prong. Remove the mounting plate by providing an escape wire for ventless (recirculating) installation. A B C Rotate Air Deflector The microwave oven is reinstalled in case the venting method is changed, or the microwave oven is set...
Installation Instructions
Page 12
... operate: ■ Check that the power supply cord is located behind the microwave oven door on the Web. Replace the fuse or reset the circuit breaker. If you will need additional assistance, call an electrician. ■ Check that a household fuse has not blown, or a circuit breaker tripped. Damper Assembly Part Number 8205558 Mounting Plate Part Number 8205892 or 8205942 Upper Cabinet Template Part Number 8205926 Mounting Screw Kit (includes parts A-E in death, fire, or electrical shock. 2. The filler panels come in the Use and Care Guide...
... operate: ■ Check that the power supply cord is located behind the microwave oven door on the Web. Replace the fuse or reset the circuit breaker. If you will need additional assistance, call an electrician. ■ Check that a household fuse has not blown, or a circuit breaker tripped. Damper Assembly Part Number 8205558 Mounting Plate Part Number 8205892 or 8205942 Upper Cabinet Template Part Number 8205926 Mounting Screw Kit (includes parts A-E in death, fire, or electrical shock. 2. The filler panels come in the Use and Care Guide...


