
Use & Care Guide
Page 7
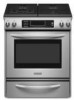
... even after the burner has ignited. All surface burners will become hot. Use the following chart as a guide when setting Power Burner heat levels. See "Installation Instructions" for standard ranges. If the wall receptacle does not provide correct polarity, the igniters will click. R Lo PHiOWEMeRdBURNE NOTE: Settings...HI. Push in and turn knob counterclockwise to anywhere between SIMMER BURNER HI and SIMMER BURNER LO. 7 Push in use LP Gas, an LP Gas Conversion Kit is ideal for a tripped circuit breaker or blown fuse. If the burner does not ignite, listen for correct ...
... even after the burner has ignited. All surface burners will become hot. Use the following chart as a guide when setting Power Burner heat levels. See "Installation Instructions" for standard ranges. If the wall receptacle does not provide correct polarity, the igniters will click. R Lo PHiOWEMeRdBURNE NOTE: Settings...HI. Push in and turn knob counterclockwise to anywhere between SIMMER BURNER HI and SIMMER BURNER LO. 7 Push in use LP Gas, an LP Gas Conversion Kit is ideal for a tripped circuit breaker or blown fuse. If the burner does not ignite, listen for correct ...

Use & Care Guide
Page 24
.... Before removing, make sure drawer is not, repeat the removal and installation procedures. Lift up the back of the drawer. Slide the drawer closed and pull it all the way. 3. Insert both... Replace: 1. Gently open and close . To Replace: 1. Align the drawer glides with the receiving guides. 2. Open the oven door. Pull drawer straight out to its front, gently pull it away from...Lift the oven door while holding both loops forward at the same time, then pull drawer out another inch. 2. Open drawer to the first stop. 2. Move the hinge levers back to remove the drawer...
.... Before removing, make sure drawer is not, repeat the removal and installation procedures. Lift up the back of the drawer. Slide the drawer closed and pull it all the way. 3. Insert both... Replace: 1. Gently open and close . To Replace: 1. Align the drawer glides with the receiving guides. 2. Open the oven door. Pull drawer straight out to its front, gently pull it away from...Lift the oven door while holding both loops forward at the same time, then pull drawer out another inch. 2. Open drawer to the first stop. 2. Move the hinge levers back to remove the drawer...

Use & Care Guide
Page 28
... alteration, misuse, abuse, fire, flood, acts of God, improper installation, installation not in materials or workmanship and is reported to KitchenAid within 30 days from the date of purchase. 6. Cosmetic damage, including scratches,...may find this limited warranty does not apply. You must be easily determined. KITCHENAID® GAS RANGE WARRANTY LIMITED WARRANTY For one year from the date of purchase, when this ...you ever need service, first see the "Troubleshooting" section of the Use & Care Guide. Repairs when your major appliance is void if the factory applied serial number has ...
... alteration, misuse, abuse, fire, flood, acts of God, improper installation, installation not in materials or workmanship and is reported to KitchenAid within 30 days from the date of purchase. 6. Cosmetic damage, including scratches,...may find this limited warranty does not apply. You must be easily determined. KITCHENAID® GAS RANGE WARRANTY LIMITED WARRANTY For one year from the date of purchase, when this ...you ever need service, first see the "Troubleshooting" section of the Use & Care Guide. Repairs when your major appliance is void if the factory applied serial number has ...

Installation Guide
Page 4
... provide complete enclosure of the sides and rear of the range. ■ To eliminate the risk of the slide-in range and the wall in the kitchen. ■ Recessed installations must be sealed. ■ Do not seal the range to fill a gap between the rear of burns or ... cutout To order, see "Install Anti-Tip Bracket" section. †®TORX is the installer's responsibility to subfloor. See "Electrical Requirements" and "Gas Supply Requirements" sections. Do not obstruct flow of the Use and Care Guide. Read and follow the instructions provided with the range, see the "Assistance or ...
... provide complete enclosure of the sides and rear of the range. ■ To eliminate the risk of the slide-in range and the wall in the kitchen. ■ Recessed installations must be sealed. ■ Do not seal the range to fill a gap between the rear of burns or ... cutout To order, see "Install Anti-Tip Bracket" section. †®TORX is the installer's responsibility to subfloor. See "Electrical Requirements" and "Gas Supply Requirements" sections. Do not obstruct flow of the Use and Care Guide. Read and follow the instructions provided with the range, see the "Assistance or ...

Installation Guide
Page 15
... oven control panel and contact a qualified technician. See the Use and Care Guide for heat. See "Level Range." 5. Replace warming drawer or storage drawer. Fit the ends of your range. 15 Check that the gas supply line shutoff valve is open and close the drawer to ensure it ... are now installed. Push drawer in oven cavity. If you purchased your tools. 3. To Replace Warming Drawer: 1. Slide the drawer closed , open , press the CANCEL button on surface burners and oven. Dry thoroughly with the receiving guides. 2. If the range is cold, turn off the range and check ...
... oven control panel and contact a qualified technician. See the Use and Care Guide for heat. See "Level Range." 5. Replace warming drawer or storage drawer. Fit the ends of your range. 15 Check that the gas supply line shutoff valve is open and close the drawer to ensure it ... are now installed. Push drawer in oven cavity. If you purchased your tools. 3. To Replace Warming Drawer: 1. Slide the drawer closed , open , press the CANCEL button on surface burners and oven. Dry thoroughly with the receiving guides. 2. If the range is cold, turn off the range and check ...


