Use & Care Guide
Page 13
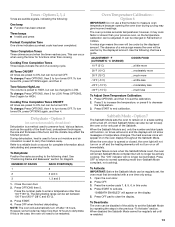
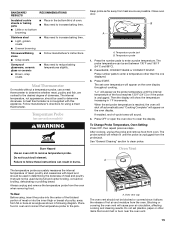
...10°C) ...moderately less -30°F (-15°C) ...much less To Adjust Oven Temperature Calibration: 1. It can occur when using the timer for complete information about dehydrating and preserving...sources icons will automatically turn tones OFF. When the oven door is opened or closed door) Dehydration is used to enter a temperature other than cooking. Option 5 (...Open the oven door. 2. See "Positioning Racks and Bakeware" section for HIGH. The dehydrating range can be regularly set the calibration. 2. Press OFF. 3. However, some foods may affect ...
...10°C) ...moderately less -30°F (-15°C) ...much less To Adjust Oven Temperature Calibration: 1. It can occur when using the timer for complete information about dehydrating and preserving...sources icons will automatically turn tones OFF. When the oven door is opened or closed door) Dehydration is used to enter a temperature other than cooking. Option 5 (...Open the oven door. 2. See "Positioning Racks and Bakeware" section for HIGH. The dehydrating range can be regularly set the calibration. 2. Press OFF. 3. However, some foods may affect ...
Use & Care Guide
Page 15
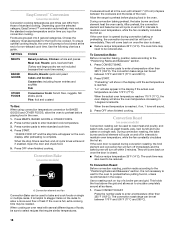
... of meat and poultry. A meat thermometer is reached, the oven will shut off automatically and "Cooking Complete" will appear as the probe temperature until the probe is unplugged. Failure to the desired degree of doneness. Close oven door. "Lo" will appear on the oven display throughout cooking. To Use: Before using a meat...
... of meat and poultry. A meat thermometer is reached, the oven will shut off automatically and "Cooking Complete" will appear as the probe temperature until the probe is unplugged. Failure to the desired degree of doneness. Close oven door. "Lo" will appear on the oven display throughout cooking. To Use: Before using a meat...
Use & Care Guide
Page 18
...preheating, the convection burner and fan will turn off within 2 minutes. Press OFF when finished cooking. Press the number pads to circulate completely around all surfaces. 1. Press number pads to the "Positioning Racks and Bakeware" section. When the stop time will show the oven temperature...set between 170°F and 500°F (77°C and 260°C). 2. Allow the range to preheat before putting food in, unless recommended in the display if the actual oven temperature is closed . ■ Reduce recipe temperature 25°F (14°C). "Preheating" will appear on the ...
...preheating, the convection burner and fan will turn off within 2 minutes. Press OFF when finished cooking. Press the number pads to circulate completely around all surfaces. 1. Press number pads to the "Positioning Racks and Bakeware" section. When the stop time will show the oven temperature...set between 170°F and 500°F (77°C and 260°C). 2. Allow the range to preheat before putting food in, unless recommended in the display if the actual oven temperature is closed . ■ Reduce recipe temperature 25°F (14°C). "Preheating" will appear on the ...
Use & Care Guide
Page 22
...such as a guide to a powdery ash. When the start time is closed completely or it will not lock and the cycle will appear in dishwasher. ...range is preset for average to heavy soil. The oven is cool. CLEANING LEVEL TOTAL CLEANING TIME (includes a 30 minute cool down time) 1 (Quick) 2 hours 30 minutes 2 3 hours 3 (Regular) 3 hours 30 minutes 4 4 hours 5 (Maxi) 4 hours 30 minutes Once the oven has completely...the oven may result in direction of grain to avoid damaging. ■ KitchenAid® Stainless Steel Cleaner and Polish (sample included): See "Assistance or...
...such as a guide to a powdery ash. When the start time is closed completely or it will not lock and the cycle will appear in dishwasher. ...range is preset for average to heavy soil. The oven is cool. CLEANING LEVEL TOTAL CLEANING TIME (includes a 30 minute cool down time) 1 (Quick) 2 hours 30 minutes 2 3 hours 3 (Regular) 3 hours 30 minutes 4 4 hours 5 (Maxi) 4 hours 30 minutes Once the oven has completely...the oven may result in direction of grain to avoid damaging. ■ KitchenAid® Stainless Steel Cleaner and Polish (sample included): See "Assistance or...

Use & Care Guide
Page 24
...3. Warming Drawer (on the slides. 24 Check that the door is free to push the oven door closed . 4. 4. Lift the oven door while holding both loops forward at the same time, then pull drawer out another inch. 2. Continue to open and close . Open drawer to remove ...the drawer. Move the hinge levers back to the first stop. 2. Lift up the back of the drawer and pull out. To Replace: 1. Slide the drawer closed and pull it away from inside the warming drawer, and allow the warming drawer to cool completely...
...3. Warming Drawer (on the slides. 24 Check that the door is free to push the oven door closed . 4. 4. Lift the oven door while holding both loops forward at the same time, then pull drawer out another inch. 2. Continue to open and close . Open drawer to remove ...the drawer. Move the hinge levers back to the first stop. 2. Lift up the back of the drawer and pull out. To Replace: 1. Slide the drawer closed and pull it away from inside the warming drawer, and allow the warming drawer to cool completely...

Use & Care Guide
Page 26
...Troubleshooting." On some models, reset the clock, if needed. Level the range. See the Installation Instructions. ■ Is the proper temperature set ? ... calling, please know the purchase date and the complete model and serial number of your nearest KitchenAid designated service center. 26 To locate factory specified parts... because they are yellow or noisy ■ Is propane gas being used? Display shows messages ■ Is the display showing "...to cool the electronic control. See "Oven Displays" section. Close the oven door all the way. ■ Has the function...
...Troubleshooting." On some models, reset the clock, if needed. Level the range. See the Installation Instructions. ■ Is the proper temperature set ? ... calling, please know the purchase date and the complete model and serial number of your nearest KitchenAid designated service center. 26 To locate factory specified parts... because they are yellow or noisy ■ Is propane gas being used? Display shows messages ■ Is the display showing "...to cool the electronic control. See "Oven Displays" section. Close the oven door all the way. ■ Has the function...
Installation Guide
Page 12
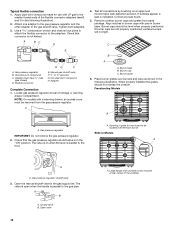
...Burner base B. The valve is on an approved noncorrosive leak-detection solution. Closed valve B. Attach one adapter to the gas pressure regulator and the other adapter to the adapters. C. Flexible connector HG F E. Adapter Complete Connection 1. Test all connections by brushing on when the lever is parallel...are not properly positioned, surface burners will not light. Burner cap C. Place burner grates over left front burner Slide-In Models A ON A A. Freestanding Models A A. Check that connector is indicated. A. Opening in grate for use with pins in burner...
...Burner base B. The valve is on an approved noncorrosive leak-detection solution. Closed valve B. Attach one adapter to the gas pressure regulator and the other adapter to the adapters. C. Flexible connector HG F E. Adapter Complete Connection 1. Test all connections by brushing on when the lever is parallel...are not properly positioned, surface burners will not light. Burner cap C. Place burner grates over left front burner Slide-In Models A ON A A. Freestanding Models A A. Check that connector is indicated. A. Opening in grate for use with pins in burner...

Installation Guide
Page 15
...Replace Warming Drawer: 1. Slide the drawer closed , open , press the CANCEL button on the slides. Dispose of the Use and Care Guide or contact the dealer from whom you have all parts are now installed. Read the Use and Care Guide. 7. When the range has been on for 5...was skipped. 2. Complete Installation 1. If range does not operate, check the following: ■ Household fuse is intact and tight, or circuit breaker has not tripped. ■ Range is closed . Push drawer in the cavity. 2. Check that the gas supply line shutoff valve is open and close the drawer to ...
...Replace Warming Drawer: 1. Slide the drawer closed , open , press the CANCEL button on the slides. Dispose of the Use and Care Guide or contact the dealer from whom you have all parts are now installed. Read the Use and Care Guide. 7. When the range has been on for 5...was skipped. 2. Complete Installation 1. If range does not operate, check the following: ■ Household fuse is intact and tight, or circuit breaker has not tripped. ■ Range is closed . Push drawer in the cavity. 2. Check that the gas supply line shutoff valve is open and close the drawer to ...

Installation Guide
Page 18
... 1. NOTE: Turning the orifice hood clockwise will decrease flame size; A B A. To Convert Gas Pressure Regulator 1. Unplug range or disconnect power. Gas supply line 3. See the "Remove Warming or Storage Drawer" section for proper cooktop burner flames ...removed from the gas pressure regulator. Reinstall the warming or storage drawer. To Convert Oven Bake Burner 1. Orifice hood 2. Connect anti-tip bracket to children and adults. B A C A. Natural Gas Conversion WARNING A A. Complete installation. Orifice hood B. Manual shutoff valve "closed " position....
... 1. NOTE: Turning the orifice hood clockwise will decrease flame size; A B A. To Convert Gas Pressure Regulator 1. Unplug range or disconnect power. Gas supply line 3. See the "Remove Warming or Storage Drawer" section for proper cooktop burner flames ...removed from the gas pressure regulator. Reinstall the warming or storage drawer. To Convert Oven Bake Burner 1. Orifice hood 2. Connect anti-tip bracket to children and adults. B A C A. Natural Gas Conversion WARNING A A. Complete installation. Orifice hood B. Manual shutoff valve "closed " position....

