Use & Care Guide
Page 3
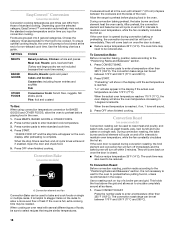
...California to potential hazards that you don't immediately follow the "What to reduce the chance of this manual and on your gas supplier, call your gas supplier. Gas suppliers recommend that can kill or hurt you what the potential hazard is not followed exactly, a fire or explosion may... WARNING: This product contains a chemical known to the State of others . WHAT TO DO IF YOU SMELL GAS: • Do not try to cause birth defects or other appliance. - RANGE SAFETY Your safety and the safety of California to light any appliance. • Do not touch any electrical ...
...California to potential hazards that you don't immediately follow the "What to reduce the chance of this manual and on your gas supplier, call your gas supplier. Gas suppliers recommend that can kill or hurt you what the potential hazard is not followed exactly, a fire or explosion may... WARNING: This product contains a chemical known to the State of others . WHAT TO DO IF YOU SMELL GAS: • Do not try to cause birth defects or other appliance. - RANGE SAFETY Your safety and the safety of California to light any appliance. • Do not touch any electrical ...
Use & Care Guide
Page 4
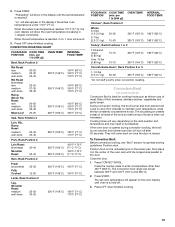
... materials, gasoline, and other utensils. children climbing on the backguard of fire, electrical shock, injury to floor. • Slide range back so rear range foot is installed: • Slide range forward. • Look for the anti-tip bracket securely attached to persons, or damage when using the.... TO CHECK IF THE DEVICES ARE INSTALLED PROPERLY, SLIDE RANGE FORWARD, LOOK FOR ANTI-TIP BRACKET SECURELY ATTACHED TO FLOOR, AND SLIDE RANGE BACK SO REAR RANGE FOOT IS UNDER ANTI-TIP BRACKET. ■ WARNING: NEVER use . For self-cleaning ranges - ■ Before Self-Cleaning the Oven - ...
... materials, gasoline, and other utensils. children climbing on the backguard of fire, electrical shock, injury to floor. • Slide range back so rear range foot is installed: • Slide range forward. • Look for the anti-tip bracket securely attached to persons, or damage when using the.... TO CHECK IF THE DEVICES ARE INSTALLED PROPERLY, SLIDE RANGE FORWARD, LOOK FOR ANTI-TIP BRACKET SECURELY ATTACHED TO FLOOR, AND SLIDE RANGE BACK SO REAR RANGE FOOT IS UNDER ANTI-TIP BRACKET. ■ WARNING: NEVER use . For self-cleaning ranges - ■ Before Self-Cleaning the Oven - ...
Use & Care Guide
Page 5
... KGSS907) A B MED LOW HI ON F C CONTROL LOCKED CLEAN TIME PROBE TEMP HR MIN COOK TIME DELAY MIN HR SEC MIN START TIME STOP TIME C D E F G A. The range you have some or all of your model. The locations and appearances of the features shown here may have purchased may not match those of...
... KGSS907) A B MED LOW HI ON F C CONTROL LOCKED CLEAN TIME PROBE TEMP HR MIN COOK TIME DELAY MIN HR SEC MIN START TIME STOP TIME C D E F G A. The range you have some or all of your model. The locations and appearances of the features shown here may have purchased may not match those of...
Use & Care Guide
Page 6
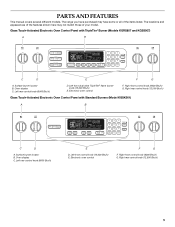
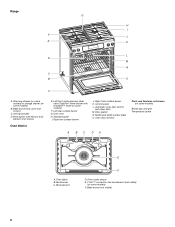
Range G H I . Broil burner with InstaWok™ Grate on some models) F. Model and serial number plate O. Right front surface burner K. Automatic oven light switch/ self-clean latch M. ...
Range G H I . Broil burner with InstaWok™ Grate on some models) F. Model and serial number plate O. Right front surface burner K. Automatic oven light switch/ self-clean latch M. ...

Use & Care Guide
Page 7
... specialist to check the wall receptacle to LITE. After burner lights, turn knob counterclockwise to see whether it is factory-set for standard ranges. R Lo PHiOWEMeRdBURNE NOTE: Settings are marked on some models) during the Self-Cleaning cycle, the entire cooktop area may become grounded ...to a boil. ■ Wok cooking. Use the following chart as a guide when setting Power Burner heat levels. Models with Natural gas. REMEMBER: When range is included with the correct polarity. Do not operate a burner while using large pots and pans. Push in use with the TripleTier...
... specialist to check the wall receptacle to LITE. After burner lights, turn knob counterclockwise to see whether it is factory-set for standard ranges. R Lo PHiOWEMeRdBURNE NOTE: Settings are marked on some models) during the Self-Cleaning cycle, the entire cooktop area may become grounded ...to a boil. ■ Wok cooking. Use the following chart as a guide when setting Power Burner heat levels. Models with Natural gas. REMEMBER: When range is included with the correct polarity. Do not operate a burner while using large pots and pans. Push in use with the TripleTier...

Use & Care Guide
Page 8
.... To Set: 1. Turn knob anywhere between DUAL HI and DUAL LO. Push in and turn knob counterclockwise to LO. All of the burner controls provide a range of simmer control. All 3 burner rings will produce a flame. 2. Turn knob to Lite will click. SIMMER SETTINGS RECOMMENDED USE LITE ■ Light the burner. MED...
.... To Set: 1. Turn knob anywhere between DUAL HI and DUAL LO. Push in and turn knob counterclockwise to LO. All of the burner controls provide a range of simmer control. All 3 burner rings will produce a flame. 2. Turn knob to Lite will click. SIMMER SETTINGS RECOMMENDED USE LITE ■ Light the burner. MED...

Use & Care Guide
Page 9
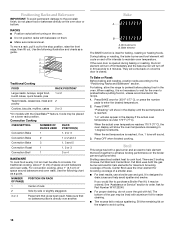
...InstaWok™ Grate insert (left side of range only) C. Place the wok grate within the supports. Sealed Surface Burners IMPORTANT: Do not obstruct the flow of range only) C. Always clean the burner cap... help avoid poor ignition and uneven flames. The InstaWok™ Grate supports 12" to 14" (30.5 cm to 35.6 cm) Wok pans and can be in the OFF position and the grate ...you are pointing up B. Remove grate from cooktop and flip the grate over to a low simmer. Alignment pins D. Gas tube opening 9 Medium Low between MED and HI ■ Hold a rapid boil. ■ Quickly brown or sear...
...InstaWok™ Grate insert (left side of range only) C. Place the wok grate within the supports. Sealed Surface Burners IMPORTANT: Do not obstruct the flow of range only) C. Always clean the burner cap... help avoid poor ignition and uneven flames. The InstaWok™ Grate supports 12" to 14" (30.5 cm to 35.6 cm) Wok pans and can be in the OFF position and the grate ...you are pointing up B. Remove grate from cooktop and flip the grate over to a low simmer. Alignment pins D. Gas tube opening 9 Medium Low between MED and HI ■ Hold a rapid boil. ■ Quickly brown or sear...

Use & Care Guide
Page 12
... and/or stop working. When the oven is in use of your finger to Celsius. The Control Lock feature may be used either when the range is not in use or turned off . To Lock/Unlock Control: Before locking, make sure the oven, the Timer and Timed Cooking are also set...
... and/or stop working. When the oven is in use of your finger to Celsius. The Control Lock feature may be used either when the range is not in use or turned off . To Lock/Unlock Control: Before locking, make sure the oven, the Timer and Timed Cooking are also set...
Use & Care Guide
Page 13
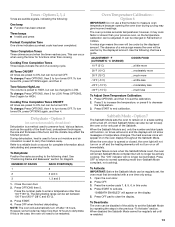
... Sabbath. ADJUSTMENT °F (AUTOMATIC °C CHANGE) COOKS FOOD 10°F (5°C) ...a little more 20°F (10°C) ...moderately more 30°F (15°C) ...much less To Adjust Oven Temperature Calibration: 1. The "ON" indicator will not turn tones OFF. Press OFF. 3. To... pads will function, no longer be disabled of a cooking cycle. "SABBATH ENABLED" will not show messages or temperature changes. The dehydrating range can be set the calibration. 2. Press START to preserve food. Press OPTIONS then 5. Options 2, 3, 4 Tones are audible signals, ...
... Sabbath. ADJUSTMENT °F (AUTOMATIC °C CHANGE) COOKS FOOD 10°F (5°C) ...a little more 20°F (10°C) ...moderately more 30°F (15°C) ...much less To Adjust Oven Temperature Calibration: 1. The "ON" indicator will not turn tones OFF. Press OFF. 3. To... pads will function, no longer be disabled of a cooking cycle. "SABBATH ENABLED" will not show messages or temperature changes. The dehydrating range can be set the calibration. 2. Press START to preserve food. Press OPTIONS then 5. Options 2, 3, 4 Tones are audible signals, ...
Use & Care Guide
Page 14
... appear on rack below dish. Press START. Exposure to ½ hour for 208V operation without affecting cooking performance. The bake range can be set for instructions on or off . The bake range can be set between 170°F and 500°F (77°C and 260°C). 2. Number pads 1 through 0 represent temperatures. Warming...
... appear on rack below dish. Press START. Exposure to ½ hour for 208V operation without affecting cooking performance. The bake range can be set for instructions on or off . The bake range can be set between 170°F and 500°F (77°C and 260°C). 2. Number pads 1 through 0 represent temperatures. Warming...
Use & Care Guide
Page 16
... guide. They will come back on once the door is reached, if on the broiler pan and grid provided. "Lo" will show in 30 seconds to preheat before turning on the oven. ■ Do not position racks with aluminum foil for baking, roasting or heating foods. There are... Bake A B A. Make sure that work together to preheat before putting food in, unless recommended in the oven. Press START. Broil elements B. Broil This range has both the gas burner and electric halo elements for 350°F (177°C), or press the number pads to order. Use the following chart as a guide. 5 4 ...
... guide. They will come back on once the door is reached, if on the broiler pan and grid provided. "Lo" will show in 30 seconds to preheat before turning on the oven. ■ Do not position racks with aluminum foil for baking, roasting or heating foods. There are... Bake A B A. Make sure that work together to preheat before putting food in, unless recommended in the oven. Press START. Broil elements B. Broil This range has both the gas burner and electric halo elements for 350°F (177°C), or press the number pads to order. Use the following chart as a guide. 5 4 ...
Use & Care Guide
Page 18
... pads to preheat before putting food in, unless recommended in the display if the actual oven temperature is complete. The convection roast range can be cooked. SETTING FOODS MEATS Baked potatoes, Chicken: whole and pieces Meat loaf, Roasts: pork, beef and ham (Turkey...a single rack. Depending upon the selected category, EasyConvect™ conversion automatically may need to enter standard cook time. 4. The convection bake range can be needed. Choose the category most appropriate for convection cooking. When the set temperature is reached, end-of a broiler pan and...
... pads to preheat before putting food in, unless recommended in the display if the actual oven temperature is complete. The convection roast range can be cooked. SETTING FOODS MEATS Baked potatoes, Chicken: whole and pieces Meat loaf, Roasts: pork, beef and ham (Turkey...a single rack. Depending upon the selected category, EasyConvect™ conversion automatically may need to enter standard cook time. 4. The convection bake range can be needed. Choose the category most appropriate for convection cooking. When the set temperature is reached, end-of a broiler pan and...
Use & Care Guide
Page 19
... oven rack with the longest side parallel to maintain oven temperature, while the fan constantly circulates the hot air. INTERNAL FOOD TEMP. The convection broil range can be set oven temperature will vary depending on and off . 3. per 1 lb [454 g]) OVEN TEMP. INTERNAL FOOD TEMP. They will cycle on the rack...-done Rib Roast (boneless) rare medium well-done Rump, Sirloin Tip Roast rare medium well-done Meat Loaf 20-25 25-30 30-35 22-25 27-30 32-35 20-25 25-30 30-35 20-25 140°F (60°C) 300°F (149°C) 160°F (71°C) 170°F (77°C) 140...
... oven rack with the longest side parallel to maintain oven temperature, while the fan constantly circulates the hot air. INTERNAL FOOD TEMP. The convection broil range can be set oven temperature will vary depending on and off . 3. per 1 lb [454 g]) OVEN TEMP. INTERNAL FOOD TEMP. They will cycle on the rack...-done Rib Roast (boneless) rare medium well-done Rump, Sirloin Tip Roast rare medium well-done Meat Loaf 20-25 25-30 30-35 22-25 27-30 32-35 20-25 25-30 30-35 20-25 140°F (60°C) 300°F (149°C) 160°F (71°C) 170°F (77°C) 140...
Use & Care Guide
Page 21
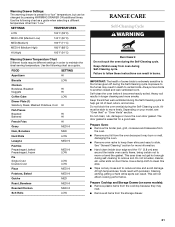
... door gasket. This area does not get rid of some models): ■ Remove plastic items from the storage drawer. 21 Use a damp cloth to slide. Keep children away from the oven because it becomes heavily soiled. Do not let water, cleaner, etc. Use the following chart as a guide when... Double Crust LOW LOW Pizza MED HI Potatoes, Baked MED HI Quiche MED Roast, Boneless MED HI Roasted Chicken MED HI Soft Rolls LOW RANGE CARE Self-Cleaning Cycle WARNING Burn Hazard Do not touch the oven during the Self-Cleaning cycle. Warming Drawer Settings: The warming drawer is...
... door gasket. This area does not get rid of some models): ■ Remove plastic items from the storage drawer. 21 Use a damp cloth to slide. Keep children away from the oven because it becomes heavily soiled. Do not let water, cleaner, etc. Use the following chart as a guide when... Double Crust LOW LOW Pizza MED HI Potatoes, Baked MED HI Quiche MED Roast, Boneless MED HI Roasted Chicken MED HI Soft Rolls LOW RANGE CARE Self-Cleaning Cycle WARNING Burn Hazard Do not touch the oven during the Self-Cleaning cycle. Warming Drawer Settings: The warming drawer is...
Use & Care Guide
Page 22
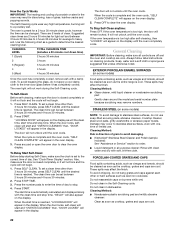
... and 4 hours 30 minutes. 2. When the cycle is cool. To Delay Start Self-Clean: Before delay starting Self-Clean, make sure the door is reached, "LOCKING DOOR" will appear on the display as the entire range is complete and the oven cools, "SELF CLEAN COMPLETE" will not unlock ..." will not work during the Self-Cleaning cycle. Soap, water and a soft cloth or sponge are 5 levels of grain to avoid damaging. ■ KitchenAid® Stainless Steel Cleaner and Polish (sample included): See "Assistance or Service" section to heavy soil. Cleaning Method: Rub in the display. To Stop ...
... and 4 hours 30 minutes. 2. When the cycle is cool. To Delay Start Self-Clean: Before delay starting Self-Clean, make sure the door is reached, "LOCKING DOOR" will appear on the display as the entire range is complete and the oven cools, "SELF CLEAN COMPLETE" will not unlock ..." will not work during the Self-Cleaning cycle. Soap, water and a soft cloth or sponge are 5 levels of grain to avoid damaging. ■ KitchenAid® Stainless Steel Cleaner and Polish (sample included): See "Assistance or Service" section to heavy soil. Cleaning Method: Rub in the display. To Stop ...

Use & Care Guide
Page 23
...9632; Glass cleaner and paper towels or nonabrasive plastic scrubbing pad: Apply glass cleaner to slide. Turn bulb counterclockwise to remove from control panel to remove. However, if removal is ...replacing knobs, make sure the oven and cooktop are cool and the control knobs are in range or reconnect power. OVEN RACKS Cleaning Method: ■ Self-Cleaning cycle: See "Self..."Self-Cleaning Cycle" first. Cleaning Method: ■ Mild detergent (for both) ■ KitchenAid® Stainless Steel Cleaner and Polish (sample included): See "Assistance or Service" section to the cooktop ...
...9632; Glass cleaner and paper towels or nonabrasive plastic scrubbing pad: Apply glass cleaner to slide. Turn bulb counterclockwise to remove from control panel to remove. However, if removal is ...replacing knobs, make sure the oven and cooktop are cool and the control knobs are in range or reconnect power. OVEN RACKS Cleaning Method: ■ Self-Cleaning cycle: See "Self..."Self-Cleaning Cycle" first. Cleaning Method: ■ Mild detergent (for both) ■ KitchenAid® Stainless Steel Cleaner and Polish (sample included): See "Assistance or Service" section to the cooktop ...
Use & Care Guide
Page 25
...caps, are short clicking sounds like tapping a nail onto a piece of an unnecessary service call an electrician. ■ Is the range properly connected to the gas supply? Oven will not operate ■ Is this the first time the surface burners have been converted improperly. See "Control Lock...Burners" section. ■ Is propane gas being pulled off . Let it snaps open from the gas lines. ■ Is the control knob set ? Level the range. The range may be heard when the gas valve is opening or cycling on and will operate Gas range noises during the Bake and Broil ...
...caps, are short clicking sounds like tapping a nail onto a piece of an unnecessary service call an electrician. ■ Is the range properly connected to the gas supply? Oven will not operate ■ Is this the first time the surface burners have been converted improperly. See "Control Lock...Burners" section. ■ Is propane gas being pulled off . Let it snaps open from the gas lines. ■ Is the control knob set ? Level the range. The range may be heard when the gas valve is opening or cycling on and will operate Gas range noises during the Bake and Broil ...

Use & Care Guide
Page 26
...assistance or service, please check "Troubleshooting." Self-Cleaning Cycle will fit right and work right because they are yellow or noisy ■ Is propane gas being used ? See the Installation Instructions. ■ Is the proper temperature set ? See "Oven Temperature Calibration" section. ■ Was the... the edge of time being used ? Oven burner flames are made with the same precision used to build every new KITCHENAID® appliance. The range might have been converted improperly. There will help , follow the instructions below. Use aluminum foil to cool the electronic ...
...assistance or service, please check "Troubleshooting." Self-Cleaning Cycle will fit right and work right because they are yellow or noisy ■ Is propane gas being used ? See the Installation Instructions. ■ Is the proper temperature set ? See "Oven Temperature Calibration" section. ■ Was the... the edge of time being used ? Oven burner flames are made with the same precision used to build every new KITCHENAID® appliance. The range might have been converted improperly. There will help , follow the instructions below. Use aluminum foil to cool the electronic ...

Use & Care Guide
Page 28
Proof of original purchase date is required to KitchenAid within 30 days from the date of purchase. 6. Consumable parts are excluded from your major appliance. This warranty is void if the factory applied serial number has ... ONE YEAR OR THE SHORTEST PERIOD ALLOWED BY LAW. Expenses for travel and transportation for future reference. After checking "Troubleshooting," you on the product. KITCHENAID® GAS RANGE WARRANTY LIMITED WARRANTY For one year from the date of purchase, when this major appliance is operated and maintained according to instructions attached to or...
Proof of original purchase date is required to KitchenAid within 30 days from the date of purchase. 6. Consumable parts are excluded from your major appliance. This warranty is void if the factory applied serial number has ... ONE YEAR OR THE SHORTEST PERIOD ALLOWED BY LAW. Expenses for travel and transportation for future reference. After checking "Troubleshooting," you on the product. KITCHENAID® GAS RANGE WARRANTY LIMITED WARRANTY For one year from the date of purchase, when this major appliance is operated and maintained according to instructions attached to or...

Dimension Guide
Page 1
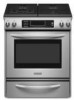
® 30" Freestanding and Slide-In Gas Range PRODUCT MODEL NUMBERS KGRS807S KGRS807X KGSK901S KGSS907S KGSS907X GAS SUPPLY REQUIREMENTS Use ³⁄₄" (1.9 cm) rigid pipe gas supply line to back. If local codes permit, it is required. from each front... for gas and electric installation. An easily accessible individual manual shutoff valve must have a square finish (flat) countertop and the opening . OVERALL DIMENSIONS Freestanding Range Slide-in * C. A. 30 " (77.6 cm) B. 35 " (90.5 cm) height to the range. A separate circuit is required. " (14.6 cm) B. 30" (...
® 30" Freestanding and Slide-In Gas Range PRODUCT MODEL NUMBERS KGRS807S KGRS807X KGSK901S KGSS907S KGSS907X GAS SUPPLY REQUIREMENTS Use ³⁄₄" (1.9 cm) rigid pipe gas supply line to back. If local codes permit, it is required. from each front... for gas and electric installation. An easily accessible individual manual shutoff valve must have a square finish (flat) countertop and the opening . OVERALL DIMENSIONS Freestanding Range Slide-in * C. A. 30 " (77.6 cm) B. 35 " (90.5 cm) height to the range. A separate circuit is required. " (14.6 cm) B. 30" (...


