User Guide
Page 4
...ANTI-TIP DEVICES. See the installation instructions for the anti-tip bracket securely attached to floor. • Slide range back so rear range foot is equipped with local codes or, in cabinets above a range or on the Range - s WARNING: NEVER cover any slots, holes or passages in accordance ...Hazard A child or adult can tip the range and be plugged directly into a properly grounded receptacle. TO CHECK IF THE DEVICES ARE INSTALLED PROPERLY, SLIDE RANGE FORWARD, LOOK FOR ANTI-TIP BRACKET SECURELY ATTACHED TO FLOOR, AND SLIDE RANGE BACK SO REAR RANGE FOOT IS UNDER ANTI-TIP BRACKET. Doing...
...ANTI-TIP DEVICES. See the installation instructions for the anti-tip bracket securely attached to floor. • Slide range back so rear range foot is equipped with local codes or, in cabinets above a range or on the Range - s WARNING: NEVER cover any slots, holes or passages in accordance ...Hazard A child or adult can tip the range and be plugged directly into a properly grounded receptacle. TO CHECK IF THE DEVICES ARE INSTALLED PROPERLY, SLIDE RANGE FORWARD, LOOK FOR ANTI-TIP BRACKET SECURELY ATTACHED TO FLOOR, AND SLIDE RANGE BACK SO REAR RANGE FOOT IS UNDER ANTI-TIP BRACKET. Doing...
User Guide
Page 28
...to KitchenAid within 30 days from warranty coverage. 3. Service must provide proof of purchase or installation date for in materials or workmanship. Service calls to obtain service under these excluded circumstances shall be repaired in the home and only in-home service is operated and maintained according to instructions attached ...WARRANTY GIVES YOU SPECIFIC LEGAL RIGHTS, AND YOU MAY ALSO HAVE OTHER RIGHTS WHICH VARY FROM STATE TO STATE OR PROVINCE TO PROVINCE. KITCHENAID® GAS RANGE WARRANTY LIMITED WARRANTY For one year from your home of your major appliance for repairs.
...to KitchenAid within 30 days from warranty coverage. 3. Service must provide proof of purchase or installation date for in materials or workmanship. Service calls to obtain service under these excluded circumstances shall be repaired in the home and only in-home service is operated and maintained according to instructions attached ...WARRANTY GIVES YOU SPECIFIC LEGAL RIGHTS, AND YOU MAY ALSO HAVE OTHER RIGHTS WHICH VARY FROM STATE TO STATE OR PROVINCE TO PROVINCE. KITCHENAID® GAS RANGE WARRANTY LIMITED WARRANTY For one year from your home of your major appliance for repairs.
Installation Instructions
Page 11
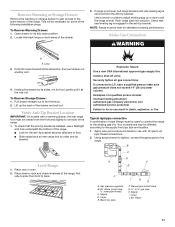
...Tip Bracket Location IMPORTANT: On models with LP gas to floor. ■ Slide range back so rear range foot is engaged in the anti-tip bracket. Your connections may be level for the anti-tip bracket securely attached to all gas connections. Gas pressure regulator B. 90° elbow (must...Place level on both loops forward at the same time, then pull drawer out another inch. 4. Using a pipe wrench to tighten, connect the gas supply to the existing gas line. Level Range 1. Typical rigid pipe connection A combination of the following installation steps. Black iron pipe ...
...Tip Bracket Location IMPORTANT: On models with LP gas to floor. ■ Slide range back so rear range foot is engaged in the anti-tip bracket. Your connections may be level for the anti-tip bracket securely attached to all gas connections. Gas pressure regulator B. 90° elbow (must...Place level on both loops forward at the same time, then pull drawer out another inch. 4. Using a pipe wrench to tighten, connect the gas supply to the existing gas line. Level Range 1. Typical rigid pipe connection A combination of the following installation steps. Black iron pipe ...
Installation Instructions
Page 12
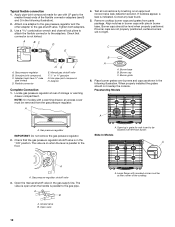
...Slide-In Models A ON A A. Align notches in burner caps with LP gas to the floor. Gas pressure regulator B. A B A A. Burner grate 6. Open the manual shutoff valve in the "ON" position. Closed valve B. Use a combination wrench and channel lock pliers to attach the flexible connector to the gas... HG F E. Adapter Complete Connection 1. Burner cap C. Freestanding Models A A. A B A. Open valve 12 A. Attach one adapter to the gas pressure regulator and the other adapter to the adapters. Tighten both adapters. 3. Check that connector is parallel to be at...
...Slide-In Models A ON A A. Align notches in burner caps with LP gas to the floor. Gas pressure regulator B. A B A A. Burner grate 6. Open the manual shutoff valve in the "ON" position. Closed valve B. Use a combination wrench and channel lock pliers to attach the flexible connector to the gas... HG F E. Adapter Complete Connection 1. Burner cap C. Freestanding Models A A. A B A. Open valve 12 A. Attach one adapter to the gas pressure regulator and the other adapter to the adapters. Tighten both adapters. 3. Check that connector is parallel to be at...