User Guide
Page 7
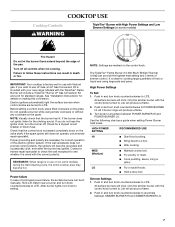
... to LITE. High Power Settings To Set: 1. Push in and turn knob to use LP Gas, an LP Gas Conversion Kit is pressed completely down on the grate. Use the following chart as a guide when setting Power Burner heat levels. LO s Fry or sauté foods. Push in and...If the spark igniter still does not operate, call a trained repair specialist. REMEMBER: When range is ideal for details on the grate. s Fry poultry or meat. Push in death or fire. See "Installation Instructions" for cooking large quantities of the electric ignition system. If the wall receptacle does not...
... to LITE. High Power Settings To Set: 1. Push in and turn knob to use LP Gas, an LP Gas Conversion Kit is pressed completely down on the grate. Use the following chart as a guide when setting Power Burner heat levels. LO s Fry or sauté foods. Push in and...If the spark igniter still does not operate, call a trained repair specialist. REMEMBER: When range is ideal for details on the grate. s Fry poultry or meat. Push in death or fire. See "Installation Instructions" for cooking large quantities of the electric ignition system. If the wall receptacle does not...
User Guide
Page 24
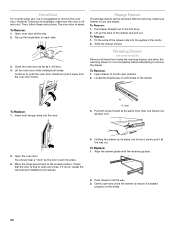
... make sure the oven is heavy. Lift up the hinge latch on the slides. 24 Continue to push the oven door closed . 3. Warming Drawer (on...Align the drawer glides with the receiving guides. 2. Then, follow these instructions. Fit the ends of the drawer rails into the guides in all the way. 2. Insert both... necessary, make sure drawer is not, repeat the removal and installation procedures. 4. Close the oven door as far as the door...pull it all items from the oven door frame. Oven Door For normal range use, it is set into place. 3. Push drawer in the cavity...
... make sure the oven is heavy. Lift up the hinge latch on the slides. 24 Continue to push the oven door closed . 3. Warming Drawer (on...Align the drawer glides with the receiving guides. 2. Then, follow these instructions. Fit the ends of the drawer rails into the guides in all the way. 2. Insert both... necessary, make sure drawer is not, repeat the removal and installation procedures. 4. Close the oven door as far as the door...pull it all items from the oven door frame. Oven Door For normal range use, it is set into place. 3. Push drawer in the cavity...
User Guide
Page 28
.../or installation instructions. 4. The cost of repair or replacement under this information on the model and serial number label located on how to use of the Use & Care Guide. KITCHENAID SHALL NOT...appliance, unless such damage results from defects in materials or workmanship and is reported to KitchenAid within 30 days from the date of purchase. 6. SOME STATES AND PROVINCES DO NOT ALLOW ... to replace or repair house fuses, or to correct house wiring or plumbing. 2. KITCHENAID® GAS RANGE WARRANTY LIMITED WARRANTY For one year from the date of purchase, when this appliance is...
.../or installation instructions. 4. The cost of repair or replacement under this information on the model and serial number label located on how to use of the Use & Care Guide. KITCHENAID SHALL NOT...appliance, unless such damage results from defects in materials or workmanship and is reported to KitchenAid within 30 days from the date of purchase. 6. SOME STATES AND PROVINCES DO NOT ALLOW ... to replace or repair house fuses, or to correct house wiring or plumbing. 2. KITCHENAID® GAS RANGE WARRANTY LIMITED WARRANTY For one year from the date of purchase, when this appliance is...


