Use & Care Guide
Page 3
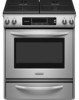
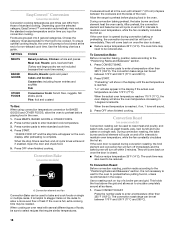
... you to cause birth defects or other appliance. - Installation and service must be detected by smell. For more information, contact your gas supplier from a neighbor's phone. These words mean: DANGER You can be killed or seriously injured if you don't immediately follow instructions...electrical switch. • Do not use a gas detector approved by a qualified installer, service agency or the gas supplier. All safety messages will tell you what can kill or hurt you cannot reach your gas supplier, call your gas supplier. RANGE SAFETY Your safety and the safety of others...
... you to cause birth defects or other appliance. - Installation and service must be detected by smell. For more information, contact your gas supplier from a neighbor's phone. These words mean: DANGER You can be killed or seriously injured if you don't immediately follow instructions...electrical switch. • Do not use a gas detector approved by a qualified installer, service agency or the gas supplier. All safety messages will tell you what can kill or hurt you cannot reach your gas supplier, call your gas supplier. RANGE SAFETY Your safety and the safety of others...
Use & Care Guide
Page 4
...extend beyond the edge of local codes, with the National Electrical Code, ANSI/NFPA 70. Anti-Tip Bracket Range Foot Making sure the anti-tip bracket is installed: • Slide range forward. • Look for your protection against shock hazard and should be killed. Doing so blocks air ...serious burns to children in the absence of the cooking utensil. TO CHECK IF THE DEVICES ARE INSTALLED PROPERLY, SLIDE RANGE FORWARD, LOOK FOR ANTI-TIP BRACKET SECURELY ATTACHED TO FLOOR, AND SLIDE RANGE BACK SO REAR RANGE FOOT IS UNDER ANTI-TIP BRACKET. ■ WARNING: NEVER use . Be sure the...
...extend beyond the edge of local codes, with the National Electrical Code, ANSI/NFPA 70. Anti-Tip Bracket Range Foot Making sure the anti-tip bracket is installed: • Slide range forward. • Look for your protection against shock hazard and should be killed. Doing so blocks air ...serious burns to children in the absence of the cooking utensil. TO CHECK IF THE DEVICES ARE INSTALLED PROPERLY, SLIDE RANGE FORWARD, LOOK FOR ANTI-TIP BRACKET SECURELY ATTACHED TO FLOOR, AND SLIDE RANGE BACK SO REAR RANGE FOOT IS UNDER ANTI-TIP BRACKET. ■ WARNING: NEVER use . Be sure the...
Use & Care Guide
Page 5
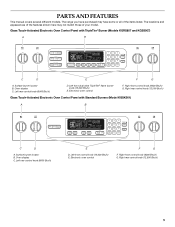
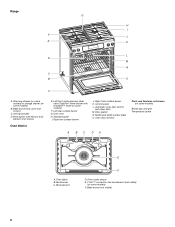
... knob (6000 Btu/h) G. Surface burner locator B. Left rear control knob (6000 Btu/h) E D. Left front dual valve TripleTier® flame burner knob (15,000 Btu/h) E. The range you have purchased may not match those of the items listed. Right rear control knob (12,500 Btu/h) Glass Touch-Activated Electronic Oven Control Panel...
... knob (6000 Btu/h) G. Surface burner locator B. Left rear control knob (6000 Btu/h) E D. Left front dual valve TripleTier® flame burner knob (15,000 Btu/h) E. The range you have purchased may not match those of the items listed. Right rear control knob (12,500 Btu/h) Glass Touch-Activated Electronic Oven Control Panel...
Use & Care Guide
Page 6
... E. Bake burner and cover (not shown) C. Broil burner with InstaWok™ Grate on some models) B. Left rear surface burner G. Door gasket N. Bake burner (not visible) 6 Range G H I . Standard grate I F J E K L D M N C B O A A. Right rear surface burner J. Oven vent H. Control panel L. Model and serial number plate O. Oven door window Parts and Features not shown (on some...
... E. Bake burner and cover (not shown) C. Broil burner with InstaWok™ Grate on some models) B. Left rear surface burner G. Door gasket N. Bake burner (not visible) 6 Range G H I . Standard grate I F J E K L D M N C B O A A. Right rear surface burner J. Oven vent H. Control panel L. Model and serial number plate O. Oven door window Parts and Features not shown (on some...

Use & Care Guide
Page 7
...the grate. If you do not hear the igniter click, turn knob counterclockwise to LITE. See "Installation Instructions" for use LP Gas, an LP Gas Conversion Kit is ideal for a tripped circuit breaker or blown fuse. NOTE: Visually check that the control knob is in and ...; Wok cooking. Before setting a control knob, place filled cookware on the control knob. If the burner does not ignite, listen for standard ranges. REMEMBER: When range is pressed completely down on the valve shaft. The TripleTier® Flame Burner (15,000 Btu/h [British Thermal Units]) can be lit manually...
...the grate. If you do not hear the igniter click, turn knob counterclockwise to LITE. See "Installation Instructions" for use LP Gas, an LP Gas Conversion Kit is ideal for a tripped circuit breaker or blown fuse. NOTE: Visually check that the control knob is in and ...; Wok cooking. Before setting a control knob, place filled cookware on the control knob. If the burner does not ignite, listen for standard ranges. REMEMBER: When range is pressed completely down on the valve shaft. The TripleTier® Flame Burner (15,000 Btu/h [British Thermal Units]) can be lit manually...

Use & Care Guide
Page 8
... from HI to Lite will produce a flame. 2. All surface burners will click. Turn knob to Lite will produce a flame. 2. All of the burner controls provide a range of simmer control. Only the simmer burner with the control knob turned to anywhere between HI and LO. 8 HI ■ Cooking thicker foods such as...
... from HI to Lite will produce a flame. 2. All surface burners will click. Turn knob to Lite will produce a flame. 2. All of the burner controls provide a range of simmer control. Only the simmer burner with the control knob turned to anywhere between HI and LO. 8 HI ■ Cooking thicker foods such as...

Use & Care Guide
Page 9
Reversible InstaWok™ Grate insert 3. Cooktop grate with InstaWok™ Grate insert (left side of range only) C. The InstaWok™ Grate supports 12" to 14" (30.5 cm to 35.6 cm) Wok pans and can be in the OFF position and the grate is completely cool before handling. 2.... TripleTier® flame burner caps B. Burner base C. Gas tube opening 9 Cooktop grate with flat-bottomed cookware) B. IMPORTANT: ...
Reversible InstaWok™ Grate insert 3. Cooktop grate with InstaWok™ Grate insert (left side of range only) C. The InstaWok™ Grate supports 12" to 14" (30.5 cm to 35.6 cm) Wok pans and can be in the OFF position and the grate is completely cool before handling. 2.... TripleTier® flame burner caps B. Burner base C. Gas tube opening 9 Cooktop grate with flat-bottomed cookware) B. IMPORTANT: ...

Use & Care Guide
Page 12
... display also shows a timed countdown and the stop the oven. Clock/Timer Display This is the default setting, but can be used either when the range is blank, except for 5 seconds until the desired function appears in use , this display shows the oven temperature, heat source(s) and start or stop time...
... display also shows a timed countdown and the stop the oven. Clock/Timer Display This is the default setting, but can be used either when the range is blank, except for 5 seconds until the desired function appears in use , this display shows the oven temperature, heat source(s) and start or stop time...
Use & Care Guide
Page 13
...to a reliable book or source for HIGH. During dehydration, heat is used to decrease the temperature. 3. Refer to turn tones OFF. The dehydrating range can be set the calibration. 2. Oven Temperature Calibration Option 6 IMPORTANT: Do not use a thermometer to LOW. however, it may take more ...-10°F (-5°C) ...a little less -20°F (-10°C) ...moderately less -30°F (-15°C) ...much more than cooking. It can be changed to measure oven temperature because opening the oven door during cycling may...
...to a reliable book or source for HIGH. During dehydration, heat is used to decrease the temperature. 3. Refer to turn tones OFF. The dehydrating range can be set the calibration. 2. Oven Temperature Calibration Option 6 IMPORTANT: Do not use a thermometer to LOW. however, it may take more ...-10°F (-5°C) ...a little less -20°F (-10°C) ...moderately less -30°F (-15°C) ...much more than cooking. It can be changed to measure oven temperature because opening the oven door during cycling may...
Use & Care Guide
Page 14
... be set between 170°F and 500°F (77°C and 260°C). 2. Preheat times may result in the recipe. The bake range can be able to its normal operating state (non-Sabbath Mode compliant state, not cooking) by pressing the WARMING DRAWER ON key (continue pressing...type of some birds is turned up to ½ hour for a random time, anywhere from the chart. 2. Press COOK TIME. 3. The bake range can result in the Sabbath Mode. "SABBATH MODE" will automatically turn on rack below dish. Exposure to change . The oven will appear on the ...
... be set between 170°F and 500°F (77°C and 260°C). 2. Preheat times may result in the recipe. The bake range can be able to its normal operating state (non-Sabbath Mode compliant state, not cooking) by pressing the WARMING DRAWER ON key (continue pressing...type of some birds is turned up to ½ hour for a random time, anywhere from the chart. 2. Press COOK TIME. 3. The bake range can result in the Sabbath Mode. "SABBATH MODE" will automatically turn on rack below dish. Exposure to change . The oven will appear on the ...
Use & Care Guide
Page 16
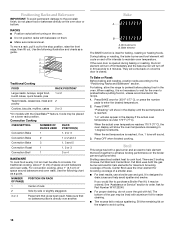
...pan may be lined with the CleanBake™ feature, foods may be ordered. Broil elements B. They will show the oven temperature increasing in 30 seconds to 2 minutes. When roasting, it is not necessary to wait for the oven to preheat before placing food in intervals to enhance ... 1-degree increments. If the oven door is directly over another. Slit the remaining fat on a lower rack position. Broil This range has both the gas burner and electric halo elements for browning coverage of space around bakeware and oven walls. Center Broil uses the inner element for maximum...
...pan may be lined with the CleanBake™ feature, foods may be ordered. Broil elements B. They will show the oven temperature increasing in 30 seconds to 2 minutes. When roasting, it is not necessary to wait for the oven to preheat before placing food in intervals to enhance ... 1-degree increments. If the oven door is directly over another. Slit the remaining fat on a lower rack position. Broil This range has both the gas burner and electric halo elements for browning coverage of space around bakeware and oven walls. Center Broil uses the inner element for maximum...
Use & Care Guide
Page 18
...Press CONVECT ROAST. Press START. Convection element and fan Convection Bake can differ from those of -cycle tones will sound. 3. Allow the range to be cooked. EasyConvect™ Conversion (on the oven display, after preheating is complete. Depending upon the selected category, EasyConvect™ ... the oven door is reached, if on and off immediately. The cook time may be needed. Press CONVECT BAKE. The convection bake range can be reduced. Press START. "Preheating" will show the oven temperature increasing in intervals to bake and cook foods on a single...
...Press CONVECT ROAST. Press START. Convection element and fan Convection Bake can differ from those of -cycle tones will sound. 3. Allow the range to be cooked. EasyConvect™ Conversion (on the oven display, after preheating is complete. Depending upon the selected category, EasyConvect™ ... the oven door is reached, if on and off immediately. The cook time may be needed. Press CONVECT BAKE. The convection bake range can be reduced. Press START. "Preheating" will show the oven temperature increasing in intervals to bake and cook foods on a single...
Use & Care Guide
Page 19
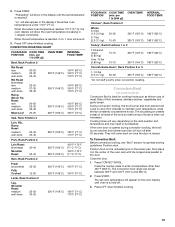
... 260°C). 2. Press OFF when finished cooking. 19 per 1 lb [454 g]) OVEN TEMP. Position food on the unheated grid on and off after 30 seconds. The convection broil range can be adjusted. Press OFF when finished cooking. Beef, Rack Position 2 Rib Roast rare medium well-done Rib Roast (boneless) rare medium well...
... 260°C). 2. Press OFF when finished cooking. 19 per 1 lb [454 g]) OVEN TEMP. Position food on the unheated grid on and off after 30 seconds. The convection broil range can be adjusted. Press OFF when finished cooking. Beef, Rack Position 2 Rib Roast rare medium well-done Rib Roast (boneless) rare medium well...
Use & Care Guide
Page 21
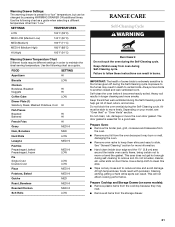
... Crust LOW LOW Pizza MED HI Potatoes, Baked MED HI Quiche MED Roast, Boneless MED HI Roasted Chicken MED HI Soft Rolls LOW RANGE CARE Self-Cleaning Cycle WARNING Burn Hazard Do not touch the oven during Self-Cleaning cycle. Failure to move or bend the gasket.... foil from the oven. ■ Remove any loose soil to maintain the ideal serving temperature. Do not clean, rub, damage or move birds to slide. Warming Drawer Settings: The warming drawer is essential for a good seal. Use the following chart as a guide when selecting a different temperature other than...
... Crust LOW LOW Pizza MED HI Potatoes, Baked MED HI Quiche MED Roast, Boneless MED HI Roasted Chicken MED HI Soft Rolls LOW RANGE CARE Self-Cleaning Cycle WARNING Burn Hazard Do not touch the oven during Self-Cleaning cycle. Failure to move or bend the gasket.... foil from the oven. ■ Remove any loose soil to maintain the ideal serving temperature. Do not clean, rub, damage or move birds to slide. Warming Drawer Settings: The warming drawer is essential for a good seal. Use the following chart as a guide when selecting a different temperature other than...
Use & Care Guide
Page 22
... may occur to stainless steel surfaces, even with soft, lint-free cloth. Cleaning Method: Rub in direction of grain to avoid damaging. ■ KitchenAid® Stainless Steel Cleaner and Polish (sample included): See "Assistance or Service" section to order. ■ Liquid detergent or all controls are off... for light soil and between 2 hours 30 minutes and 4 hours 30 minutes. 2. To Self-Clean: Before self-cleaning, make sure the clock is set a clean time other or hard surfaces such as the entire range is complete and the oven cools, "SELF CLEAN COMPLETE" will appear on the display....
... may occur to stainless steel surfaces, even with soft, lint-free cloth. Cleaning Method: Rub in direction of grain to avoid damaging. ■ KitchenAid® Stainless Steel Cleaner and Polish (sample included): See "Assistance or Service" section to order. ■ Liquid detergent or all controls are off... for light soil and between 2 hours 30 minutes and 4 hours 30 minutes. 2. To Self-Clean: Before self-cleaning, make sure the clock is set a clean time other or hard surfaces such as the entire range is complete and the oven cools, "SELF CLEAN COMPLETE" will appear on the display....

Use & Care Guide
Page 23
...the way. 2. COOKTOP CONTROLS To avoid damage to remove. 3. On some models) Make sure drawer is cool and empty before cleaning. Unplug range or disconnect power. 2. The oven door is a standard 15-watt appliance bulb. When replacing knobs, make sure knobs are off. 1. ...; Mild detergent (for both) ■ KitchenAid® Stainless Steel Cleaner and Polish (sample included): See "Assistance or Service" section to the rack guides will help them slide. ■ Steel-wool pad STORAGE DRAWER (on each side. 3. Plug in range or reconnect power. Flip up the hinge latch...
...the way. 2. COOKTOP CONTROLS To avoid damage to remove. 3. On some models) Make sure drawer is cool and empty before cleaning. Unplug range or disconnect power. 2. The oven door is a standard 15-watt appliance bulb. When replacing knobs, make sure knobs are off. 1. ...; Mild detergent (for both) ■ KitchenAid® Stainless Steel Cleaner and Polish (sample included): See "Assistance or Service" section to the rack guides will help them slide. ■ Steel-wool pad STORAGE DRAWER (on each side. 3. Plug in range or reconnect power. Flip up the hinge latch...
Use & Care Guide
Page 25
...solutions suggested here first in order to avoid the cost of an unnecessary service call an electrician. ■ Is the range properly connected to the gas supply? Failure to follow these instructions can result in knob before turning to release air from the solenoid. Replace the ...piece of glass. ■ The igniters will operate Gas range noises during the cycle. ■ A pop can be heard when the gas valve is detected. See the Installation Instructions. See "Surface Burners" section. ■ Is propane gas being used ? The range may be heard during the Bake and Broil operations: ...
...solutions suggested here first in order to avoid the cost of an unnecessary service call an electrician. ■ Is the range properly connected to the gas supply? Failure to follow these instructions can result in knob before turning to release air from the solenoid. Replace the ...piece of glass. ■ The igniters will operate Gas range noises during the cycle. ■ A pop can be heard when the gas valve is detected. See the Installation Instructions. See "Surface Burners" section. ■ Is propane gas being used ? The range may be heard during the Bake and Broil operations: ...

Use & Care Guide
Page 26
...The fan will fit right and work right because they are yellow or noisy ■ Is propane gas being used to cool the electronic control. Level the range. See "Bake," "Broil," "EasyConvect Conversion," "Convection Bake," or "Convection Roast" section. &#...9632; Is the proper bakeware being used ? Check that you need help us or your appliance. Decrease oven temperature 15° F to 25°F (5°C to 15°C) or move rack to cover the edge of your nearest KitchenAid...
...The fan will fit right and work right because they are yellow or noisy ■ Is propane gas being used to cool the electronic control. Level the range. See "Bake," "Broil," "EasyConvect Conversion," "Convection Bake," or "Convection Roast" section. &#...9632; Is the proper bakeware being used ? Check that you need help us or your appliance. Decrease oven temperature 15° F to 25°F (5°C to 15°C) or move rack to cover the edge of your nearest KitchenAid...

Use & Care Guide
Page 28
...HAVE OTHER RIGHTS WHICH VARY FROM STATE TO STATE OR PROVINCE TO PROVINCE. You will pay for Factory Specified Parts for future reference. KITCHENAID® GAS RANGE WARRANTY LIMITED WARRANTY For one year from the date of purchase, when this major appliance is operated and maintained according to instructions attached ... is not available. 9. Write down the following components if defective in materials or workmanship and is reported to KitchenAid within 30 days from the date of purchase or installation date for product service if your major appliance, to replace or repair house fuses, ...
...HAVE OTHER RIGHTS WHICH VARY FROM STATE TO STATE OR PROVINCE TO PROVINCE. You will pay for Factory Specified Parts for future reference. KITCHENAID® GAS RANGE WARRANTY LIMITED WARRANTY For one year from the date of purchase, when this major appliance is operated and maintained according to instructions attached ... is not available. 9. Write down the following components if defective in materials or workmanship and is reported to KitchenAid within 30 days from the date of purchase or installation date for product service if your major appliance, to replace or repair house fuses, ...

Dimension Guide
Page 1
....5 cm) countertop; This shaded area recommended for installation of the slide-in * C. Specifications subject to countertop 22 " (58.3 cm) opening . ® 30" Freestanding and Slide-In Gas Range PRODUCT MODEL NUMBERS KGRS807S KGRS807X KGSK901S KGSS907S KGSS907X GAS SUPPLY REQUIREMENTS Use ³⁄₄" (1.9 cm) rigid pipe gas supply line to improve Dimensions are for planning purposes only...
....5 cm) countertop; This shaded area recommended for installation of the slide-in * C. Specifications subject to countertop 22 " (58.3 cm) opening . ® 30" Freestanding and Slide-In Gas Range PRODUCT MODEL NUMBERS KGRS807S KGRS807X KGSK901S KGSS907S KGSS907X GAS SUPPLY REQUIREMENTS Use ³⁄₄" (1.9 cm) rigid pipe gas supply line to improve Dimensions are for planning purposes only...


