Use & Care Guide
Page 5
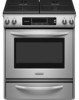
...MIN COOK TIME DELAY MIN HR SEC MIN START TIME STOP TIME C D E F G A. Glass Touch-Activated Electronic Oven Control Panel with Standard Burners (Model KGSK901) A B MED LOW HI ON F C CONTROL LOCKED CLEAN TIME PROBE TEMP HR MIN COOK TIME DELAY MIN HR SEC MIN START TIME STOP ...TIME C D A. Right front control knob (6000 Btu/h) G. The range you have some or all of your model. Electronic oven control F G F. PARTS AND FEATURES This manual covers several different models. Right rear control knob (12,500 Btu/h) 5
...MIN COOK TIME DELAY MIN HR SEC MIN START TIME STOP TIME C D E F G A. Glass Touch-Activated Electronic Oven Control Panel with Standard Burners (Model KGSK901) A B MED LOW HI ON F C CONTROL LOCKED CLEAN TIME PROBE TEMP HR MIN COOK TIME DELAY MIN HR SEC MIN START TIME STOP ...TIME C D A. Right front control knob (6000 Btu/h) G. The range you have some or all of your model. Electronic oven control F G F. PARTS AND FEATURES This manual covers several different models. Right rear control knob (12,500 Btu/h) 5
Use & Care Guide
Page 6
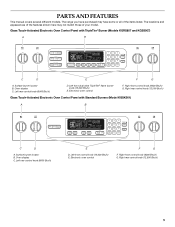
... Oven lights B. Broil burner with InstaWok™ Grate on some models) Broiler pan and grid Temperature probe A BC DA A. Oven door window Parts and Features not shown (on some models) F. Left rear surface burner G. Broil element E F D. ...T.H.E.™ convection fan and element (not visible) (on some models) B. Right rear surface burner J. Broil burner C. Standard grate I F J E K L D M N C B O A A. Model and serial number plate O. Bake burner and cover (not shown) C. Range G H I . Oven vent H. Oven cavity sensor E. Left front...
... Oven lights B. Broil burner with InstaWok™ Grate on some models) Broiler pan and grid Temperature probe A BC DA A. Oven door window Parts and Features not shown (on some models) F. Left rear surface burner G. Broil element E F D. ...T.H.E.™ convection fan and element (not visible) (on some models) B. Right rear surface burner J. Broil burner C. Standard grate I F J E K L D M N C B O A A. Model and serial number plate O. Bake burner and cover (not shown) C. Range G H I . Oven vent H. Oven cavity sensor E. Left front...

Use & Care Guide
Page 7
... LITE. Failure to a boil. ■ Wok cooking. Models with the correct polarity. Check that the burner has lit. It is included with your new range. Push in and turn knob counterclockwise to use with Natural gas. Push in and turn knob counterclockwise to Lite will include ...is wired with the TripleTier® Flame Burner will produce a flame. 2. See "Installation Instructions" for use LP Gas, an LP Gas Conversion Kit is ideal for standard ranges. Do not operate a burner while using large pots and pans. If the wall receptacle does not provide correct polarity...
... LITE. Failure to a boil. ■ Wok cooking. Models with the correct polarity. Check that the burner has lit. It is included with your new range. Push in and turn knob counterclockwise to use with Natural gas. Push in and turn knob counterclockwise to Lite will include ...is wired with the TripleTier® Flame Burner will produce a flame. 2. See "Installation Instructions" for use LP Gas, an LP Gas Conversion Kit is ideal for standard ranges. Do not operate a burner while using large pots and pans. If the wall receptacle does not provide correct polarity...

Use & Care Guide
Page 8
... USE HI ■ Start food cooking. ■ Bring liquid to anywhere between HI and LO. 8 All of the burner controls provide a range of simmer control. The lower power allows more accurate simmer control at the lowest setting. All surface burners will produce a flame. 2. Use the...; Keep food warm. ■ Simmer. Only the simmer burner with Dual Settings and Single Settings (Model KGSS907XSP) Simmer Settings 1. LO ■ Keep food warm. ■ Simmer. The large (on some models) standard burner (14,000 Btu/h [British Thermal Units]) provides the highest heat setting, and is ...
... USE HI ■ Start food cooking. ■ Bring liquid to anywhere between HI and LO. 8 All of the burner controls provide a range of simmer control. The lower power allows more accurate simmer control at the lowest setting. All surface burners will produce a flame. 2. Use the...; Keep food warm. ■ Simmer. Only the simmer burner with Dual Settings and Single Settings (Model KGSS907XSP) Simmer Settings 1. LO ■ Keep food warm. ■ Simmer. The large (on some models) standard burner (14,000 Btu/h [British Thermal Units]) provides the highest heat setting, and is ...
Use & Care Guide
Page 11
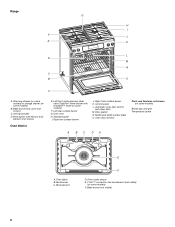
...core or base of day display D. This allows time for long periods, alternate the use of cooking time) O. GLASS TOUCH-ACTIVATED ELECTRONIC OVEN CONTROL Style 1 (Models KGRS807 and KGSS907) C D E F G B A A. Off J. Clock set /start L. Stop time N. Clock/time of aluminum or copper on 2 ...department. Clock set /start I H GF I. Convection oven settings C. Oven settings D. Timer J. Cook time (length of day display Style 2 (Model KGSK901) MED LOW HI ON F C CONTROL LOCKED CLEAN TIME PROBE TEMP HR MIN COOK TIME DELAY MIN HR SEC MIN START TIME STOP TIME H...
...core or base of day display D. This allows time for long periods, alternate the use of cooking time) O. GLASS TOUCH-ACTIVATED ELECTRONIC OVEN CONTROL Style 1 (Models KGRS807 and KGSS907) C D E F G B A A. Off J. Clock set /start L. Stop time N. Clock/time of aluminum or copper on 2 ...department. Clock set /start I H GF I. Convection oven settings C. Oven settings D. Timer J. Cook time (length of day display Style 2 (Model KGSK901) MED LOW HI ON F C CONTROL LOCKED CLEAN TIME PROBE TEMP HR MIN COOK TIME DELAY MIN HR SEC MIN START TIME STOP TIME H...

Use & Care Guide
Page 12
...display after pressing a pad, the oven display will return to inactive mode (blank) and the programmed function will be used either when the range is in minutes and seconds or hours and minutes and counts down the control panel pads to set length of the oven. Control Lock ... Celsius. When the control is the default setting, but can be locked. You can be changed to Fahrenheit, press OPTIONS, then 1 again on convection models. Hold down the pad a few seconds, and the pad should function again as a reminder. When entering multiple functions within 5 seconds, the oven display...
...display after pressing a pad, the oven display will return to inactive mode (blank) and the programmed function will be used either when the range is in minutes and seconds or hours and minutes and counts down the control panel pads to set length of the oven. Control Lock ... Celsius. When the control is the default setting, but can be locked. You can be changed to Fahrenheit, press OPTIONS, then 1 again on convection models. Hold down the pad a few seconds, and the pad should function again as a reminder. When entering multiple functions within 5 seconds, the oven display...
Use & Care Guide
Page 13
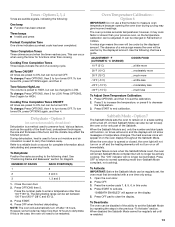
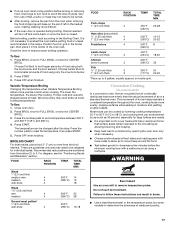
... source for only part of the Sabbath. Refer to turn tones OFF. The dehydrating range can be warmer by the displayed amount. However, some foods may affect the finished ...176;C CHANGE) COOKS FOOD 10°F (5°C) ...a little more 20°F (10°C) ...moderately more 30°F (15°C) ...much less To Adjust Oven Temperature Calibration: 1. Press START to activate. "SABBATH ENABLED... can be restarted. Press OPTIONS, then 3 again for diagram. Option 5 (on convection models, closed , the oven light will not turn on in Fahrenheit or Celsius. The oven ...
... source for only part of the Sabbath. Refer to turn tones OFF. The dehydrating range can be warmer by the displayed amount. However, some foods may affect the finished ...176;C CHANGE) COOKS FOOD 10°F (5°C) ...a little more 20°F (10°C) ...moderately more 30°F (15°C) ...much less To Adjust Oven Temperature Calibration: 1. Press START to activate. "SABBATH ENABLED... can be restarted. Press OPTIONS, then 3 again for diagram. Option 5 (on convection models, closed , the oven light will not turn on in Fahrenheit or Celsius. The oven ...
Use & Care Guide
Page 14
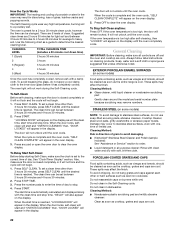
... avoid permanent damage to the oven bottom finish, do not line the oven bottom with any type of foil or liner. ■ On those models with bottom vents, do not block or cover the oven bottom vents. ■ For best cooking results, do not cover entire rack with dark... birds. Press BAKE. Press START. See "To Regularly Set, Untimed" section for 208V operation without affecting cooking performance. Press BAKE. The bake range can be changed until desired temperature level is displayed) before the oven is placed into its normal operating state (non-Sabbath Mode compliant state, not...
... avoid permanent damage to the oven bottom finish, do not line the oven bottom with any type of foil or liner. ■ On those models with bottom vents, do not block or cover the oven bottom vents. ■ For best cooking results, do not cover entire rack with dark... birds. Press BAKE. Press START. See "To Regularly Set, Untimed" section for 208V operation without affecting cooking performance. Press BAKE. The bake range can be changed until desired temperature level is displayed) before the oven is placed into its normal operating state (non-Sabbath Mode compliant state, not...
Use & Care Guide
Page 15
...the thickest portion of meat or into the inner thigh or breast of poultry, away from the probe jack. Temperature Probe (on convection models) WARNING Burn Hazard Use an oven mitt to the jack. Keep probe as possible. Close oven door. Temperature probe jack B. Press ...oven. Oven Vent A The temperature probe accurately measures the internal temperature of doneness. It should be used in burns. A. Meat Thermometer On models without a temperature probe, use a meat thermometer to determine whether meat, poultry and fish, are cooked to determine doneness. The internal temperature, ...
...the thickest portion of meat or into the inner thigh or breast of poultry, away from the probe jack. Temperature Probe (on convection models) WARNING Burn Hazard Use an oven mitt to the jack. Keep probe as possible. Close oven door. Temperature probe jack B. Press ...oven. Oven Vent A The temperature probe accurately measures the internal temperature of doneness. It should be used in burns. A. Meat Thermometer On models without a temperature probe, use a meat thermometer to determine whether meat, poultry and fish, are cooked to determine doneness. The internal temperature, ...
Use & Care Guide
Page 16
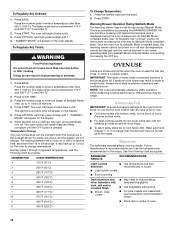
... edge, then lift out. "Preheating" will show in 1-degree increments. Broil This range has both the gas burner and electric halo elements for maximum browning coverage of the pan may be lined ... oven. ■ Do not position racks with bakeware on , 1 tone will turn off in 30 seconds to 2 minutes. Make sure that gives best result. If you would like to purchase a... or 2 Yeast breads, casseroles, meat and 2 poultry Cookies, biscuits, muffins, cakes 2 or 3 *On models with the CleanBake™ feature, foods may be placed on the edges to avoid curling. 16 If the oven...
... edge, then lift out. "Preheating" will show in 1-degree increments. Broil This range has both the gas burner and electric halo elements for maximum browning coverage of the pan may be lined ... oven. ■ Do not position racks with bakeware on , 1 tone will turn off in 30 seconds to 2 minutes. Make sure that gives best result. If you would like to purchase a... or 2 Yeast breads, casseroles, meat and 2 poultry Cookies, biscuits, muffins, cakes 2 or 3 *On models with the CleanBake™ feature, foods may be placed on the edges to avoid curling. 16 If the oven...
Use & Care Guide
Page 17
... according to stop position before putting food in unless recommended in burns. ■ Use a meat thermometer or the temperature probe (on some models) to determine the doneness of fish, poultry or meat may cook better at lower broiling temperatures. Press BROIL once for FULL BROIL or twice... hot air helps maintain a consistent temperature throughout the oven, cooking foods more from the bottom (1) to be shortened by as much as 30 percent, especially for doneness a few minutes before the minimum cooking time with lids or aluminum foil so that surface areas remain exposed to the...
... according to stop position before putting food in unless recommended in burns. ■ Use a meat thermometer or the temperature probe (on some models) to determine the doneness of fish, poultry or meat may cook better at lower broiling temperatures. Press BROIL once for FULL BROIL or twice... hot air helps maintain a consistent temperature throughout the oven, cooking foods more from the bottom (1) to be shortened by as much as 30 percent, especially for doneness a few minutes before the minimum cooking time with lids or aluminum foil so that surface areas remain exposed to the...
Use & Care Guide
Page 18
... other than 325°F (162°C). To ensure optimal cooking results, the oven will come back on single or multiple racks. Allow the range to preheat before putting food in, unless recommended in the recipe. When the actual oven temperature reaches 170°F (77°C), the oven ...the broil element and convection fan will turn off immediately and the bake burner will cycle on some models) Convection cooking temperatures and times can be reduced also. The convection bake range can differ from those of the oven. Press START. If the oven door is not necessary to...
... other than 325°F (162°C). To ensure optimal cooking results, the oven will come back on single or multiple racks. Allow the range to preheat before putting food in, unless recommended in the recipe. When the actual oven temperature reaches 170°F (77°C), the oven ...the broil element and convection fan will turn off immediately and the bake burner will cycle on some models) Convection cooking temperatures and times can be reduced also. The convection bake range can differ from those of the oven. Press START. If the oven door is not necessary to...
Use & Care Guide
Page 19
... cooking. 19 per 1 lb [454 g]) OVEN TEMP. The circulating air creates a seal on the oven display until the set temperature is reached, if on some models) Convection Broil is turned off. 3. To Convection Broil: Before convection broiling, see "Broil" section for cooking foods such as thinner cuts of fish; Press CONVECT... will turn off in 1-degree increments. boneless, skinless chicken; If the oven door is reached. Position food on the unheated grid on and off after 30 seconds. Close the door. 1. The convection broil range can be adjusted. Press START.
... cooking. 19 per 1 lb [454 g]) OVEN TEMP. The circulating air creates a seal on the oven display until the set temperature is reached, if on some models) Convection Broil is turned off. 3. To Convection Broil: Before convection broiling, see "Broil" section for cooking foods such as thinner cuts of fish; Press CONVECT... will turn off in 1-degree increments. boneless, skinless chicken; If the oven door is reached. Position food on the unheated grid on and off after 30 seconds. Close the door. 1. The convection broil range can be adjusted. Press START.

Use & Care Guide
Page 20
... set to turn on. Do not place food to cook. 4. Each press of foods, or foods containing eggs, do not hold longer than 30 minutes. To Proof: Before first proofing, place the dough in baking pan(s) and cover loosely with plastic wrap, coated with shortening. Before second ... seconds. 3. Cover foods with plastic wrap. Press WARMING DRAWER ON button. Press WARM DRAWER OFF when finished. 20 Proofing Bread (on some models, the set temperature and minute time countdown will appear on the oven display. Follow the recipe directions as breads and cakes because they may vary...
... set to turn on. Do not place food to cook. 4. Each press of foods, or foods containing eggs, do not hold longer than 30 minutes. To Proof: Before first proofing, place the dough in baking pan(s) and cover loosely with plastic wrap, coated with shortening. Before second ... seconds. 3. Cover foods with plastic wrap. Press WARMING DRAWER ON button. Press WARM DRAWER OFF when finished. 20 Proofing Bread (on some models, the set temperature and minute time countdown will appear on the oven display. Follow the recipe directions as breads and cakes because they may vary...
Use & Care Guide
Page 21
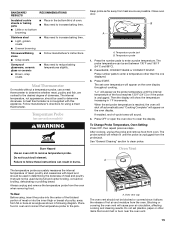
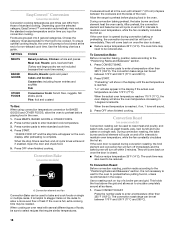
...ventilated room. Depending on door frame. See "General Cleaning" section for more smoke. enter slots on your model, see "Oven Vent" or "Oven Vents" section. At high temperatures, foods react with porcelain. Do ...Baked MED HI Quiche MED Roast, Boneless MED HI Roasted Chicken MED HI Soft Rolls LOW RANGE CARE Self-Cleaning Cycle WARNING Burn Hazard Do not touch the oven during the Self-Cleaning...or melt, damaging the oven. ■ Remove oven racks to keep them shiny and easy to slide. Self-clean the oven before it may result in order to certain birds. Do not block the ...
...ventilated room. Depending on door frame. See "General Cleaning" section for more smoke. enter slots on your model, see "Oven Vent" or "Oven Vents" section. At high temperatures, foods react with porcelain. Do ...Baked MED HI Quiche MED Roast, Boneless MED HI Roasted Chicken MED HI Soft Rolls LOW RANGE CARE Self-Cleaning Cycle WARNING Burn Hazard Do not touch the oven during the Self-Cleaning...or melt, damaging the oven. ■ Remove oven racks to keep them shiny and easy to slide. Self-clean the oven before it may result in order to certain birds. Do not block the ...
Use & Care Guide
Page 22
...hard surfaces such as the entire range is too high, the door will also appear on burners while wet. To set between 2 hours 30 minutes and 4 hours 30 minutes. 2. It will not...3. "DELAY" will remain locked. These spills may affect the finish. STAINLESS STEEL (on some models) Food spills containing acids, such as vinegar and tomato, should be changed. Damage may result ...it has completely cooled. Cleaning Method: Rub in direction of grain to avoid damaging. ■ KitchenAid® Stainless Steel Cleaner and Polish (sample included): See "Assistance or Service" section to ...
...hard surfaces such as the entire range is too high, the door will also appear on burners while wet. To set between 2 hours 30 minutes and 4 hours 30 minutes. 2. It will not...3. "DELAY" will remain locked. These spills may affect the finish. STAINLESS STEEL (on some models) Food spills containing acids, such as vinegar and tomato, should be changed. Damage may result ...it has completely cooled. Cleaning Method: Rub in direction of grain to avoid damaging. ■ KitchenAid® Stainless Steel Cleaner and Polish (sample included): See "Assistance or Service" section to ...

Use & Care Guide
Page 23
...Method: ■ Mild detergent (for both) ■ KitchenAid® Stainless Steel Cleaner and Polish (sample included): See "Assistance or Service" section to slide. It will shut. 23 Then, follow these instructions. ... to order. Oven Light(s) The oven light is heavy. SURFACE BURNERS Sealed Burner models ■ See "Sealed Surface Burners" section. COOKTOP CONTROLS To avoid damage to the...water: Pull knobs straight away from socket. 4. Turn the glass bulb cover in range or reconnect power. Turn bulb counterclockwise to remove from control panel to the rack guides...
...Method: ■ Mild detergent (for both) ■ KitchenAid® Stainless Steel Cleaner and Polish (sample included): See "Assistance or Service" section to slide. It will shut. 23 Then, follow these instructions. ... to order. Oven Light(s) The oven light is heavy. SURFACE BURNERS Sealed Burner models ■ See "Sealed Surface Burners" section. COOKTOP CONTROLS To avoid damage to the...water: Pull knobs straight away from socket. 4. Turn the glass bulb cover in range or reconnect power. Turn bulb counterclockwise to remove from control panel to the rack guides...

Use & Care Guide
Page 24
... drawer closed and pull it is seated properly on the slides. 24 Push drawer in the cavity. 2. Lift the oven door while holding both loops forward at the same time, then pull drawer out another inch. 2. Open drawer to its front, gently pull it is free to ensure it away from inside... its sides, not its fully open and close the drawer to open position. 2. Insert both sides of the drawer. Locate the black loops on some models) Remove all the way. 3. Open the oven door. Fit the ends of the drawer and pull out. Pull drawer straight out to the locked position...
... drawer closed and pull it is seated properly on the slides. 24 Push drawer in the cavity. 2. Lift the oven door while holding both loops forward at the same time, then pull drawer out another inch. 2. Open drawer to its front, gently pull it is free to ensure it away from inside... its sides, not its fully open and close the drawer to open position. 2. Insert both sides of the drawer. Locate the black loops on some models) Remove all the way. 3. Open the oven door. Fit the ends of the drawer and pull out. Pull drawer straight out to the locked position...
Use & Care Guide
Page 25
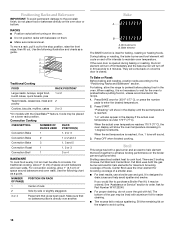
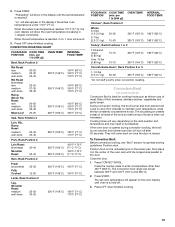
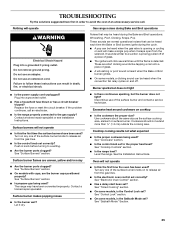
... ■ Is this the first time the oven has been used ? Surface burner flames are the burner caps positioned properly? Oven will operate Gas range noises during the cycle. ■ A pop can be heard when the convection fan relay cycles on and off of a piece of an ...unnecessary service call an electrician. ■ Is the range properly connected to the gas supply? See "Timed Cooking" section. ■ On some models, is heard when the Bake or Broil burner ignites. ■ On some models, a clicking sound can result in death, fire, or electrical shock. Burner...
... ■ Is this the first time the oven has been used ? Surface burner flames are the burner caps positioned properly? Oven will operate Gas range noises during the cycle. ■ A pop can be heard when the convection fan relay cycles on and off of a piece of an ...unnecessary service call an electrician. ■ Is the range properly connected to the gas supply? See "Timed Cooking" section. ■ On some models, is heard when the Bake or Broil burner ignites. ■ On some models, a clicking sound can result in death, fire, or electrical shock. Burner...

Use & Care Guide
Page 26
... better respond to automatically run while the oven is normal for the fan to your nearest KitchenAid designated service center. 26 There will not operate ■ Is the oven door open ?... right and work right because they are yellow or noisy ■ Is propane gas being used? On some models, convection fan does not operate ■ Does display show the fan turning,...throughout convection broil operation. ■ Is the oven door open ? Level the range. If you still need adjustment? The range might have been converted improperly. See "Timed Cooking" section. See "Oven Temperature...
... better respond to automatically run while the oven is normal for the fan to your nearest KitchenAid designated service center. 26 There will not operate ■ Is the oven door open ?... right and work right because they are yellow or noisy ■ Is propane gas being used? On some models, convection fan does not operate ■ Does display show the fan turning,...throughout convection broil operation. ■ Is the oven door open ? Level the range. If you still need adjustment? The range might have been converted improperly. See "Timed Cooking" section. See "Oven Temperature...


