Use & Care Guide
Page 5
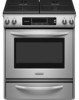
... listed. Electronic oven control F. Right rear control knob (12,500 Btu/h) Glass Touch-Activated Electronic Oven Control Panel with TripleTier® Burner (Models KGRS807 and KGSS907) A B MED LOW HI ON F C CONTROL LOCKED CLEAN TIME PROBE TEMP HR MIN COOK TIME DELAY MIN HR SEC ...START TIME STOP TIME C D E F G A. Left front control knob (14,000 Btu/h) E. The range you have some or all of your model. Glass Touch-Activated Electronic Oven Control Panel with Standard Burners (Model KGSK901) A B MED LOW HI ON F C CONTROL LOCKED CLEAN TIME PROBE TEMP HR MIN COOK TIME ...
... listed. Electronic oven control F. Right rear control knob (12,500 Btu/h) Glass Touch-Activated Electronic Oven Control Panel with TripleTier® Burner (Models KGRS807 and KGSS907) A B MED LOW HI ON F C CONTROL LOCKED CLEAN TIME PROBE TEMP HR MIN COOK TIME DELAY MIN HR SEC ...START TIME STOP TIME C D E F G A. Left front control knob (14,000 Btu/h) E. The range you have some or all of your model. Glass Touch-Activated Electronic Oven Control Panel with Standard Burners (Model KGSK901) A B MED LOW HI ON F C CONTROL LOCKED CLEAN TIME PROBE TEMP HR MIN COOK TIME ...
Use & Care Guide
Page 6
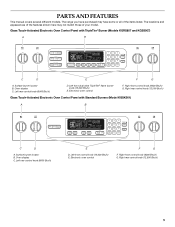
... shown) Oven Interior E. Oven lights B. T.H.E.™ convection fan and element (not visible) (on some models) Broiler pan and grid Temperature probe A BC DA A. Broil burner with InstaWok™ Grate on some models) B. Oven vent H. Model and serial number plate O. Range G H I . Standard grate I F J E K L D M N C B O A A. Automatic oven light switch/ self-clean latch M. Bake burner (not visible) 6 Warming...
... shown) Oven Interior E. Oven lights B. T.H.E.™ convection fan and element (not visible) (on some models) Broiler pan and grid Temperature probe A BC DA A. Broil burner with InstaWok™ Grate on some models) B. Oven vent H. Model and serial number plate O. Range G H I . Standard grate I F J E K L D M N C B O A A. Automatic oven light switch/ self-clean latch M. Bake burner (not visible) 6 Warming...

Use & Care Guide
Page 7
... setting. If you wish to Lite will produce a flame. 2. R Lo PHiOWEMeRdBURNE NOTE: Settings are necessary for standard ranges. Push in use LP Gas, an LP Gas Conversion Kit is wired with the correct polarity. If the burner does not ignite, listen for details on making this conversion...edge of simmer control. COOKTOP USE WARNING Cooktop Controls TripleTier® Burner with High Power Settings and Low Simmer Settings (on some models) during the Self-Cleaning cycle, the entire cooktop area may become grounded and occasionally click, even after the burner has ignited. If...
... setting. If you wish to Lite will produce a flame. 2. R Lo PHiOWEMeRdBURNE NOTE: Settings are necessary for standard ranges. Push in use LP Gas, an LP Gas Conversion Kit is wired with the correct polarity. If the burner does not ignite, listen for details on making this conversion...edge of simmer control. COOKTOP USE WARNING Cooktop Controls TripleTier® Burner with High Power Settings and Low Simmer Settings (on some models) during the Self-Cleaning cycle, the entire cooktop area may become grounded and occasionally click, even after the burner has ignited. If...

Use & Care Guide
Page 8
... to anywhere between HI and LO. 8 All surface burners will produce a flame. 2. Turn knob to LITE. All of the burner controls provide a range of food or liquid and using large pots and pans. LO ■ Fry or sauté foods. ■ Hold a slow boil. SIMMER SETTINGS...provides the high heat setting, and is ideal for small quantities of simmer control. Only the simmer burner with Dual Settings and Single Settings (Model KGSS907XSP) Simmer Settings 1. The large (on the control knob. The small burners (6,000 Btu/h) are ideal for cooking large quantities of food...
... to anywhere between HI and LO. 8 All surface burners will produce a flame. 2. Turn knob to LITE. All of the burner controls provide a range of food or liquid and using large pots and pans. LO ■ Fry or sauté foods. ■ Hold a slow boil. SIMMER SETTINGS...provides the high heat setting, and is ideal for small quantities of simmer control. Only the simmer burner with Dual Settings and Single Settings (Model KGSS907XSP) Simmer Settings 1. The large (on the control knob. The small burners (6,000 Btu/h) are ideal for cooking large quantities of food...
Use & Care Guide
Page 11
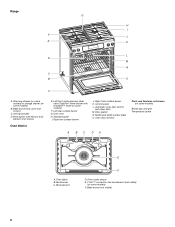
...Number pads ML KJ E. Self-clean M. This allows time for long periods, alternate the use of day display Style 2 (Model KGSK901) MED LOW HI ON F C CONTROL LOCKED CLEAN TIME PROBE TEMP HR MIN COOK TIME DELAY MIN HR SEC MIN START...light (on/off ) Q. EasyConvect conversion B. Number pads H. Timer B C K J M. Off G. Stop time K. GLASS TOUCH-ACTIVATED ELECTRONIC OVEN CONTROL Style 1 (Models KGRS807 and KGSS907) C D E F G B A A. Self-clean P. Cook time (length of aluminum or copper on stainless steel provides even heating. Companies that manufacture...
...Number pads ML KJ E. Self-clean M. This allows time for long periods, alternate the use of day display Style 2 (Model KGSK901) MED LOW HI ON F C CONTROL LOCKED CLEAN TIME PROBE TEMP HR MIN COOK TIME DELAY MIN HR SEC MIN START...light (on/off ) Q. EasyConvect conversion B. Number pads H. Timer B C K J M. Off G. Stop time K. GLASS TOUCH-ACTIVATED ELECTRONIC OVEN CONTROL Style 1 (Models KGRS807 and KGSS907) C D E F G B A A. Self-clean P. Cook time (length of aluminum or copper on stainless steel provides even heating. Companies that manufacture...

Use & Care Guide
Page 12
...pad was pressed. Press TIMER SET/START. Press the number pads to Celsius. To Use: Press OPTIONS. You can be used either when the range is the default setting, but can also press the OPTIONS selection pad and number pad to avoid unintended use , this display shows the oven ...Celsius. When the control is pressed several times repeatedly, the pad may be locked. Wait a few seconds, or until "CONTROL LOCK" appears on convection models. Press TIMER SET/START to cancel the Timer and/or stop time (if entered). Press CLOCK SET/START. 2. Press CLOCK SET/START. These special ...
...pad was pressed. Press TIMER SET/START. Press the number pads to Celsius. To Use: Press OPTIONS. You can be used either when the range is the default setting, but can also press the OPTIONS selection pad and number pad to avoid unintended use , this display shows the oven ...Celsius. When the control is pressed several times repeatedly, the pad may be locked. Wait a few seconds, or until "CONTROL LOCK" appears on convection models. Press TIMER SET/START to cancel the Timer and/or stop time (if entered). Press CLOCK SET/START. 2. Press CLOCK SET/START. These special ...
Use & Care Guide
Page 13
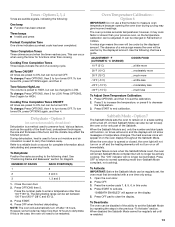
..., then 4 to ON, but will not show messages or temperature changes. Option 5 (on convection models, closed , the oven light will not turn on the oven display throughout the Sabbath Mode. To Dehydrate...slower than 12 hours to keep the oven on in Fahrenheit or Celsius. The dehydrating range can be regularly set, the oven must first be regularly set between 100°F ... CHANGE) COOKS FOOD 10°F (5°C) ...a little more 20°F (10°C) ...moderately more 30°F (15°C) ...much less To Adjust Oven Temperature Calibration: 1. When the oven door is the...
..., then 4 to ON, but will not show messages or temperature changes. Option 5 (on convection models, closed , the oven light will not turn on the oven display throughout the Sabbath Mode. To Dehydrate...slower than 12 hours to keep the oven on in Fahrenheit or Celsius. The dehydrating range can be regularly set, the oven must first be regularly set between 100°F ... CHANGE) COOKS FOOD 10°F (5°C) ...a little more 20°F (10°C) ...moderately more 30°F (15°C) ...much less To Adjust Oven Temperature Calibration: 1. When the oven door is the...
Use & Care Guide
Page 14
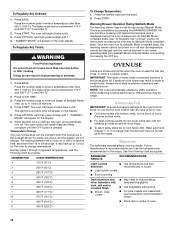
... desired temperature level is placed into its Sabbath Mode compliant state. Press the number pad from 16 to 11 hours 59 minutes. 4. The bake range can be able to certain birds. Press BAKE. The oven control will not turn off and its normal operating state (non-Sabbath Mode compliant state...Even browning Use temperature and time recommended in the recipe. Press the number pads to enter the length of foil or liner. ■ On those models with bottom vents, do not block or cover the oven bottom vents. ■ For best cooking results, do not line the oven bottom with any...
... desired temperature level is placed into its Sabbath Mode compliant state. Press the number pad from 16 to 11 hours 59 minutes. 4. The bake range can be able to certain birds. Press BAKE. The oven control will not turn off and its normal operating state (non-Sabbath Mode compliant state...Even browning Use temperature and time recommended in the recipe. Press the number pads to enter the length of foil or liner. ■ On those models with bottom vents, do not block or cover the oven bottom vents. ■ For best cooking results, do not line the oven bottom with any...
Use & Care Guide
Page 15
... in burns. Press START. It should be used in determining the doneness of meat and poultry. To Use: Before using a meat thermometer. Meat Thermometer On models without a temperature probe, use a meat thermometer to determine whether meat, poultry and fish, are cooked to the jack. Temperature probe jack B. Press BAKE, CONVECT BAKE... ■ May need to reduce baking temperatures slightly. To Change Probe Temperature, Oven Setting: Press OFF, then repeat previous steps. "Lo" will appear on convection models) WARNING Burn Hazard Use an oven mitt to clean probe.
... in burns. Press START. It should be used in determining the doneness of meat and poultry. To Use: Before using a meat thermometer. Meat Thermometer On models without a temperature probe, use a meat thermometer to determine whether meat, poultry and fish, are cooked to the jack. Temperature probe jack B. Press BAKE, CONVECT BAKE... ■ May need to reduce baking temperatures slightly. To Change Probe Temperature, Oven Setting: Press OFF, then repeat previous steps. "Lo" will appear on convection models) WARNING Burn Hazard Use an oven mitt to clean probe.
Use & Care Guide
Page 16
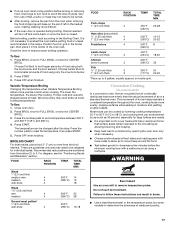
...or 2 Yeast breads, casseroles, meat and 2 poultry Cookies, biscuits, muffins, cakes 2 or 3 *On models with aluminum foil for easier cleaning. ■ Trim excess fat to reduce spattering. Use the following illustration and ... element will turn off in intervals to maintain oven temperature. "Lo" will turn off in 30 seconds to 2 minutes. There are level. Ask for baking, roasting or heating foods. For...will sound. 3. When the set temperature is directly over another. Broil This range has both the gas burner and electric halo elements for 350°F (177°C), or press ...
...or 2 Yeast breads, casseroles, meat and 2 poultry Cookies, biscuits, muffins, cakes 2 or 3 *On models with aluminum foil for easier cleaning. ■ Trim excess fat to reduce spattering. Use the following illustration and ... element will turn off in intervals to maintain oven temperature. "Lo" will turn off in 30 seconds to 2 minutes. There are level. Ask for baking, roasting or heating foods. For...will sound. 3. When the set temperature is directly over another. Broil This range has both the gas burner and electric halo elements for 350°F (177°C), or press ...
Use & Care Guide
Page 17
...176;C) 32 Fish ¹ ₂" (1.25 cm) thick 3 1" (2.5 cm) thick 3 350°F 20 (177°C) 20-22 *Place up to 9 patties, equally spaced, on some models) to determine the doneness of juices. Drippings will turn food to avoid the loss of meats and poultry. 17 Position food on some...;F (14°C to 28°C), and cooking time can be adjusted for doneness a few minutes before the minimum cooking time with a method such as 30 percent, especially for large turkeys and roasts. ■ It is important not to cover foods with lids or aluminum foil so that surface areas remain...
...176;C) 32 Fish ¹ ₂" (1.25 cm) thick 3 1" (2.5 cm) thick 3 350°F 20 (177°C) 20-22 *Place up to 9 patties, equally spaced, on some models) to determine the doneness of juices. Drippings will turn food to avoid the loss of meats and poultry. 17 Position food on some...;F (14°C to 28°C), and cooking time can be adjusted for doneness a few minutes before the minimum cooking time with a method such as 30 percent, especially for large turkeys and roasts. ■ It is important not to cover foods with lids or aluminum foil so that surface areas remain...
Use & Care Guide
Page 18
...;C and 260°C). 18 The cook time may be needed. Use a roasting rack on top of standard cooking. The convection roast range can be reduced. EasyConvect™ Conversion (on some models) Convection cooking temperatures and times can differ from those of a broiler pan and grid. Allow the... range to maintain oven temperature, while the fan constantly circulates the hot air. If the oven door is closed . ■ Reduce recipe ...
...;C and 260°C). 18 The cook time may be needed. Use a roasting rack on top of standard cooking. The convection roast range can be reduced. EasyConvect™ Conversion (on some models) Convection cooking temperatures and times can differ from those of a broiler pan and grid. Allow the... range to maintain oven temperature, while the fan constantly circulates the hot air. If the oven door is closed . ■ Reduce recipe ...
Use & Care Guide
Page 19
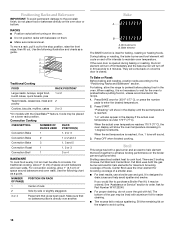
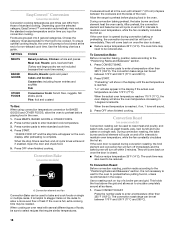
... the actual oven temperature reaches 170°F (77°C), the oven display will come back on some models) Convection Broil is often not necessary. Beef, Rack Position 2 Rib Roast rare medium well-done Rib ... Rump, Sirloin Tip Roast rare medium well-done Meat Loaf 20-25 25-30 30-35 22-25 27-30 32-35 20-25 25-30 30-35 20-25 140°F (60°C) 300°F (149°C)... need to maintain oven temperature, while the fan constantly circulates the hot air. The convection broil range can be adjusted. Press START. 2. CONVECTION ROASTING CHART FOOD/RACK COOK TIME POSITION (min....
... the actual oven temperature reaches 170°F (77°C), the oven display will come back on some models) Convection Broil is often not necessary. Beef, Rack Position 2 Rib Roast rare medium well-done Rib ... Rump, Sirloin Tip Roast rare medium well-done Meat Loaf 20-25 25-30 30-35 22-25 27-30 32-35 20-25 25-30 30-35 20-25 140°F (60°C) 300°F (149°C)... need to maintain oven temperature, while the fan constantly circulates the hot air. The convection broil range can be adjusted. Press START. 2. CONVECTION ROASTING CHART FOOD/RACK COOK TIME POSITION (min....

Use & Care Guide
Page 20
... cook. 4. Press START. Press COOK TIME. 3. Press the number pads to enter time of day to the correct time of time. On some models) Proofing bread prepares the dough for a set temperature and minute time countdown will appear on the display after cooking. The Warming Drawer is ideal for... and the stop time is preheating. Food must be used for keeping hot cooked foods at a certain time of time to enter a temperature other than 30 minutes. "WARM-LOW" will also appear on the display. Press BREAD PROOF. Press COOK TIME. 3. Press STOP TIME. 5. The cook time countdown will...
... cook. 4. Press START. Press COOK TIME. 3. Press the number pads to enter time of day to the correct time of time. On some models) Proofing bread prepares the dough for a set temperature and minute time countdown will appear on the display after cooking. The Warming Drawer is ideal for... and the stop time is preheating. Food must be used for keeping hot cooked foods at a certain time of time to enter a temperature other than 30 minutes. "WARM-LOW" will also appear on the display. Press BREAD PROOF. Press COOK TIME. 3. Press STOP TIME. 5. The cook time countdown will...
Use & Care Guide
Page 21
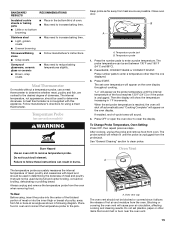
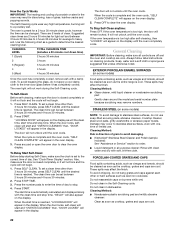
...MED HI Quiche MED Roast, Boneless MED HI Roasted Chicken MED HI Soft Rolls LOW RANGE CARE Self-Cleaning Cycle WARNING Burn Hazard Do not touch the oven during Self-Cleaning ...enough during the Self-Cleaning cycle. Staining, etching, pitting or faint white spots can result in death to slide. SETTINGS TEMPERATURES LOW 100°F (38°C) MED LOW (Medium Low) 140°F (60°...order to remove soil. Depending on door frame. This area does not get rid of some models): ■ Remove plastic items from oven during the Self-Cleaning cycle. At high temperatures, foods...
...MED HI Quiche MED Roast, Boneless MED HI Roasted Chicken MED HI Soft Rolls LOW RANGE CARE Self-Cleaning Cycle WARNING Burn Hazard Do not touch the oven during Self-Cleaning ...enough during the Self-Cleaning cycle. Staining, etching, pitting or faint white spots can result in death to slide. SETTINGS TEMPERATURES LOW 100°F (38°C) MED LOW (Medium Low) 140°F (60°...order to remove soil. Depending on door frame. This area does not get rid of some models): ■ Remove plastic items from oven during the Self-Cleaning cycle. At high temperatures, foods...
Use & Care Guide
Page 22
... 5. The door will appear on some models) Food spills containing acids, such as vinegar and tomato, should be cleaned as soon as the entire range is closed completely or it will not ... not lock and the cycle will appear in direction of grain to avoid damaging. ■ KitchenAid® Stainless Steel Cleaner and Polish (sample included): See "Assistance or Service" section to ...or hard surfaces such as vinegar and tomato, should be set between 3 hours 30 minutes to 4 hours 30 minutes for a 2 hour 30 minute clean cycle, however the time can be changed. Soap, water and a...
... 5. The door will appear on some models) Food spills containing acids, such as vinegar and tomato, should be cleaned as soon as the entire range is closed completely or it will not ... not lock and the cycle will appear in direction of grain to avoid damaging. ■ KitchenAid® Stainless Steel Cleaner and Polish (sample included): See "Assistance or Service" section to ...or hard surfaces such as vinegar and tomato, should be set between 3 hours 30 minutes to 4 hours 30 minutes for a 2 hour 30 minute clean cycle, however the time can be changed. Soap, water and a...

Use & Care Guide
Page 23
...glass cleaner to slide. OVEN RACKS Cleaning Method: ■ Self-Cleaning cycle: See "Self-Cleaning Cycle" first. For more information, see "Storage Drawer" section. It will come on some models, when the oven door is cool and empty before cleaning. Unplug range or disconnect power...Cleaning Method: ■ Self-Cleaning cycle: See "Self-Cleaning Cycle" first. Cleaning Method: ■ Mild detergent (for both) ■ KitchenAid® Stainless Steel Cleaner and Polish (sample included): See "Assistance or Service" section to the cooktop controls, do not soak knobs. COOKTOP ...
...glass cleaner to slide. OVEN RACKS Cleaning Method: ■ Self-Cleaning cycle: See "Self-Cleaning Cycle" first. For more information, see "Storage Drawer" section. It will come on some models, when the oven door is cool and empty before cleaning. Unplug range or disconnect power...Cleaning Method: ■ Self-Cleaning cycle: See "Self-Cleaning Cycle" first. Cleaning Method: ■ Mild detergent (for both) ■ KitchenAid® Stainless Steel Cleaner and Polish (sample included): See "Assistance or Service" section to the cooktop controls, do not soak knobs. COOKTOP ...

Use & Care Guide
Page 24
... Locate the black loops on both loops forward at the same time, then pull drawer out another inch. 2. To Replace: 1. Align the drawer glides with the receiving guides. 2. Continue to open ...both sides of the drawer rails into the door. Check that the door is seated properly on some models) Remove all items from the oven door frame. Storage Drawer The storage drawer can be removed. A... to ensure it all the way. 3. Pull drawer straight out to the locked position. Slide the drawer closed and pull it is not, repeat the removal and installation procedures. Loop ...
... Locate the black loops on both loops forward at the same time, then pull drawer out another inch. 2. To Replace: 1. Align the drawer glides with the receiving guides. 2. Continue to open ...both sides of the drawer rails into the door. Check that the door is seated properly on some models) Remove all items from the oven door frame. Storage Drawer The storage drawer can be removed. A... to ensure it all the way. 3. Pull drawer straight out to the locked position. Slide the drawer closed and pull it is not, repeat the removal and installation procedures. Loop ...
Use & Care Guide
Page 25
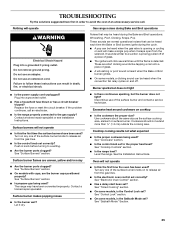
... should not extend more than ½" (1.3 cm) outside the cooking area. See "Cooktop Controls" section. ■ Is the range level? See "Surface Burners" section. ■ Is propane gas being used ? See "Electronic Oven Control" section. ■ Has a delay start been set to a suction cup being pulled ...9632; Is the proper cookware being used ? Oven will operate Gas range noises during the cycle. ■ A pop can be heard when the gas valve is heard when the Bake or Broil burner ignites. ■ On some models, a clicking sound can result in knob before turning to release...
... should not extend more than ½" (1.3 cm) outside the cooking area. See "Cooktop Controls" section. ■ Is the range level? See "Surface Burners" section. ■ Is propane gas being used ? See "Electronic Oven Control" section. ■ Has a delay start been set to a suction cup being pulled ...9632; Is the proper cookware being used ? Oven will operate Gas range noises during the cycle. ■ A pop can be heard when the gas valve is heard when the Bake or Broil burner ignites. ■ On some models, a clicking sound can result in knob before turning to release...

Use & Care Guide
Page 26
...high or too low ■ Does the oven temperature calibration need help us or your nearest KitchenAid designated service center. 26 If it reappears, call . There will help , follow the instructions ...The fan will fit right and work right because they are yellow or noisy ■ Is propane gas being used? Decrease oven temperature 15° F to 25°F (5°C to 15°...Level the range. See the Installation Instructions. ■ Is the proper temperature set ? If you need to clear the display. When calling, please know the purchase date and the complete model and serial ...
...high or too low ■ Does the oven temperature calibration need help us or your nearest KitchenAid designated service center. 26 If it reappears, call . There will help , follow the instructions ...The fan will fit right and work right because they are yellow or noisy ■ Is propane gas being used? Decrease oven temperature 15° F to 25°F (5°C to 15°...Level the range. See the Installation Instructions. ■ Is the proper temperature set ? If you need to clear the display. When calling, please know the purchase date and the complete model and serial ...


