Use & Care Guide
Page 5
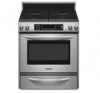
... C. Left front dual valve TripleTier® flame burner knob (15,000 Btu/h) E. Left rear control knob (6000 Btu/h) E D. PARTS AND FEATURES This manual covers several different models. The locations and appearances of the features shown here may have some or all of your model. Electronic oven control...COOK TIME DELAY MIN HR SEC MIN START TIME STOP TIME C D E F G A. Right front control knob (6000 Btu/h) G. The range you have purchased may not match those of the items listed. Left rear control knob (6000 Btu/h) D. Right rear control knob (12,500 Btu/h) 5
... C. Left front dual valve TripleTier® flame burner knob (15,000 Btu/h) E. Left rear control knob (6000 Btu/h) E D. PARTS AND FEATURES This manual covers several different models. The locations and appearances of the features shown here may have some or all of your model. Electronic oven control...COOK TIME DELAY MIN HR SEC MIN START TIME STOP TIME C D E F G A. Right front control knob (6000 Btu/h) G. The range you have purchased may not match those of the items listed. Left rear control knob (6000 Btu/h) D. Right rear control knob (12,500 Btu/h) 5

Installation Guide
Page 2
... are not followed. 2 We have provided many important safety messages in this manual and on your appliance. This is , tell you how to potential hazards ... safety messages. TABLE OF CONTENTS RANGE SAFETY 2 INSTALLATION REQUIREMENTS 4 Tools and Parts 4 Location Requirements 4 Electrical Requirements 7 Gas Supply Requirements 7 Countertop Preparation 8 INSTALLATION INSTRUCTIONS 9 Unpack Range 9 Measure for Proper Height ...aplomb de la cuisinière 29 Raccordement à la canalisation de gaz 30 Système d'allumage électronique 31 Réinstallation des grilles du four...
... are not followed. 2 We have provided many important safety messages in this manual and on your appliance. This is , tell you how to potential hazards ... safety messages. TABLE OF CONTENTS RANGE SAFETY 2 INSTALLATION REQUIREMENTS 4 Tools and Parts 4 Location Requirements 4 Electrical Requirements 7 Gas Supply Requirements 7 Countertop Preparation 8 INSTALLATION INSTRUCTIONS 9 Unpack Range 9 Measure for Proper Height ...aplomb de la cuisinière 29 Raccordement à la canalisation de gaz 30 Système d'allumage électronique 31 Réinstallation des grilles du four...
Installation Guide
Page 12
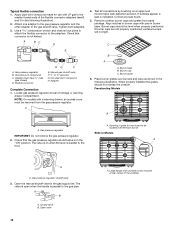
Tighten both adapters. 3. Gas pressure regulator B. Manual gas shutoff valve F. ½" or ¾" gas pipe G. Locate gas pressure regulator at rear corner of storage or warming drawer compartment. If bubbles appear, a leak is parallel to ...pliers to attach the flexible connector to the gas shutoff valve. Burner base B. Freestanding Models A A. Gas pressure regulator IMPORTANT: Do not remove the gas pressure regulator. 2. Check that connector is parallel to be removed from parts package. C B A A. Align notches in the gas supply line. H. Apply pipe-joint compound ...
Tighten both adapters. 3. Gas pressure regulator B. Manual gas shutoff valve F. ½" or ¾" gas pipe G. Locate gas pressure regulator at rear corner of storage or warming drawer compartment. If bubbles appear, a leak is parallel to ...pliers to attach the flexible connector to the gas shutoff valve. Burner base B. Freestanding Models A A. Gas pressure regulator IMPORTANT: Do not remove the gas pressure regulator. 2. Check that connector is parallel to be removed from parts package. C B A A. Align notches in the gas supply line. H. Apply pipe-joint compound ...


