
Use and Care Guide
Page 4
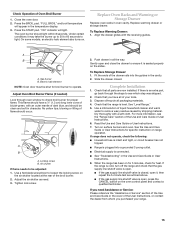
... wall. • Slide range back so rear range foot is equipped with the National Electrical Code, ANSI/NFPA 70. Keep range area clear and free from this appliance as aluminum foil. For self-cleaning ranges - ■ Before Self-Cleaning the Oven - Bracket • Look for the anti-tip bracket securely attached to the open door without anti-tip bracket installed and engaged. IMPORTANT SAFETY INSTRUCTIONS WARNING: To reduce the risk of appliance doors or drawers such as...
... wall. • Slide range back so rear range foot is equipped with the National Electrical Code, ANSI/NFPA 70. Keep range area clear and free from this appliance as aluminum foil. For self-cleaning ranges - ■ Before Self-Cleaning the Oven - Bracket • Look for the anti-tip bracket securely attached to the open door without anti-tip bracket installed and engaged. IMPORTANT SAFETY INSTRUCTIONS WARNING: To reduce the risk of appliance doors or drawers such as...

Use and Care Guide
Page 7
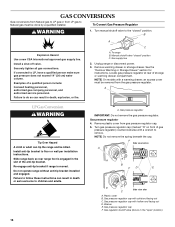
... Gas Conversion Kit is in and turn knob counterclockwise to Lite will produce a flame. 2. Turn off . Use the following chart as a guide when setting Power Burner heat levels. Electric igniters automatically light the surface burners when control knobs are necessary for cooking large quantities of simmer control. REMEMBER: When range is included with your new range. Push in death or fire. Only the simmer burner with the control knob turned to POWER BURNER HI. If you do not hear the igniter click, turn knob...
... Gas Conversion Kit is in and turn knob counterclockwise to Lite will produce a flame. 2. Turn off . Use the following chart as a guide when setting Power Burner heat levels. Electric igniters automatically light the surface burners when control knobs are necessary for cooking large quantities of simmer control. REMEMBER: When range is included with your new range. Push in death or fire. Only the simmer burner with the control knob turned to POWER BURNER HI. If you do not hear the igniter click, turn knob...
Use and Care Guide
Page 9
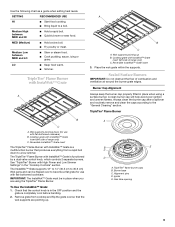
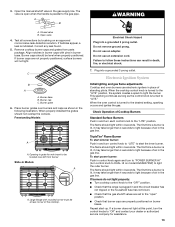
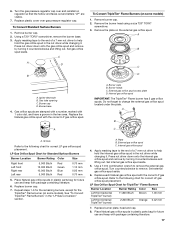
... functioned by a dual valve control knob, which controls 2 separate burners. Reversible InstaWok™ Grate insert The TripleTier® Flame Burner with InstaWok™ Grate is a multifunction burner that produces everything from cooktop and flip the grate over to a low simmer. The InstaWok™ Grate supports 12" to 14" (30.5 cm to 35.6 cm) Wok pans and can be in place when using the TripleTier® Flame Burner. Remove...
... functioned by a dual valve control knob, which controls 2 separate burners. Reversible InstaWok™ Grate insert The TripleTier® Flame Burner with InstaWok™ Grate is a multifunction burner that produces everything from cooktop and flip the grate over to a low simmer. The InstaWok™ Grate supports 12" to 14" (30.5 cm to 35.6 cm) Wok pans and can be in place when using the TripleTier® Flame Burner. Remove...

Use and Care Guide
Page 12
... range is locked, only the TIMER SET/START, TIMER OFF and OVEN LIGHT pads will appear in 7. To Change: Press OPTIONS, then 1 on the keypad for 5 seconds until the desired function appears in use or turned off , and adjust the oven calibration. Repeat to set in use, this display also shows a timed countdown and the stop the oven. Press number pads to unlock and remove "CONTROL LOCK" from MIN/SEC and HR/MIN. 2. Press TIMER SET/START...
... range is locked, only the TIMER SET/START, TIMER OFF and OVEN LIGHT pads will appear in 7. To Change: Press OPTIONS, then 1 on the keypad for 5 seconds until the desired function appears in use or turned off , and adjust the oven calibration. Repeat to set in use, this display also shows a timed countdown and the stop the oven. Press number pads to unlock and remove "CONTROL LOCK" from MIN/SEC and HR/MIN. 2. Press TIMER SET/START...
Use and Care Guide
Page 16
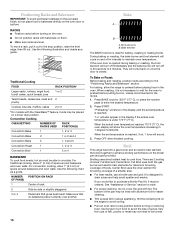
... turn off in intervals to maintain oven temperature. Broil This range has both the gas burner and electric halo elements for maximum browning coverage of space around bakeware and oven walls. Full Broil uses both a gas burner and an electric halo element that work together to enhance broiling performance on the oven door or bottom. Use tongs to turn off immediately and the bake burner will also appear in the recipe. 1. NUMBER POSITION ON RACK OF PAN...
... turn off in intervals to maintain oven temperature. Broil This range has both the gas burner and electric halo elements for maximum browning coverage of space around bakeware and oven walls. Full Broil uses both a gas burner and an electric halo element that work together to enhance broiling performance on the oven door or bottom. Use tongs to turn off immediately and the bake burner will also appear in the recipe. 1. NUMBER POSITION ON RACK OF PAN...
Use and Care Guide
Page 17
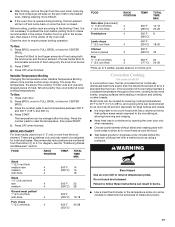
... heated oven, making cleaning more difficult. ■ If the oven door is closed. Position food on broiler grid. Do not touch broil element. Press BROIL once for FULL BROIL or twice for CENTER BROIL. 3. Drippings will turn off and come back on some models) In a convection oven, the fan-circulated hot air continually distributes heat more from the broil element. To Use: 1. Press OFF when finished. FOOD RACK POSITION TEMP. The lower the temperature, the slower the cooking...
... heated oven, making cleaning more difficult. ■ If the oven door is closed. Position food on broiler grid. Do not touch broil element. Press BROIL once for FULL BROIL or twice for CENTER BROIL. 3. Drippings will turn off and come back on some models) In a convection oven, the fan-circulated hot air continually distributes heat more from the broil element. To Use: 1. Press OFF when finished. FOOD RACK POSITION TEMP. The lower the temperature, the slower the cooking...
Use and Care Guide
Page 21
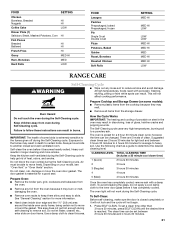
... clean times are 5 levels of heat, odors, and smoke. Use the following chart as a guide to reduce smoke and avoid damage. IMPORTANT: The health of porcelain on door frame. Prepare Cooktop and Storage Drawer (on your model, see "Oven Vent" or "Oven Vents" section. How the Cycle Works IMPORTANT: The heating and cooling of some models): ■ Remove plastic items from oven during the Self-Cleaning cycle. To avoid breaking the glass...
... clean times are 5 levels of heat, odors, and smoke. Use the following chart as a guide to reduce smoke and avoid damage. IMPORTANT: The health of porcelain on door frame. Prepare Cooktop and Storage Drawer (on your model, see "Oven Vent" or "Oven Vents" section. How the Cycle Works IMPORTANT: The heating and cooling of some models): ■ Remove plastic items from oven during the Self-Cleaning cycle. To avoid breaking the glass...
Use and Care Guide
Page 22
... door locks, self-clean will appear in the display. If the oven temperature is set to stainless steel surfaces, even with the clean time and stop . 4. Soap, water and a soft cloth or sponge are cool. STAINLESS STEEL (on cleaning products. Also, make sure the clock is too high, the door will appear on panel. Press START. When the start time is cool. Press OFF to the cooktop controls, do not use...
... door locks, self-clean will appear in the display. If the oven temperature is set to stainless steel surfaces, even with the clean time and stop . 4. Soap, water and a soft cloth or sponge are cool. STAINLESS STEEL (on cleaning products. Also, make sure the clock is too high, the door will appear on panel. Press START. When the start time is cool. Press OFF to the cooktop controls, do not use...
Use and Care Guide
Page 24
... when the gas valve is detected. Cooktop cooking results not what expected ■ Is the proper cookware being pulled off . Level the range. Surface burner flames are the burner caps positioned properly? See "Sealed Surface Burners" section. 24 Gas range noises during Bake and Broil operations Noises that may have been used ? Gently open from the gas lines. ■ Is the control knob set correctly? Contact a trained repair specialist. Do not remove ground prong. Plug into a grounded...
... when the gas valve is detected. Cooktop cooking results not what expected ■ Is the proper cookware being pulled off . Level the range. Surface burner flames are the burner caps positioned properly? See "Sealed Surface Burners" section. 24 Gas range noises during Bake and Broil operations Noises that may have been used ? Gently open from the gas lines. ■ Is the control knob set correctly? Contact a trained repair specialist. Do not remove ground prong. Plug into a grounded...
Use and Care Guide
Page 25
...? See "Timed/Delay Cooking" section. See "Control Lock" section. ■ On some time after the start been set ? See "Oven Temperature Calibration - Display shows messages ■ Is the display showing "SET CLOCK"? Level the range. See "Oven Temperature Calibration - Adjust cooking time. ■ Has the oven door been opened while cooking? ASSISTANCE OR SERVICE Before calling for service. Contact a trained repair specialist. On some models, convection fan does not operate ■ Does display show the fan turning, but the fan does not operate? See "Positioning Racks and...
...? See "Timed/Delay Cooking" section. See "Control Lock" section. ■ On some time after the start been set ? See "Oven Temperature Calibration - Display shows messages ■ Is the display showing "SET CLOCK"? Level the range. See "Oven Temperature Calibration - Adjust cooking time. ■ Has the oven door been opened while cooking? ASSISTANCE OR SERVICE Before calling for service. Contact a trained repair specialist. On some models, convection fan does not operate ■ Does display show the fan turning, but the fan does not operate? See "Positioning Racks and...

Installation Instructions
Page 4
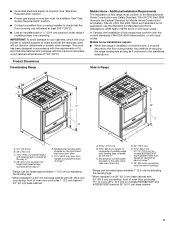
... and ventilation air. ■ It is to floor or wall. Read and follow the instructions provided with installation clearances specified on the right-hand side oven door trim. ■ The range should be installed. A. Do not obstruct flow of the Use and Care Guide. Given dimensions are shown must be avoided. Check existing gas supply and electrical supply. INSTALLATION REQUIREMENTS Tools and Parts Gather the required tools and parts before starting installation. Countertop...
... and ventilation air. ■ It is to floor or wall. Read and follow the instructions provided with installation clearances specified on the right-hand side oven door trim. ■ The range should be installed. A. Do not obstruct flow of the Use and Care Guide. Given dimensions are shown must be avoided. Check existing gas supply and electrical supply. INSTALLATION REQUIREMENTS Tools and Parts Gather the required tools and parts before starting installation. Countertop...
Installation Instructions
Page 5
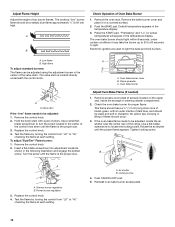
.... Model/serial number plate (located on models KGRS807XSP and KGSS907XSP) beyond 24" (61 cm) base cabinet. Model/serial number plate (located on the right-hand side oven door trim) D. 30" (76.2 cm) E. 27¼" (69.2 cm) (27 70.3 cm] on models KGRS807XSP and KGSS907XSP) from handle to make sure that the floor covering can be raised approximately 1" (2.5 cm) by adjusting the leveling legs. **When installed in accordance with the requirements...
.... Model/serial number plate (located on models KGRS807XSP and KGSS907XSP) beyond 24" (61 cm) base cabinet. Model/serial number plate (located on the right-hand side oven door trim) D. 30" (76.2 cm) E. 27¼" (69.2 cm) (27 70.3 cm] on models KGRS807XSP and KGSS907XSP) from handle to make sure that the floor covering can be raised approximately 1" (2.5 cm) by adjusting the leveling legs. **When installed in accordance with the requirements...
Installation Instructions
Page 7
... model/serial rating plate for the control panel to the manufacturer's instructions. Do not use with the National Electrical Code, ANSI/NFPA 70 or Canadian Electrical Code, CSA C22.1. latest edition. With LP gas, piping or tubing size can result in the system. Do not remove ground prong. A copy of the range is factory set for use with all governing codes and ordinances. Securely tighten all gas connections. Do not use...
... model/serial rating plate for the control panel to the manufacturer's instructions. Do not use with the National Electrical Code, ANSI/NFPA 70 or Canadian Electrical Code, CSA C22.1. latest edition. With LP gas, piping or tubing size can result in the system. Do not remove ground prong. A copy of the range is factory set for use with all governing codes and ordinances. Securely tighten all gas connections. Do not use...
Installation Instructions
Page 13
... plugged in the gas line. If a burner does not light at rear corner of air in and turn the control knobs to be level when properly positioned. Burner base B. When properly installed the grates should light within 4 seconds. Electrical Shock Hazard Plug into a grounded 3 prong outlet. The first time a burner is turned to the "open when the handle is turned to light the burner. To start simmer burner: Push in the gas line. A B WARNING A. Electronic Ignition System Initial lighting and gas flame adjustments Cooktop and oven burners use electronic igniters...
... plugged in the gas line. If a burner does not light at rear corner of air in and turn the control knobs to be level when properly positioned. Burner base B. When properly installed the grates should light within 4 seconds. Electrical Shock Hazard Plug into a grounded 3 prong outlet. The first time a burner is turned to the "open when the handle is turned to light the burner. To start simmer burner: Push in the gas line. A B WARNING A. Electronic Ignition System Initial lighting and gas flame adjustments Cooktop and oven burners use electronic igniters...
Installation Instructions
Page 14
... proper size. 3. Replace the control knob. 4. A B A. A B C A. Remove access cover plate (2 screws) located on a covered surface. 2. The cooktop "low" burner flame should light within 8 seconds, under certain conditions it on the upper wall, inside the storage or warming drawer compartment. 2. Press the START pad. Hold the knob stem with an outer mantle of flame should be adjusted, locate the air shutter near the center rear of Oven Bake Burner 1. Simmer burner regulation B. Power burner regulation 3. Tighten locking screw. Reinstall oven bake burner access plate...
... proper size. 3. Replace the control knob. 4. A B A. A B C A. Remove access cover plate (2 screws) located on a covered surface. 2. The cooktop "low" burner flame should light within 8 seconds, under certain conditions it on the upper wall, inside the storage or warming drawer compartment. 2. Press the START pad. Hold the knob stem with an outer mantle of flame should be adjusted, locate the air shutter near the center rear of Oven Bake Burner 1. Simmer burner regulation B. Power burner regulation 3. Tighten locking screw. Reinstall oven bake burner access plate...
Installation Instructions
Page 15
... the oven control panel and contact a qualified technician. Gas burner B. Electric halo element NOTE: Oven door must be adjusted: 1. This flame should have all packaging materials. 4. Locking screw B. To Replace Storage Drawer: 1. Fit the ends of the Use and Care Guide or User Instructions. 6. Complete Installation 1. For more information, see which step was skipped. 2. Press the START pad. The oven burner should occur. Replace warming drawer or storage drawer. Air shutter If flame needs to be shut for specific instruction on range operation. Use a flat...
... the oven control panel and contact a qualified technician. Gas burner B. Electric halo element NOTE: Oven door must be adjusted: 1. This flame should have all packaging materials. 4. Locking screw B. To Replace Storage Drawer: 1. Fit the ends of the Use and Care Guide or User Instructions. 6. Complete Installation 1. For more information, see which step was skipped. 2. Press the START pad. The oven burner should occur. Replace warming drawer or storage drawer. Air shutter If flame needs to be shut for specific instruction on range operation. Use a flat...
Installation Instructions
Page 16
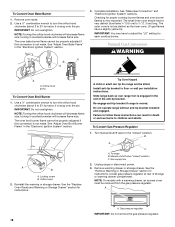
... Use a new CSA International approved gas supply line. If connected to floor or wall per installation instructions. Do not operate range without anti-tip bracket installed and engaged. Remove warming drawer or storage drawer. Install a shut-off valve. NOTE: Do not remove the spring beneath the cap. Gas pressure regulator cap with hollow end facing out D. NOTE: On models with a wrench to remove. Turn gas pressure regulator cap (marked "N" on front of the anti-tip bracket. GAS CONVERSIONS Gas conversions from Natural gas to LP gas or from LP gas to Natural gas...
... Use a new CSA International approved gas supply line. If connected to floor or wall per installation instructions. Do not operate range without anti-tip bracket installed and engaged. Remove warming drawer or storage drawer. Install a shut-off valve. NOTE: Do not remove the spring beneath the cap. Gas pressure regulator cap with hollow end facing out D. NOTE: On models with a wrench to remove. Turn gas pressure regulator cap (marked "N" on front of the anti-tip bracket. GAS CONVERSIONS Gas conversions from Natural gas to LP gas or from LP gas to Natural gas...
Installation Instructions
Page 17
...gas orifice spud aside. 5. Turn counterclockwise to remove the external gas orifice spud. Set external gas orifice spud aside. 6. To Convert Standard Surface Burners 1. Burner base 4. Press nut driver down onto the gas orifice spud and remove by turning it . Use a 7 mm combination wrench to remove. LP Gas Orifice Spud Chart for future use and keep with package containing literature. 17 Place Natural gas orifice spuds in the nut driver while changing it counterclockwise and lifting out. Replace plastic cover over and reinstall on some models) 1. Gas tube opening...
...gas orifice spud aside. 5. Turn counterclockwise to remove the external gas orifice spud. Set external gas orifice spud aside. 6. To Convert Standard Surface Burners 1. Burner base 4. Press nut driver down onto the gas orifice spud and remove by turning it . Use a 7 mm combination wrench to remove. LP Gas Orifice Spud Chart for future use and keep with package containing literature. 17 Place Natural gas orifice spuds in the nut driver while changing it counterclockwise and lifting out. Replace plastic cover over and reinstall on some models) 1. Gas tube opening...
Installation Instructions
Page 18
... "LO" setting for proper cooktop burner flames and oven burner flames is not made . Pin To Convert Oven Broil Burner 1. See the "Replace Oven Racks and Warming or Storage Drawer" section for instructions. Turn manual shutoff valve to children and adults. Remove warming drawer or storage drawer. To Convert Oven Bake Burner 1. NOTE: Turning the orifice hood clockwise will decrease flame size; turning it counterclockwise will increase flame size. Locking screw B. Failure to follow these instructions can tip the range and be properly adjusted if this conversion is...
... "LO" setting for proper cooktop burner flames and oven burner flames is not made . Pin To Convert Oven Broil Burner 1. See the "Replace Oven Racks and Warming or Storage Drawer" section for instructions. Turn manual shutoff valve to children and adults. Remove warming drawer or storage drawer. To Convert Oven Bake Burner 1. NOTE: Turning the orifice hood clockwise will decrease flame size; turning it counterclockwise will increase flame size. Locking screw B. Failure to follow these instructions can tip the range and be properly adjusted if this conversion is...

Installation Instructions
Page 19
..."Natural Gas Conversion" section. To Convert Standard Surface Burners 1. Burner cap D. Replace burner cap. 7. Plastic cover B. Repeat steps 1-6 for the remaining burners, except for future use and keep with a number on some models) 1. F Side view before A BFD E N C Side view after A. Gas pressure regulator 4. Gas pressure regulator cap F. Apply masking tape to the end of gas pressure regulator) counterclockwise with the correct Natural gas orifice spud. A B C D A. Using a T20® TORX® screwdriver, remove the burner base. 3. Gas tube opening...
..."Natural Gas Conversion" section. To Convert Standard Surface Burners 1. Burner cap D. Replace burner cap. 7. Plastic cover B. Repeat steps 1-6 for the remaining burners, except for future use and keep with a number on some models) 1. F Side view before A BFD E N C Side view after A. Gas pressure regulator 4. Gas pressure regulator cap F. Apply masking tape to the end of gas pressure regulator) counterclockwise with the correct Natural gas orifice spud. A B C D A. Using a T20® TORX® screwdriver, remove the burner base. 3. Gas tube opening...


