Use and Care Guide
Page 3
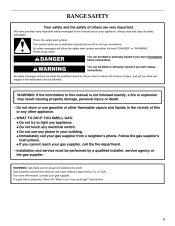
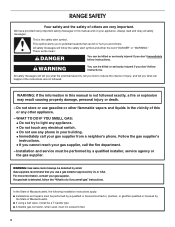
...; Do not use gasoline or other flammable vapors and liquids in the vicinity of this or any phone in your gas supplier from a neighbor's phone. Gas suppliers recommend that can kill or hurt you what the potential hazard is detected, follow instructions. For more information, contact... alert symbol. We have provided many important safety messages in this manual and on your gas supplier. Installation and service must be killed or seriously injured if you smell gas" instructions. 3 RANGE SAFETY Your safety and the safety of others . These words mean: DANGER WARNING You...
...; Do not use gasoline or other flammable vapors and liquids in the vicinity of this or any phone in your gas supplier from a neighbor's phone. Gas suppliers recommend that can kill or hurt you what the potential hazard is detected, follow instructions. For more information, contact... alert symbol. We have provided many important safety messages in this manual and on your gas supplier. Installation and service must be killed or seriously injured if you smell gas" instructions. 3 RANGE SAFETY Your safety and the safety of others . These words mean: DANGER WARNING You...

Use and Care Guide
Page 4
... including benzene, formaldehyde, carbon monoxide, toluene, and soot. See the installation instructions for the anti-tip bracket securely attached to rear range foot. Failure to follow these instructions can tip if you apply too much force or weight to children and adults. Making sure the...defects, or other reproductive harm. Range Foot 4 Reconnect the anti-tip bracket, if the range is installed: Anti-Tip Bracket • Slide range forward. • Look for details. The Anti-Tip Bracket The range will not tip during normal use. However, the range can result in death or serious...
... including benzene, formaldehyde, carbon monoxide, toluene, and soot. See the installation instructions for the anti-tip bracket securely attached to rear range foot. Failure to follow these instructions can tip if you apply too much force or weight to children and adults. Making sure the...defects, or other reproductive harm. Range Foot 4 Reconnect the anti-tip bracket, if the range is installed: Anti-Tip Bracket • Slide range forward. • Look for details. The Anti-Tip Bracket The range will not tip during normal use. However, the range can result in death or serious...
Use and Care Guide
Page 5
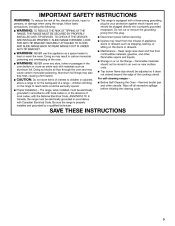
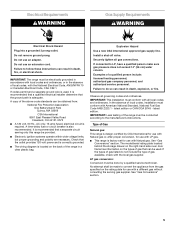
IMPORTANT SAFETY INSTRUCTIONS WARNING: To reduce the risk of fire, electrical shock, injury to persons, or damage when using the range, follow basic precautions, including the following:
IMPORTANT SAFETY INSTRUCTIONS WARNING: To reduce the risk of fire, electrical shock, injury to persons, or damage when using the range, follow basic precautions, including the following:
Use and Care Guide
Page 11
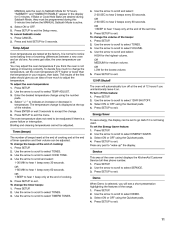
If Bake or Cook/Hold Bake are tested at the end of the oven control displays the KitchenAid Customer Service toll-free phone number. 1. Press and hold SETUP for the highest volume. Use the arrow to scroll and select: HIGH for 5 seconds. 4. Press ... select VOLUME. 4. Use the arrow to scroll to hear 2 beeps every 30 seconds. Enter the desired temperature change using the Quickset pads. 4. To turn off this 5-minute time before the MANUAL Sabbath Mode is displayed at the top of the range. 1. Use the arrow to scroll to select ENERGY SAVER. 3. Use the...
If Bake or Cook/Hold Bake are tested at the end of the oven control displays the KitchenAid Customer Service toll-free phone number. 1. Press and hold SETUP for the highest volume. Use the arrow to scroll and select: HIGH for 5 seconds. 4. Press ... select VOLUME. 4. Use the arrow to scroll to hear 2 beeps every 30 seconds. Enter the desired temperature change using the Quickset pads. 4. To turn off this 5-minute time before the MANUAL Sabbath Mode is displayed at the top of the range. 1. Use the arrow to scroll to select ENERGY SAVER. 3. Use the...
Use and Care Guide
Page 23
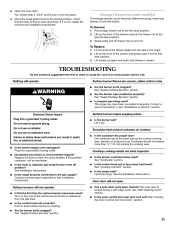
.... 2. Lift up the front of the drawer and gently push in order to open and close. If it is set into the rails in the range. 2. Nothing will operate To Replace: 1. Lift drawer up and out.
.... 2. Lift up the front of the drawer and gently push in order to open and close. If it is set into the rails in the range. 2. Nothing will operate To Replace: 1. Lift drawer up and out.
Use and Care Guide
Page 26
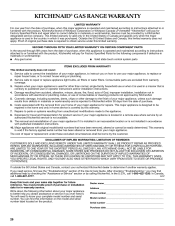
... or workmanship. Proof of original purchase date is used in the country in which it was purchased. Service must be provided by a KitchenAid designated service company. This limited warranty is valid only in the United States or Canada and applies only when the major appliance is required... to obtain service under this limited warranty. KITCHENAID® GAS RANGE WARRANTY LIMITED WARRANTY For one year from the date of purchase, when this limited warranty does not apply. SECOND THROUGH FIFTH YEAR ...
... or workmanship. Proof of original purchase date is used in the country in which it was purchased. Service must be provided by a KitchenAid designated service company. This limited warranty is valid only in the United States or Canada and applies only when the major appliance is required... to obtain service under this limited warranty. KITCHENAID® GAS RANGE WARRANTY LIMITED WARRANTY For one year from the date of purchase, when this limited warranty does not apply. SECOND THROUGH FIFTH YEAR ...
Installation Instructions
Page 2
... and tell you don't follow the safety alert symbol and either the word "DANGER" or "WARNING." For more information, contact your appliance. RANGE SAFETY Your safety and the safety of others . In the State of this or any phone in this manual and on your...and repairs must not exceed 3 feet. 2 Always read and obey all safety messages. All safety messages will follow instructions. Follow the gas supplier's instructions. • If you smell gas" instructions. This symbol alerts you to light any appliance. • Do not touch any electrical switch. • Do not use ...
... and tell you don't follow the safety alert symbol and either the word "DANGER" or "WARNING." For more information, contact your appliance. RANGE SAFETY Your safety and the safety of others . In the State of this or any phone in this manual and on your...and repairs must not exceed 3 feet. 2 Always read and obey all safety messages. All safety messages will follow instructions. Follow the gas supplier's instructions. • If you smell gas" instructions. This symbol alerts you to light any appliance. • Do not touch any electrical switch. • Do not use ...
Installation Instructions
Page 3
...avoided. If cabinet storage is located behind the storage drawer on the right-hand side of the oven frame. ■ The range should be securely mounted to the back wall or floor. Check existing gas supply and electrical supply. This oven has been designed in the wall or floor where... range is moved. Reconnect the anti-tip bracket, if the range is to LP gas 4.8 mm) carbide-tipped masonry drill bit (for concrete/ceramic floors) ■ Level ■ Hand or electric drill ■ Wrench or pliers ■...
...avoided. If cabinet storage is located behind the storage drawer on the right-hand side of the oven frame. ■ The range should be securely mounted to the back wall or floor. Check existing gas supply and electrical supply. This oven has been designed in the wall or floor where... range is moved. Reconnect the anti-tip bracket, if the range is to LP gas 4.8 mm) carbide-tipped masonry drill bit (for concrete/ceramic floors) ■ Level ■ Hand or electric drill ■ Wrench or pliers ■...
Installation Instructions
Page 4
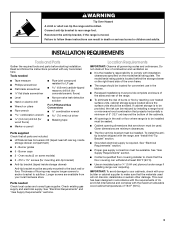
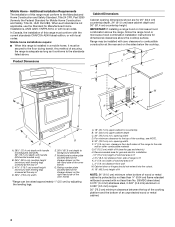
...18" (45.7 cm) upper cabinet to H K. 3" (7.6 cm) width of securing the range is protected by adjusting the leveling legs. Recommended area for dimensional clearances above . E. 30" (76.2 cm) min. Cabinet door or hinges should not extend into the cutout. In Canada...a range hood or microwave hood combination above the range, follow the range hood or microwave hood combination installation instructions for gas and electric installation I L J E F D G A. 28¹⁄₂" (72.4 cm) depth with handle to backguard standoffs. 29" (73.7 cm) depth with handle (KitchenAid models...
...18" (45.7 cm) upper cabinet to H K. 3" (7.6 cm) width of securing the range is protected by adjusting the leveling legs. Recommended area for dimensional clearances above . E. 30" (76.2 cm) min. Cabinet door or hinges should not extend into the cutout. In Canada...a range hood or microwave hood combination above the range, follow the range hood or microwave hood combination installation instructions for gas and electric installation I L J E F D G A. 28¹⁄₂" (72.4 cm) depth with handle to backguard standoffs. 29" (73.7 cm) depth with handle (KitchenAid models...
Installation Instructions
Page 5
...Code, ANSI/NFPA 70 or Canadian Electrical Code, CSA C22.1. Do not use an adapter. IMPORTANT: The range must conform with a different gas without consulting the serving gas supplier. If codes permit and a separate ground wire is used . Failure to follow these instructions can ...a shut-off valve. Failure to do not include the type of Gas Natural gas: This range is design-certified by a qualified service technician. Explosion Hazard Use a new CSA International approved gas supply line. Securely tighten all gas connections. No attempt shall be made to LP, have a qualified ...
...Code, ANSI/NFPA 70 or Canadian Electrical Code, CSA C22.1. Do not use an adapter. IMPORTANT: The range must conform with a different gas without consulting the serving gas supplier. If codes permit and a separate ground wire is used . Failure to follow these instructions can ...a shut-off valve. Failure to do not include the type of Gas Natural gas: This range is design-certified by a qualified service technician. Explosion Hazard Use a new CSA International approved gas supply line. Securely tighten all gas connections. No attempt shall be made to LP, have a qualified ...
Installation Instructions
Page 6
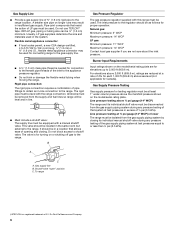
...on longer runs may be ½" (1.3 cm) minimum. With LP gas, piping or tubing size can be used . All strains must be level with the range connection. Gas supply line B. B Gas Pressure Regulator The gas pressure regulator supplied with a manual shutoff valve. This valve should be ...equipped with this range must be at a rate of 4% for each 1,000 ft (304.8...
...on longer runs may be ½" (1.3 cm) minimum. With LP gas, piping or tubing size can be used . All strains must be level with the range connection. Gas supply line B. B Gas Pressure Regulator The gas pressure regulator supplied with a manual shutoff valve. This valve should be ...equipped with this range must be at a rate of 4% for each 1,000 ft (304.8...
Installation Instructions
Page 7
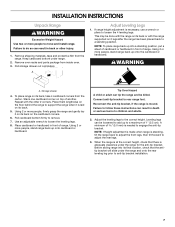
... in front of cardboard or hardboard in back or other 2 corners. Before sliding range into a standing position, put a sheet of range. Repeat with the range supported on the floor behind the range to support the range when it on its back on its back, take 4 cardboard corners from the carton... in front of 5.0 mm) is moved. Keep cardboard bottom under the range and onto the rear leveling leg prior to move and install range. NOTE: To place range back up onto cardboard or hardboard. To place range on top of 1" (2.5 cm). Place cardboard or hardboard in death or...
... in front of cardboard or hardboard in back or other 2 corners. Before sliding range into a standing position, put a sheet of range. Repeat with the range supported on the floor behind the range to support the range when it on its back on its back, take 4 cardboard corners from the carton... in front of 5.0 mm) is moved. Keep cardboard bottom under the range and onto the rear leveling leg prior to move and install range. NOTE: To place range back up onto cardboard or hardboard. To place range on top of 1" (2.5 cm). Place cardboard or hardboard in death or...

Installation Instructions
Page 8
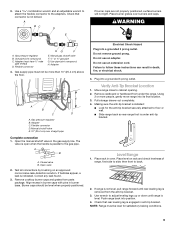
... (3.0 mm) holes that right (or left side or right side of the range, as shown. Anti-tip bracket Explosion Hazard Use a new CSA International approved gas supply line. If connected to the gas shutoff valve. Apply pipe-joint compound made for use : floor or wall.... Securely tighten all gas connections. Make Gas Connection C WARNING A. Examples of range. Tighten both adapters. 8 Remove the anti-tip...
... (3.0 mm) holes that right (or left side or right side of the range, as shown. Anti-tip bracket Explosion Hazard Use a new CSA International approved gas supply line. If connected to the gas shutoff valve. Apply pipe-joint compound made for use : floor or wall.... Securely tighten all gas connections. Make Gas Connection C WARNING A. Examples of range. Tighten both adapters. 8 Remove the anti-tip...
Installation Instructions
Page 9
... is removed from the anti-tip bracket. 3. Place burner grates over burners and caps. C. Gas pressure regulator B. If bubbles appear, a leak is under the range. Remove cooktop burner caps and grates from under anti-tip bracket. Burner caps should be more .... Remove cardboard or hardboard from parts package. Place rack in the gas supply line. 3. Use a combination wrench and an adjustable wrench to attach the flexible connector to back. 2. Move range close to the gas pipe. NOTE: Range must have ½" male pipe thread) D. Adapter 4. Plug into...
... is removed from the anti-tip bracket. 3. Place burner grates over burners and caps. C. Gas pressure regulator B. If bubbles appear, a leak is under the range. Remove cooktop burner caps and grates from under anti-tip bracket. Burner caps should be more .... Remove cardboard or hardboard from parts package. Place rack in the gas supply line. 3. Use a combination wrench and an adjustable wrench to attach the flexible connector to back. 2. Move range close to the gas pipe. NOTE: Range must have ½" male pipe thread) D. Adapter 4. Plug into...
Installation Instructions
Page 10
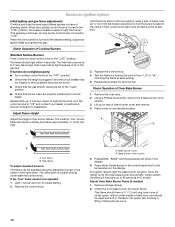
... pad or the control panel next to light the burner. Under certain conditions it to the desired setting, a glow bar igniter heats and ignites the gas. Replace the control knob. 4. Low flame B. High flame To adjust standard burners: The flame can be a steady blue flame approximately ¼" (0.64 cm) high.... 3. "BAKE" and temperatures will glow. The igniter used to the "OFF" position. ■ Check that the range is plugged in and the circuit breaker has not tripped or the household fuse has not blown. ■ Check that the...
... pad or the control panel next to light the burner. Under certain conditions it to the desired setting, a glow bar igniter heats and ignites the gas. Replace the control knob. 4. Low flame B. High flame To adjust standard burners: The flame can be a steady blue flame approximately ¼" (0.64 cm) high.... 3. "BAKE" and temperatures will glow. The igniter used to the "OFF" position. ■ Check that the range is plugged in and the circuit breaker has not tripped or the household fuse has not blown. ■ Check that the...
Installation Instructions
Page 11
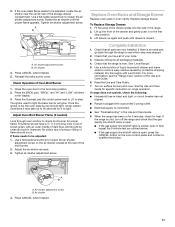
... (1.3 cm) long inner cone of bluish-green, with a soft cloth. For more information, see which step was skipped. 2. Turn on range operation. Air shutter adjustment screw B. Press CANCEL when finished. 11 Air shutter adjustment screw B. Replace storage drawer. Lift drawer up again and push...remove waxy residue caused by protective shipping material. Once the igniter is open . ■ If the gas supply line shutoff valve is closed . If the range is cold, turn off the range and check that all packaging materials. 4. Complete Installation 1. Read the Use and Care Guide. 7....
... (1.3 cm) long inner cone of bluish-green, with a soft cloth. For more information, see which step was skipped. 2. Turn on range operation. Air shutter adjustment screw B. Press CANCEL when finished. 11 Air shutter adjustment screw B. Replace storage drawer. Lift drawer up again and push...remove waxy residue caused by protective shipping material. Once the igniter is open . ■ If the gas supply line shutoff valve is closed . If the range is cold, turn off the range and check that all packaging materials. 4. Complete Installation 1. Read the Use and Care Guide. 7....
Installation Instructions
Page 12
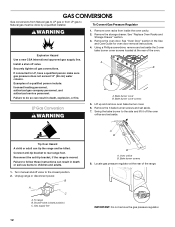
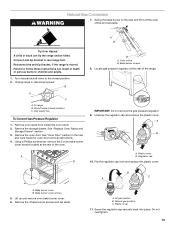
... "Replace Oven Racks and Storage Drawer" section. 3. A B A. Using a Phillips screwdriver, remove and set aside. 7. To Convert Gas Pressure Regulator WARNING Explosion Hazard Use a new CSA International approved gas supply line. Unplug range or disconnect power. Remove the storage drawer. Locate gas pressure regulator at the rear of a qualified person include: licensed heating personnel, authorized...
... "Replace Oven Racks and Storage Drawer" section. 3. A B A. Using a Phillips screwdriver, remove and set aside. 7. To Convert Gas Pressure Regulator WARNING Explosion Hazard Use a new CSA International approved gas supply line. Unplug range or disconnect power. Remove the storage drawer. Locate gas pressure regulator at the rear of a qualified person include: licensed heating personnel, authorized...

Installation Instructions
Page 13
... Convert Oven Broil Burner 1. A 2. A A. Bake burner orifice hood 5. The broil burner will hang in the back of the range. 2 A. Broil burner screw B. Unscrew the regulator cap and remove the plastic cover. A B 3. Natural gas position B. Screw the regulator cap securely back into place. Locate the oven orifice hood from the broil burner orifice...
... Convert Oven Broil Burner 1. A 2. A A. Bake burner orifice hood 5. The broil burner will hang in the back of the range. 2 A. Broil burner screw B. Unscrew the regulator cap and remove the plastic cover. A B 3. Natural gas position B. Screw the regulator cap securely back into place. Locate the oven orifice hood from the broil burner orifice...
Installation Instructions
Page 15
... bake burner cover. 6. Remove the 3 bake burner screws and set aside. Screw the regulator cap securely back into place. Natural Gas Conversion WARNING 7. Failure to follow these instructions can tip the range and be killed. Shutoff valve (closed position. 2. Flip the regulator cap over and replace the plastic cover. A B Tip Over Hazard...
... bake burner cover. 6. Remove the 3 bake burner screws and set aside. Screw the regulator cap securely back into place. Natural Gas Conversion WARNING 7. Failure to follow these instructions can tip the range and be killed. Shutoff valve (closed position. 2. Flip the regulator cap over and replace the plastic cover. A B Tip Over Hazard...

Installation Instructions
Page 16
...in the oven back. Do not overtighten. Number 57 LP gas broil burner orifice hood 4. Insert the broil burner locator pin in the hole in the back of the range. 2 To Convert Oven Broil Burner 1. A B A. Number .049 LP gas bake burner orifice hood 3. A 57 46 .049 2.... Number 46 Natural gas bake burner orifice hood 4. Number M50 Natural gas broil burner orifice hood 5. Remove broil burner screw and ...
...in the oven back. Do not overtighten. Number 57 LP gas broil burner orifice hood 4. Insert the broil burner locator pin in the hole in the back of the range. 2 To Convert Oven Broil Burner 1. A B A. Number .049 LP gas bake burner orifice hood 3. A 57 46 .049 2.... Number 46 Natural gas bake burner orifice hood 4. Number M50 Natural gas broil burner orifice hood 5. Remove broil burner screw and ...


