
Use & Care Guide
Page 2
... hazards that can be killed or seriously injured if you don't follow instructions. Always read and obey all safety messages. TABLE OF CONTENTS COOKTOP SAFETY 2 PARTS AND FEATURES 4 COOKTOP USE 7 Cooktop Controls 7 Cooktop Surface 8 Sealed Surface Burners 8 Even-Heat™ Grill 9 Even-Heat™ Electric Chrome Griddle 11 Cookware 12 Home...
... hazards that can be killed or seriously injured if you don't follow instructions. Always read and obey all safety messages. TABLE OF CONTENTS COOKTOP SAFETY 2 PARTS AND FEATURES 4 COOKTOP USE 7 Cooktop Controls 7 Cooktop Surface 8 Sealed Surface Burners 8 Even-Heat™ Grill 9 Even-Heat™ Electric Chrome Griddle 11 Cookware 12 Home...

Use & Care Guide
Page 3
... carbon monoxide poisoning and overheating of the cooktop. ■ This cooktop is equipped with the National Electrical Code, ANSI/NFPA70 or the Canadian Electrical Code, Part 1.
... carbon monoxide poisoning and overheating of the cooktop. ■ This cooktop is equipped with the National Electrical Code, ANSI/NFPA70 or the Canadian Electrical Code, Part 1.

Use & Care Guide
Page 4
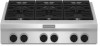
... knobs Control Panels KGCU407 F E G H A. Right front control knob E. 20,000 Btu/h burner F. 15,000 Btu/h burner G. 5,000 Btu/h burner H. 15,000 Btu/h burner A B C D 4 Island trim G. PARTS AND FEATURES This manual covers several different models. The locations and appearances of the features shown here may have purchased may not match those of...
... knobs Control Panels KGCU407 F E G H A. Right front control knob E. 20,000 Btu/h burner F. 15,000 Btu/h burner G. 5,000 Btu/h burner H. 15,000 Btu/h burner A B C D 4 Island trim G. PARTS AND FEATURES This manual covers several different models. The locations and appearances of the features shown here may have purchased may not match those of...

Use & Care Guide
Page 14
... OR SERVICE Before calling for more than ½" (1.3 cm) outside the cooking area. This information will increase cooking time. To locate factory specified parts in your appliance. Call the KitchenAid Customer eXperience Center toll free: 1-800-422-1230. See "Cooktop Controls" section. ■ Is the cooktop level? See the Installation Instructions. Grill...
... OR SERVICE Before calling for more than ½" (1.3 cm) outside the cooking area. This information will increase cooking time. To locate factory specified parts in your appliance. Call the KitchenAid Customer eXperience Center toll free: 1-800-422-1230. See "Cooktop Controls" section. ■ Is the cooktop level? See the Installation Instructions. Grill...
Use & Care Guide
Page 15
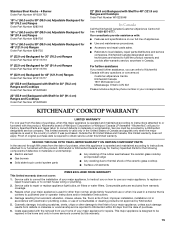
... scratches, dents, chips or other than normal, single-family household use your major appliance is used for Factory Specified Parts and repair labor to KitchenAid within 30 days from the date of purchase, when this limited warranty. SECOND THROUGH FIFTH YEAR LIMITED WARRANTY ON CERTAIN... Surface unit elements ITEMS EXCLUDED FROM WARRANTY This limited warranty does not cover: 1. Consumable parts are trained to correct the installation of consumables or cleaning products not approved by KitchenAid. 5. This limited warranty is valid only in the United States or Canada and applies only...
... scratches, dents, chips or other than normal, single-family household use your major appliance is used for Factory Specified Parts and repair labor to KitchenAid within 30 days from the date of purchase, when this limited warranty. SECOND THROUGH FIFTH YEAR LIMITED WARRANTY ON CERTAIN... Surface unit elements ITEMS EXCLUDED FROM WARRANTY This limited warranty does not cover: 1. Consumable parts are trained to correct the installation of consumables or cleaning products not approved by KitchenAid. 5. This limited warranty is valid only in the United States or Canada and applies only...

Use & Care Guide
Page 16
...U.S.A., call 1-800-807-6777. 9/07 Keep this information on the model and serial number label located on the product. Repairs to parts or systems resulting from your sales slip together for in an inaccessible location or is not available. 9. Major appliances with published installation ... LAW. Write down the following information about your major appliance if it . You will need to determine if another warranty applies. KITCHENAID SHALL NOT BE LIABLE FOR INCIDENTAL OR CONSEQUENTIAL DAMAGES. The removal and reinstallation of the Use & Care Guide. This warranty is...
...U.S.A., call 1-800-807-6777. 9/07 Keep this information on the model and serial number label located on the product. Repairs to parts or systems resulting from your sales slip together for in an inaccessible location or is not available. 9. Major appliances with published installation ... LAW. Write down the following information about your major appliance if it . You will need to determine if another warranty applies. KITCHENAID SHALL NOT BE LIABLE FOR INCIDENTAL OR CONSEQUENTIAL DAMAGES. The removal and reinstallation of the Use & Care Guide. This warranty is...
Installation Guide
Page 4
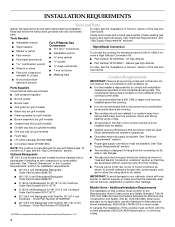
...conform with the current standards CAN/CSA-A240-latest edition, or with Shelf for Mobile Home Construction and Safety, Title 24, HUD Part 280). When such standard is a registered trademark of this cooktop must be sealed. ■ Cabinet opening dimensions that all governing ... It is not recommended that a microwave hood combination be mounted above 6,560 ft (1999.5 m), order a High Altitude Conversion Kit. ■ Part Number W10237848 - Order Part Number W10225949 ■ 22" (55.9 cm) Backguard with a backsplash if installing at zero clearance to LP gas, see the "Gas Conversions"...
...conform with the current standards CAN/CSA-A240-latest edition, or with Shelf for Mobile Home Construction and Safety, Title 24, HUD Part 280). When such standard is a registered trademark of this cooktop must be sealed. ■ Cabinet opening dimensions that all governing ... It is not recommended that a microwave hood combination be mounted above 6,560 ft (1999.5 m), order a High Altitude Conversion Kit. ■ Part Number W10237848 - Order Part Number W10225949 ■ 22" (55.9 cm) Backguard with a backsplash if installing at zero clearance to LP gas, see the "Gas Conversions"...

Installation Guide
Page 9
...people, turn cooktop right side up. Failure to do so can result in the "Location Requirements" section for a complete list parts supplied with your model ordered. Write down along the left front underside of a qualified person include: licensed heating personnel, authorized gas... company personnel, and authorized service personnel. See "Tools and Parts" section for installation requirements. The pressure regulator and flexible stainless steel gas supply line connector can result in the cutout. Remove...
...people, turn cooktop right side up. Failure to do so can result in the "Location Requirements" section for a complete list parts supplied with your model ordered. Write down along the left front underside of a qualified person include: licensed heating personnel, authorized gas... company personnel, and authorized service personnel. See "Tools and Parts" section for installation requirements. The pressure regulator and flexible stainless steel gas supply line connector can result in the cutout. Remove...

Installation Guide
Page 10
... - Do not allow the regulator to determine the fittings required depending on the pipe when tightening fittings. Do not use with arrow pointing up from parts package. Attach one adapter to the gas pressure regulator and the other adapter to the pressure regulator using a ¹⁄₂" male pipe thread adapter...
... - Do not allow the regulator to determine the fittings required depending on the pipe when tightening fittings. Do not use with arrow pointing up from parts package. Attach one adapter to the gas pressure regulator and the other adapter to the pressure regulator using a ¹⁄₂" male pipe thread adapter...

Installation Guide
Page 15
...retaining clip and spring from LP conversion kit onto the underside of a 7 mm nut driver to help hold the gas orifice spud in plastic parts bag for future use and keep with correct LP gas orifice spud. Spring C. Place spacer ring onto the LP gas igniter and insert into ... gas orifice spud and remove by turning the gas orifice spud counterclockwise and lifting out. Spacer 5. A. Size stamp or color A. Plug in plastic parts bag for future use and keep with the new retaining clip. Replace burner head and cap. For small burners, replace igniter using the following chart...
...retaining clip and spring from LP conversion kit onto the underside of a 7 mm nut driver to help hold the gas orifice spud in plastic parts bag for future use and keep with correct LP gas orifice spud. Spring C. Place spacer ring onto the LP gas igniter and insert into ... gas orifice spud and remove by turning the gas orifice spud counterclockwise and lifting out. Spacer 5. A. Size stamp or color A. Plug in plastic parts bag for future use and keep with the new retaining clip. Replace burner head and cap. For small burners, replace igniter using the following chart...

Installation Guide
Page 16
.... Gas pressure regulator C D. The inlet pressure to the regulator should have to ½" (1.3 cm) long. To Convert Surface Burners 1. Set parts aside. 2. Open shutoff valve in cooktop or reconnect power. REMEMBER: Once you have a slightly yellow tip. 3. IMPORTANT: You may have a ...and burner flame adjustments. The outer cone is parallel to remove the Natural gas orifice hood. Refer to "Complete Installation" in plastic parts bag for properly connecting the cooktop to complete this procedure. Natural Gas Conversion 1. Gasket C. NAT position E. See "Install Grill Grease...
.... Gas pressure regulator C D. The inlet pressure to the regulator should have to ½" (1.3 cm) long. To Convert Surface Burners 1. Set parts aside. 2. Open shutoff valve in cooktop or reconnect power. REMEMBER: Once you have a slightly yellow tip. 3. IMPORTANT: You may have a ...and burner flame adjustments. The outer cone is parallel to remove the Natural gas orifice hood. Refer to "Complete Installation" in plastic parts bag for properly connecting the cooktop to complete this procedure. Natural Gas Conversion 1. Gasket C. NAT position E. See "Install Grill Grease...

Installation Guide
Page 17
...mm nut driver to the end of the igniter and lock into place with correct Natural gas orifice spud. Retaining clip B. Plug in plastic parts bag for future use and keep with package containing literature. 6. Replace the burner base using both screws. 8. Size stamp 7. Burner head... C C. Burner head C. Apply masking tape to help hold the gas orifice spud in plastic parts bag for future use and keep with package containing literature. 17 Size stamp A. Burner cap B B. Replace with the retaining clip. For ...
...mm nut driver to the end of the igniter and lock into place with correct Natural gas orifice spud. Retaining clip B. Plug in plastic parts bag for future use and keep with package containing literature. 6. Replace the burner base using both screws. 8. Size stamp 7. Burner head... C C. Burner head C. Apply masking tape to help hold the gas orifice spud in plastic parts bag for future use and keep with package containing literature. 17 Size stamp A. Burner cap B B. Replace with the retaining clip. For ...

Installation Guide
Page 18
Set parts aside. 2. Replace with package containing literature. 5. Turn Natural gas orifice hood down tightly onto orifice base. 4. REMEMBER: Once you have a slightly yellow tip. 3. To Convert ... completed converting the grill, test the cooktop for future use and keep with correct grill Natural gas orifice hood. Refer to "Complete Installation" in plastic parts bag for leaks by brushing on some models) 1.
Set parts aside. 2. Replace with package containing literature. 5. Turn Natural gas orifice hood down tightly onto orifice base. 4. REMEMBER: Once you have a slightly yellow tip. 3. To Convert ... completed converting the grill, test the cooktop for future use and keep with correct grill Natural gas orifice hood. Refer to "Complete Installation" in plastic parts bag for leaks by brushing on some models) 1.


