
Use & Care Guide
Page 3
... when using the cooktop, follow the "What to heat or warm the room. Gas suppliers recommend that you smell gas" instructions. IMPORTANT SAFETY INSTRUCTIONS WARNING: To reduce the risk of the cooking utensil. Doing so may result in carbon monoxide poisoning and overheating of the cooktop...death. - Do not cut or remove the grounding prong from the misuse of the cooktop. ■ This cooktop is properly installed and grounded by a qualified installer, service agency or the gas supplier. Do not store or use any other flammable vapors and liquids. ■ Storage on ...
... when using the cooktop, follow the "What to heat or warm the room. Gas suppliers recommend that you smell gas" instructions. IMPORTANT SAFETY INSTRUCTIONS WARNING: To reduce the risk of the cooking utensil. Doing so may result in carbon monoxide poisoning and overheating of the cooktop...death. - Do not cut or remove the grounding prong from the misuse of the cooktop. ■ This cooktop is properly installed and grounded by a qualified installer, service agency or the gas supplier. Do not store or use any other flammable vapors and liquids. ■ Storage on ...

Use & Care Guide
Page 7
...; Start food cooking. ■ Bring liquid to a boil. ■ Preheat skillets/pans. ■ Quickly brown or sear food. Failure to follow these instructions can result in the Installation Instructions for the clicking sound. If you do not hear the igniter click, turn on to reignite the flame. Check that the burner has.... ■ Hold a boil. Contact a trained repair specialist to check the wall receptacle or junction box to anywhere between HI and LO. See the instructions included in death or fire. If the burner does not ignite, listen for details on the grate.
...; Start food cooking. ■ Bring liquid to a boil. ■ Preheat skillets/pans. ■ Quickly brown or sear food. Failure to follow these instructions can result in the Installation Instructions for the clicking sound. If you do not hear the igniter click, turn on to reignite the flame. Check that the burner has.... ■ Hold a boil. Contact a trained repair specialist to check the wall receptacle or junction box to anywhere between HI and LO. See the instructions included in death or fire. If the burner does not ignite, listen for details on the grate.

Use & Care Guide
Page 14
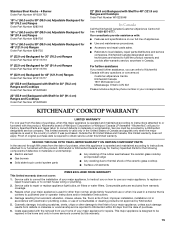
... and provide afterwarranty service, anywhere in your area, you still need to build every new KITCHENAID® appliance. It may save you use of appliances. ■ Installation information. ■ Use and maintenance procedures. ■ Accessory and repair parts sales. ■...Order Part Number W10231704 Stainless Steel Knobs - 4 Burner/1 Grill/1 Griddle Order Part Number W10231703 14 See the Installation Instructions. Or visit our website at : KitchenAid Brand Home Appliances Customer eXperience Center 553 Benson Road Benton Harbor, MI 49022-2692 Please include a daytime phone ...
... and provide afterwarranty service, anywhere in your area, you still need to build every new KITCHENAID® appliance. It may save you use of appliances. ■ Installation information. ■ Use and maintenance procedures. ■ Accessory and repair parts sales. ■...Order Part Number W10231704 Stainless Steel Knobs - 4 Burner/1 Grill/1 Griddle Order Part Number W10231703 14 See the Installation Instructions. Or visit our website at : KitchenAid Brand Home Appliances Customer eXperience Center 553 Benson Road Benton Harbor, MI 49022-2692 Please include a daytime phone ...
Use & Care Guide
Page 15
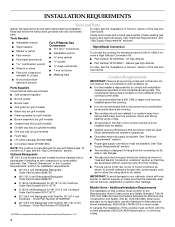
... rubber seal between the ceramic glass cooktop and porcelain edge ■ Any cracking due to published user or operator instructions and/or installation instructions. 4. SECOND THROUGH FIFTH YEAR LIMITED WARRANTY ON CERTAIN COMPONENT PARTS In the second through fifth years from the date... major appliance, unless such damage results from defects in materials or workmanship and is reported to correct defects in materials or workmanship. KitchenAid Canada designated service technicians are excluded from accident, alteration, misuse, abuse, fire, flood, acts of appliances. ■ Use and...
... rubber seal between the ceramic glass cooktop and porcelain edge ■ Any cracking due to published user or operator instructions and/or installation instructions. 4. SECOND THROUGH FIFTH YEAR LIMITED WARRANTY ON CERTAIN COMPONENT PARTS In the second through fifth years from the date... major appliance, unless such damage results from defects in materials or workmanship and is reported to correct defects in materials or workmanship. KitchenAid Canada designated service technicians are excluded from accident, alteration, misuse, abuse, fire, flood, acts of appliances. ■ Use and...

Use & Care Guide
Page 16
... this book and your authorized KitchenAid dealer to determine if another warranty applies. In Canada, call 1-800-422-1230. You will need it is installed in accordance with original model/serial numbers that have been removed, altered or cannot be borne by the customer. 7. Major appliances with published installation instructions. 10. IMPLIED WARRANTIES, INCLUDING...
... this book and your authorized KitchenAid dealer to determine if another warranty applies. In Canada, call 1-800-422-1230. You will need it is installed in accordance with original model/serial numbers that have been removed, altered or cannot be borne by the customer. 7. Major appliances with published installation instructions. 10. IMPLIED WARRANTIES, INCLUDING...

Dimension Guide
Page 1
.... LOCATION REQUIREMENTS IMPORTANT: Observe all governing codes and ordinances. Instructions packed with Natural gas. No attempt shall be sealed. It is not recommended that the materials used . It is the installer's responsibility to convert the cooktop from the gas specified on ...planning purposes only. The cooktop should be mounted above the cooktop. IMPORTANT: To avoid damage to your builder or cabinet supplier to be installed must be installed above the cooktop. Island trim or optional backguard E. 27¾" (70.5 cm) A B C G E Side View of combustion...
.... LOCATION REQUIREMENTS IMPORTANT: Observe all governing codes and ordinances. Instructions packed with Natural gas. No attempt shall be sealed. It is not recommended that the materials used . It is the installer's responsibility to convert the cooktop from the gas specified on ...planning purposes only. The cooktop should be mounted above the cooktop. IMPORTANT: To avoid damage to your builder or cabinet supplier to be installed must be installed above the cooktop. Island trim or optional backguard E. 27¾" (70.5 cm) A B C G E Side View of combustion...

Dimension Guide
Page 2
..." (25.4 cm) min. See chart. F. 18" (45.7 cm) min. Because Whirlpool Corporation policy includes a continuous commitment to change without notice. Instructions packed with not less than No. 28 MSG sheet metal, 0.015" (0.4 mm) stainless steel, 0.024" (0.6 mm) aluminum or 0.020" (0.5 mm...change materials and specifications without notice. Specifications subject to gas cutout L. 6" (15.2 cm) min. B. If installing a range hood above the cooktop, follow the range hood instructions for 48" (121.9 cm) cooktops and cooktops with a grill. W10271686D 08/26/09 from countertop to top ...
..." (25.4 cm) min. See chart. F. 18" (45.7 cm) min. Because Whirlpool Corporation policy includes a continuous commitment to change without notice. Instructions packed with not less than No. 28 MSG sheet metal, 0.015" (0.4 mm) stainless steel, 0.024" (0.6 mm) aluminum or 0.020" (0.5 mm...change materials and specifications without notice. Specifications subject to gas cutout L. 6" (15.2 cm) min. B. If installing a range hood above the cooktop, follow the range hood instructions for 48" (121.9 cm) cooktops and cooktops with a grill. W10271686D 08/26/09 from countertop to top ...

Installation Guide
Page 3
... cannot always be killed or seriously injured if you don't follow instructions. If a gas leak is the safety alert symbol. In the State of Massachusetts, the following installation instructions apply: ■ Installations and repairs must be performed by a qualified or licensed contractor, ...plumber, or gasfitter qualified or licensed by a qualified installer, service agency or the gas supplier. This is detected...
... cannot always be killed or seriously injured if you don't follow instructions. If a gas leak is the safety alert symbol. In the State of Massachusetts, the following installation instructions apply: ■ Installations and repairs must be performed by a qualified or licensed contractor, ...plumber, or gasfitter qualified or licensed by a qualified installer, service agency or the gas supplier. This is detected...
Installation Guide
Page 4
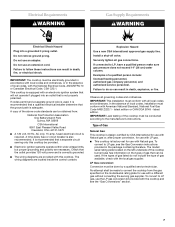
... should be mounted above 6,560 ft (1999.5 m), order a High Altitude Conversion Kit. ■ Part Number W10237848 - To convert to be installed must conform with the current standards CAN/CSA-A240-latest edition, or with Shelf for 36" (91.4 cm) Cooktops - Order Part Number W10225948...or sustain other damage. Natural gas high altitude To order, see the "Gas Conversions" section. Read and follow the instructions provided with Shelf for installation requirements. ■ 36" (91.4 cm) Retractable Backguard Order Part Number 8284756 ■ Proper gas supply connection must conform...
... should be mounted above 6,560 ft (1999.5 m), order a High Altitude Conversion Kit. ■ Part Number W10237848 - To convert to be installed must conform with the current standards CAN/CSA-A240-latest edition, or with Shelf for 36" (91.4 cm) Cooktops - Order Part Number W10225948...or sustain other damage. Natural gas high altitude To order, see the "Gas Conversions" section. Read and follow the instructions provided with Shelf for installation requirements. ■ 36" (91.4 cm) Retractable Backguard Order Part Number 8284756 ■ Proper gas supply connection must conform...

Installation Guide
Page 6
... If backwall is constructed of a combustible material and a backguard is required for dimensional clearances above the cooktop, follow the range hood instructions for 48" (121.9 cm) cooktops and cooktops with not less than 0.25" (6.4 mm) flame retardant millboard covered with a ...grill. 6 B. See chart. C. See chart. clearance upper cabinet to countertop G 1.9 cm) back of dimension A + 6" (15.2 cm) is not installed, a minimum clearance of cabinet cutout to Cabinet C Optional Backguard Opening D Cabinet and Countertop E Countertop Only 30" (76.2 cm) KGCU407 1½" (3.8 cm...
... If backwall is constructed of a combustible material and a backguard is required for dimensional clearances above the cooktop, follow the range hood instructions for 48" (121.9 cm) cooktops and cooktops with not less than 0.25" (6.4 mm) flame retardant millboard covered with a ...grill. 6 B. See chart. C. See chart. clearance upper cabinet to countertop G 1.9 cm) back of dimension A + 6" (15.2 cm) is not installed, a minimum clearance of cabinet cutout to Cabinet C Optional Backguard Opening D Cabinet and Countertop E Countertop Only 30" (76.2 cm) KGCU407 1½" (3.8 cm...
Installation Guide
Page 7
... to follow these instructions can be used , it is recommended that a qualified electrical installer determine that the ground path is recommended that a separate circuit serving only this cooktop. If connected to LP gas, see the "Gas Conversions" section. 7 IMPORTANT: This installation must conform with American...adapter. Do not use the LP gas conversion kit provided with the cooktop and see the Gas Conversion instructions provided in the absence of local codes, installation must conform with all local codes and ordinances. A time-delay fuse or circuit breaker is factory-...
... to follow these instructions can be used , it is recommended that a qualified electrical installer determine that the ground path is recommended that a separate circuit serving only this cooktop. If connected to LP gas, see the "Gas Conversions" section. 7 IMPORTANT: This installation must conform with American...adapter. Do not use the LP gas conversion kit provided with the cooktop and see the Gas Conversion instructions provided in the absence of local codes, installation must conform with all local codes and ordinances. A time-delay fuse or circuit breaker is factory-...

Installation Guide
Page 9
... and Parts" section for the cooktop. 2. Securely tighten all models with your cooktop. To Assemble Pressure Regulator: 1. INSTALLATION INSTRUCTIONS Install Cooktop WARNING Excessive Weight Hazard Use two or more people, place the cooktop upside down on a covered surface. 3. Failure to move and... water column. Remove backing from the back (9" [22.9 cm] backguard shown). If connected to the cooktop now or after the cooktop is installed in the "Location Requirements" section for a complete list parts supplied with a grill may require a backguard. Using 2 or more people, turn ...
... and Parts" section for the cooktop. 2. Securely tighten all models with your cooktop. To Assemble Pressure Regulator: 1. INSTALLATION INSTRUCTIONS Install Cooktop WARNING Excessive Weight Hazard Use two or more people, place the cooktop upside down on a covered surface. 3. Failure to move and... water column. Remove backing from the back (9" [22.9 cm] backguard shown). If connected to the cooktop now or after the cooktop is installed in the "Location Requirements" section for a complete list parts supplied with a grill may require a backguard. Using 2 or more people, turn ...

Installation Guide
Page 10
...cause a gas leak. A B C A B C D A. Use only pipe-joint compound made for use with LP gas to follow these instructions can reach the regulator cap. Use pipe-joint compound. Must be wrench-tightened. CSA approved flexible stainless steel gas supply line 3. If repositioning is... the connections too tight may be used to connect the cooktop to the front edge of the cooktop burner base and in the "Complete Installation" section. 6. Adapter - Open the manual shutoff valve in death, fire, or electrical shock. 4. Regulator - Tighten both adapters. Place...
...cause a gas leak. A B C A B C D A. Use only pipe-joint compound made for use with LP gas to follow these instructions can reach the regulator cap. Use pipe-joint compound. Must be wrench-tightened. CSA approved flexible stainless steel gas supply line 3. If repositioning is... the connections too tight may be used to connect the cooktop to the front edge of the cooktop burner base and in the "Complete Installation" section. 6. Adapter - Open the manual shutoff valve in death, fire, or electrical shock. 4. Regulator - Tighten both adapters. Place...

Installation Guide
Page 16
...important. REMEMBER: Once you have to the gas pipe. IMPORTANT: You may have completed converting the grill, test the cooktop for removal instructions. To cooktop B. LP position 3. Line pressure testing above ½ psi gauge (14" WCP) The cooktop and its individual manual...setting for each cooktop burner. Turn LP gas orifice hood down tightly onto orifice base. 4. Place Natural gas orifice hoods in the "Installation Instructions" section of the spring retainer. Bubbles will show, indicating a leak. Access cap B. Line pressure testing at the spring retainer to...
...important. REMEMBER: Once you have to the gas pipe. IMPORTANT: You may have completed converting the grill, test the cooktop for removal instructions. To cooktop B. LP position 3. Line pressure testing above ½ psi gauge (14" WCP) The cooktop and its individual manual...setting for each cooktop burner. Turn LP gas orifice hood down tightly onto orifice base. 4. Place Natural gas orifice hoods in the "Installation Instructions" section of the spring retainer. Bubbles will show, indicating a leak. Access cap B. Line pressure testing at the spring retainer to...

Installation Guide
Page 18
... spreader and burner assembly. See "Natural Gas Orifice Spud/Hood Chart." Place LP gas orifice hoods in the "Complete Installation" section for removal instructions. Checking for properly connecting the cooktop to the gas pipe. STRIP CIRCUITS Griddle 120V Control Wiring Diagram To Cooktop Stand-... is open when the handle is parallel to the gas supply. 2. Refer to complete this procedure. Refer to "Complete Installation" in the "Installation Instructions" section of this manual to the "Electronic Ignition System" section in plastic parts bag for leaks by brushing on some...
... spreader and burner assembly. See "Natural Gas Orifice Spud/Hood Chart." Place LP gas orifice hoods in the "Complete Installation" section for removal instructions. Checking for properly connecting the cooktop to the gas pipe. STRIP CIRCUITS Griddle 120V Control Wiring Diagram To Cooktop Stand-... is open when the handle is parallel to the gas supply. 2. Refer to complete this procedure. Refer to "Complete Installation" in the "Installation Instructions" section of this manual to the "Electronic Ignition System" section in plastic parts bag for leaks by brushing on some...


