
Use & Care Guide
Page 3
... or use gasoline or other flammable vapors and liquids in the absence of this or any phone in carbon monoxide poisoning and overheating of the cooking utensil. Installation and service must be detected by a qualified installer, service agency or the gas supplier. WARNING: Gas leaks cannot always be electrically grounded in...
... or use gasoline or other flammable vapors and liquids in the absence of this or any phone in carbon monoxide poisoning and overheating of the cooking utensil. Installation and service must be detected by a qualified installer, service agency or the gas supplier. WARNING: Gas leaks cannot always be electrically grounded in...

Use & Care Guide
Page 7
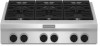
.... Push in and turn knob counterclockwise to LITE. Sparking may continue. See the instructions included in the room is factory-set for cooking smaller quantities of food or liquid, and using large pots and pans. To Set: 1. Only the burner with the control knob ...000 Btu/h Professional Burner SETTING RECOMMENDED USE LITE (Light) ■ Light the burner. If the draft in the Installation Instructions for cooking large quantities of food and melting chocolate or butter. IMPORTANT: Your cooktop is not removed, occasional sparking may also occasionally occur when using...
.... Push in and turn knob counterclockwise to LITE. Sparking may continue. See the instructions included in the room is factory-set for cooking smaller quantities of food or liquid, and using large pots and pans. To Set: 1. Only the burner with the control knob ...000 Btu/h Professional Burner SETTING RECOMMENDED USE LITE (Light) ■ Light the burner. If the draft in the Installation Instructions for cooking large quantities of food and melting chocolate or butter. IMPORTANT: Your cooktop is not removed, occasional sparking may also occasionally occur when using...

Use & Care Guide
Page 8
SETTING MED (Medium) LO (Low) RECOMMENDED USE ■ Fry or sauté foods. ■ Hold a boil. ■ Cook soups, sauces and gravies. ■ Stew or steam foods. 5,000 Btu/h Simmer/Melt Burner SETTING RECOMMENDED USE LITE (Light) ■ Light the burner. After... Burner ports: Check burner flames occasionally for the burner to enter the gas opening by always using a surface burner. Burner cap B B. HI (High) ■ Cook soups, sauces and gravies. ■ Stew or steam foods. REMEMBER: When range is blue in use will help keep the burner cap in place when...
SETTING MED (Medium) LO (Low) RECOMMENDED USE ■ Fry or sauté foods. ■ Hold a boil. ■ Cook soups, sauces and gravies. ■ Stew or steam foods. 5,000 Btu/h Simmer/Melt Burner SETTING RECOMMENDED USE LITE (Light) ■ Light the burner. After... Burner ports: Check burner flames occasionally for the burner to enter the gas opening by always using a surface burner. Burner cap B B. HI (High) ■ Cook soups, sauces and gravies. ■ Stew or steam foods. REMEMBER: When range is blue in use will help keep the burner cap in place when...

Use & Care Guide
Page 9
... grill to grill foods. To Remove: 1. Flame spreader E. A B C D A. Turn on some models) ■ Do not leave the grill unattended while cooking. ■ To avoid damage to the grill, do not use aluminum foil, charcoal or wood chips. ■ To avoid damage to the "Grill Chart" for...burner yourself. Grill grate B. Burner assembly D. If the burner does not light, check cap alignment. Grease tray connection C. Food should be cooked directly on the grill. Crowding food will avoid loss of meats and poultry, use . To remove the small grease tray, unhook tabs ...
... grill to grill foods. To Remove: 1. Flame spreader E. A B C D A. Turn on some models) ■ Do not leave the grill unattended while cooking. ■ To avoid damage to the grill, do not use aluminum foil, charcoal or wood chips. ■ To avoid damage to the "Grill Chart" for...burner yourself. Grill grate B. Burner assembly D. If the burner does not light, check cap alignment. Grease tray connection C. Food should be cooked directly on the grill. Crowding food will avoid loss of meats and poultry, use . To remove the small grease tray, unhook tabs ...

Use & Care Guide
Page 10
... are guides to 4 seconds. If desired, apply a light coating of the drip tray. Push in 1 to assure correct placement of vegetable oil or nonstick cooking spray to LITE/HI. Turn knob to preheat for 15 minutes. 4. D A. Slots 10 3. A. There are installed properly, the small grease tray will ...tray on the right front side of the grill basin, then the rear tabs into place. Turn knob to MED and allow grill to desired cook setting. Grease tray connection C. Front tabs and slots B. The flame will hook over the large grease tray. Clean basin. Place the grill...
... are guides to 4 seconds. If desired, apply a light coating of the drip tray. Push in 1 to assure correct placement of vegetable oil or nonstick cooking spray to LITE/HI. Turn knob to preheat for 15 minutes. 4. D A. Slots 10 3. A. There are installed properly, the small grease tray will ...tray on the right front side of the grill basin, then the rear tabs into place. Turn knob to MED and allow grill to desired cook setting. Grease tray connection C. Front tabs and slots B. The flame will hook over the large grease tray. Clean basin. Place the grill...

Use & Care Guide
Page 11
... To avoid scratching the griddle, do not place any pots or pans on and off and let cool. 2. Rinse griddle with paper towels to clean cooking surface. ■ Remove plastic film and clean with hot water. 6. Dry griddle, drip tray and area below . Griddle The Even-Heat™ chrome... (on a hot griddle may warp the griddle, resulting in and turn off when the griddle has finished preheating. To Use: 1. Push in an uneven cooking surface. Allow griddle to desired temperature. 3. The griddle light will turn on the griddle. ■ To avoid scratching the griddle, use only heat resistant...
... To avoid scratching the griddle, do not place any pots or pans on and off and let cool. 2. Rinse griddle with paper towels to clean cooking surface. ■ Remove plastic film and clean with hot water. 6. Dry griddle, drip tray and area below . Griddle The Even-Heat™ chrome... (on a hot griddle may warp the griddle, resulting in and turn off when the griddle has finished preheating. To Use: 1. Push in an uneven cooking surface. Allow griddle to desired temperature. 3. The griddle light will turn on the griddle. ■ To avoid scratching the griddle, use only heat resistant...

Use & Care Guide
Page 12
... for browning and frying. ■ Maintains heat for the most cooking tasks. This allows time for slow cooking. Damage may be of cooking. ■ Medium or heavy thickness is cool. Cleaning Method: ■ KitchenAid® Stainless Steel Cleaner and Polish: See "Assistance or Service"... section to medium heat settings. Do not clean in how quickly and evenly heat is transferred, which affects cooking results. Cookware material is cool. COOKWARE ...
... for browning and frying. ■ Maintains heat for the most cooking tasks. This allows time for slow cooking. Damage may be of cooking. ■ Medium or heavy thickness is cool. Cleaning Method: ■ KitchenAid® Stainless Steel Cleaner and Polish: See "Assistance or Service"... section to medium heat settings. Do not clean in how quickly and evenly heat is transferred, which affects cooking results. Cookware material is cool. COOKWARE ...

Use & Care Guide
Page 13
.... ■ Is propane gas being used ? Contact a trained repair specialist. Surface burner makes popping noises ■ Is the burner wet? NOTE: When replacing knobs after cooking is completed and the burner has been turned off. ■ While still warm, use a soft bristle barbecue brush to loosen soil. Cleaning Method: ■ Soap...
.... ■ Is propane gas being used ? Contact a trained repair specialist. Surface burner makes popping noises ■ Is the burner wet? NOTE: When replacing knobs after cooking is completed and the burner has been turned off. ■ While still warm, use a soft bristle barbecue brush to loosen soil. Cleaning Method: ■ Soap...

Use & Care Guide
Page 14
... respond to order replacement parts, we recommend that you need replacement parts If you use of your nearest KitchenAid designated service center. Go to cook? Excessive heat around cookware on "Shopping Options." Space food evenly across the grill grates. ■ Are...; Is the cookware the proper size? These factory specified parts will increase cooking time. Accessories Accessories U.S.A. KitchenAid® Stainless Steel Cleaner and Polish Order Part Number 4396920 KitchenAid® Stainless Steel Wipes Order Part Number 8212510 Cooktop Cleaner Order Part Number...
... respond to order replacement parts, we recommend that you need replacement parts If you use of your nearest KitchenAid designated service center. Go to cook? Excessive heat around cookware on "Shopping Options." Space food evenly across the grill grates. ■ Are...; Is the cookware the proper size? These factory specified parts will increase cooking time. Accessories Accessories U.S.A. KitchenAid® Stainless Steel Cleaner and Polish Order Part Number 4396920 KitchenAid® Stainless Steel Wipes Order Part Number 8212510 Cooktop Cleaner Order Part Number...

Dimension Guide
Page 2
... Back Wall B* Cooktop to gas cutout L. 6" (15.2 cm) min. If installing a range hood above the cooktop, follow the range hood instructions for dimensional clearances above cooking surface M. 24" (61.0 cm) cabinet depth N. 7¼" (18.4 cm) cabinet depth to improve Dimensions are for zero clearance *NOTES: Dimension "B" can be equal on rear...
... Back Wall B* Cooktop to gas cutout L. 6" (15.2 cm) min. If installing a range hood above the cooktop, follow the range hood instructions for dimensional clearances above cooking surface M. 24" (61.0 cm) cabinet depth N. 7¼" (18.4 cm) cabinet depth to improve Dimensions are for zero clearance *NOTES: Dimension "B" can be equal on rear...

Installation Guide
Page 6
... than 0.25" (6.4 mm) flame retardant millboard covered with a grill. 6 If installing a range hood above the cooktop, follow the range hood instructions for dimensional clearances above cooking surface M. 24" (61.0 cm) cabinet depth N. 7¹⁄₄" (18.4 cm) cabinet depth to countertop O. See chart. See chart. E. Cabinet Requirements C O D N E P F L J K D E C G H I . 12½" (31.7 cm...
... than 0.25" (6.4 mm) flame retardant millboard covered with a grill. 6 If installing a range hood above the cooktop, follow the range hood instructions for dimensional clearances above cooking surface M. 24" (61.0 cm) cabinet depth N. 7¹⁄₄" (18.4 cm) cabinet depth to countertop O. See chart. See chart. E. Cabinet Requirements C O D N E P F L J K D E C G H I . 12½" (31.7 cm...


