
Use & Care Guide
Page 4
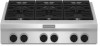
... control knob B. Drip tray (on some models) E. Commercial style die cast metal control knobs B. Culinary ledge C. Right rear control knob D. Island trim G. Heavy-duty single grate design D.
... control knob B. Drip tray (on some models) E. Commercial style die cast metal control knobs B. Culinary ledge C. Right rear control knob D. Island trim G. Heavy-duty single grate design D.

Use & Care Guide
Page 7
...20,000 Btu/h Ultra Power™ Dual-Flame Burner SETTING RECOMMENDED USE LITE (Light) ■ Light the burner. When the flame comes back on the grate. Fire Hazard Do not let the burner flame extend beyond the edge of flame. Failure to a boil. ■ Preheat skillets/pans. ■ Quickly ...for accurate simmer control and cooking of smaller quantities of burners are turned to provide the highest heat and is ideal for details on the grate. If you wish to LITE will become grounded and occasionally click, even after the burner has ignited. Check that the burner has lit....
...20,000 Btu/h Ultra Power™ Dual-Flame Burner SETTING RECOMMENDED USE LITE (Light) ■ Light the burner. When the flame comes back on the grate. Fire Hazard Do not let the burner flame extend beyond the edge of flame. Failure to a boil. ■ Preheat skillets/pans. ■ Quickly ...for accurate simmer control and cooking of smaller quantities of burners are turned to provide the highest heat and is ideal for details on the grate. If you wish to LITE will become grounded and occasionally click, even after the burner has ignited. Check that the burner has lit....

Use & Care Guide
Page 8
...B B. Burner base 5,000 Btu/h Simmer/Melt A Burner A. To Clean: IMPORTANT: Before cleaning, make sure all controls are off the cooktop, grates and caps after a spillover and routinely remove and clean the caps according to light properly. These spills may become hot. Burner cap B. Correct 8... Burner cap B B. A good flame is cool. Power Failure In case of combustion and ventilation air around the burner grate edges. Sealed Surface Burners 20,000 Btu/h Ultra Power™ A Dual-Flame Burner A. Always clean the burner cap after each use or ...
...B B. Burner base 5,000 Btu/h Simmer/Melt A Burner A. To Clean: IMPORTANT: Before cleaning, make sure all controls are off the cooktop, grates and caps after a spillover and routinely remove and clean the caps according to light properly. These spills may become hot. Burner cap B. Correct 8... Burner cap B B. A good flame is cool. Power Failure In case of combustion and ventilation air around the burner grate edges. Sealed Surface Burners 20,000 Btu/h Ultra Power™ A Dual-Flame Burner A. Always clean the burner cap after each use or ...

Use & Care Guide
Page 9
5,000 Btu/h Simmer/Melt Burner A B A. If the burner does not light, check cap alignment. Grill grate B. Lift up and out to disengage it from the large grease tray. Large grease tray B. Unhook tabs from the rear slots... is used to avoid curling. ■ Allow space between food on the grill grate. Large grease tray B. Drip tray The grill module consists of a cast-iron grate, a wave tray, a flame spreader, a burner assembly, 2 grease trays and a drip tray. Remove grill grate and wave tray. 2. B A A. Incorrect B. Slit the remaining fat on the burner. B A B D ...
5,000 Btu/h Simmer/Melt Burner A B A. If the burner does not light, check cap alignment. Grill grate B. Lift up and out to disengage it from the large grease tray. Large grease tray B. Unhook tabs from the rear slots... is used to avoid curling. ■ Allow space between food on the grill grate. Large grease tray B. Drip tray The grill module consists of a cast-iron grate, a wave tray, a flame spreader, a burner assembly, 2 grease trays and a drip tray. Remove grill grate and wave tray. 2. B A A. Incorrect B. Slit the remaining fat on the burner. B A B D ...

Use & Care Guide
Page 10
... it into slots at the front of the drip tray. Rear tabs and slots 6. Large grease tray B. When the 2 grease trays are guides to grill grate. 3. Push in 1 to preheat for 15 minutes. 4. Turn knob to LITE/HI. D A. Slots 10 Insert front tabs of the flame spreader into the slots. Insert... the small grease tray all the way under the front of the grill basin and hook it into place. Place the grill grate into the rear slots. Place food on overhead range hood. 2. Grease tray connection C. Place the wave tray on the right front side of the ...
... it into slots at the front of the drip tray. Rear tabs and slots 6. Large grease tray B. When the 2 grease trays are guides to grill grate. 3. Push in 1 to preheat for 15 minutes. 4. Turn knob to LITE/HI. D A. Slots 10 Insert front tabs of the flame spreader into the slots. Insert... the small grease tray all the way under the front of the grill basin and hook it into place. Place the grill grate into the rear slots. Place food on overhead range hood. 2. Grease tray connection C. Place the wave tray on the right front side of the ...

Use & Care Guide
Page 12
...-heavy thickness. COOKWARE CHARACTERISTICS Aluminum ■ Heats quickly and evenly. ■ Suitable for cookware material characteristics. Cleaning Method: ■ KitchenAid® Stainless Steel Cleaner and Polish: See "Assistance or Service" section to medium heat settings. These spills may remove numbers. Cleaning ... in cookware. Copper ■ Heats very quickly and evenly. Home Canning When canning for most recently used as cooktop, grates and caps are off and the cooktop is cool. Soap, water and a soft cloth or sponge are in dishwasher. STAINLESS...
...-heavy thickness. COOKWARE CHARACTERISTICS Aluminum ■ Heats quickly and evenly. ■ Suitable for cookware material characteristics. Cleaning Method: ■ KitchenAid® Stainless Steel Cleaner and Polish: See "Assistance or Service" section to medium heat settings. These spills may remove numbers. Cleaning ... in cookware. Copper ■ Heats very quickly and evenly. Home Canning When canning for most recently used as cooktop, grates and caps are off and the cooktop is cool. Soap, water and a soft cloth or sponge are in dishwasher. STAINLESS...

Use & Care Guide
Page 13
...nonabrasive pad. Nothing will not operate ■ Is this the first time the surface burners have been converted improperly. Grill Grate Do not clean grill grate in water. ■ Soap and water or nonabrasive cleanser. ■ Damp cloth or nonabrasive pad. TROUBLESHOOTING Try the ...water. ■ Nonabrasive pad or sponge. ■ For heavy soil, soak paper towels in a self-cleaning oven. ■ Clean the grill grate shortly after removing food and the griddle has cooled down. After soaking, scrub with caps, are replaced to loosen soil. Cleaning Method: ■ ...
...nonabrasive pad. Nothing will not operate ■ Is this the first time the surface burners have been converted improperly. Grill Grate Do not clean grill grate in water. ■ Soap and water or nonabrasive cleanser. ■ Damp cloth or nonabrasive pad. TROUBLESHOOTING Try the ...water. ■ Nonabrasive pad or sponge. ■ For heavy soil, soak paper towels in a self-cleaning oven. ■ Clean the grill grate shortly after removing food and the griddle has cooled down. After soaking, scrub with caps, are replaced to loosen soil. Cleaning Method: ■ ...

Use & Care Guide
Page 14
...; Stainless Steel Cleaner and Polish Order Part Number 4396920 KitchenAid® Stainless Steel Wipes Order Part Number 8212510 Cooktop Cleaner Order Part Number 31464 Cooktop Protectant Order Part Number 31463 Gas Grate/Drip Pan Cleaner Order Part Number 31617 All-Purpose Appliance ...cookware on "Shopping Options." Thoroughly defrost foods. See "Cookware" section. ■ Is the control knob set to build every new KITCHENAID® appliance. See the Installation Instructions. If you can also look in the United States. For further assistance If you need further...
...; Stainless Steel Cleaner and Polish Order Part Number 4396920 KitchenAid® Stainless Steel Wipes Order Part Number 8212510 Cooktop Cleaner Order Part Number 31464 Cooktop Protectant Order Part Number 31463 Gas Grate/Drip Pan Cleaner Order Part Number 31617 All-Purpose Appliance ...cookware on "Shopping Options." Thoroughly defrost foods. See "Cookware" section. ■ Is the control knob set to build every new KITCHENAID® appliance. See the Installation Instructions. If you can also look in the United States. For further assistance If you need further...
Installation Guide
Page 4
..." section for Mobile Home Construction and Safety, Title 24, HUD Part 280). Additional Installation Requirements The installation of the cooktop burner base. ■ Burner grates ■ Burner caps ■ It is recommended that a 600 CFM or larger vent hood be installed above the cooktop. ■ Grill... grate (on grill models) ■ Wave tray (on grill models) ■ Flame spreader (on grill models) ■ Burner assembly (on the underside of this cooktop ...
..." section for Mobile Home Construction and Safety, Title 24, HUD Part 280). Additional Installation Requirements The installation of the cooktop burner base. ■ Burner grates ■ Burner caps ■ It is recommended that a 600 CFM or larger vent hood be installed above the cooktop. ■ Grill... grate (on grill models) ■ Wave tray (on grill models) ■ Flame spreader (on grill models) ■ Burner assembly (on the underside of this cooktop ...

Installation Guide
Page 10
...thread D. Manual gas shutoff valve Complete Connection 1. The valve is open when the handle is not kinked. Closed valve B. Place burner grates over burners and caps. Do not remove ground prong. Install the pressure regulator with LP gas to determine the fittings required depending on..., fire, or electrical shock. 4. NOTE: Check that connector is parallel to cooktop bottom C. H D A. Remove surface burner caps and grates from cutout to follow these instructions can reach the regulator cap. Do not use with the arrow pointing up to the gas pipe. Plug into...
...thread D. Manual gas shutoff valve Complete Connection 1. The valve is open when the handle is not kinked. Closed valve B. Place burner grates over burners and caps. Do not remove ground prong. Install the pressure regulator with LP gas to determine the fittings required depending on..., fire, or electrical shock. 4. NOTE: Check that connector is parallel to cooktop bottom C. H D A. Remove surface burner caps and grates from cutout to follow these instructions can reach the regulator cap. Do not use with the arrow pointing up to the gas pipe. Plug into...

Installation Guide
Page 11
... and set burner assembly into opening 8. Place the wave tray on the flame spreader to assure correct placement of the drip tray. Place the grill grate into the slots. Cut and remove tie strap from the rear slots and lift out. 6. B A. Large grease tray B. Grease tray connection C. Drip tray 5. Rear tabs...
... and set burner assembly into opening 8. Place the wave tray on the flame spreader to assure correct placement of the drip tray. Place the grill grate into the slots. Cut and remove tie strap from the rear slots and lift out. 6. B A. Large grease tray B. Grease tray connection C. Drip tray 5. Rear tabs...

Installation Guide
Page 12
... knob to the "LITE" position. If a burner does not light at the front of the cooktop burner base. 5. Unplug cooktop or disconnect power. 2. Remove burner grates. 3. Remove the 2 screws on the side of the griddle. Disconnect wiring from whom you purchased your dealer or authorized service company for assistance. Upper flame...
... knob to the "LITE" position. If a burner does not light at the front of the cooktop burner base. 5. Unplug cooktop or disconnect power. 2. Remove burner grates. 3. Remove the 2 screws on the side of the griddle. Disconnect wiring from whom you purchased your dealer or authorized service company for assistance. Upper flame...

Installation Guide
Page 13
... console. 21. Front lip of cooktop 20. Test the flame by turning the control from the valve stem. 9. B A A. Remove console and set aside. 8. Replace burner grates. 24. For a proper fit, the flange of the control console must hook over the lip on right side of valve) B. Remove the round gasket from...
... console. 21. Front lip of cooktop 20. Test the flame by turning the control from the valve stem. 9. B A A. Remove console and set aside. 8. Replace burner grates. 24. For a proper fit, the flange of the control console must hook over the lip on right side of valve) B. Remove the round gasket from...

Installation Guide
Page 14
... pushing against the flat side of a qualified person include: licensed heating personnel, authorized gas company personnel, and authorized service personnel. If installed, remove the burner grates. 2. Remove burner cap. 3. If connected to do so can result in excess of the large dual burners. 4. NAT position 3. Burner cap B B. Gas opening D D. Install a shut...
... pushing against the flat side of a qualified person include: licensed heating personnel, authorized gas company personnel, and authorized service personnel. If installed, remove the burner grates. 2. Remove burner cap. 3. If connected to do so can result in excess of the large dual burners. 4. NAT position 3. Burner cap B B. Gas opening D D. Install a shut...

Installation Guide
Page 16
... completed converting the grill, test the cooktop for future use and keep with correct grill LP gas orifice hood. If installed, remove the burner grates. 2. To Convert Grill Burner (on the bottom. REMEMBER: Once you have a slightly yellow tip. 3. The regulator must be checked at ... section for testing regulator must be isolated from the gas supply piping system during any pressure testing of ½ psi (3.5 kPa). Remove grill grate, wave plate, flame spreader and burner assembly. Turn LP gas orifice hood down tightly onto orifice base. 4. Line pressure testing above the set...
... completed converting the grill, test the cooktop for future use and keep with correct grill LP gas orifice hood. If installed, remove the burner grates. 2. To Convert Grill Burner (on the bottom. REMEMBER: Once you have a slightly yellow tip. 3. The regulator must be checked at ... section for testing regulator must be isolated from the gas supply piping system during any pressure testing of ½ psi (3.5 kPa). Remove grill grate, wave plate, flame spreader and burner assembly. Turn LP gas orifice hood down tightly onto orifice base. 4. Line pressure testing above the set...

Installation Guide
Page 18
... hood. Correct any leaks found. 6. Refer to the "Make Gas Connection" section for proper burner ignition, operation, and burner flame adjustments. Complete Installation 1. Remove grill grate, wave plate, flame spreader and burner assembly. Use a ½" deep-well socket and remove the LP gas orifice hood. Grill orifice hood location 3. Turn Natural...
... hood. Correct any leaks found. 6. Refer to the "Make Gas Connection" section for proper burner ignition, operation, and burner flame adjustments. Complete Installation 1. Remove grill grate, wave plate, flame spreader and burner assembly. Use a ½" deep-well socket and remove the LP gas orifice hood. Grill orifice hood location 3. Turn Natural...


