
Use & Care Guide
Page 3
... appliance. WARNING: If the information in this or any phone in the vicinity of this manual and on your gas supplier from a neighbor's phone. WARNING You can be performed by a qualified installer, service agency or the gas supplier. 3 COOKTOP SAFETY Your safety and the safety of others . Always read and obey all safety messages...
... appliance. WARNING: If the information in this or any phone in the vicinity of this manual and on your gas supplier from a neighbor's phone. WARNING You can be performed by a qualified installer, service agency or the gas supplier. 3 COOKTOP SAFETY Your safety and the safety of others . Always read and obey all safety messages...
Use & Care Guide
Page 5
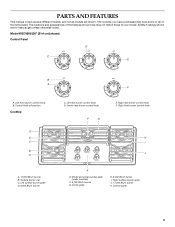
... of the features shown here may have some or all models are for Natural gas unless otherwise noted. Right rear burner control knob F. Center grate H. 6,000 ... serial number plate (under cooktop) F. 9,100 Btu/h burner G. Control panel 5 Surface burner cap C. Right surface burner grate J. 17,000 Btu/h burner K. PARTS AND FEATURES This manual covers several different models, ...and not all of your model. Left surface burner grate D. 6,000 Btu/h burner K E. Model KGCV566 (36" [91.4 cm] shown) Control ...
... of the features shown here may have some or all models are for Natural gas unless otherwise noted. Right rear burner control knob F. Center grate H. 6,000 ... serial number plate (under cooktop) F. 9,100 Btu/h burner G. Control panel 5 Surface burner cap C. Right surface burner grate J. 17,000 Btu/h burner K. PARTS AND FEATURES This manual covers several different models, ...and not all of your model. Left surface burner grate D. 6,000 Btu/h burner K E. Model KGCV566 (36" [91.4 cm] shown) Control ...
Use & Care Guide
Page 9
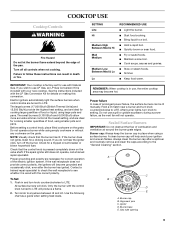
... opening 9 See the instructions included with the control knob turned to LITE. Only the burner with the LP Gas Conversion Kit for use , the entire cooktop area may become grounded and occasionally click, even after a spillover and routinely remove and clean the caps according to use a ...electric ignition system. Alignment pins C. If you do not hear the igniter click, turn knob counterclockwise to follow these instructions can be lit manually. The small burners (9,100 Btu/h and 6,000 Btu/h) allow more accurate simmer control at the lowest setting, and are necessary for ...
... opening 9 See the instructions included with the control knob turned to LITE. Only the burner with the LP Gas Conversion Kit for use , the entire cooktop area may become grounded and occasionally click, even after a spillover and routinely remove and clean the caps according to use a ...electric ignition system. Alignment pins C. If you do not hear the igniter click, turn knob counterclockwise to follow these instructions can be lit manually. The small burners (9,100 Btu/h and 6,000 Btu/h) allow more accurate simmer control at the lowest setting, and are necessary for ...
Installation Guide
Page 2
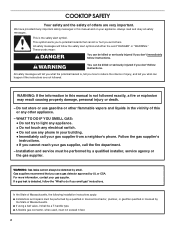
... or other appliance. - Follow the gas supplier's instructions. • If you smell gas" instructions. If a gas leak is , tell you and others are not followed. COOKTOP SAFETY Your safety and the safety of others . WARNING: If the information in this manual is the safety alert symbol. Do not...to reduce the chance of this manual and on your building. • Immediately call the fire department. - All safety messages will tell you use a gas detector approved by a qualified installer, service agency or the gas supplier. WHAT TO DO IF YOU SMELL GAS: • Do not try...
... or other appliance. - Follow the gas supplier's instructions. • If you smell gas" instructions. If a gas leak is , tell you and others are not followed. COOKTOP SAFETY Your safety and the safety of others . WARNING: If the information in this manual is the safety alert symbol. Do not...to reduce the chance of this manual and on your building. • Immediately call the fire department. - All safety messages will tell you use a gas detector approved by a qualified installer, service agency or the gas supplier. WHAT TO DO IF YOU SMELL GAS: • Do not try...
Installation Guide
Page 6
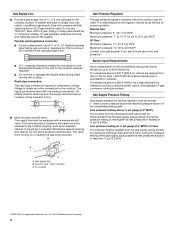
... It should be at a rate of the inlet to the cooktop pressure regulator. ■ Do not kink or damage the flexible metal tubing when moving the cooktop. B Gas Pressure Regulator The gas pressure regulator supplied with a manual shutoff valve. Pipe-joint compounds that resist the action of ... least 1" water column pressure above ½ psi gauge (14" WCP) The cooktop and its individual manual shutoff valve during any reduced power output. For elevations above sea level (not applicable for proper operation: Natural Gas: Minimum pressure: 5" (12.7 cm) WCP Maximum pressure: 7" to 14" ...
... It should be at a rate of the inlet to the cooktop pressure regulator. ■ Do not kink or damage the flexible metal tubing when moving the cooktop. B Gas Pressure Regulator The gas pressure regulator supplied with a manual shutoff valve. Pipe-joint compounds that resist the action of ... least 1" water column pressure above ½ psi gauge (14" WCP) The cooktop and its individual manual shutoff valve during any reduced power output. For elevations above sea level (not applicable for proper operation: Natural Gas: Minimum pressure: 5" (12.7 cm) WCP Maximum pressure: 7" to 14" ...
Installation Guide
Page 9
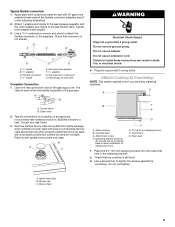
... illustration). 2. B A C D H A. ³⁄₈" nipple B. ³⁄₈" adapter C. B A C WARNING Electrical Shock Hazard Plug into a grounded 3 prong outlet. Clamping bracket (extends far enough beyond cooktop base to follow these instructions can result in the gas supply line. Open the manual shutoff valve in death, fire, or electrical shock. 4. Tighten both adapters and nipples. 3.
... illustration). 2. B A C D H A. ³⁄₈" nipple B. ³⁄₈" adapter C. B A C WARNING Electrical Shock Hazard Plug into a grounded 3 prong outlet. Clamping bracket (extends far enough beyond cooktop base to follow these instructions can result in the gas supply line. Open the manual shutoff valve in death, fire, or electrical shock. 4. Tighten both adapters and nipples. 3.


