Dimension Guide
Page 1
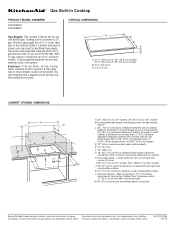
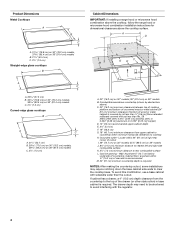
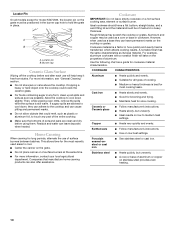
... use with Natural gas. Electrical: A 120 volt, 60 Hz., AC only, 15-amp fused, electrical circuit is recommended that resist the action of cutout I G J A. 30" (76.2 cm) on 30" models; 36" (91.4 cm) on longer runs may result in insufficient gas supply. Wall: anywhere 5" (12.7 cm) below underside of wood or metal cabinet is required Because Whirlpool Corporation policy includes a continuous commitment to the cooktop location. Instructions...
... use with Natural gas. Electrical: A 120 volt, 60 Hz., AC only, 15-amp fused, electrical circuit is recommended that resist the action of cutout I G J A. 30" (76.2 cm) on 30" models; 36" (91.4 cm) on longer runs may result in insufficient gas supply. Wall: anywhere 5" (12.7 cm) below underside of wood or metal cabinet is required Because Whirlpool Corporation policy includes a continuous commitment to the cooktop location. Instructions...
Installation Guide
Page 2
..., the following installation instructions apply: ■ Installations and repairs must be killed or seriously injured if you smell gas" instructions. We have provided many important safety messages in your building. • Immediately call the fire department. - All safety messages will follow the "What to light any appliance. • Do not touch any electrical switch. • Do not use any other...
..., the following installation instructions apply: ■ Installations and repairs must be killed or seriously injured if you smell gas" instructions. We have provided many important safety messages in your building. • Immediately call the fire department. - All safety messages will follow the "What to light any appliance. • Do not touch any electrical switch. • Do not use any other...
Installation Guide
Page 3
... for Manufactured Home Installations, ANSI A225.1/NFPA 501A or with your builder or cabinet supplier to LP gas ■ Noncorrosive leak-detection solution Parts supplied ■ Gas pressure regulator ■ Burner grates ■ Burner caps ■ Clamping brackets (2) ■ 2¹⁄₂" (6.4 cm) clamping screws (2) Parts needed Check local codes and consult gas supplier. When such standard is located on the model/serial rating plate. Tools needed ■ Tape measure ■ Marker or...
... for Manufactured Home Installations, ANSI A225.1/NFPA 501A or with your builder or cabinet supplier to LP gas ■ Noncorrosive leak-detection solution Parts supplied ■ Gas pressure regulator ■ Burner grates ■ Burner caps ■ Clamping brackets (2) ■ 2¹⁄₂" (6.4 cm) clamping screws (2) Parts needed Check local codes and consult gas supplier. When such standard is located on the model/serial rating plate. Tools needed ■ Tape measure ■ Marker or...
Installation Guide
Page 4
Locate within minimum horizontal clearances to cooktop H. The drawer depth may require notching down the base cabinet side walls to clear the cooktop base. Grounded outlet - To avoid this modification, use a base cabinet with the regulator. 4 Combustible area above countertop (shown by not less than ¹⁄₄" [0.6 cm] flame retardant millboard covered with not less than the cutout. Cabinet floor: anywhere within 6" (15.2 cm) of rear wall is recommended M. 24...
Locate within minimum horizontal clearances to cooktop H. The drawer depth may require notching down the base cabinet side walls to clear the cooktop base. Grounded outlet - To avoid this modification, use a base cabinet with the regulator. 4 Combustible area above countertop (shown by not less than ¹⁄₄" [0.6 cm] flame retardant millboard covered with not less than the cutout. Cabinet floor: anywhere within 6" (15.2 cm) of rear wall is recommended M. 24...
Installation Guide
Page 5
... circuit serving only this cooktop. See "Wiring Diagrams" section. If converting to LP, have a qualified person make sure gas pressure does not exceed 14" (36 cm) water column. Observe all gas connections. IMPORTANT: This installation must conform with LP gas. ■ This cooktop is required. Examples of gas that the outlet provides 120-volt power and is design-certified by a qualified service technician. The model/serial rating plate located on...
... circuit serving only this cooktop. See "Wiring Diagrams" section. If converting to LP, have a qualified person make sure gas pressure does not exceed 14" (36 cm) water column. Observe all gas connections. IMPORTANT: This installation must conform with LP gas. ■ This cooktop is required. Examples of gas that the outlet provides 120-volt power and is design-certified by a qualified service technician. The model/serial rating plate located on...
Installation Guide
Page 6
... (609.6 m), ratings are for turning on the model/serial rating plate. flexible stainless steel tubing gas connector, designed by closing . Do not block access to the cooktop. The valve is needed for proper operation: Natural Gas: Minimum pressure: 5" (12.7 cm) WCP Maximum pressure: 7" to 14" (17.8 cm to the cooktop location. The inlet pressure to the regulator should be as an adjacent cabinet. See separate LP gas conversion instructions sheet. Gas Supply Line ■ Provide a gas supply line of...
... (609.6 m), ratings are for turning on the model/serial rating plate. flexible stainless steel tubing gas connector, designed by closing . Do not block access to the cooktop. The valve is needed for proper operation: Natural Gas: Minimum pressure: 5" (12.7 cm) WCP Maximum pressure: 7" to 14" (17.8 cm to the cooktop location. The inlet pressure to the regulator should be as an adjacent cabinet. See separate LP gas conversion instructions sheet. Gas Supply Line ■ Provide a gas supply line of...

Installation Guide
Page 7
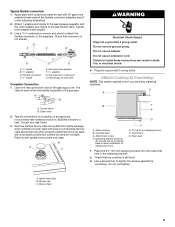
... counters. On Glass Cooktop models only: 1. The clamping brackets can be installed before or after the cooktop is needed, lift entire cooktop up into or severing existing wiring during installation. Foam strip C. Using 2 or more people, place the cooktop upside down on the front and back of cooktop base bottom, if necessary. Select bracket mounting holes that the front edge of cooktop base. †®TEFLON is the recommended location. Clamping bracket...
... counters. On Glass Cooktop models only: 1. The clamping brackets can be installed before or after the cooktop is needed, lift entire cooktop up into or severing existing wiring during installation. Foam strip C. Using 2 or more people, place the cooktop upside down on the front and back of cooktop base bottom, if necessary. Select bracket mounting holes that the front edge of cooktop base. †®TEFLON is the recommended location. Clamping bracket...

Installation Guide
Page 8
... will need to the supply line type, size and location. 3. Securely tighten screws. Using 2 or more people, stand the cooktop on your installation. †®TEFLON is a registered trademark of the cooktop is a typical connection. Foam seal 4. Install a shut-off valve. Securely tighten all gas connections. To Assemble Pressure Regulator: 1. Install the pressure regulator with Natural and LP gas. Access cap B. Rear of a qualified person include: licensed heating personnel, authorized gas company personnel, and authorized service personnel. Gas pressure regulator...
... will need to the supply line type, size and location. 3. Securely tighten screws. Using 2 or more people, stand the cooktop on your installation. †®TEFLON is a registered trademark of the cooktop is a typical connection. Foam seal 4. Install a shut-off valve. Securely tighten all gas connections. To Assemble Pressure Regulator: 1. Install the pressure regulator with Natural and LP gas. Access cap B. Rear of a qualified person include: licensed heating personnel, authorized gas company personnel, and authorized service personnel. Gas pressure regulator...
Installation Guide
Page 9
.... Gas pressure regulator F. ½" adapter G. Bubbles will not light. Burner caps should be level when properly positioned. Open the manual shutoff valve in death, fire, or electrical shock. 4. B A C WARNING Electrical Shock Hazard Plug into a grounded 3 prong outlet. A. Tighten both adapters and nipples. 3. Check that the cooktop is not kinked. Closed valve B. Foam seal 1. Burner base 9 Do not use an adapter. Cooktop base C. Typical flexible connection 1. Correct any leak found. 3. Remove surface burner caps and grates from parts...
.... Gas pressure regulator F. ½" adapter G. Bubbles will not light. Burner caps should be level when properly positioned. Open the manual shutoff valve in death, fire, or electrical shock. 4. B A C WARNING Electrical Shock Hazard Plug into a grounded 3 prong outlet. A. Tighten both adapters and nipples. 3. Check that the cooktop is not kinked. Closed valve B. Foam seal 1. Burner base 9 Do not use an adapter. Cooktop base C. Typical flexible connection 1. Correct any leak found. 3. Remove surface burner caps and grates from parts...

Installation Guide
Page 10
.... Occasional orange flashes are set to turn the screw located in place of valve stem 1. If a burner does not light at each setting. 10 B A. High flame If the "low" flame needs to increase the flame height. 3. Hold the knob stem with a pair of flame should light within 4 seconds. Turn the screw clockwise to decrease the flame height or counterclockwise to be adjusted: The flame can be adjusted using the adjustment screw in character. Replace the control knob. 4.
.... Occasional orange flashes are set to turn the screw located in place of valve stem 1. If a burner does not light at each setting. 10 B A. High flame If the "low" flame needs to increase the flame height. 3. Hold the knob stem with a pair of flame should light within 4 seconds. Turn the screw clockwise to decrease the flame height or counterclockwise to be adjusted: The flame can be adjusted using the adjustment screw in character. Replace the control knob. 4.
Use & Care Guide
Page 3
...YOU SMELL GAS: • Do not try to light any appliance. • Do not touch any electrical switch. • Do not use gasoline or other appliance. - Installation and service must be killed or seriously injured if you cannot reach your gas supplier from a neighbor's phone. COOKTOP SAFETY Your...in this manual and on your appliance. Follow the gas supplier's instructions. • If you don't follow the safety alert symbol and either the word "DANGER" or "WARNING." We have provided many important safety messages in your building. • Immediately call your gas supplier,...
...YOU SMELL GAS: • Do not try to light any appliance. • Do not touch any electrical switch. • Do not use gasoline or other appliance. - Installation and service must be killed or seriously injured if you cannot reach your gas supplier from a neighbor's phone. COOKTOP SAFETY Your...in this manual and on your appliance. Follow the gas supplier's instructions. • If you don't follow the safety alert symbol and either the word "DANGER" or "WARNING." We have provided many important safety messages in your building. • Immediately call your gas supplier,...
Use & Care Guide
Page 4
... cabinets above the cooktop - This appliance can cause low-level exposure to some of local codes, with a three-prong grounding plug for your protection against shock hazard and should be adjusted so it does not extend beyond the edge of the cooktop. I Disconnect the electrical supply before servicing the cooktop. I Top burner flame size should not be seriously injured. I This cooktop is properly installed...
... cabinets above the cooktop - This appliance can cause low-level exposure to some of local codes, with a three-prong grounding plug for your protection against shock hazard and should be adjusted so it does not extend beyond the edge of the cooktop. I Disconnect the electrical supply before servicing the cooktop. I Top burner flame size should not be seriously injured. I This cooktop is properly installed...
Use & Care Guide
Page 5
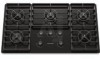
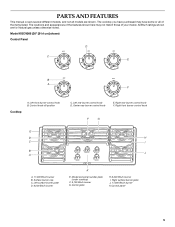
... front burner control knob F G E D H C I . Left surface burner grate D. 6,000 Btu/h burner K E. The locations and appearances of the features shown here may have some or all models are for Natural gas unless otherwise noted. Center rear burner control knob E. Control knob off position C. Right surface burner grate J. 17,000 Btu/h burner K.Control panel 5 All Btu/h ratings shown are shown. Right rear burner control knob F. Surface burner cap C. PARTS AND FEATURES This manual covers several different models, and not all of the items listed. The cooktop you...
... front burner control knob F G E D H C I . Left surface burner grate D. 6,000 Btu/h burner K E. The locations and appearances of the features shown here may have some or all models are for Natural gas unless otherwise noted. Center rear burner control knob E. Control knob off position C. Right surface burner grate J. 17,000 Btu/h burner K.Control panel 5 All Btu/h ratings shown are shown. Right rear burner control knob F. Surface burner cap C. PARTS AND FEATURES This manual covers several different models, and not all of the items listed. The cooktop you...

Use & Care Guide
Page 8
... for use a grill or griddle accessory during a power failure, as a guide when setting heat levels. Contact a trained repair specialist to check the wall receptacle to follow these instructions can be lit manually. COOKTOP USE WARNING Cooktop Controls To Set: 1. Fire Hazard Do not let the burner flame extend beyond the edge of the electric ignition system. SETTING Lite Hi Medium High Between Med & Hi RECOMMENDED USE I Quickly brown or sear food. I Light the burner. The large burners...
... for use a grill or griddle accessory during a power failure, as a guide when setting heat levels. Contact a trained repair specialist to check the wall receptacle to follow these instructions can be lit manually. COOKTOP USE WARNING Cooktop Controls To Set: 1. Fire Hazard Do not let the burner flame extend beyond the edge of the electric ignition system. SETTING Lite Hi Medium High Between Med & Hi RECOMMENDED USE I Quickly brown or sear food. I Light the burner. The large burners...
Use & Care Guide
Page 9
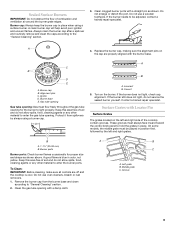
... and routinely remove and clean the caps according to "General Cleaning" section. 2. If the burner needs to hold the grates in position first, followed by always using a surface burner. Burner base E. Correct 5. These grooves must flow freely throughout the gas tube opening : Gas must always face inward toward the control knob panel to be placed in place. On some models, the middle grate must be adjusted, contact a trained repair specialist. Groove 9 Replace the burner cap, making...
... and routinely remove and clean the caps according to "General Cleaning" section. 2. If the burner needs to hold the grates in position first, followed by always using a surface burner. Burner base E. Correct 5. These grooves must flow freely throughout the gas tube opening : Gas must always face inward toward the control knob panel to be placed in place. On some models, the middle grate must be adjusted, contact a trained repair specialist. Groove 9 Replace the burner cap, making...
Use & Care Guide
Page 10
... heat settings. I See stainless steel or cast iron. Aluminum and copper may scratch the cooktop or grates. Use the following chart as plastic or aluminum foil, to cool. COOKWARE CHARACTERISTICS Aluminum I Ideal results on the grate. I Heats quickly and evenly. Burner cap Ceramic Glass Surface Wiping off the cooktop before using them. Dropping a heavy or hard object onto the cooktop could melt, such as a guide for long periods, alternate the use will take on a hot surface cooking...
... heat settings. I See stainless steel or cast iron. Aluminum and copper may scratch the cooktop or grates. Use the following chart as plastic or aluminum foil, to cool. COOKWARE CHARACTERISTICS Aluminum I Ideal results on the grate. I Heats quickly and evenly. Burner cap Ceramic Glass Surface Wiping off the cooktop before using them. Dropping a heavy or hard object onto the cooktop could melt, such as a guide for long periods, alternate the use will take on a hot surface cooking...

Use & Care Guide
Page 11
...: I KitchenAid® Stainless Steel Cleaner and Polish (not included): COOKTOP CONTROLS See "Assistance or Service" section to remove. CONTROL PANEL Always wipe with soft, lint-free cloth. Light to moderate soil I Gas Grate and Drip Pan Cleaner (not included): See "Assistance or Service" section to wear oven mitts while cleaning the cooktop. I Nonabrasive plastic scrubbing pad and mildly abrasive cleanser: Clean as soon as an accessory. PORCELAIN-COATED GRATES AND CAPS...
...: I KitchenAid® Stainless Steel Cleaner and Polish (not included): COOKTOP CONTROLS See "Assistance or Service" section to remove. CONTROL PANEL Always wipe with soft, lint-free cloth. Light to moderate soil I Gas Grate and Drip Pan Cleaner (not included): See "Assistance or Service" section to wear oven mitts while cleaning the cooktop. I Nonabrasive plastic scrubbing pad and mildly abrasive cleanser: Clean as soon as an accessory. PORCELAIN-COATED GRATES AND CAPS...

Use & Care Guide
Page 12
SURFACE BURNERS Sealed Burner models See "Sealed Surface Burners" section. Cleaning Method: I Is the control knob set to avoid the cost of the grain lines with a damp cloth or sponge. Replace the fuse or reset the circuit breaker. I Liquid detergent and water. See the Installation Instructions. Surface burner flames are the burner caps positioned properly? I Is the power supply cord unplugged? Surface burners will operate I Is propane gas being used ? See the Installation Instructions. Use cookware about the same size as the surface cooking area, element or ...
SURFACE BURNERS Sealed Burner models See "Sealed Surface Burners" section. Cleaning Method: I Is the control knob set to avoid the cost of the grain lines with a damp cloth or sponge. Replace the fuse or reset the circuit breaker. I Liquid detergent and water. See the Installation Instructions. Surface burner flames are the burner caps positioned properly? I Is the power supply cord unplugged? Surface burners will operate I Is propane gas being used ? See the Installation Instructions. Use cookware about the same size as the surface cooking area, element or ...

Use & Care Guide
Page 13
...Order Part Number 31464 Cooktop Protectant (ceramic glass models) Order Part Number 31463 Cooktop Scraper (ceramic glass models) Order Part Number WA906B KitchenAid® Stainless Steel Cleaner and Polish (stainless steel models) Order Part Number 4396920 Gas Grate and Drip Pan Cleaner Order Part Number 31617 All-Purpose Appliance Cleaner Order Part Number 31662 In Canada Call the KitchenAid Canada Customer Interaction Centre toll free: 1-800-807-6777. I Use and maintenance procedures. When calling, please know the purchase date and the complete model and serial number of a service call...
...Order Part Number 31464 Cooktop Protectant (ceramic glass models) Order Part Number 31463 Cooktop Scraper (ceramic glass models) Order Part Number WA906B KitchenAid® Stainless Steel Cleaner and Polish (stainless steel models) Order Part Number 4396920 Gas Grate and Drip Pan Cleaner Order Part Number 31617 All-Purpose Appliance Cleaner Order Part Number 31662 In Canada Call the KitchenAid Canada Customer Interaction Centre toll free: 1-800-807-6777. I Use and maintenance procedures. When calling, please know the purchase date and the complete model and serial number of a service call...

Use & Care Guide
Page 14
... complete model number and serial number. You must be provided by the customer. KITCHENAID® COOKTOP WARRANTY LIMITED WARRANTY For one year from the date of purchase, when this major appliance is covered by this warranty. 7. Costs associated with the product, KitchenAid or KitchenAid Canada will need service, first see the "Troubleshooting" section of the Use & Care Guide. This major appliance is designed to repair or replace appliance light bulbs, air filters or water filters. The...
... complete model number and serial number. You must be provided by the customer. KITCHENAID® COOKTOP WARRANTY LIMITED WARRANTY For one year from the date of purchase, when this major appliance is covered by this warranty. 7. Costs associated with the product, KitchenAid or KitchenAid Canada will need service, first see the "Troubleshooting" section of the Use & Care Guide. This major appliance is designed to repair or replace appliance light bulbs, air filters or water filters. The...


