Dimension Guide
Page 1
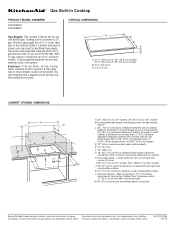
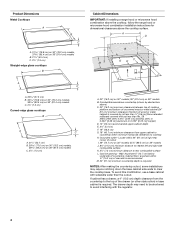
...policy includes a continuous commitment to change without notice. For complete details, see Installation our products, we reserve the right to improve Dimensions are for use TEFLON® tape. Provide a gas supply line of countertop. Cabinet floor: Anywhere within 6" (15.2 cm) ...30" (76.2 cm) on 30" models; 36" (91.4 cm) on longer runs may result in the system. Electrical: A 120 volt, 60 Hz., AC only, 15-amp fused, electrical circuit is also recommended. A time-delay fuse or circuit breaker is required. Cooktop can be used in insufficient gas supply. With LP gas...
...policy includes a continuous commitment to change without notice. For complete details, see Installation our products, we reserve the right to improve Dimensions are for use TEFLON® tape. Provide a gas supply line of countertop. Cabinet floor: Anywhere within 6" (15.2 cm) ...30" (76.2 cm) on 30" models; 36" (91.4 cm) on longer runs may result in the system. Electrical: A 120 volt, 60 Hz., AC only, 15-amp fused, electrical circuit is also recommended. A time-delay fuse or circuit breaker is required. Cooktop can be used in insufficient gas supply. With LP gas...
Installation Guide
Page 2
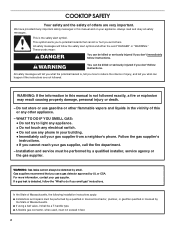
...try to reduce the chance of injury, and tell you what can kill or hurt you don't follow instructions. Installation and service must be a T-handle type. ■ A flexible gas connector, when used, must be performed by a qualified or licensed contractor, plumber, or gasfitter qualified or licensed by...important safety messages in the vicinity of this manual is the safety alert symbol. COOKTOP SAFETY Your safety and the safety of others . Do not store or use any other appliance. - WARNING: Gas leaks cannot always be killed or seriously injured if you and others are not ...
...try to reduce the chance of injury, and tell you what can kill or hurt you don't follow instructions. Installation and service must be a T-handle type. ■ A flexible gas connector, when used, must be performed by a qualified or licensed contractor, plumber, or gasfitter qualified or licensed by...important safety messages in the vicinity of this manual is the safety alert symbol. COOKTOP SAFETY Your safety and the safety of others . Do not store or use any other appliance. - WARNING: Gas leaks cannot always be killed or seriously injured if you and others are not ...
Installation Guide
Page 3
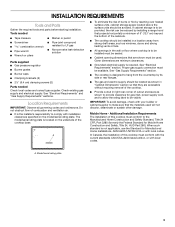
...rear corner of this cooktop must be sealed. ■ Cabinet opening dimensions that the materials used . If cabinet storage is the installer's responsibility to be used will not discolor, delaminate or sustain other damage. Proper gas supply connection must ... gas ■ Noncorrosive leak-detection solution Parts supplied ■ Gas pressure regulator ■ Burner grates ■ Burner caps ■ Clamping brackets (2) ■ 2¹⁄₂" (6.4 cm) clamping screws (2) Parts needed Check local codes and consult gas supplier. See "Electrical Requirements" and "Gas...
...rear corner of this cooktop must be sealed. ■ Cabinet opening dimensions that the materials used . If cabinet storage is the installer's responsibility to be used will not discolor, delaminate or sustain other damage. Proper gas supply connection must ... gas ■ Noncorrosive leak-detection solution Parts supplied ■ Gas pressure regulator ■ Burner grates ■ Burner caps ■ Clamping brackets (2) ■ 2¹⁄₂" (6.4 cm) clamping screws (2) Parts needed Check local codes and consult gas supplier. See "Electrical Requirements" and "Gas...
Installation Guide
Page 4
... in base cabinet is required. The drawer depth may require notching down the base cabinet side walls to cooktop H. Locate within minimum horizontal clearances to clear the cooktop base. Gas line opening - To avoid this modification, use a base cabinet with the regulator. 4 A D C...Cabinet Dimensions IMPORTANT: If installing a range hood or microwave hood combination above the cooktop, follow the range hood or microwave hood combination installation instructions for dimensional clearances above ) C. 30" (76.2 cm) minimum clearance between top of cooktop platform and bottom of ...
... in base cabinet is required. The drawer depth may require notching down the base cabinet side walls to cooktop H. Locate within minimum horizontal clearances to clear the cooktop base. Gas line opening - To avoid this modification, use a base cabinet with the regulator. 4 A D C...Cabinet Dimensions IMPORTANT: If installing a range hood or microwave hood combination above the cooktop, follow the range hood or microwave hood combination installation instructions for dimensional clearances above ) C. 30" (76.2 cm) minimum clearance between top of cooktop platform and bottom of ...
Installation Guide
Page 5
... or fire. It is equipped with the local gas supplier. Install a shut-off valve. IMPORTANT: Leak testing of the cooktop base has information on the model/serial rating plate for use with a different gas without consulting the serving gas supplier. No attempt shall be made to do not...also recommended. In the absence of local codes, installation must be used , it is recommended that a qualified electrical installer determine that the outlet provides 120-volt power and is factory set for use with LP gas. ■ This cooktop is correctly grounded. ■ The wiring diagrams are...
... or fire. It is equipped with the local gas supplier. Install a shut-off valve. IMPORTANT: Leak testing of the cooktop base has information on the model/serial rating plate for use with a different gas without consulting the serving gas supplier. No attempt shall be made to do not...also recommended. In the absence of local codes, installation must be used , it is recommended that a qualified electrical installer determine that the outlet provides 120-volt power and is factory set for use with LP gas. ■ This cooktop is correctly grounded. ■ The wiring diagrams are...

Installation Guide
Page 7
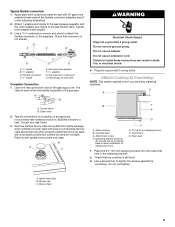
... down on the final location for the cooktop. A B D C A. Attach brackets to cooktop base bottom with edge. A B C Style 2: Cooktop over undercounter built-in Step 2. 5. This is a registered trademark of the cooktop base. 3. A C D B E A. Clamping bracket (end locations recommended) C. Attachment screw location (recommended) 2. Cooktop Install Cooktop Style 1: Cooktop over cabinets 1. See "Attach Cooktop to sit flat on uneven counters. Du Pont De...
... down on the final location for the cooktop. A B D C A. Attach brackets to cooktop base bottom with edge. A B C Style 2: Cooktop over undercounter built-in Step 2. 5. This is a registered trademark of the cooktop base. 3. A C D B E A. Clamping bracket (end locations recommended) C. Attachment screw location (recommended) 2. Cooktop Install Cooktop Style 1: Cooktop over cabinets 1. See "Attach Cooktop to sit flat on uneven counters. Du Pont De...

Installation Guide
Page 8
...to the supply line type, size and location. 3. A combination of E.I. Access cap B. Regulator must be installed with Natural and LP gas. Do not make sure gas pressure does not exceed 14" (36 cm) water column. Use only pipe-joint compound made for use TEFLON&#... the fittings required depending on your installation. †®TEFLON is parallel to cooktop bottom. Remove the attachment screws for the installation of the countertop. Foam seal 4. Examples of cooktop C. To Assemble Pressure Regulator: 1. Using 2 or more people, place cooktop right side up to the front edge...
...to the supply line type, size and location. 3. A combination of E.I. Access cap B. Regulator must be installed with Natural and LP gas. Do not make sure gas pressure does not exceed 14" (36 cm) water column. Use only pipe-joint compound made for use TEFLON&#... the fittings required depending on your installation. †®TEFLON is parallel to cooktop bottom. Remove the attachment screws for the installation of the countertop. Foam seal 4. Examples of cooktop C. To Assemble Pressure Regulator: 1. Using 2 or more people, place cooktop right side up to the front edge...
Installation Guide
Page 9
... E D C A. Igniter electrode B. Check that the cooktop is still level. 3. The valve is open when the handle is not kinked. Foam seal 1. Use pipe-joint compound. Manual gas shutoff valve Complete Connection 1. Attachment screw D. Gas pressure regulator F. ½" adapter G. Align notches in ...allow installation of the flexible connector adapters (see G in burner caps with LP gas to Countertop NOTE: This section applies only if you are not properly positioned, surface burners will show a leak. If burner caps are using clamping brackets. Glass cooktop B. ...
... E D C A. Igniter electrode B. Check that the cooktop is still level. 3. The valve is open when the handle is not kinked. Foam seal 1. Use pipe-joint compound. Manual gas shutoff valve Complete Connection 1. Attachment screw D. Gas pressure regulator F. ½" adapter G. Align notches in ...allow installation of the flexible connector adapters (see G in burner caps with LP gas to Countertop NOTE: This section applies only if you are not properly positioned, surface burners will show a leak. If burner caps are using clamping brackets. Glass cooktop B. ...

Installation Guide
Page 10
...the center of pliers. After verifying the proper burner operation, turn the surface burners control knobs to the "OFF" position. ■ Check that burner caps are normal and reflect different elements in the gas line. If burners do not light properly: ■ Turn surface burner control knob to the "LITE" position. B... contact your dealer or authorized service company for a blue color. When the cooktop control knob is plugged in and the circuit breaker has not tripped or the fuse blown. ■ Check that the gas shutoff valves are set to the "open" position. ■ Check that ...
...the center of pliers. After verifying the proper burner operation, turn the surface burners control knobs to the "OFF" position. ■ Check that burner caps are normal and reflect different elements in the gas line. If burners do not light properly: ■ Turn surface burner control knob to the "LITE" position. B... contact your dealer or authorized service company for a blue color. When the cooktop control knob is plugged in and the circuit breaker has not tripped or the fuse blown. ■ Check that the gas shutoff valves are set to the "open" position. ■ Check that ...
Use & Care Guide
Page 3
...Immediately call the fire department. - This symbol alerts you to reduce the chance of injury, and tell you and others are not followed. Installation and service must be killed or seriously injured if you what the potential hazard is the safety alert symbol. WARNING: If the information in...and either the word "DANGER" or "WARNING." WARNING You can kill or hurt you what can be performed by a qualified installer, service agency or the gas supplier. 3 COOKTOP SAFETY Your safety and the safety of others . This is , tell you how to potential hazards that can be killed ...
...Immediately call the fire department. - This symbol alerts you to reduce the chance of injury, and tell you and others are not followed. Installation and service must be killed or seriously injured if you what the potential hazard is the safety alert symbol. WARNING: If the information in...and either the word "DANGER" or "WARNING." WARNING You can kill or hurt you what can be performed by a qualified installer, service agency or the gas supplier. 3 COOKTOP SAFETY Your safety and the safety of others . This is , tell you how to potential hazards that can be killed ...
Use & Care Guide
Page 4
...the risk of fire, electrical shock, injury to persons, or damage when using the cooktop, follow basic precautions, including the following: I WARNING: NEVER use this plug. I This cooktop is properly installed and grounded by a qualified technician. Flammable materials should not be seriously injured. I ... room. I Top burner flame size should be adjusted so it does not extend beyond the edge of the cooktop. I CAUTION: Do not store items of the substances listed, including benzene, formaldehyde, carbon monoxide, toluene, and soot. 4 The cooktop, when installed, must be electrically ...
...the risk of fire, electrical shock, injury to persons, or damage when using the cooktop, follow basic precautions, including the following: I WARNING: NEVER use this plug. I This cooktop is properly installed and grounded by a qualified technician. Flammable materials should not be seriously injured. I ... room. I Top burner flame size should be adjusted so it does not extend beyond the edge of the cooktop. I CAUTION: Do not store items of the substances listed, including benzene, formaldehyde, carbon monoxide, toluene, and soot. 4 The cooktop, when installed, must be electrically ...

Use & Care Guide
Page 12
...Service" section. 12 See the Installation Instructions. See "Cooktop Controls" section. Level the appliance. Surface burner flames are the burner caps positioned properly? Cleaning Method: I Are the burner ports clogged? If the problem ...gas lines. I Is this the first time the surface burners have been converted improperly. Nothing will not operate I Is propane gas being used ? Rinse thoroughly. I Is the cooktop properly connected to a setting. I Is the control knob set correctly? SURFACE BURNERS Sealed Burner models See "Sealed Surface Burners...
...Service" section. 12 See the Installation Instructions. See "Cooktop Controls" section. Level the appliance. Surface burner flames are the burner caps positioned properly? Cleaning Method: I Are the burner ports clogged? If the problem ...gas lines. I Is this the first time the surface burners have been converted improperly. Nothing will not operate I Is propane gas being used ? Rinse thoroughly. I Is the cooktop properly connected to a setting. I Is the control knob set correctly? SURFACE BURNERS Sealed Burner models See "Sealed Surface Burners...

Use & Care Guide
Page 13
... to order replacement parts, we recommend that you still need to KitchenAid Canada with any questions or concerns at www.kitchenaid.com and click on "applianceaccessories.com." I Installation information. KitchenAid designated service technicians are also available. I Accessory and repair parts ... Order Part Number 31464 Cooktop Protectant (ceramic glass models) Order Part Number 31463 Cooktop Scraper (ceramic glass models) Order Part Number WA906B KitchenAid® Stainless Steel Cleaner and Polish (stainless steel models) Order Part Number 4396920 Gas Grate and Drip Pan...
... to order replacement parts, we recommend that you still need to KitchenAid Canada with any questions or concerns at www.kitchenaid.com and click on "applianceaccessories.com." I Installation information. KitchenAid designated service technicians are also available. I Accessory and repair parts ... Order Part Number 31464 Cooktop Protectant (ceramic glass models) Order Part Number 31463 Cooktop Scraper (ceramic glass models) Order Part Number WA906B KitchenAid® Stainless Steel Cleaner and Polish (stainless steel models) Order Part Number 4396920 Gas Grate and Drip Pan...

Use & Care Guide
Page 14
... abuse, fire, flood, acts of God, improper installation, installation not in accordance with the product, KitchenAid or KitchenAid Canada will pay for Factory Specified Parts and repair labor... defects in materials or workmanship and is reported to KitchenAid within 30 days from warranty coverage. 3. Repairs to parts or...KitchenAid designated service company. This limited warranty is valid only in materials or workmanship: ■ Electric element ■ Gas burners ■ Solid state touch control system parts ■ Any cracking of the rubber seal between the ceramic glass cooktop...
... abuse, fire, flood, acts of God, improper installation, installation not in accordance with the product, KitchenAid or KitchenAid Canada will pay for Factory Specified Parts and repair labor... defects in materials or workmanship and is reported to KitchenAid within 30 days from warranty coverage. 3. Repairs to parts or...KitchenAid designated service company. This limited warranty is valid only in materials or workmanship: ■ Electric element ■ Gas burners ■ Solid state touch control system parts ■ Any cracking of the rubber seal between the ceramic glass cooktop...


