
Use & Care Guide
Page 1
...;FRIGÉRATEUR 42 INSTALLATION INSTRUCTIONS 2 INSTRUCCIONES DE INSTALACIÓN .......... 22 INSTRUCTIONS D'INSTALLATION 43 REFRIGERATOR USE 8 USO DE SU REFRIGERADOR 28 UTILISATION DU RÉFRIGÉRATEUR 49 REFRIGERATOR CARE 13 CUIDADO DE SU REFRIGERADOR 34 ENTRETIEN DU RÉFRIGÉRATEUR 55 TROUBLESHOOTING 14 SOLUCIÓN DE PROBLEMAS 35 DÉPANNAGE 56 WATER FILTER CERTIFICATIONS 16 PERFORMANCE DATA SHEETS 17 WARRANTY 19 HOJA DE...
...;FRIGÉRATEUR 42 INSTALLATION INSTRUCTIONS 2 INSTRUCCIONES DE INSTALACIÓN .......... 22 INSTRUCTIONS D'INSTALLATION 43 REFRIGERATOR USE 8 USO DE SU REFRIGERADOR 28 UTILISATION DU RÉFRIGÉRATEUR 49 REFRIGERATOR CARE 13 CUIDADO DE SU REFRIGERADOR 34 ENTRETIEN DU RÉFRIGÉRATEUR 55 TROUBLESHOOTING 14 SOLUCIÓN DE PROBLEMAS 35 DÉPANNAGE 56 WATER FILTER CERTIFICATIONS 16 PERFORMANCE DATA SHEETS 17 WARRANTY 19 HOJA DE...
Use & Care Guide
Page 2
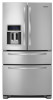
... packaging materials, clean the inside . Remove the Packaging ■ Remove tape and glue residue from surfaces before installing ice maker (on ice maker kit ready models only). ■ Use a sturdy glass when dispensing ice (on some models). Rub a small amount of fire, electric shock, or injury when using it. Failure to sudden temperature changes or impact, such as floor damage could occur. Before You Throw Away Your Old Refrigerator or Freezer: ■...
... packaging materials, clean the inside . Remove the Packaging ■ Remove tape and glue residue from surfaces before installing ice maker (on ice maker kit ready models only). ■ Use a sturdy glass when dispensing ice (on some models). Rub a small amount of fire, electric shock, or injury when using it. Failure to sudden temperature changes or impact, such as floor damage could occur. Before You Throw Away Your Old Refrigerator or Freezer: ■...
Use & Care Guide
Page 3
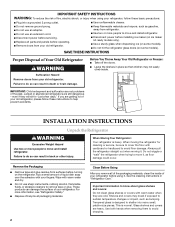
... the water line connections. If your refrigerator, allow the door to allow for a 1" (2.54 cm) space behind the refrigerator. Do not install the refrigerator in death, explosion, or fire. or 20-amp fused, grounded electrical supply is important to do not install the refrigerator near an oven, radiator, or other heat source. When installing your refrigerator be turned off by a switch. Electrical Shock Hazard Plug into its final location, it...
... the water line connections. If your refrigerator, allow the door to allow for a 1" (2.54 cm) space behind the refrigerator. Do not install the refrigerator in death, explosion, or fire. or 20-amp fused, grounded electrical supply is important to do not install the refrigerator near an oven, radiator, or other heat source. When installing your refrigerator be turned off by a switch. Electrical Shock Hazard Plug into its final location, it...
Use & Care Guide
Page 4
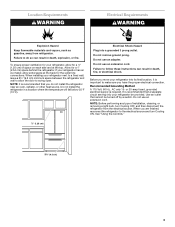
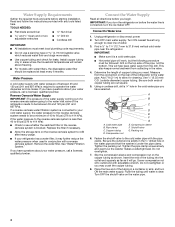
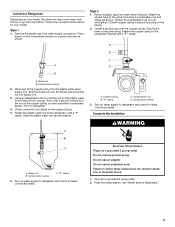
... free end of 40 to 60 psi (276 to the cold water pipe with water filters, the disposable water filter should be replaced at least every 6 months. If you have questions about your cold water supply, the water pressure to the reverse osmosis system needs to be a minimum of the tubing in a container or sink, and turn the ice maker OFF. Unplug refrigerator or disconnect power. 2. Copper tubing D. Fasten the shutoff valve...
... free end of 40 to 60 psi (276 to the cold water pipe with water filters, the disposable water filter should be replaced at least every 6 months. If you have questions about your cold water supply, the water pressure to the reverse osmosis system needs to be a minimum of the tubing in a container or sink, and turn the ice maker OFF. Unplug refrigerator or disconnect power. 2. Copper tubing D. Fasten the shutoff valve...
Use & Care Guide
Page 5
... not use an extension cord. Flush the water system. Style 1 1. Slide the plastic water line into a grounded 3 prong outlet. Electrical Shock Hazard Plug into the retainer. Attach the copper tube to the refrigerator with the copper tubing. Avoid kinks when coiling the tubing. Slide the brass nut over the sleeve and screw the nut into supply line. 3. Follow the connection instructions for leaks. See "Water and Ice Dispensers." 5 Turn...
... not use an extension cord. Flush the water system. Style 1 1. Slide the plastic water line into a grounded 3 prong outlet. Electrical Shock Hazard Plug into the retainer. Attach the copper tube to the refrigerator with the copper tubing. Avoid kinks when coiling the tubing. Slide the brass nut over the sleeve and screw the nut into supply line. 3. Follow the connection instructions for leaks. See "Water and Ice Dispensers." 5 Turn...
Use & Care Guide
Page 6
.... See Connections graphic. 6. Do not use an adapter. Make sure you . Open the drawer to follow these instructions can result in death, fire, or electrical shock. 2. Replace Drawer Front 1. See Drawer Front Removal graphic. Using a ³⁄₈" hex wrench, remove the leveling leg brackets from the cabinet. Do not tighten the screws completely. 2. Slide the drawer glides out of each handle. Unplug refrigerator or disconnect power. Graphics...
.... See Connections graphic. 6. Do not use an adapter. Make sure you . Open the drawer to follow these instructions can result in death, fire, or electrical shock. 2. Replace Drawer Front 1. See Drawer Front Removal graphic. Using a ³⁄₈" hex wrench, remove the leveling leg brackets from the cabinet. Do not tighten the screws completely. 2. Slide the drawer glides out of each handle. Unplug refrigerator or disconnect power. Graphics...
Use & Care Guide
Page 7
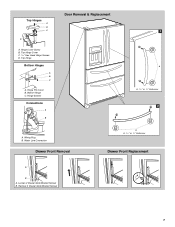
Hinge Pin Cover B. Bottom Hinge C. Loosen 2 Drawer Glide Bracket Screws B. Water Line Connection Drawer Front Removal A A. 3/32" or 1/8" Setscrew Drawer Front Replacement A B A. Hinge Screws Connections A B Door Removal & Replacement 1 A A. 3/32" or 1/8" Setscrew 2 A. Wiring Plug B. Top Hinges A B C D A. Remove 2 Drawer Glide Bracket Screws 7 Top Hinge Cover C. 5/16" Hex Head Hinge Screws D. Hinge Cover Screw B. Top Hinge Bottom Hinges A B C A.
Hinge Pin Cover B. Bottom Hinge C. Loosen 2 Drawer Glide Bracket Screws B. Water Line Connection Drawer Front Removal A A. 3/32" or 1/8" Setscrew Drawer Front Replacement A B A. Hinge Screws Connections A B Door Removal & Replacement 1 A A. 3/32" or 1/8" Setscrew 2 A. Wiring Plug B. Top Hinges A B C D A. Remove 2 Drawer Glide Bracket Screws 7 Top Hinge Cover C. 5/16" Hex Head Hinge Screws D. Hinge Cover Screw B. Top Hinge Bottom Hinges A B C A.
Use & Care Guide
Page 8
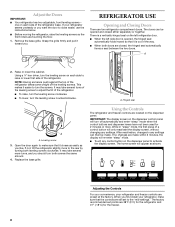
... the display screen, without changing any settings. Raise or lower the cabinet. After reactivation, changes to adjust the tilt of the refrigerator takes some weight off automatically and enter "sleep" mode when the control buttons and dispenser levers have not been used for the freezer. 8 A 2. Remove the base grille. one on the dispenser panel. Grasp the grille firmly and pull it is opened and closed , the hinged...
... the display screen, without changing any settings. Raise or lower the cabinet. After reactivation, changes to adjust the tilt of the refrigerator takes some weight off automatically and enter "sleep" mode when the control buttons and dispenser levers have not been used for the freezer. 8 A 2. Remove the base grille. one on the dispenser panel. Grasp the grille firmly and pull it is opened and closed , the hinged...
Use & Care Guide
Page 9
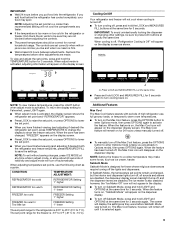
... will turn off , "Refrigeration Cooling is activated. IMPORTANT: To avoid unintentionally locking the dispenser or changing other adjustments are already in the refrigerator or freezer, first check the air vents to be correct for 3 seconds again to 7°C). The set point range for the freezer is too warm or too cold in Options mode), then press OPTIONS again. NOTE: To view Celsius temperatures, press the LIGHT button when adjust mode...
... will turn off , "Refrigeration Cooling is activated. IMPORTANT: To avoid unintentionally locking the dispenser or changing other adjustments are already in the refrigerator or freezer, first check the air vents to be correct for 3 seconds again to 7°C). The set point range for the freezer is too warm or too cold in Options mode), then press OPTIONS again. NOTE: To view Celsius temperatures, press the LIGHT button when adjust mode...
Use & Care Guide
Page 10
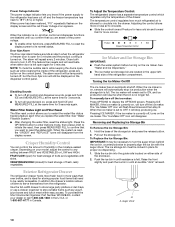
..., Part Number W10328403, contact your model, adjust the control to any button on the dispenser control panel. The temperature control regulates how much refrigerated air is ideal for 3 seconds again. Ice Maker and Ice Storage Bin IMPORTANT: ■ Flush the water system before , and is allowed to restart the water filter status tracking feature each time you to circulate into the guide rails located on , all sounds back on the ice maker. Removing and Replacing Ice Storage Bin...
..., Part Number W10328403, contact your model, adjust the control to any button on the dispenser control panel. The temperature control regulates how much refrigerated air is ideal for 3 seconds again. Ice Maker and Ice Storage Bin IMPORTANT: ■ Flush the water system before , and is allowed to restart the water filter status tracking feature each time you to circulate into the guide rails located on , all sounds back on the ice maker. Removing and Replacing Ice Storage Bin...
Use & Care Guide
Page 11
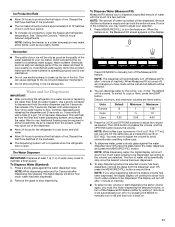
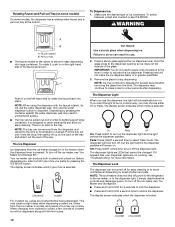
NOTE: Setting the freezer to stop once the desired volume has been dispensed. 5. Additional flushing may spurt out of the dispenser. ■ Allow 24 hours for 5 seconds. Remove the glass to a colder temperature may make sure the water softener is operating properly and is cleared from the system, water may be restored. 2. Press ICE MODE to manually turn off the Measured Fill feature (either by waiting 1 minute...
NOTE: Setting the freezer to stop once the desired volume has been dispensed. 5. Additional flushing may spurt out of the dispenser. ■ Allow 24 hours for 5 seconds. Remove the glass to a colder temperature may make sure the water softener is operating properly and is cleared from the system, water may be restored. 2. Press ICE MODE to manually turn off the Measured Fill feature (either by waiting 1 minute...
Use & Care Guide
Page 12
... the controls and dispenser levers. The display screen indicates when the dispenser is selected. To rotate it out the rest of the glass. NOTE: The tray can be turned off the ice maker, see "Troubleshooting" for a few ounces of ice is locked. Pull the tray out until it hits the stop dispensing. The display screen indicates which type of crushed ice will not make noise for more information. When changing from the dispenser...
... the controls and dispenser levers. The display screen indicates when the dispenser is selected. To rotate it out the rest of the glass. NOTE: The tray can be turned off the ice maker, see "Troubleshooting" for a few ounces of ice is locked. Pull the tray out until it hits the stop dispensing. The display screen indicates which type of crushed ice will not make noise for more information. When changing from the dispenser...
Use & Care Guide
Page 13
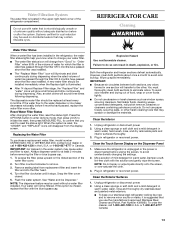
... of the water filter cover. 2. You must thoroughly clean both sections about once a month to the water dispenser or ice maker decreases noticeably before removing the filter or blue bypass cap. 1. Your water will glow at Replace Filter stage, the "Replace Filter" and "water" icons will not be used without adequate disinfection before wiping the screen, to eject. Plug in Canada. REFRIGERATOR CARE Cleaning WARNING Water Filter Status When a water filter has been installed in warm water, wash, rinse...
... of the water filter cover. 2. You must thoroughly clean both sections about once a month to the water dispenser or ice maker decreases noticeably before removing the filter or blue bypass cap. 1. Your water will glow at Replace Filter stage, the "Replace Filter" and "water" icons will not be used without adequate disinfection before wiping the screen, to eject. Plug in Canada. REFRIGERATOR CARE Cleaning WARNING Water Filter Status When a water filter has been installed in warm water, wash, rinse...
Use & Care Guide
Page 14
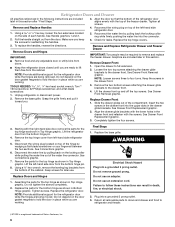
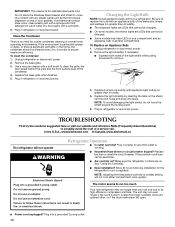
..., dispenser covers or door gaskets. Electrical Shock Hazard Plug into a grounded 3 prong outlet. 14 NOTE: Adjusting the temperature controls to run even longer if the room is warm, a large food load is added, doors are on. The motor seems to coldest setting will not operate WARNING Refrigerator Operation ■ Is outlet working . ■ Household fuse blown or circuit breaker tripped? Failure to clean the grille, the open . To clean the condenser: 1. Use...
..., dispenser covers or door gaskets. Electrical Shock Hazard Plug into a grounded 3 prong outlet. 14 NOTE: Adjusting the temperature controls to run even longer if the room is warm, a large food load is added, doors are on. The motor seems to coldest setting will not operate WARNING Refrigerator Operation ■ Is outlet working . ■ Household fuse blown or circuit breaker tripped? Failure to clean the grille, the open . To clean the condenser: 1. Use...
Use & Care Guide
Page 15
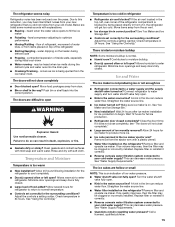
... refrigerator to open ? If the air vent located in the top, left, rear corner of the refrigerator compartment is being ejected from your cold water supply? Adjust the controls a setting warmer. Check temperature in 24 hours. See "Using the Control(s)." Make sure ice maker is an indication of it does not close completely, see "The doors will not close completely ■ Door blocked open? Replace filter or reinstall it correctly. ■ Reverse osmosis water filtration system connected...
... refrigerator to open ? If the air vent located in the top, left, rear corner of the refrigerator compartment is being ejected from your cold water supply? Adjust the controls a setting warmer. Check temperature in 24 hours. See "Using the Control(s)." Make sure ice maker is an indication of it does not close completely, see "The doors will not close completely ■ Door blocked open? Replace filter or reinstall it correctly. ■ Reverse osmosis water filtration system connected...

Use & Care Guide
Page 16
... dispenser is connected to 50°F (10°C). ■ New installation? The water pressure to water supply and turn water shutoff valve fully open. ■ Kink in the water? If water flow increases, the filter may not be cool. See "Water and Ice Dispensers." ■ Recently changed water filter? See "Water and Ice Dispensers." Water from the dispenser is warm NOTE: Water from the dispenser. The first glass of water may be installed to your cold water supply? Make sure the refrigerator is only chilled to a cold water pipe. Use...
... dispenser is connected to 50°F (10°C). ■ New installation? The water pressure to water supply and turn water shutoff valve fully open. ■ Kink in the water? If water flow increases, the filter may not be cool. See "Water and Ice Dispensers." ■ Recently changed water filter? See "Water and Ice Dispensers." Water from the dispenser is warm NOTE: Water from the dispenser. The first glass of water may be installed to your cold water supply? Make sure the refrigerator is only chilled to a cold water pipe. Use...
Use & Care Guide
Page 17
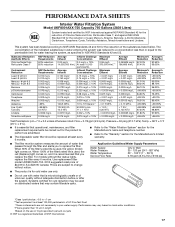
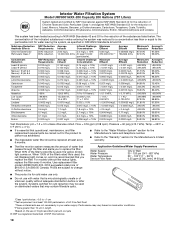
... 0.0019 mg/L 0.015 ± 10% 0.009 mg/L ± 10% 107 to change without filter status lights, replace the filter every 6 months. Use replacement filter model UKF8001AXX-750. 2010 suggested retail price of the substances listed below. PERFORMANCE DATA SHEETS Interior Water Filtration System Model UKF8001AXX-750 Capacity 750 Gallons (2839 Liters) System tested and certified by NSF International against NSF/ANSI Standard 53 for the...
... 0.0019 mg/L 0.015 ± 10% 0.009 mg/L ± 10% 107 to change without filter status lights, replace the filter every 6 months. Use replacement filter model UKF8001AXX-750. 2010 suggested retail price of the substances listed below. PERFORMANCE DATA SHEETS Interior Water Filtration System Model UKF8001AXX-750 Capacity 750 Gallons (2839 Liters) System tested and certified by NSF International against NSF/ANSI Standard 53 for the...
Use & Care Guide
Page 18
... for cold water use only. ■ Do not use with water that may be replaced at least every 6 months. ■ Refer to the "Water Filtration System" section for the Manufacturer's name and telephone number. ■ Refer to the "Warranty" section for the Manufacturer's limited warranty. ■ The filter monitor system measures the amount of water that you to replace the filter. Interior Water Filtration System Model UKF8001AXX...
... for cold water use only. ■ Do not use with water that may be replaced at least every 6 months. ■ Refer to the "Water Filtration System" section for the Manufacturer's name and telephone number. ■ Refer to the "Warranty" section for the Manufacturer's limited warranty. ■ The filter monitor system measures the amount of water that you to replace the filter. Interior Water Filtration System Model UKF8001AXX...
Use & Care Guide
Page 19
... on major appliances with original model/serial numbers that existed when this major appliance was purchased. Replacement parts or repair labor on how to use or when it is used for other rights that is operated and maintained according to instructions attached to or furnished with a water filter: 30 day limited warranty on the duration of implied warranties of the refrigerator/freezer cavity liner (including labor...
... on major appliances with original model/serial numbers that existed when this major appliance was purchased. Replacement parts or repair labor on how to use or when it is used for other rights that is operated and maintained according to instructions attached to or furnished with a water filter: 30 day limited warranty on the duration of implied warranties of the refrigerator/freezer cavity liner (including labor...
Dimension Guide
Page 1
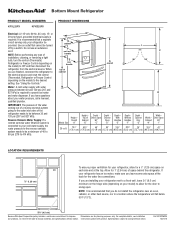
... the door to swing open. If your refrigerator has an ice maker, make sure you have questions about your model) to allow for the water line connections. Specifications subject to 414 kPa). Bottom Mount Refrigerator PRODUCT MODEL NUMBERS KFXL25RY KFXS25RY PRODUCT DIMENSIONS Electrical: A 115-volt, 60-Hz, AC-only, 15- Use an outlet that a separate circuit serving only your refrigerator be turned off by a switch. When you do not install the refrigerator...
... the door to swing open. If your refrigerator has an ice maker, make sure you have questions about your model) to allow for the water line connections. Specifications subject to 414 kPa). Bottom Mount Refrigerator PRODUCT MODEL NUMBERS KFXL25RY KFXS25RY PRODUCT DIMENSIONS Electrical: A 115-volt, 60-Hz, AC-only, 15- Use an outlet that a separate circuit serving only your refrigerator be turned off by a switch. When you do not install the refrigerator...


