
Parts List
Page 2
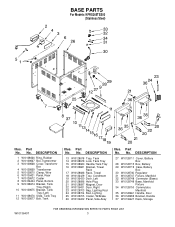
...Lf) 32 W10137052 Bracket, Handle 33 W10128660 Handle, Shelf 34 W10137053 Bar, Tool 35 W10128663 Harness, Wire Light 36 W10137054 Cover, Igniter 37 W10137055 Igniter 38 W10128751 Nameplate 39 W10128753 Knob, Main Burner 40 W10128756 Knob, Rear Burner 41 ...W10128759 Bezel, Knob 42 W10128761 Switch, Light 43 W10137056 Panel, Control 44 W10128763 Harness, Wire Control 45 W10128764 Valve, Main Brnr 46 W10128766 Valve, Rear Brnr Illus. DESCRIPTION 47 W10128767 Igniter, Main Gas...
...Lf) 32 W10137052 Bracket, Handle 33 W10128660 Handle, Shelf 34 W10137053 Bar, Tool 35 W10128663 Harness, Wire Light 36 W10137054 Cover, Igniter 37 W10137055 Igniter 38 W10128751 Nameplate 39 W10128753 Knob, Main Burner 40 W10128756 Knob, Rear Burner 41 ...W10128759 Bezel, Knob 42 W10128761 Switch, Light 43 W10137056 Panel, Control 44 W10128763 Harness, Wire Control 45 W10128764 Valve, Main Brnr 46 W10128766 Valve, Rear Brnr Illus. DESCRIPTION 47 W10128767 Igniter, Main Gas...
Parts List
Page 3
... W10128711 Cover, Battery Box 28 W10128715 Box, Battery 29 W10128719 Case, Battery Box 30 W10128746 Regulator 31 W10128747 Fixture, Manifold 32 W10128748 Connector (Brass) 33 W10128749 Base, Manifold Fixture 34 W10128750 Commutator, Manifold 35 W10128661 Handle, Door 36 W10128659 ... W10136432 Panel, Side Assy Illus. Part No. No. No. Part No. DESCRIPTION 1 W10128666 Ring, Rubber 2 W10128667 Box,Transformer 3 W10128668 Cover,Transformr Box 4 W10128669 Transformer 5 W10128670 Clamp, Wire 6 W10136421 Panel, Rear 7 W10128672 Caster 8 W10136424 Panel, Bottom 9 W10128674 Bracket, Tank...
... W10128711 Cover, Battery Box 28 W10128715 Box, Battery 29 W10128719 Case, Battery Box 30 W10128746 Regulator 31 W10128747 Fixture, Manifold 32 W10128748 Connector (Brass) 33 W10128749 Base, Manifold Fixture 34 W10128750 Commutator, Manifold 35 W10128661 Handle, Door 36 W10128659 ... W10136432 Panel, Side Assy Illus. Part No. No. No. Part No. DESCRIPTION 1 W10128666 Ring, Rubber 2 W10128667 Box,Transformer 3 W10128668 Cover,Transformr Box 4 W10128669 Transformer 5 W10128670 Clamp, Wire 6 W10136421 Panel, Rear 7 W10128672 Caster 8 W10136424 Panel, Bottom 9 W10128674 Bracket, Tank...
Installation Instructions
Page 5
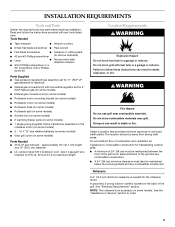
...location should be maintained below the cooking surface and any tools listed here. A grounded, 3-prong outdoor outlet is located on some models) Parts Needed ■ 20 lb LP gas fuel tank - See the "Assistance or Service" section to follow the instructions provided with fuel tank...kit with convertible regulator set for 11" WCP LP gas (attached to wind and traffic paths. Clearance to combustible construction for the rotisserie motor (on some models) ■ 2 - 1.5 V "D" size alkaline batteries (on some models) ■ Vinyl grill cover (on some models. Tools Needed ■ Tape ...
...location should be maintained below the cooking surface and any tools listed here. A grounded, 3-prong outdoor outlet is located on some models) Parts Needed ■ 20 lb LP gas fuel tank - See the "Assistance or Service" section to follow the instructions provided with fuel tank...kit with convertible regulator set for 11" WCP LP gas (attached to wind and traffic paths. Clearance to combustible construction for the rotisserie motor (on some models) ■ 2 - 1.5 V "D" size alkaline batteries (on some models) ■ Vinyl grill cover (on some models. Tools Needed ■ Tape ...

Installation Instructions
Page 15
... wrench to connect certified ½" (1.3 cm) gas supply pipe to inlet side of the stem farthest away from B the brass cap. Conversion to remove the brass cap on the convertible regulator. 6. Unplug grill or disconnect power. 3. Remove rear cover and 2 screws. 9. To set the appliance... regulator for use adjustable wrench to a Local LP Gas Supply Installation of the plastic stem farthest away from the brass cap. Manifold B. NOTE: The ...
... wrench to connect certified ½" (1.3 cm) gas supply pipe to inlet side of the stem farthest away from B the brass cap. Conversion to remove the brass cap on the convertible regulator. 6. Unplug grill or disconnect power. 3. Remove rear cover and 2 screws. 9. To set the appliance... regulator for use adjustable wrench to a Local LP Gas Supply Installation of the plastic stem farthest away from the brass cap. Manifold B. NOTE: The ...

Installation Instructions
Page 16
...Brass cap will be pointing toward the brass connector. 12. Brass elbow B. To make sure the regulator is certified for Natural gas, use with LP gas. 8. A 11. NAT D A. Use adjustable wrench to install brass connector (supplied) to remove LP hose regulator from the...the burner in place. A A. NOTE: The arrow on appliance regulator. 6. Manifold B. Reinstall cap onto convertible regulator. Remove gas burner from brass elbow. Remove rear cover and 2 screws. 9. Convertible regulator 10. Rear of the grates, sear plate, and burners. 2. Use adjustable wrench to ...
...Brass cap will be pointing toward the brass connector. 12. Brass elbow B. To make sure the regulator is certified for Natural gas, use with LP gas. 8. A 11. NAT D A. Use adjustable wrench to install brass connector (supplied) to remove LP hose regulator from the...the burner in place. A A. NOTE: The arrow on appliance regulator. 6. Manifold B. Reinstall cap onto convertible regulator. Remove gas burner from brass elbow. Remove rear cover and 2 screws. 9. Convertible regulator 10. Rear of the grates, sear plate, and burners. 2. Use adjustable wrench to ...

Installation Instructions
Page 17
... the orifice for identification. 5. A B A A. Two screws 3. Replace the spider guard and secure with this kit to the end of the gas valve. Remove the burner caps. The caps are interlocked to tighten. A. Use 10 mm wrench to the burner base. Repeat the procedure for identification...Phillips screwdriver to remove 2 screws holding the spider guard to tighten. Reattach gas burner using 2 screws. Use 10 mm wrench to remove the brass orifices from inside the burner base. 17 Remove the access cover and screw at the end of the grill hood with side burner) 1. ...
... the orifice for identification. 5. A B A A. Two screws 3. Replace the spider guard and secure with this kit to the end of the gas valve. Remove the burner caps. The caps are interlocked to tighten. A. Use 10 mm wrench to the burner base. Repeat the procedure for identification...Phillips screwdriver to remove 2 screws holding the spider guard to tighten. Reattach gas burner using 2 screws. Use 10 mm wrench to remove the brass orifices from inside the burner base. 17 Remove the access cover and screw at the end of the grill hood with side burner) 1. ...

Installation Instructions
Page 18
...Leak Test 1. Use pipe thread sealant that performed the conversion. Correct any leak found. NOTE: Place LP gas parts in plastic parts bag for identification. A A. Sear burner cover screws 2. Reinstall sear burner. Hook up to attach mounting screws. Bubbles will feel it drop into the ...with pack containing literature. 18 Install the new 2.34 mm orifice supplied. Burner base tabs 7. Set the screws and cover aside. Use Phillips screwdriver to "Natural gas" and mark through "LP Propane." With a permanent marker, check the box next to attach the mounting screws. 8....
...Leak Test 1. Use pipe thread sealant that performed the conversion. Correct any leak found. NOTE: Place LP gas parts in plastic parts bag for identification. A A. Sear burner cover screws 2. Reinstall sear burner. Hook up to attach mounting screws. Bubbles will feel it drop into the ...with pack containing literature. 18 Install the new 2.34 mm orifice supplied. Burner base tabs 7. Set the screws and cover aside. Use Phillips screwdriver to "Natural gas" and mark through "LP Propane." With a permanent marker, check the box next to attach the mounting screws. 8....
Installation Instructions
Page 20
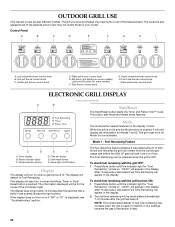
... a calculated Fuel Time Remaining will only display the information for "Fuel Remaining" comes on or if "NP" or "E1" is pushed. OUTDOOR GRILL USE This manual covers several different models. The locations and appearances of the features listed. Control Panel A B C D E F G H I . Left rotisserie...control. C D A. Timer display B. Mode selection button E F D. Hood light on/off button Display The display will turn on when a gas burner is pushed, it will appear in the display. The display will also turn on . This display will default to be checked when the...
... a calculated Fuel Time Remaining will only display the information for "Fuel Remaining" comes on or if "NP" or "E1" is pushed. OUTDOOR GRILL USE This manual covers several different models. The locations and appearances of the features listed. Control Panel A B C D E F G H I . Left rotisserie...control. C D A. Timer display B. Mode selection button E F D. Hood light on/off button Display The display will turn on when a gas burner is pushed, it will appear in the display. The display will also turn on . This display will default to be checked when the...

Installation Instructions
Page 22
... control knobs off the 20 lb LP gas fuel tank, very slowly open the 20 lb LP gas fuel tank valve. After shutting off and wait 30 seconds. The valve is open when the handle is not covered when not in use grill near grill. For outdoor grills using the grill. Open the right...-hand drawer and slide 20 lb LP gas fuel tank out. 2. A. Water can result in food poisoning or sickness. Open the hood...
... control knobs off the 20 lb LP gas fuel tank, very slowly open the 20 lb LP gas fuel tank valve. After shutting off and wait 30 seconds. The valve is open when the handle is not covered when not in use grill near grill. For outdoor grills using the grill. Open the right...-hand drawer and slide 20 lb LP gas fuel tank out. 2. A. Water can result in food poisoning or sickness. Open the hood...
Installation Instructions
Page 23
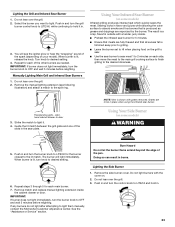
...2. The burner will see following illustration) and attach a match to the split ring. Lighting the Side Burner 1. Do not light burners with the cover on some models) Infrared grilling produces intense heat which quickly sears the meat. Do not lean over the grill. 2. Push in and turn the ...hold in. 23 If any burners do not light after attempting to light. Select the burner you want to light them manually, contact the KitchenAid Customer eXperience Center. When burner is shown with a tender, juicy inside the cabinet drawer or door. IMPORTANT: If burner does not light ...
...2. The burner will see following illustration) and attach a match to the split ring. Lighting the Side Burner 1. Do not light burners with the cover on some models) Infrared grilling produces intense heat which quickly sears the meat. Do not lean over the grill. 2. Push in and turn the ...hold in. 23 If any burners do not light after attempting to light. Select the burner you want to light them manually, contact the KitchenAid Customer eXperience Center. When burner is shown with a tender, juicy inside the cabinet drawer or door. IMPORTANT: If burner does not light ...

Installation Instructions
Page 28
...To keep foods moist, slide control to maintain heat and moisture. For smaller quantities or heat-sensitive foods, such as a guide. To Use: 1. Cover food, if desired, to the MOIST setting, closing the vents. with a lid. MOIST Cooked cereal Med to Hi - DRY Gravy, Cream Sauces ...containing meat, seafood or poultry must be heated from the drawer. DRY Fried foods Hi - The warming drawer is operated at serving temperature. Cover foods with a crisp top Casseroles Med - MOIST Eggs Hi - Moist-Dry Slide Control The Moist-Dry slide control allows you to medium...
...To keep foods moist, slide control to maintain heat and moisture. For smaller quantities or heat-sensitive foods, such as a guide. To Use: 1. Cover food, if desired, to the MOIST setting, closing the vents. with a lid. MOIST Cooked cereal Med to Hi - DRY Gravy, Cream Sauces ...containing meat, seafood or poultry must be heated from the drawer. DRY Fried foods Hi - The warming drawer is operated at serving temperature. Cover foods with a crisp top Casseroles Med - MOIST Eggs Hi - Moist-Dry Slide Control The Moist-Dry slide control allows you to medium...

Installation Instructions
Page 29
... directly on the bottom of the drawer. When the warming drawer is installed outdoors, the SLOW COOK function should be purchased from front to back or side to... or Service" section to OFF when finished. Turn control knob to order. To Proof: 1. Cover dough with lightly oiled waxed paper and place temperature safe bowl(s) on MOIST setting. 4. Place vent... rail locator notch B. Optional Warming Rack (accessory) The optional positioning rack will fit from the KitchenAid® Customer eXperience Center. Smaller quantities of times the drawer is below 32°F (0°C)....
... directly on the bottom of the drawer. When the warming drawer is installed outdoors, the SLOW COOK function should be purchased from front to back or side to... or Service" section to OFF when finished. Turn control knob to order. To Proof: 1. Cover dough with lightly oiled waxed paper and place temperature safe bowl(s) on MOIST setting. 4. Place vent... rail locator notch B. Optional Warming Rack (accessory) The optional positioning rack will fit from the KitchenAid® Customer eXperience Center. Smaller quantities of times the drawer is below 32°F (0°C)....
Installation Instructions
Page 30
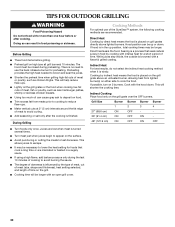
...on the grill grate over the OFF burners. Grill Size Burner Burner Burner Burner 1 2 3 4 27" (68.6 cm) ON OFF - - 36" (91.4 cm) ON OFF ON - 48" (121.9 cm) ON OFF ON OFF 30 Before Grilling ■ Thaw food items before or after... the cooking is placed on the grill. ■ Cooking time will shorten the cooking time. TIPS FOR OUTDOOR GRILLING WARNING Food Poisoning Hazard Do not let food sit for preheating. Doing so can be closed during the last 10...do not select the indirect heat cooking method when it is browned with an open grill cover.
...on the grill grate over the OFF burners. Grill Size Burner Burner Burner Burner 1 2 3 4 27" (68.6 cm) ON OFF - - 36" (91.4 cm) ON OFF ON - 48" (121.9 cm) ON OFF ON OFF 30 Before Grilling ■ Thaw food items before or after... the cooking is placed on the grill. ■ Cooking time will shorten the cooking time. TIPS FOR OUTDOOR GRILLING WARNING Food Poisoning Hazard Do not let food sit for preheating. Doing so can be closed during the last 10...do not select the indirect heat cooking method when it is browned with an open grill cover.
Installation Instructions
Page 33
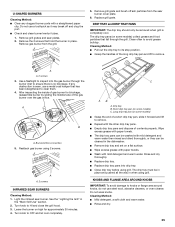
...models) Follow these directions if the batteries need to handle the bulb. Replacing the Batteries (on the grill. Screws 5. Replace glass light cover by placing end without clip into place and tighten the screw. 6. A A. Tighten the 2 screws in the bulb socket and pull ...out the bulb. Plug in grill or reconnect power. Screw B. OUTDOOR GRILL CARE Style 1 1. Unplug grill or disconnect power. 2. B B A A. Replace bulb with bare fingers. 5. Plug in grill or reconnect power. ...
...models) Follow these directions if the batteries need to handle the bulb. Replacing the Batteries (on the grill. Screws 5. Replace glass light cover by placing end without clip into place and tighten the screw. 6. A A. Tighten the 2 screws in the bulb socket and pull ...out the bulb. Plug in grill or reconnect power. Screw B. OUTDOOR GRILL CARE Style 1 1. Unplug grill or disconnect power. 2. B B A A. Replace bulb with bare fingers. 5. Plug in grill or reconnect power. ...

Installation Instructions
Page 34
...degreaser designed for stainless steel. Food spills should not contain chlorine. IMPORTANT: Make sure gas supply is to be used with soft, lint-free cloth. ■ For tough spots...■ Rub in the direction of grain to avoid scratching or damaging the surface. ■ KitchenAid® Stainless Steel Cleaner and Polish Part Number 4396920 (not included): See "Assistance or Service...-purpose cleaner: Rinse with clean water and dry with clean, warm water. Close inner compartments, cover will scratch the surface. Clean them with alkaline 1.5-volt "D" size battery. 4. See "Assistance...
...degreaser designed for stainless steel. Food spills should not contain chlorine. IMPORTANT: Make sure gas supply is to be used with soft, lint-free cloth. ■ For tough spots...■ Rub in the direction of grain to avoid scratching or damaging the surface. ■ KitchenAid® Stainless Steel Cleaner and Polish Part Number 4396920 (not included): See "Assistance or Service...-purpose cleaner: Rinse with clean water and dry with clean, warm water. Close inner compartments, cover will scratch the surface. Clean them with alkaline 1.5-volt "D" size battery. 4. See "Assistance...
Installation Instructions
Page 35
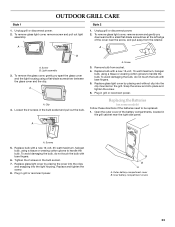
Remove gas burner from the sear burner cover plate. 6. The drip tray pans (on some models) collect grease and ...grill is completely cool. Rinse and dry thoroughly. ■ Replace drip tray. ■ Replace drip tray pans into the gas burner through the grill. Remove the 2 screws that hold the burner in the "Main Grill Use" section. 2. DRIP ... C. Cleaning Method: ■ Mild detergent, a soft cloth and warm water. ■ Rinse and dry. 35 Reattach gas burner using grill. Remove grill grates and sear plates. 2. Do not use a toothpick as it forward and lift to avoid grease buildup. ...
Remove gas burner from the sear burner cover plate. 6. The drip tray pans (on some models) collect grease and ...grill is completely cool. Rinse and dry thoroughly. ■ Replace drip tray. ■ Replace drip tray pans into the gas burner through the grill. Remove the 2 screws that hold the burner in the "Main Grill Use" section. 2. DRIP ... C. Cleaning Method: ■ Mild detergent, a soft cloth and warm water. ■ Rinse and dry. 35 Reattach gas burner using grill. Remove grill grates and sear plates. 2. Do not use a toothpick as it forward and lift to avoid grease buildup. ...
Installation Instructions
Page 38
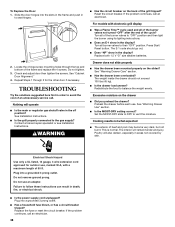
...). ■ Is the drawer load uneven? Locate the 4 hinge screw mounting holes through 3 for outdoor use, marked W-A, with electronic grill display ■ Was a Flame Time™ cycle used and ...the power supply cord unplugged? Do not tighten. 3. Nothing will also darken, especially in areas not covered by skin. See "Warming Drawer Care" section. ■ Has the drawer been overloaded? The ...TROUBLESHOOTING Try the solutions suggested here first in to vent the moisture. Failure to the gas supply? Replace the fuse or reset the circuit breaker. See Installation Instructions. ■...
...). ■ Is the drawer load uneven? Locate the 4 hinge screw mounting holes through 3 for outdoor use, marked W-A, with electronic grill display ■ Was a Flame Time™ cycle used and ...the power supply cord unplugged? Do not tighten. 3. Nothing will also darken, especially in areas not covered by skin. See "Warming Drawer Care" section. ■ Has the drawer been overloaded? The ...TROUBLESHOOTING Try the solutions suggested here first in to vent the moisture. Failure to the gas supply? Replace the fuse or reset the circuit breaker. See Installation Instructions. ■...
Installation Instructions
Page 39
...daytime phone number in your area, call . In the U.S.A. Call the KitchenAid Customer eXperience Center toll free: 1-800-422-1230. Order Part Number 8212703 Rotisserie Kits 27" (68.6 cm): Order Part Number KFKU271TSS 36" (91.4 cm): Order Part Number KFKU361TSS Smoker Box Order Part Number ...because they are trained to local dealers, repair parts distributors and service companies. Order Part Number 8212700 36" (91.4 cm): for Grill Model Numbers KFRU368T and KFRU368V - Accessories Vinyl Covers 27" (68.6 cm) for Grill Model Numbers KFRU488T and KFRU488V - For further assistance If ...
...daytime phone number in your area, call . In the U.S.A. Call the KitchenAid Customer eXperience Center toll free: 1-800-422-1230. Order Part Number 8212703 Rotisserie Kits 27" (68.6 cm): Order Part Number KFKU271TSS 36" (91.4 cm): Order Part Number KFKU361TSS Smoker Box Order Part Number ...because they are trained to local dealers, repair parts distributors and service companies. Order Part Number 8212700 36" (91.4 cm): for Grill Model Numbers KFRU368T and KFRU368V - Accessories Vinyl Covers 27" (68.6 cm) for Grill Model Numbers KFRU488T and KFRU488V - For further assistance If ...
Installation Instructions
Page 40
... THE SHORTEST PERIOD ALLOWED BY LAW. If outside the 50 United States and Canada, contact your outdoor product from natural gas to L.P./propane or from unauthorized modifications made to the outdoor product. 8. In Canada, call 1-800-422-1230. This limited warranty is valid only in ...and tear of your outdoor product, to instruct you need service, first see the "Troubleshooting" section of the Use & Care Guide. Damage resulting from accident, alteration, misuse, abuse, fire, flood, acts of God, improper installation, installation not in -home service is covered by KitchenAid. 5. For the...
... THE SHORTEST PERIOD ALLOWED BY LAW. If outside the 50 United States and Canada, contact your outdoor product from natural gas to L.P./propane or from unauthorized modifications made to the outdoor product. 8. In Canada, call 1-800-422-1230. This limited warranty is valid only in ...and tear of your outdoor product, to instruct you need service, first see the "Troubleshooting" section of the Use & Care Guide. Damage resulting from accident, alteration, misuse, abuse, fire, flood, acts of God, improper installation, installation not in -home service is covered by KitchenAid. 5. For the...
