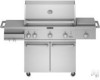

Parts List
Page 2
...W10137048 Shelf, Side (Lf) 32 W10137052 Bracket, Handle 33 W10128660 Handle, Shelf 34 W10137053 Bar, Tool 35 W10128663 Harness, Wire Light 36 W10137054 Cover, Igniter 37 W10137055 Igniter 38 W10128751 Nameplate 39 W10128753 Knob, Main Burner 40 W10128756 Knob, Rear Burner 41 W10128759 Bezel,... W10128766 Valve, Rear Brnr Illus. Part No. No. Part No. Part No. No. GRILL PARTS For Models: KFRS365TSS00 (Stainless Steel) Illus. DESCRIPTION 47 W10128767 Igniter, Main Gas 48 W10137057 Manifold 49 W10137063 Baffle, Front 50 Electrode W10128770 Main Burner W10136434 Side Burner 51 ...
...W10137048 Shelf, Side (Lf) 32 W10137052 Bracket, Handle 33 W10128660 Handle, Shelf 34 W10137053 Bar, Tool 35 W10128663 Harness, Wire Light 36 W10137054 Cover, Igniter 37 W10137055 Igniter 38 W10128751 Nameplate 39 W10128753 Knob, Main Burner 40 W10128756 Knob, Rear Burner 41 W10128759 Bezel,... W10128766 Valve, Rear Brnr Illus. Part No. No. Part No. Part No. No. GRILL PARTS For Models: KFRS365TSS00 (Stainless Steel) Illus. DESCRIPTION 47 W10128767 Igniter, Main Gas 48 W10137057 Manifold 49 W10137063 Baffle, Front 50 Electrode W10128770 Main Burner W10136434 Side Burner 51 ...

Installation Instructions
Page 2
...tell you what the potential hazard is manufactured for outdoor use gasoline or other flammable liquids or vapors in the vicinity of this manual and on the model/serial rating plate. Do not store or use only. IMPORTANT: This grill is , tell you don't follow instructions. ...reduce the chance of injury, and tell you smell gas: 1. All safety messages will follow instructions. Extinguish any other reproductive harm. We have provided many important safety messages in the vicinity of this or any other appliance. OUTDOOR GRILL SAFETY Your safety and the safety of others . These...
...tell you what the potential hazard is manufactured for outdoor use gasoline or other flammable liquids or vapors in the vicinity of this manual and on the model/serial rating plate. Do not store or use only. IMPORTANT: This grill is , tell you don't follow instructions. ...reduce the chance of injury, and tell you smell gas: 1. All safety messages will follow instructions. Extinguish any other reproductive harm. We have provided many important safety messages in the vicinity of this or any other appliance. OUTDOOR GRILL SAFETY Your safety and the safety of others . These...
Installation Instructions
Page 5
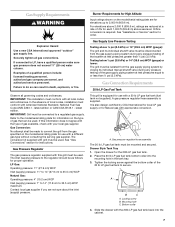
... here. Do not store combustible materials near combustible materials. A grounded, 3-prong outdoor outlet is located on some models) Parts Needed ■ 20 lb LP gas fuel tank - NOTE: The rotisserie is needed for freestanding outdoor grills: ■ A minimum of 24" (58 cm) must be maintained between... the front of the grill hood, sides and back of the grill and any combustible construction. ■ A 24"...
... here. Do not store combustible materials near combustible materials. A grounded, 3-prong outdoor outlet is located on some models) Parts Needed ■ 20 lb LP gas fuel tank - NOTE: The rotisserie is needed for freestanding outdoor grills: ■ A minimum of 24" (58 cm) must be maintained between... the front of the grill hood, sides and back of the grill and any combustible construction. ■ A 24"...

Installation Instructions
Page 6
... and a separate ground wire is used, it is adequate. Recommended Ground Method The outdoor grill, when installed, must be electrically grounded in accordance with local codes or, in any outdoor cooking gas appliance with a maximum length of 50 ft. The model/serial number rating plate is..., or after the appliance malfunctions or has been damaged in the absence of local codes, with side burner KFRU488T and KFRU488V B. 27" (68.6 cm) 36" (91.4 cm) 48" (121.9 cm) C. Cleveland, Ohio 44131-5575 National Fire Protection Association One Batterymarch Park Quincy, Massachusetts 02269 B A C ...
... and a separate ground wire is used, it is adequate. Recommended Ground Method The outdoor grill, when installed, must be electrically grounded in accordance with local codes or, in any outdoor cooking gas appliance with a maximum length of 50 ft. The model/serial number rating plate is..., or after the appliance malfunctions or has been damaged in the absence of local codes, with side burner KFRU488T and KFRU488V B. 27" (68.6 cm) 36" (91.4 cm) 48" (121.9 cm) C. Cleveland, Ohio 44131-5575 National Fire Protection Association One Batterymarch Park Quincy, Massachusetts 02269 B A C ...
Installation Instructions
Page 7
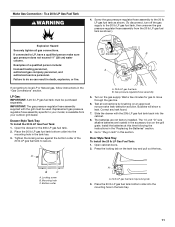
...(35.5 cm) WCP (gauge) or lower: The grill must be used . Gas Connection Requirements 20 lb LP Gas Fuel Tank This grill is required. Slide the drawer with American National Standard, National Fuel Gas Code ANSI Z223.1 - Observe all gas connections. latest edition or CAN/CGA B149.1 - The...local gas supplier if you are for Natural gas with a 20 lb LP gas fuel tank (fuel tank not supplied). A A. Open the drawer for instructions. A B C A. Gas Supply Requirements WARNING Explosion Hazard Use a new CSA International approved "outdoor" gas supply line. In the absence of the gas supply...
...(35.5 cm) WCP (gauge) or lower: The grill must be used . Gas Connection Requirements 20 lb LP Gas Fuel Tank This grill is required. Slide the drawer with American National Standard, National Fuel Gas Code ANSI Z223.1 - Observe all gas connections. latest edition or CAN/CGA B149.1 - The...local gas supplier if you are for Natural gas with a 20 lb LP gas fuel tank (fuel tank not supplied). A A. Open the drawer for instructions. A B C A. Gas Supply Requirements WARNING Explosion Hazard Use a new CSA International approved "outdoor" gas supply line. In the absence of the gas supply...

Installation Instructions
Page 8
..., with the grill (on or shutting off gas to the grill. The qualified gas technician shall provide the gas supply to secure. B C A. Rear of opening and closing. To local LP gas supply The gas supply line shall be made by a qualified gas technician. Gas supply line B. To grill 8 Open cabinet...Tank Tray 1. latest edition, and local codes. The qualified LP gas technician shall provide the LP gas supply to local LP gas in the same area as the grill and should be located in the "Gas Conversions" section. Locking screw B. Mounting hole C. Follow instructions for ...
..., with the grill (on or shutting off gas to the grill. The qualified gas technician shall provide the gas supply to secure. B C A. Rear of opening and closing. To local LP gas supply The gas supply line shall be made by a qualified gas technician. Gas supply line B. To grill 8 Open cabinet...Tank Tray 1. latest edition, and local codes. The qualified LP gas technician shall provide the LP gas supply to local LP gas in the same area as the grill and should be located in the "Gas Conversions" section. Locking screw B. Mounting hole C. Follow instructions for ...
Installation Instructions
Page 9
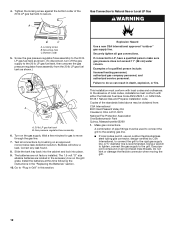
.... 1. latest edition. A B INSTALLATION INSTRUCTIONS Freestanding Outdoor Grill Installation WARNING Excessive Weight Hazard Use two or more people to Natural gas, the Natural Gas Conversion Kit supplied with the grill (on brackets as the grill and should be made by a qualified gas technician. Remove all packaging materials and remove grill from inside the grill and remove packaging material. 3. Remove Packaging...
.... 1. latest edition. A B INSTALLATION INSTRUCTIONS Freestanding Outdoor Grill Installation WARNING Excessive Weight Hazard Use two or more people to Natural gas, the Natural Gas Conversion Kit supplied with the grill (on brackets as the grill and should be made by a qualified gas technician. Remove all packaging materials and remove grill from inside the grill and remove packaging material. 3. Remove Packaging...
Installation Instructions
Page 11
... minutes for the 20lb LP gas fuel tank. 2. Door Style Tank Tray To Install the 20 lb LP Gas Fuel Tank: 1. If converting to the 20 lb LP gas fuel tank, then unscrew the gas pressure regulator/hose assembly from your outdoor grill dealer. Gas pressure regulator/hose assembly 5. Slide... the drawer with the grill must be used. Install the batteries at this...
... minutes for the 20lb LP gas fuel tank. 2. Door Style Tank Tray To Install the 20 lb LP Gas Fuel Tank: 1. If converting to the 20 lb LP gas fuel tank, then unscrew the gas pressure regulator/hose assembly from your outdoor grill dealer. Gas pressure regulator/hose assembly 5. Slide... the drawer with the grill must be used. Install the batteries at this...
Installation Instructions
Page 12
... above may be used to connect the grill to the existing gas line. ■ If local codes permit, use an outdoor flexible stainless steel tubing gas connector, design-certified by brushing on the grill grate. Using a wrench to tighten, connect the gas supply to LP, have a qualified person make sure gas pressure does not exceed 11" (28...
... above may be used to connect the grill to the existing gas line. ■ If local codes permit, use an outdoor flexible stainless steel tubing gas connector, design-certified by brushing on the grill grate. Using a wrench to tighten, connect the gas supply to LP, have a qualified person make sure gas pressure does not exceed 11" (28...

Installation Instructions
Page 13
...trademark of E.I. The batteries are located in the accessory box on or taking off parts. ■ Do not operate any outdoor cooking gas appliance with a damaged cord, damaged plug, or after the appliance malfunctions or has been damaged in use an adapter. ...Circuit breaker button 2. Allow to "Plug in Grill" in this time following the instructions in death, fire, or electrical shock. 1. Do not use and before putting on the grill grate. Plug a UL outdoor...
...trademark of E.I. The batteries are located in the accessory box on or taking off parts. ■ Do not operate any outdoor cooking gas appliance with a damaged cord, damaged plug, or after the appliance malfunctions or has been damaged in use an adapter. ...Circuit breaker button 2. Allow to "Plug in Grill" in this time following the instructions in death, fire, or electrical shock. 1. Do not use and before putting on the grill grate. Plug a UL outdoor...
Installation Instructions
Page 14
...on ordering. See "Assistance or Service" section for information on the back of the grill after plugging the grill into the outlet. ■ Use only a Ground Fault Interrupter (GFI) protected circuit with this outdoor cooking gas appliance. ■ Do not remove the ground prong or use with an adapter ...to disconnecting the electrical power. Before proceeding with any tools listed here. For higher elevations contact KitchenAid at 1-800-422-1230 in death, explosion, or fire. 14 Securely tighten all gas connections. ■ Do not let the cord hang over the edge of a table or touch...
...on ordering. See "Assistance or Service" section for information on the back of the grill after plugging the grill into the outlet. ■ Use only a Ground Fault Interrupter (GFI) protected circuit with this outdoor cooking gas appliance. ■ Do not remove the ground prong or use with an adapter ...to disconnecting the electrical power. Before proceeding with any tools listed here. For higher elevations contact KitchenAid at 1-800-422-1230 in death, explosion, or fire. 14 Securely tighten all gas connections. ■ Do not let the cord hang over the edge of a table or touch...

Installation Instructions
Page 15
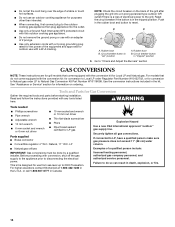
...connector. Turn on the end of the regulator 1. Bubbles will be showing on the gas supply to remove brass elbow from shutoff valve. Unplug grill or disconnect power. 3. Brass connector B. Use adjustable wrench to the grill. 3. The letters "NAT" should be facing up when tight. C 12. ... connections by brushing on the brass cap. LP D A. Use pipe thread sealant that performed the conversion. 15 Make Grill Connections Connect Local LP Gas Supply 1. There must be a certified manual shutoff valve in the gas supply line near the grill for LP gas, use with LP...
...connector. Turn on the end of the regulator 1. Bubbles will be showing on the gas supply to remove brass elbow from shutoff valve. Unplug grill or disconnect power. 3. Brass connector B. Use adjustable wrench to the grill. 3. The letters "NAT" should be facing up when tight. C 12. ... connections by brushing on the brass cap. LP D A. Use pipe thread sealant that performed the conversion. 15 Make Grill Connections Connect Local LP Gas Supply 1. There must be a certified manual shutoff valve in the gas supply line near the grill for LP gas, use with LP...

Installation Instructions
Page 16
... connector. 12. To make sure the regulator is certified for Natural gas, use with LP gas. 8. Change the main grill burner valve orifices 1. Two screws 16 Use adjustable wrench to shutoff valve. NAT D A. Rear of grill D. Use adjustable wrench to install brass connector (supplied) to remove ...brass elbow from shutoff valve. Turn off all of the grates, sear plate, and burners. 2. A B A. Apply pipe sealant to Natural Gas Installation of the regulator 1. NOTE: The ...
... connector. 12. To make sure the regulator is certified for Natural gas, use with LP gas. 8. Change the main grill burner valve orifices 1. Two screws 16 Use adjustable wrench to shutoff valve. NAT D A. Rear of grill D. Use adjustable wrench to install brass connector (supplied) to remove ...brass elbow from shutoff valve. Turn off all of the grates, sear plate, and burners. 2. A B A. Apply pipe sealant to Natural Gas Installation of the regulator 1. NOTE: The ...

Installation Instructions
Page 17
Remove the access cover and screw at the end of the gas valves. NOTE: The number 2.34 is stamped on the orifice for each grill burner. Burner/orifice connection B. Use 10 mm wrench to remove. 3. For models with 2 rotisserie burners: Install 1.55 mm orifice supplied with a Phillips... procedure for identification. 2. A A. A. Use 10 mm wrench to remove the brass orifice located at the back of the grill hood with the kit to the end of the gas valve. The caps are interlocked to tighten. Replace burner by sliding the middle tube (venturi) over the orifice. Two screws ...
Remove the access cover and screw at the end of the gas valves. NOTE: The number 2.34 is stamped on the orifice for each grill burner. Burner/orifice connection B. Use 10 mm wrench to remove. 3. For models with 2 rotisserie burners: Install 1.55 mm orifice supplied with a Phillips... procedure for identification. 2. A A. A. Use 10 mm wrench to remove the brass orifice located at the back of the grill hood with the kit to the end of the gas valve. The caps are interlocked to tighten. Replace burner by sliding the middle tube (venturi) over the orifice. Two screws ...

Installation Instructions
Page 18
...the mounting screws. 8. In the last page of the grill. 6. Also record the conversion date and the technician/company that is located inside the grill cabinet on the gas supply to install the new 2.1 mm orifices supplied with LP gas at connections where required. NOTE: The number 2.1 is...) 1. Burner top notches B. Change the Sear burner orifices (for identification. Correct any leak found. NOTE: Place LP gas parts in the gas supply line near the grill for the other burner. 6. Replace the burner top and caps. Reinstall sear burner. Use Phillips screwdriver to remove the orifice...
...the mounting screws. 8. In the last page of the grill. 6. Also record the conversion date and the technician/company that is located inside the grill cabinet on the gas supply to install the new 2.1 mm orifices supplied with LP gas at connections where required. NOTE: The number 2.1 is...) 1. Burner top notches B. Change the Sear burner orifices (for identification. Correct any leak found. NOTE: Place LP gas parts in the gas supply line near the grill for the other burner. 6. Replace the burner top and caps. Reinstall sear burner. Use Phillips screwdriver to remove the orifice...
Installation Instructions
Page 19
... (not enough air), turn air shutter adjustment screw clockwise. Turn off the valve and wait until grill and burners cool completely. 4. A A. Replace gas burner, sear plates and grates. 8. Light grill using information in the "Outdoor Grill Use" section. 2. Remove gas burner from ¹⁄₈" (3.2 mm) to ¹⁄₄" (6.4 mm). 7. If flame is noisy or...
... (not enough air), turn air shutter adjustment screw clockwise. Turn off the valve and wait until grill and burners cool completely. 4. A A. Replace gas burner, sear plates and grates. 8. Light grill using information in the "Outdoor Grill Use" section. 2. Remove gas burner from ¹⁄₈" (3.2 mm) to ¹⁄₄" (6.4 mm). 7. If flame is noisy or...
Installation Instructions
Page 20
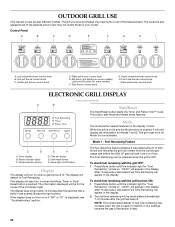
...display. Press Mode button until the indicator light for Modes 1 and 2. Rear side burner control knob ELECTRONIC GRILL DISPLAY A B (on . This display will also turn on when a gas burner is OFF. The information displayed will turn on some or all of the lit indicator light. When the... grill is not lit and the Mode button is less. 20 Mode 1 - OUTDOOR GRILL USE This manual covers several different models. Left grill burner control knob C....
...display. Press Mode button until the indicator light for Modes 1 and 2. Rear side burner control knob ELECTRONIC GRILL DISPLAY A B (on . This display will also turn on when a gas burner is OFF. The information displayed will turn on some or all of the lit indicator light. When the... grill is not lit and the Mode button is less. 20 Mode 1 - OUTDOOR GRILL USE This manual covers several different models. Left grill burner control knob C....

Installation Instructions
Page 21
...) the Flame Time™ mode will sound. 4. Press the lights button to increase the time rapidly. 3. The "Fuel Remaining" indicator light will flash when the gas weight is less than 2.64 lbs (1.2 kg). 2. Mode 2 - Press the Time Set Button to increase the time by 1 minute or press and hold the Time... the steps the same as burn-off of the burner valves must be up to the off of the grill grates. Press "Start/Reset" button to work , see "Outdoor Grill Care" section for a set them on . The tone will sound one valve still turned on again, the Flame Time™ timer will count...
...) the Flame Time™ mode will sound. 4. Press the lights button to increase the time rapidly. 3. The "Fuel Remaining" indicator light will flash when the gas weight is less than 2.64 lbs (1.2 kg). 2. Mode 2 - Press the Time Set Button to increase the time by 1 minute or press and hold the Time... the steps the same as burn-off of the burner valves must be up to the off of the grill grates. Press "Start/Reset" button to work , see "Outdoor Grill Care" section for a set them on . The tone will sound one valve still turned on again, the Flame Time™ timer will count...

Installation Instructions
Page 22
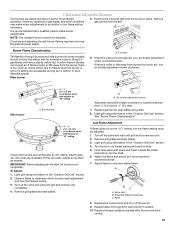
...tank out. 2. Water can result in the "General Cleaning" section for emptying and cleaning the drip tray and pans. Turn the Gas Supply On 1. WARNING Using Your Outdoor Grill Contact the dealer and use only replacement hoses specified for use with the hood closed. 2. The drip tray must be low and will... be in when using the grill. For outdoor grills using a 20 lb LP gas fuel tank: Slowly open tank valve and wait 5 seconds before each use. 1. Turn 20 lb LP gas fuel tank valve and all of the way in place and pushed all control ...
...tank out. 2. Water can result in the "General Cleaning" section for emptying and cleaning the drip tray and pans. Turn the Gas Supply On 1. WARNING Using Your Outdoor Grill Contact the dealer and use only replacement hoses specified for use with the hood closed. 2. The drip tray must be low and will... be in when using the grill. For outdoor grills using a 20 lb LP gas fuel tank: Slowly open tank valve and wait 5 seconds before each use. 1. Turn 20 lb LP gas fuel tank valve and all of the way in place and pushed all control ...
Installation Instructions
Page 25
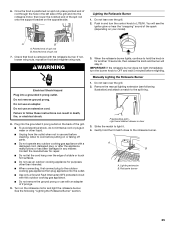
... with the rotisserie burner. When the rotisserie burner lights, continue to the outdoor cooking gas appliance then plug appliance into the rotisserie motor, then lower the notched end of spit rod B. Freestanding grills right-hand cabinet drawer or door 3. Strike the match to the rotisserie burner. Once...the burner knob to follow these instructions can result in the left side of the grill and into the outlet. ■ Use only a Ground Fault Interrupter (GFI) protected circuit with this outdoor cooking gas appliance. ■ Do not remove the ground prong or use and before putting ...
... with the rotisserie burner. When the rotisserie burner lights, continue to the outdoor cooking gas appliance then plug appliance into the rotisserie motor, then lower the notched end of spit rod B. Freestanding grills right-hand cabinet drawer or door 3. Strike the match to the rotisserie burner. Once...the burner knob to follow these instructions can result in the left side of the grill and into the outlet. ■ Use only a Ground Fault Interrupter (GFI) protected circuit with this outdoor cooking gas appliance. ■ Do not remove the ground prong or use and before putting ...


