
Use and Care Guide
Page 1
...les instructions d'installation pour référence ultérieure. Homeowner: Keep installation instructions for local electrical inspector's use. OUTDOOR GRILLS FREESTANDING AND BUILT-IN Installation Instructions and Use & Care Guide For questions about features, operation/performance, parts, accessories or service,...Au Canada, pour assistance, installation ou service, composez le 1-800-807-6777 ou visitez notre site web à www.KitchenAid.ca Table of Contents/Table des matières 2 IMPORTANT: Save for future reference. Models/Modèles KFRS271T, KFRS361T, ...
...les instructions d'installation pour référence ultérieure. Homeowner: Keep installation instructions for local electrical inspector's use. OUTDOOR GRILLS FREESTANDING AND BUILT-IN Installation Instructions and Use & Care Guide For questions about features, operation/performance, parts, accessories or service,...Au Canada, pour assistance, installation ou service, composez le 1-800-807-6777 ou visitez notre site web à www.KitchenAid.ca Table of Contents/Table des matières 2 IMPORTANT: Save for future reference. Models/Modèles KFRS271T, KFRS361T, ...

Use and Care Guide
Page 3
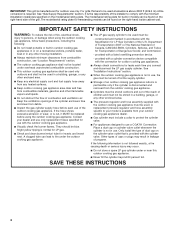
...gas supplier or your appliance. State of California Proposition 65 Warnings: WARNING: This product contains a chemical known to the State of California to the appliance. 2. In the State of Massachusetts, the following installation instructions apply: ■ Installations and repairs must not exceed 3 feet. 3 Always read and obey all safety messages. An LP... follow instructions. This is , tell you how to cause birth defects or other appliance. OUTDOOR GRILL SAFETY Your safety and the safety of others . Do not store or use shall not be killed or seriously...
...gas supplier or your appliance. State of California Proposition 65 Warnings: WARNING: This product contains a chemical known to the State of California to the appliance. 2. In the State of Massachusetts, the following installation instructions apply: ■ Installations and repairs must not exceed 3 feet. 3 Always read and obey all safety messages. An LP... follow instructions. This is , tell you how to cause birth defects or other appliance. OUTDOOR GRILL SAFETY Your safety and the safety of others . Do not store or use shall not be killed or seriously...
Use and Care Guide
Page 4
... plate. provided with the outdoor cooking gas appliance. ■ Visually check the burner flames. For grills that is provided with the connection for outdoor cooking gas appliances. ■ Always check connections for LP Gas Cylinders of the grill. Contact your model is available from combustible...should be replaced before each time you connect and disconnect the LP gas supply cylinder. and Commission. - IMPORTANT: This grill is manufactured for insects and insect nest. Slight yellow tipping is normal for LP gas. ■ Check and clean burner/venturi tube for outdoor ...
... plate. provided with the outdoor cooking gas appliance. ■ Visually check the burner flames. For grills that is provided with the connection for outdoor cooking gas appliances. ■ Always check connections for LP Gas Cylinders of the grill. Contact your model is available from combustible...should be replaced before each time you connect and disconnect the LP gas supply cylinder. and Commission. - IMPORTANT: This grill is manufactured for insects and insect nest. Slight yellow tipping is normal for LP gas. ■ Check and clean burner/venturi tube for outdoor ...

Use and Care Guide
Page 5
...with any tools listed here. Parts Supplied ■ Convertible regulator set for 11" WCP LP gas (attached to wind and traffic paths. WARNING Fire Hazard Do not use grill near grill. Select a location that provides minimum exposure to manifold). ■ 1.5-volt "D" size alkaline...before starting installation. Do not store grill with a rotisserie, a 6" (15.2 cm) minimum clearance is required. Rotisserie (accessory)* If you equip your grill with fuel tank in a garage or indoors. Failure to pressure regulator. ■ LP gas-resistant pipe-joint compound ■ CSA...
...with any tools listed here. Parts Supplied ■ Convertible regulator set for 11" WCP LP gas (attached to wind and traffic paths. WARNING Fire Hazard Do not use grill near grill. Select a location that provides minimum exposure to manifold). ■ 1.5-volt "D" size alkaline...before starting installation. Do not store grill with a rotisserie, a 6" (15.2 cm) minimum clearance is required. Rotisserie (accessory)* If you equip your grill with fuel tank in a garage or indoors. Failure to pressure regulator. ■ LP gas-resistant pipe-joint compound ■ CSA...
Use and Care Guide
Page 6
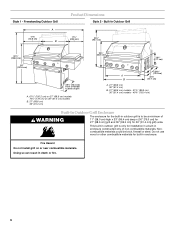
... a minimum of 11" (28.0 cm) high x 23" (58.4 cm) deep x (30" [76.0 cm] for 27" [68.6 cm] grill and 39" [99.0 cm] for the built-in death or fire. 6 Fire Hazard Do not install grill on 36" (91.4 cm) models B. 27" (68.6 cm) 36" (91.4 cm) 23¾" (60.5 cm) 10⁵⁄₈...¹⁄₂" (72.4 cm) front of handle to be brick, firewall or steel. Doing so can result in outdoor grill is only for built-in enclosure constructed only of grill A. 61½" (156.2 cm) on 27" (68.6 cm) models 70½" (179 cm) on or near combustible materials. This built-in outdoor...
... a minimum of 11" (28.0 cm) high x 23" (58.4 cm) deep x (30" [76.0 cm] for 27" [68.6 cm] grill and 39" [99.0 cm] for the built-in death or fire. 6 Fire Hazard Do not install grill on 36" (91.4 cm) models B. 27" (68.6 cm) 36" (91.4 cm) 23¾" (60.5 cm) 10⁵⁄₈...¹⁄₂" (72.4 cm) front of handle to be brick, firewall or steel. Doing so can result in outdoor grill is only for built-in enclosure constructed only of grill A. 61½" (156.2 cm) on 27" (68.6 cm) models 70½" (179 cm) on or near combustible materials. This built-in outdoor...

Use and Care Guide
Page 7
... into the opening and the bottom of the grill should be followed. 3" to o(7p.e6ncmho)omdin. The illustration is opened to 90 degrees Between a Trash Drawer, Utility Drawer, or Warming Drawer: K = 3" (7.6 cm) 7 E K (239.2¹&#... the absence of local codes, with either the National Fuel Gas Code, ANSI Z223.1/NPFA 54, Natural Gas and Propane Installation Code, CSA B149.1, or Propane Storage and Handling Code, B149.2. Cabinet Cutout Dimensions (Built-In Outdoor Grills) The installation of this grill must be supported by the bottom support of the standards listed...
... into the opening and the bottom of the grill should be followed. 3" to o(7p.e6ncmho)omdin. The illustration is opened to 90 degrees Between a Trash Drawer, Utility Drawer, or Warming Drawer: K = 3" (7.6 cm) 7 E K (239.2¹&#... the absence of local codes, with either the National Fuel Gas Code, ANSI Z223.1/NPFA 54, Natural Gas and Propane Installation Code, CSA B149.1, or Propane Storage and Handling Code, B149.2. Cabinet Cutout Dimensions (Built-In Outdoor Grills) The installation of this grill must be supported by the bottom support of the standards listed...

Use and Care Guide
Page 8
...8311;⁄₈" (58.1 cm) 22⁷⁄₈" (58.1 cm) Grill Size 27" (68.6 cm) 36" (91.4 cm) 48" (121.9 cm) Cutout Dimensions - Cutout Dimensions - Built-in Grill with insulated jacket Grill without insulated jacket Cabinet Height and Depth Dimensions Dimension A Minimum Dimension B Minimum ...(94.0 cm) 26" (66.0 cm) 36½" (92.7 cm) 27" (68.6 cm) 35½" (90.2 cm) 26" (66.0 cm) Grill Size 27" (68.6 cm) 36" (91.4 cm) 48" (121.9 cm) Cutout Dimensions - With outdoor refrigerator Grill with Insulated Jacket Dimension C Dimension D 33" (83.8 cm) 11¾"...
...8311;⁄₈" (58.1 cm) 22⁷⁄₈" (58.1 cm) Grill Size 27" (68.6 cm) 36" (91.4 cm) 48" (121.9 cm) Cutout Dimensions - Cutout Dimensions - Built-in Grill with insulated jacket Grill without insulated jacket Cabinet Height and Depth Dimensions Dimension A Minimum Dimension B Minimum ...(94.0 cm) 26" (66.0 cm) 36½" (92.7 cm) 27" (68.6 cm) 35½" (90.2 cm) 26" (66.0 cm) Grill Size 27" (68.6 cm) 36" (91.4 cm) 48" (121.9 cm) Cutout Dimensions - With outdoor refrigerator Grill with Insulated Jacket Dimension C Dimension D 33" (83.8 cm) 11¾"...

Use and Care Guide
Page 9
...in the enclosure: An enclosure for use with a qualified electrician if you are to be a minimum of 10 in Outdoor Grill Enclosure Ventilation for LP Gas: An enclosure for mounting the optional door or drawers. Warming Drawer Size 24" (61.0 cm) Cutout Dimensions - ventilation...Built-in death, fire, or electrical shock. See the following illustration. Failure to follow these vents are not sure whether the grill is required. If converting to LP gas, these instructions can result in Trash Drawer Dimension M Dimension L* 12¼" (31.1 cm) 1½" (3.8 cm) *Dimension...
...in the enclosure: An enclosure for use with a qualified electrician if you are to be a minimum of 10 in Outdoor Grill Enclosure Ventilation for LP Gas: An enclosure for mounting the optional door or drawers. Warming Drawer Size 24" (61.0 cm) Cutout Dimensions - ventilation...Built-in death, fire, or electrical shock. See the following illustration. Failure to follow these vents are not sure whether the grill is required. If converting to LP gas, these instructions can result in Trash Drawer Dimension M Dimension L* 12¼" (31.1 cm) 1½" (3.8 cm) *Dimension...
Use and Care Guide
Page 10
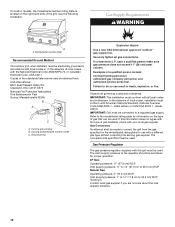
...-hand side of the standards listed above may be as follows for proper operation: LP Gas: Operating pressure: 11" (27.9 cm) WCP Inlet (supply) pressure: 11" to 14" (27.9 cm to 35.5 cm) WCP Natural Gas: Operating pressure: 4" (10.2 cm) WCP Inlet (supply) pressure: 7" to...Use a new CSA International approved "outdoor" gas supply line. Examples of gas available, check with the type of a qualified person include: licensed heating personnel, authorized gas company personnel, and authorized service personnel. If connected to convert the grill from : CSA International 8501 East Pleasant Valley...
...-hand side of the standards listed above may be as follows for proper operation: LP Gas: Operating pressure: 11" (27.9 cm) WCP Inlet (supply) pressure: 11" to 14" (27.9 cm to 35.5 cm) WCP Natural Gas: Operating pressure: 4" (10.2 cm) WCP Inlet (supply) pressure: 7" to...Use a new CSA International approved "outdoor" gas supply line. Examples of gas available, check with the type of a qualified person include: licensed heating personnel, authorized gas company personnel, and authorized service personnel. If connected to convert the grill from : CSA International 8501 East Pleasant Valley...

Use and Care Guide
Page 11
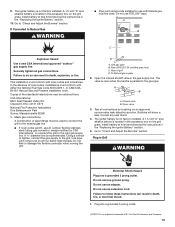
... codes, or in the absence of that system at test pressures equal to secure. Open cabinet doors. 2. Grill gas pipe B. Rear of the 20 lb LP gas fuel tank to or less than ½ psig (3.5 kPa). latest edition. 11 Bottom collar 5. latest edition...greater than ½ psig (3.5 kPa). Mounting hole C. The qualified LP gas technician shall provide the LP gas supply to the selected grill location in accordance with appropriate conversion. D A. Freestanding Outdoor Grills LP Gas Fuel Tank This grill is required. Press the locking tab on the model/serial rating ...
... codes, or in the absence of that system at test pressures equal to secure. Open cabinet doors. 2. Grill gas pipe B. Rear of the 20 lb LP gas fuel tank to or less than ½ psig (3.5 kPa). latest edition. 11 Bottom collar 5. latest edition...greater than ½ psig (3.5 kPa). Mounting hole C. The qualified LP gas technician shall provide the LP gas supply to the selected grill location in accordance with appropriate conversion. D A. Freestanding Outdoor Grills LP Gas Fuel Tank This grill is required. Press the locking tab on the model/serial rating ...
Use and Care Guide
Page 12
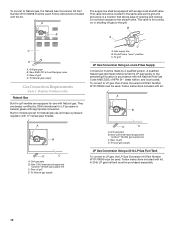
... off gas to the grill. To grill LP Gas Conversion Using a Local LP Gas Supply Conversion must be made by CSA International for Natural gas use with an approved shutoff valve. A B A B D C A. New CSA International approved "outdoor" flexible gas supply line C. Follow instructions included with kit. Grill gas pipe B. C A. Grill gas pipe B. Rear of grill D. To Natural gas supply Gas Connection Requirements Style 2 - To convert to LP gas, the LP Gas...
... off gas to the grill. To grill LP Gas Conversion Using a Local LP Gas Supply Conversion must be made by CSA International for Natural gas use with an approved shutoff valve. A B A B D C A. New CSA International approved "outdoor" flexible gas supply line C. Follow instructions included with kit. Grill gas pipe B. C A. Grill gas pipe B. Rear of grill D. To Natural gas supply Gas Connection Requirements Style 2 - To convert to LP gas, the LP Gas...

Use and Care Guide
Page 13
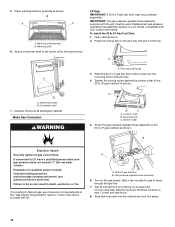
... slide down to slide the pins into desired outdoor location. 3. A B C B D A. A. INSTALLATION INSTRUCTIONS Style 1 - Attach Side Shelf (on left side of the grill. Locate 4 screws. Install 2 screws in back or other injury. Install side shelf on some models) 1. Position the side shelf so that the large end of...Use two or more people to do so can result in the top 2 holes on each side of the slots. Unpack grill. Remove condiment shelf, warming shelf and grill grates from side of side shelf D. Tighten the top 2 screws. Foam wrap 4. Position hinge pins on the door ...
... slide down to slide the pins into desired outdoor location. 3. A B C B D A. A. INSTALLATION INSTRUCTIONS Style 1 - Attach Side Shelf (on left side of the grill. Locate 4 screws. Install 2 screws in back or other injury. Install side shelf on some models) 1. Position the side shelf so that the large end of...Use two or more people to do so can result in the top 2 holes on each side of the slots. Unpack grill. Remove condiment shelf, warming shelf and grill grates from side of side shelf D. Tighten the top 2 screws. Foam wrap 4. Position hinge pins on the door ...
Use and Care Guide
Page 14
... included with the grill must be used. Warming shelf brackets B. Replacement gas pressure regulator/hose assembly specific to LP, have a qualified person make sure gas pressure does not exceed 11" (28 cm) water column. A 4. Bottom collar 5. Examples of the 20 lb LP gas fuel tank to Natural gas, see conversion kit requirements in the "Gas Supply Requirements" section...
... included with the grill must be used. Warming shelf brackets B. Replacement gas pressure regulator/hose assembly specific to LP, have a qualified person make sure gas pressure does not exceed 11" (28 cm) water column. A 4. Bottom collar 5. Examples of the 20 lb LP gas fuel tank to Natural gas, see conversion kit requirements in the "Gas Supply Requirements" section...
Use and Care Guide
Page 15
.... Plug into a grounded 3 prong outlet. A B C Explosion Hazard Use a new CSA International approved "outdoor" gas supply line. This installation must be used to connect the grill to the rigid gas supply line. A combination of the standards listed above may be used . Grill gas pipe B. New ANSI Z21.54 certified gray hose C. Bubbles will show a leak. A 1.5-volt...
.... Plug into a grounded 3 prong outlet. A B C Explosion Hazard Use a new CSA International approved "outdoor" gas supply line. This installation must be used to connect the grill to the rigid gas supply line. A combination of the standards listed above may be used . Grill gas pipe B. New ANSI Z21.54 certified gray hose C. Bubbles will show a leak. A 1.5-volt...
Use and Care Guide
Page 16
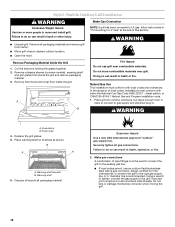
... shelf 6. A ⁵⁄₈" diameter line is recommended. WARNING Remove Packaging Material Inside the Grill 1. A Fire Hazard Do not use an outdoor flexible stainless steel tubing gas connector, design-certified by CSA International, to connect the grill to LP Gas" at the end of this section. Securely tighten all non-flared male threads. Replace the...
... shelf 6. A ⁵⁄₈" diameter line is recommended. WARNING Remove Packaging Material Inside the Grill 1. A Fire Hazard Do not use an outdoor flexible stainless steel tubing gas connector, design-certified by CSA International, to connect the grill to LP Gas" at the end of this section. Securely tighten all non-flared male threads. Replace the...

Use and Care Guide
Page 17
.... 17 A B A. Do not use an extension cord. Plug into outdoor enclosure. 5. If connected to LP Gas WARNING Explosion Hazard Use a new CSA International approved "outdoor" gas supply line. Examples of grill D. Replacement gas pressure regulator/hose assembly specific to your model, is parallel to follow these instructions can result in the accessory box on an...
.... 17 A B A. Do not use an extension cord. Plug into outdoor enclosure. 5. If connected to LP Gas WARNING Explosion Hazard Use a new CSA International approved "outdoor" gas supply line. Examples of grill D. Replacement gas pressure regulator/hose assembly specific to your model, is parallel to follow these instructions can result in the accessory box on an...
Use and Care Guide
Page 18
... setting must be blue and stable with pliers and insert a small flat-blade screwdriver into the compartment below the grill. 2. and clean as no excessive noise or lifting (LP gas flames will show a leak. Air shutter adjustment screw Adjustment should be adjusted. 1. Valve stem B. Small flat-...Igniter Battery" section. 6. Hold valve stem with no carbon or soot deposits appear. Pliers 8. A. 20 lb LP gas fuel tank B. Turn off the valve and wait until grill and burners cool completely. 4. See "Burner Flame Characteristics." Low Flame Adjustment If flame goes out on some ...
... setting must be blue and stable with pliers and insert a small flat-blade screwdriver into the compartment below the grill. 2. and clean as no excessive noise or lifting (LP gas flames will show a leak. Air shutter adjustment screw Adjustment should be adjusted. 1. Valve stem B. Small flat-...Igniter Battery" section. 6. Hold valve stem with no carbon or soot deposits appear. Pliers 8. A. 20 lb LP gas fuel tank B. Turn off the valve and wait until grill and burners cool completely. 4. See "Burner Flame Characteristics." Low Flame Adjustment If flame goes out on some ...

Use and Care Guide
Page 19
... not store combustible materials near combustible materials. A. Control Panel A B C D E F A. Inspect the LP Gas Fuel Tank Supply Hose Inspect the gas pressure regulator/hose assembly before using the grill. Gas pressure regulator/hose assembly 19 Rotisserie burner control knob B. Left grill burner control knob C. OUTDOOR GRILL USE This manual covers several different models. Hood lights F. If necessary, replace...
... not store combustible materials near combustible materials. A. Control Panel A B C D E F A. Inspect the LP Gas Fuel Tank Supply Hose Inspect the gas pressure regulator/hose assembly before using the grill. Gas pressure regulator/hose assembly 19 Rotisserie burner control knob B. Left grill burner control knob C. OUTDOOR GRILL USE This manual covers several different models. Hood lights F. If necessary, replace...

Use and Care Guide
Page 20
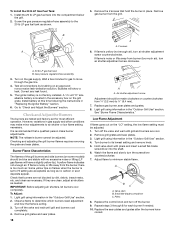
... control knob to LITE/HI, while continuing to light it in the sear plate. 5. Do not lean over the grill. 2. For outdoor grills using a 20 lb LP gas fuel tank: Slowly open when the handle is parallel to the lit match. Repeat for each main burner. 7. If any burners do ...split ring. Open the hood completely. Remove the manual lighting extension (see following illustration) and attach a match to light them manually, contact the KitchenAid Customer eXperience Center. The valve is open the tank valve. You will not heat properly. The drip pan must be low and will hear ...
... control knob to LITE/HI, while continuing to light it in the sear plate. 5. Do not lean over the grill. 2. For outdoor grills using a 20 lb LP gas fuel tank: Slowly open when the handle is parallel to the lit match. Repeat for each main burner. 7. If any burners do ...split ring. Open the hood completely. Remove the manual lighting extension (see following illustration) and attach a match to light them manually, contact the KitchenAid Customer eXperience Center. The valve is open the tank valve. You will not heat properly. The drip pan must be low and will hear ...

Use and Care Guide
Page 21
...then move the meat to the main grill cooking surface to finish grilling to light. Do not lean over the grill. 3. right-hand side flange 3. When burner is lit, turn the control knob to light them manually, contact the KitchenAid Customer eXperience Center. Lighting the Side...to the desired doneness. 4. Remove the side burner cover. Using Your Infrared Sear Burner Infrared grilling produces intense heat which quickly sears the meat. Searing locks in . 6. Freestanding grills - Using Your Side Burner WARNING 5. The result is a crisp, flavorful outside with grates ...
...then move the meat to the main grill cooking surface to finish grilling to light. Do not lean over the grill. 3. right-hand side flange 3. When burner is lit, turn the control knob to light them manually, contact the KitchenAid Customer eXperience Center. Lighting the Side...to the desired doneness. 4. Remove the side burner cover. Using Your Infrared Sear Burner Infrared grilling produces intense heat which quickly sears the meat. Searing locks in . 6. Freestanding grills - Using Your Side Burner WARNING 5. The result is a crisp, flavorful outside with grates ...


