Use & Care Guide
Page 3
... Slicing or Shredding Discs 13 Installing the Multipurpose Blade or Dough Blades 14 Installing the Mini-Bowl and Mini-Blade 14 Installing the Optional Chef's Bowl 15 Using the 3-in-1 Feed Tube 15 USING YOUR FOOD PROCESSOR Before Use...16 Maximum Liquid Level 16 Using the Low/High Speed Control 16 Using the Pulse Control 16 Removing Processed Foods 17 CARE AND CLEANING 18 TIPS FOR GREAT RESULTS Food Processing Tips 19 Helpful Hints...21 PART NUMBERS FOR ACCESSORIES 22 TROUBLESHOOTING 23 WARRANTY...24 Find recipes...
... Slicing or Shredding Discs 13 Installing the Multipurpose Blade or Dough Blades 14 Installing the Mini-Bowl and Mini-Blade 14 Installing the Optional Chef's Bowl 15 Using the 3-in-1 Feed Tube 15 USING YOUR FOOD PROCESSOR Before Use...16 Maximum Liquid Level 16 Using the Low/High Speed Control 16 Using the Pulse Control 16 Removing Processed Foods 17 CARE AND CLEANING 18 TIPS FOR GREAT RESULTS Food Processing Tips 19 Helpful Hints...21 PART NUMBERS FOR ACCESSORIES 22 TROUBLESHOOTING 23 WARRANTY...24 Find recipes...
Use & Care Guide
Page 4
... near children. 4. This product is securely locked in water or other liquid. 3. SAVE THESE INSTRUCTIONS 4 Always use outdoors. 9. Return appliance to defeat the cover interlock mechanism. 16. Do not use the food pusher. 15. Avoid contacting moving blades or discs while processing food to reduce the risk of electrical shock, do not put Food Processor in place before cleaning. 5. To protect against risk of...
... near children. 4. This product is securely locked in water or other liquid. 3. SAVE THESE INSTRUCTIONS 4 Always use outdoors. 9. Return appliance to defeat the cover interlock mechanism. 16. Do not use the food pusher. 15. Avoid contacting moving blades or discs while processing food to reduce the risk of electrical shock, do not put Food Processor in place before cleaning. 5. To protect against risk of...
Use & Care Guide
Page 6
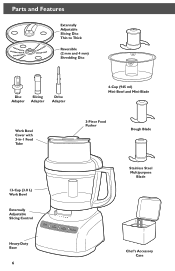
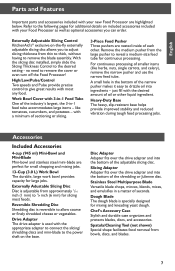
Parts and Features Externally Adjustable Slicing Disc Thin to Thick Reversible (2 mm and 4 mm) Shredding Disc Disc Slicing Adapter Adapter Drive Adapter Work Bowl Cover with 3-in-1 Feed Tube 4-Cup (945 ml) Mini-Bowl and Mini-Blade 3-Piece Food Pusher Dough Blade 13-Cup (3.0 L) Work Bowl Externally Adjustable Slicing Control Stainless Steel Multipurpose Blade Heavy-Duty Base 6 Chef's Accessory Case
Parts and Features Externally Adjustable Slicing Disc Thin to Thick Reversible (2 mm and 4 mm) Shredding Disc Disc Slicing Adapter Adapter Drive Adapter Work Bowl Cover with 3-in-1 Feed Tube 4-Cup (945 ml) Mini-Bowl and Mini-Blade 3-Piece Food Pusher Dough Blade 13-Cup (3.0 L) Work Bowl Externally Adjustable Slicing Control Stainless Steel Multipurpose Blade Heavy-Duty Base 6 Chef's Accessory Case
Use & Care Guide
Page 7
... during tough food processing jobs. English Parts and Features Important parts and accessories included with the appropriate adapter to connect the slicing/ shredding discs and mini-blade to the power shaft on the base. Drive Adapter The drive adapter is reversible to allow coarse or finely shredded cheese or vegetables. Externally Adjustable Slicing Control KitchenAid's® exclusive on-the-fly externally adjustable slicing disc allows you can order. no need to the desired setting - Work Bowl Cover with...
... during tough food processing jobs. English Parts and Features Important parts and accessories included with the appropriate adapter to connect the slicing/ shredding discs and mini-blade to the power shaft on the base. Drive Adapter The drive adapter is reversible to allow coarse or finely shredded cheese or vegetables. Externally Adjustable Slicing Control KitchenAid's® exclusive on-the-fly externally adjustable slicing disc allows you can order. no need to the desired setting - Work Bowl Cover with...
Use & Care Guide
Page 8
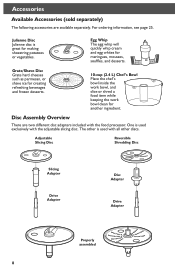
.... One is used with the adjustable slicing disc. Accessories Available Accessories (sold separately) The following accessories are two different disc adapters included with the food processor. The other discs. Grate/Shave 10-cup (2.4 L) Chef's Bowl Place the chef's bowl inside the work bowl, and slice or shred a food item while keeping the work bowl clean for meringues, mousses, soufflés, and desserts. For ordering information, see page 25. Adjustable Slicing Disc Reversible Shredding Disc Slicing Adapter Drive Adapter Disc Adapter Drive Adapter Properly assembled...
.... One is used with the adjustable slicing disc. Accessories Available Accessories (sold separately) The following accessories are two different disc adapters included with the food processor. The other discs. Grate/Shave 10-cup (2.4 L) Chef's Bowl Place the chef's bowl inside the work bowl, and slice or shred a food item while keeping the work bowl clean for meringues, mousses, soufflés, and desserts. For ordering information, see page 25. Adjustable Slicing Disc Reversible Shredding Disc Slicing Adapter Drive Adapter Disc Adapter Drive Adapter Properly assembled...
Use & Care Guide
Page 10
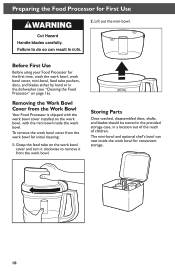
... Parts Once washed, disassembled discs, shafts, and blades should be stored in the provided storage case, in the dishwasher (see "Cleaning the Food Processor" on the work bowl cover and turn it clockwise to remove it from the work bowl. Grasp the feed tube on page 16). The mini-bowl and optional chef's bowl can nest inside the work bowl. Before First Use Before using your Food Processor for the first time, wash the work bowl, work bowl for First Use 2. Removing the Work Bowl Cover from the Work Bowl...
... Parts Once washed, disassembled discs, shafts, and blades should be stored in the provided storage case, in the dishwasher (see "Cleaning the Food Processor" on the work bowl cover and turn it clockwise to remove it from the work bowl. Grasp the feed tube on page 16). The mini-bowl and optional chef's bowl can nest inside the work bowl. Before First Use Before using your Food Processor for the first time, wash the work bowl, work bowl for First Use 2. Removing the Work Bowl Cover from the Work Bowl...
Use & Care Guide
Page 11
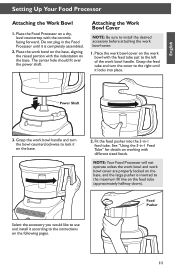
... to use and install it is inserted to install the desired accessory before attaching the work bowl cover are properly locked on the base, and the large pusher is completely assembled. 2. Grasp the work bowl on the base, aligning the raised portion with different sized foods. See "Using the 3-in -1 feed tube. Power Shaft 3. Place the Food Processor on working with the indentation on the feed tube (approximately halfway down). English Setting Up Your Food Processor Attaching the Work Bowl 1. Place the work bowl handle and turn the cover to lock it locks...
... to use and install it is inserted to install the desired accessory before attaching the work bowl cover are properly locked on the base, and the large pusher is completely assembled. 2. Grasp the work bowl on the base, aligning the raised portion with different sized foods. See "Using the 3-in -1 feed tube. Power Shaft 3. Place the Food Processor on working with the indentation on the feed tube (approximately halfway down). English Setting Up Your Food Processor Attaching the Work Bowl 1. Place the work bowl handle and turn the cover to lock it locks...
Use & Care Guide
Page 12
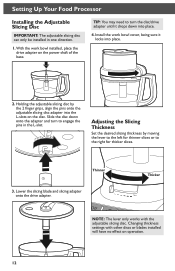
... lever only works with other discs or blades installed will have no effect on the disc. Changing thickness settings with the adjustable slicing disc. With the work bowl cover, being sure it drops down onto the adapter and turn the disc/drive adapter until it locks into place. 2. Slide the disc down into the L-slots on operation. 12 Lower the slicing blade and slicing adapter onto the drive adapter. Install the work bowl installed, place the drive adapter on the power shaft of the base.
... lever only works with other discs or blades installed will have no effect on the disc. Changing thickness settings with the adjustable slicing disc. With the work bowl cover, being sure it drops down onto the adapter and turn the disc/drive adapter until it locks into place. 2. Slide the disc down into the L-slots on operation. 12 Lower the slicing blade and slicing adapter onto the drive adapter. Install the work bowl installed, place the drive adapter on the power shaft of the base.
Use & Care Guide
Page 13
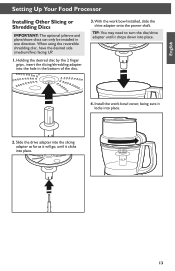
... the slicing adapter as far as it will go, until it drops down into the hole in one direction. English Setting Up Your Food Processor Installing Other Slicing or Shredding Discs IMPORTANT: The optional julienne and plane/shave discs can only be installed in the bottom of the disc. 3. TIP: You may need to turn the disc/drive adapter until it locks into place. 13 Install the work bowl installed, slide the drive adapter onto the power shaft.
... the slicing adapter as far as it will go, until it drops down into the hole in one direction. English Setting Up Your Food Processor Installing Other Slicing or Shredding Discs IMPORTANT: The optional julienne and plane/shave discs can only be installed in the bottom of the disc. 3. TIP: You may need to turn the disc/drive adapter until it locks into place. 13 Install the work bowl installed, slide the drive adapter onto the power shaft.
Use & Care Guide
Page 14
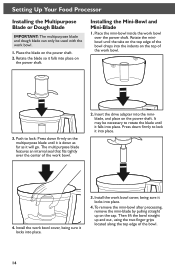
... is down firmly to rotate the blade until the tabs on the top edge of the work bowl over the center of the bowl drops into the indents on the power shaft. Setting Up Your Food Processor Installing the Multipurpose Blade or Dough Blade IMPORTANT: The multipurpose blade and dough blade can only be necessary to lock it into place. 4. Push to lock: Press down firmly on the...
... is down firmly to rotate the blade until the tabs on the top edge of the work bowl over the center of the bowl drops into the indents on the power shaft. Setting Up Your Food Processor Installing the Multipurpose Blade or Dough Blade IMPORTANT: The multipurpose blade and dough blade can only be necessary to lock it into place. 4. Push to lock: Press down firmly on the...
Use & Care Guide
Page 15
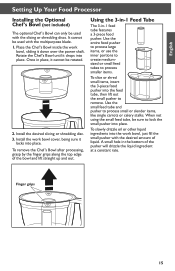
.... Install the work bowl, sliding it cannot be rotated. 2. A small hole in place, it down over the power shaft. Place the Chef's Bowl inside the work bowl cover, being sure it drops into place. Use the entire food pusher to process large items, or use the inner portions to create mediumsized or small feed tubes to process smaller items. To slice or shred small items, insert the 3-piece food pusher into the work bowl, just fill the small pusher with the multipurpose blade...
.... Install the work bowl, sliding it cannot be rotated. 2. A small hole in place, it down over the power shaft. Place the Chef's Bowl inside the work bowl cover, being sure it drops into place. Use the entire food pusher to process large items, or use the inner portions to create mediumsized or small feed tubes to process smaller items. To slice or shred small items, insert the 3-piece food pusher into the work bowl, just fill the small pusher with the multipurpose blade...
Use & Care Guide
Page 16
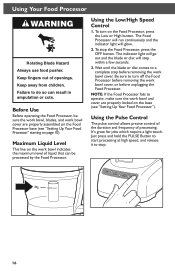
... work bowl, blades, and work bowl cover. To turn off the Food Processor before removing the work bowl cover, or before removing the work bowl cover are properly locked on the base (see "Setting Up Your Food Processor" starting on the Food Processor base (see "Setting Up Your Food Processor"). It's great for jobs which require a light touch. Keep fingers out of processing. Maximum Liquid Level This line on the Food Processor, press the Low or High button. To stop . 16 NOTE: If the Food Processor...
... work bowl, blades, and work bowl cover. To turn off the Food Processor before removing the work bowl cover, or before removing the work bowl cover are properly locked on the base (see "Setting Up Your Food Processor" starting on the Food Processor base (see "Setting Up Your Food Processor"). It's great for jobs which require a light touch. Keep fingers out of processing. Maximum Liquid Level This line on the Food Processor, press the Low or High button. To stop . 16 NOTE: If the Food Processor...
Use & Care Guide
Page 17
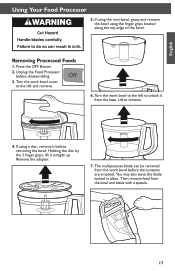
... using the mini-bowl, grasp and remove the bowl using a disc, remove it before removing the bowl. Unplug the Food Processor before the contents are emptied. Remove the adapter. 7. The multipurpose blade can be removed from the base. Removing Processed Foods 1. Press the OFF Button. 2. Holding the disc by the 2 finger grips, lift it from the work bowl before disassembling. 3. Lift to unlock it straight up. Turn the work bowl cover to the left to remove. 4. English Using Your Food Processor 5. If using...
... using the mini-bowl, grasp and remove the bowl using a disc, remove it before removing the bowl. Unplug the Food Processor before the contents are emptied. Remove the adapter. 7. The multipurpose blade can be removed from the base. Removing Processed Foods 1. Press the OFF Button. 2. Holding the disc by the 2 finger grips, lift it from the work bowl before disassembling. 3. Lift to unlock it straight up. Turn the work bowl cover to the left to remove. 4. English Using Your Food Processor 5. If using...
Use & Care Guide
Page 18
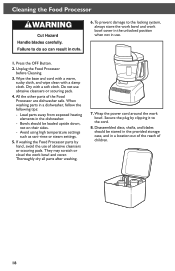
... pads. 4. Wrap the power cord around the work bowl and cover. When washing parts in the dishwasher. -- Avoid using high temperature settings such as sani-rinse or steam settings. 5. Thoroughly dry all parts after washing. 7. Press the OFF Button. 2. Disassembled discs, shafts, and blades should be stored in the provided storage case, and in use of the Food Processor are dishwasher safe. Cleaning the Food Processor 6. Wipe the base and cord with...
... pads. 4. Wrap the power cord around the work bowl and cover. When washing parts in the dishwasher. -- Avoid using high temperature settings such as sani-rinse or steam settings. 5. Thoroughly dry all parts after washing. 7. Press the OFF Button. 2. Disassembled discs, shafts, and blades should be stored in the provided storage case, and in use of the Food Processor are dishwasher safe. Cleaning the Food Processor 6. Wipe the base and cord with...
Use & Care Guide
Page 19
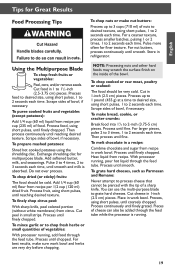
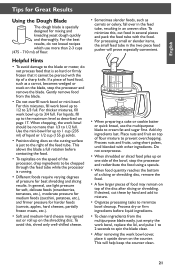
... 11/2 to chop fresh herbs or small quantities of cheese can use the multi-purpose blade to grate hard cheeses. With processor running , add food through the feed tube. Process continuously until reaching desired texture. Store in 1-inch (2.5 cm) pieces. Then process continuously until finely grated. Add softened butter, milk, and seasonings. For best results, make sure work bowl. Process until coarsely chopped. Heat liquid from recipe per 1/2 cup (120 ml...
... 11/2 to chop fresh herbs or small quantities of cheese can use the multi-purpose blade to grate hard cheeses. With processor running , add food through the feed tube. Process continuously until reaching desired texture. Store in 1-inch (2.5 cm) pieces. Then process continuously until finely grated. Add softened butter, milk, and seasonings. For best results, make sure work bowl. Process until coarsely chopped. Heat liquid from recipe per 1/2 cup (120 ml...
Use & Care Guide
Page 21
...; To clean ingredients from the blade. • Do not overfill work bowl should be pierced with the tip of the disc after slicing or shredding. When chopping, the work bowl or mini-bowl. Place nuts and fruit on the speed of pressure for best shredding and slicing results. Do not overprocess. • When shredded or sliced food piles up to the blade or motor, do not knead recipes which use light pressure...
...; To clean ingredients from the blade. • Do not overfill work bowl should be pierced with the tip of the disc after slicing or shredding. When chopping, the work bowl or mini-bowl. Place nuts and fruit on the speed of pressure for best shredding and slicing results. Do not overprocess. • When shredded or sliced food piles up to the blade or motor, do not knead recipes which use light pressure...
Use & Care Guide
Page 22
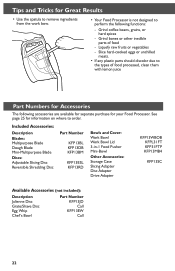
...parts of food processed, clean them with lemon juice Part Numbers for Accessories The following functions: -- Included Accessories: Description Blades: Multipurpose Blade Dough Blade Mini-Multipurpose Blade Discs: Adjustable Slicing Disc Reversible Shredding Disc Part Number KFP13BL KFP13DB KFP13BM KFP13ESL KFP13RD Bowls and Cover: Work Bowl Work Bowl Lid 3-in-1 Food Pusher Mini-Bowl Other Accessories: Storage Case Slicing Adapter Disc Adapter Drive Adapter KFP13WBOB KFPL31FT KFP31FTP KFP13MB4 KFP13SC Available Accessories (not included): Description Julienne Disc Grate/Shave Disc Egg...
...parts of food processed, clean them with lemon juice Part Numbers for Accessories The following functions: -- Included Accessories: Description Blades: Multipurpose Blade Dough Blade Mini-Multipurpose Blade Discs: Adjustable Slicing Disc Reversible Shredding Disc Part Number KFP13BL KFP13DB KFP13BM KFP13ESL KFP13RD Bowls and Cover: Work Bowl Work Bowl Lid 3-in-1 Food Pusher Mini-Bowl Other Accessories: Storage Case Slicing Adapter Disc Adapter Drive Adapter KFP13WBOB KFPL31FT KFP31FTP KFP13MB4 KFP13SC Available Accessories (not included): Description Julienne Disc Grate/Shave Disc Egg...
Use & Care Guide
Page 23
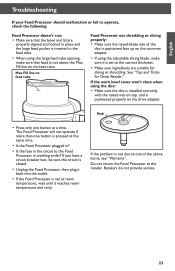
... and locked in place and the large food pusher is not due to the retailer. See "Tips and Tricks for slicing or shredding. If the work bowl cover won't close when using the large feed tube opening, make sure that the bowl and lid are suitable for Great Results." Fill line on the common adapter. • If using the adjustable slicing blade, make sure it reaches room temperature and retry. The Food Processor...
... and locked in place and the large food pusher is not due to the retailer. See "Tips and Tricks for slicing or shredding. If the work bowl cover won't close when using the large feed tube opening, make sure that the bowl and lid are suitable for Great Results." Fill line on the common adapter. • If using the adjustable slicing blade, make sure it reaches room temperature and retry. The Food Processor...
Use & Care Guide
Page 24
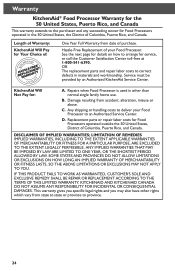
... PRODUCT FAILS TO WORK AS WARRANTED, CUSTOMER'S SOLE AND EXCLUSIVE REMEDY SHALL BE REPAIR OR REPLACEMENT ACCORDING TO THE TERMS OF THIS LIMITED WARRANTY. Length of Warranty: KitchenAid Will Pay for Your Choice of purchase. Service must be provided by an Authorized KitchenAid Service Center. C. Any shipping or handling costs to the purchaser and any succeeding owner for Food Processors operated in the...
... PRODUCT FAILS TO WORK AS WARRANTED, CUSTOMER'S SOLE AND EXCLUSIVE REMEDY SHALL BE REPAIR OR REPLACEMENT ACCORDING TO THE TERMS OF THIS LIMITED WARRANTY. Length of Warranty: KitchenAid Will Pay for Your Choice of purchase. Service must be provided by an Authorized KitchenAid Service Center. C. Any shipping or handling costs to the purchaser and any succeeding owner for Food Processors operated in the...

Warranty Information
Page 1
... in materials and workmanship. OR The replacement parts and repair labor costs to arrange for service, or call the Customer Satisfaction Center toll-free at 1-800-541-6390. B. This warranty gives you specific legal rights and you may also have other than Not Pay for: normal single family home use. Repairs when Food Processor is used in other rights which vary from...
... in materials and workmanship. OR The replacement parts and repair labor costs to arrange for service, or call the Customer Satisfaction Center toll-free at 1-800-541-6390. B. This warranty gives you specific legal rights and you may also have other than Not Pay for: normal single family home use. Repairs when Food Processor is used in other rights which vary from...


