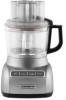
Use & Care Guide
Page 3
...FOOD PROCESSOR SAFETY Important Safeguards 4 Electrical Requirements 5 PARTS AND FEATURES 6 ACCESSORIES Included Accessories 7 Available Accessories (not included 8 Disc Assembly Overview 8 Accessories Selection Guide 9 PREPARING THE FOOD... Cover 10 Storing Parts...10 SETTING UP YOUR FOOD PROCESSOR Attaching the Work Bowl 11 Attaching the Work... 3-in-1 Feed Tube 15 USING YOUR FOOD PROCESSOR Before Use...16 Maximum Liquid Level 16 Using the Low...the Pulse Control 16 Removing Processed Foods 17 CARE AND CLEANING 18 TIPS FOR GREAT RESULTS Food Processing Tips 19 Helpful Hints......
...FOOD PROCESSOR SAFETY Important Safeguards 4 Electrical Requirements 5 PARTS AND FEATURES 6 ACCESSORIES Included Accessories 7 Available Accessories (not included 8 Disc Assembly Overview 8 Accessories Selection Guide 9 PREPARING THE FOOD... Cover 10 Storing Parts...10 SETTING UP YOUR FOOD PROCESSOR Attaching the Work Bowl 11 Attaching the Work... 3-in-1 Feed Tube 15 USING YOUR FOOD PROCESSOR Before Use...16 Maximum Liquid Level 16 Using the Low...the Pulse Control 16 Removing Processed Foods 17 CARE AND CLEANING 18 TIPS FOR GREAT RESULTS Food Processing Tips 19 Helpful Hints......
Use & Care Guide
Page 4
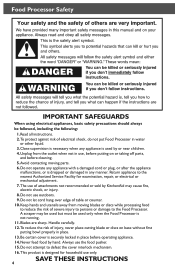
A scraper may cause fire, electric shock, or injury. 8. Never feed food by KitchenAid may be used but must be followed, including the following: 1. Close supervision is necessary when any appliance is used only when the Food Processor is securely locked in place. 13. Be certain cover is not running. 11. Always use outdoors. 9. Read...
A scraper may cause fire, electric shock, or injury. 8. Never feed food by KitchenAid may be used but must be followed, including the following: 1. Close supervision is necessary when any appliance is used only when the Food Processor is securely locked in place. 13. Be certain cover is not running. 11. Always use outdoors. 9. Read...
Use & Care Guide
Page 5
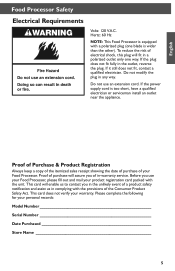
... is equipped with a polarized plug (one way. Do not use your Food Processor, please fill out and mail your Food Processor. If it still does not fit, contact a qualified electrician. Before you of a product safety notification and assist us in any way. ...too short, have a qualified electrician or serviceman install an outlet near the appliance. If the plug does not fit fully in -warranty service. English Food Processor Safety Electrical Requirements Volts: 120 V.A.C. Proof of Purchase & Product Registration Always keep a copy of the itemized sales receipt showing the date of ...
... is equipped with a polarized plug (one way. Do not use your Food Processor, please fill out and mail your Food Processor. If it still does not fit, contact a qualified electrician. Before you of a product safety notification and assist us in any way. ...too short, have a qualified electrician or serviceman install an outlet near the appliance. If the plug does not fit fully in -warranty service. English Food Processor Safety Electrical Requirements Volts: 120 V.A.C. Proof of Purchase & Product Registration Always keep a copy of the itemized sales receipt showing the date of ...
Use & Care Guide
Page 6
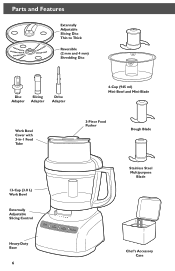
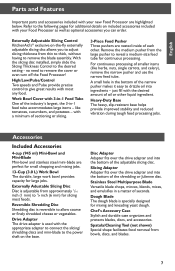
Parts and Features Externally Adjustable Slicing Disc Thin to Thick Reversible (2 mm and 4 mm) Shredding Disc Disc Slicing Adapter Adapter Drive Adapter Work Bowl Cover with 3-in-1 Feed Tube 4-Cup (945 ml) Mini-Bowl and Mini-Blade 3-Piece Food Pusher Dough Blade 13-Cup (3.0 L) Work Bowl Externally Adjustable Slicing Control Stainless Steel Multipurpose Blade Heavy-Duty Base 6 Chef's Accessory Case
Parts and Features Externally Adjustable Slicing Disc Thin to Thick Reversible (2 mm and 4 mm) Shredding Disc Disc Slicing Adapter Adapter Drive Adapter Work Bowl Cover with 3-in-1 Feed Tube 4-Cup (945 ml) Mini-Bowl and Mini-Blade 3-Piece Food Pusher Dough Blade 13-Cup (3.0 L) Work Bowl Externally Adjustable Slicing Control Stainless Steel Multipurpose Blade Heavy-Duty Base 6 Chef's Accessory Case
Use & Care Guide
Page 7
...blends, mixes, and emulsifies in a matter of the industry's largest, the 3-in -1 Feed Tube One of seconds. Externally Adjustable Slicing Control KitchenAid's® exclusive on the base. Work Bowl Cover with 3-in -1 feed tube accommodates large items - Remove the medium pusher from the large... small chopping and mixing jobs. 13-Cup (3.0 L) Work Bowl The durable, large work bowl provides capacity for slicing most any food. Externally Adustable Slicing Disc Disc is specially designed for continuous processing. Chef's Accessory Case Stylish and durable case organizes and protects blades...
...blends, mixes, and emulsifies in a matter of the industry's largest, the 3-in -1 Feed Tube One of seconds. Externally Adjustable Slicing Control KitchenAid's® exclusive on the base. Work Bowl Cover with 3-in -1 feed tube accommodates large items - Remove the medium pusher from the large... small chopping and mixing jobs. 13-Cup (3.0 L) Work Bowl The durable, large work bowl provides capacity for slicing most any food. Externally Adustable Slicing Disc Disc is specially designed for continuous processing. Chef's Accessory Case Stylish and durable case organizes and protects blades...
Use & Care Guide
Page 8
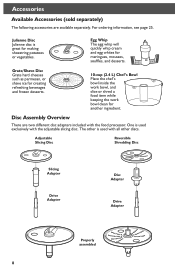
... and egg whites for another ingredient. Grate/Shave 10-cup (2.4 L) Chef's Bowl Place the chef's bowl inside the work bowl, and slice or shred a food item while keeping the work bowl clean for meringues, mousses, soufflés, and desserts. Disc Assembly Overview There are available separately. The other discs. Accessories...Adjustable Slicing Disc Reversible Shredding Disc Slicing Adapter Drive Adapter Disc Adapter Drive Adapter Properly assembled 8 Julienne Disc Julienne disc is used exclusively with the food processor. For ordering information, see page 25.
... and egg whites for another ingredient. Grate/Shave 10-cup (2.4 L) Chef's Bowl Place the chef's bowl inside the work bowl, and slice or shred a food item while keeping the work bowl clean for meringues, mousses, soufflés, and desserts. Disc Assembly Overview There are available separately. The other discs. Accessories...Adjustable Slicing Disc Reversible Shredding Disc Slicing Adapter Drive Adapter Disc Adapter Drive Adapter Properly assembled 8 Julienne Disc Julienne disc is used exclusively with the food processor. For ordering information, see page 25.
Use & Care Guide
Page 9
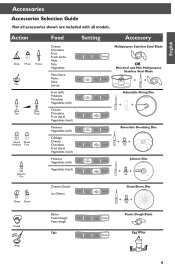
English Accessories Accessories Selection Guide Not all accessories shown are included with all models. Action Food Setting Accessory Cheese Multipurpose Stainless Steel Blade Chocolate Fruit Fresh herbs Chop Mince Puree Nuts Tofu OR Vegetables Mini-bowl and Mini Multipurpose Stainless Steel ...
English Accessories Accessories Selection Guide Not all accessories shown are included with all models. Action Food Setting Accessory Cheese Multipurpose Stainless Steel Blade Chocolate Fruit Fresh herbs Chop Mince Puree Nuts Tofu OR Vegetables Mini-bowl and Mini Multipurpose Stainless Steel ...
Use & Care Guide
Page 10
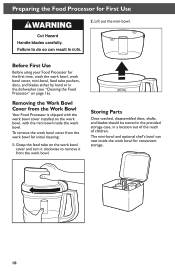
...hand or in a location out of the reach of children. Removing the Work Bowl Cover from the Work Bowl Your Food Processor is shipped with the work bowl cover installed on the work bowl cover and turn it clockwise to remove it from...1. The mini-bowl and optional chef's bowl can nest inside the work bowl. Before First Use Before using your Food Processor for the first time, wash the work bowl, work bowl for convenient storage. 10 To remove the work ...shafts, and blades should be stored in the provided storage case, in the dishwasher (see "Cleaning the Food Processor" on page 16).
...hand or in a location out of the reach of children. Removing the Work Bowl Cover from the Work Bowl Your Food Processor is shipped with the work bowl cover installed on the work bowl cover and turn it clockwise to remove it from...1. The mini-bowl and optional chef's bowl can nest inside the work bowl. Before First Use Before using your Food Processor for the first time, wash the work bowl, work bowl for convenient storage. 10 To remove the work ...shafts, and blades should be stored in the provided storage case, in the dishwasher (see "Cleaning the Food Processor" on page 16).
Use & Care Guide
Page 11
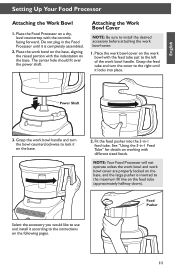
... on the work bowl with the controls facing forward. Place the work bowl cover. 1. The center hole should fit over the power shaft. Power Shaft 3. Food Pusher Select the accessory you would like to use and install it according to lock it is inserted to the maximum fill line on a dry... with the feed tube just to install the desired accessory before attaching the work bowl on the base, aligning the raised portion with different sized foods. Place the work bowl cover are properly locked on the base, and the large pusher is completely assembled. 2. Grasp the feed tube and turn the...
... on the work bowl with the controls facing forward. Place the work bowl cover. 1. The center hole should fit over the power shaft. Power Shaft 3. Food Pusher Select the accessory you would like to use and install it according to lock it is inserted to the maximum fill line on a dry... with the feed tube just to install the desired accessory before attaching the work bowl on the base, aligning the raised portion with different sized foods. Place the work bowl cover are properly locked on the base, and the large pusher is completely assembled. 2. Grasp the feed tube and turn the...
Use & Care Guide
Page 12
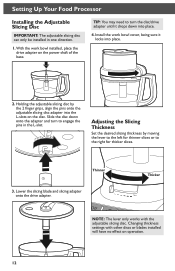
... work bowl cover, being sure it drops down onto the adapter and turn the disc/drive adapter until it locks into place. 4. Setting Up Your Food Processor Installing the Adjustable Slicing Disc IMPORTANT: The adjustable slicing disc can only be installed in the L-slot. Slide the disc down into place. 2.
... work bowl cover, being sure it drops down onto the adapter and turn the disc/drive adapter until it locks into place. 4. Setting Up Your Food Processor Installing the Adjustable Slicing Disc IMPORTANT: The adjustable slicing disc can only be installed in the L-slot. Slide the disc down into place. 2.
Use & Care Guide
Page 13
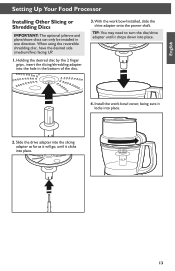
... power shaft. Slide the drive adapter into the slicing adapter as far as it will go, until it locks into place. 4. English Setting Up Your Food Processor Installing Other Slicing or Shredding Discs IMPORTANT: The optional julienne and plane/shave discs can only be installed in the bottom of the disc. 3.
... power shaft. Slide the drive adapter into the slicing adapter as far as it will go, until it locks into place. 4. English Setting Up Your Food Processor Installing Other Slicing or Shredding Discs IMPORTANT: The optional julienne and plane/shave discs can only be installed in the bottom of the disc. 3.
Use & Care Guide
Page 14
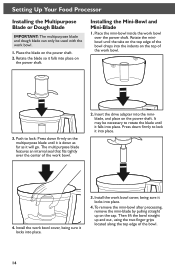
... mini-blade by pulling straight up and out, using the two finger grips located along the top edge of the bowl. 14 Setting Up Your Food Processor Installing the Multipurpose Blade or Dough Blade IMPORTANT: The multipurpose blade and dough blade can only be necessary to lock it locks into place...
... mini-blade by pulling straight up and out, using the two finger grips located along the top edge of the bowl. 14 Setting Up Your Food Processor Installing the Multipurpose Blade or Dough Blade IMPORTANT: The multipurpose blade and dough blade can only be necessary to lock it locks into place...
Use & Care Guide
Page 15
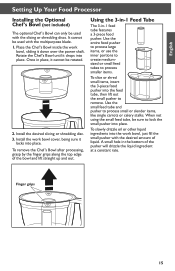
... sure it down over the power shaft. It cannot be used with the multipurpose blade. 1. Once in -1 feed tube features a 3-piece food pusher. Use the entire food pusher to process large items, or use the inner portions to create mediumsized or small feed tubes to remove. To slowly drizzle oil... bowl, sliding it locks into place. Use the small feed tube and pusher to lock the small pusher into place. English Setting Up Your Food Processor Installing the Optional Chef's Bowl (not included) The optional Chef's Bowl can only be used with the slicing or shredding discs. Finger ...
... sure it down over the power shaft. It cannot be used with the multipurpose blade. 1. Once in -1 feed tube features a 3-piece food pusher. Use the entire food pusher to process large items, or use the inner portions to create mediumsized or small feed tubes to remove. To slowly drizzle oil... bowl, sliding it locks into place. Use the small feed tube and pusher to lock the small pusher into place. English Setting Up Your Food Processor Installing the Optional Chef's Bowl (not included) The optional Chef's Bowl can only be used with the slicing or shredding discs. Finger ...
Use & Care Guide
Page 16
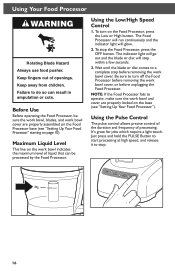
... PULSE Button to start processing at high speed, and release it to a complete stop . 16 Before Use Before operating the Food Processor, be processed by the Food Processor. Using the Low/High Speed Control 1. The indicator light will go out and the blade or disc will glow. 2.... Using the Pulse Control The pulse control allows precise control of the duration and frequency of openings. The Food Processor will run continuously and the indicator light will stop the Food Processor, press the OFF button. To stop within a few seconds. 3. It's great for jobs which require a...
... PULSE Button to start processing at high speed, and release it to a complete stop . 16 Before Use Before operating the Food Processor, be processed by the Food Processor. Using the Low/High Speed Control 1. The indicator light will go out and the blade or disc will glow. 2.... Using the Pulse Control The pulse control allows precise control of the duration and frequency of openings. The Food Processor will run continuously and the indicator light will stop the Food Processor, press the OFF button. To stop within a few seconds. 3. It's great for jobs which require a...
Use & Care Guide
Page 17
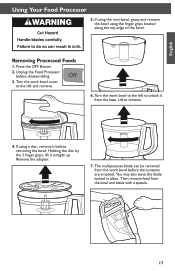
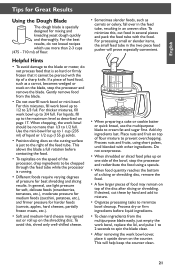
... the bowl. Remove the adapter. 7. The multipurpose blade can be removed from the bowl and blade with a spatula. 17 Unplug the Food Processor before the contents are emptied. Then remove food from the work bowl to the left and remove. 6. Holding the disc by the 2 finger grips, lift it before removing the... also leave the blade locked in place. If using the mini-bowl, grasp and remove the bowl using a disc, remove it straight up. Removing Processed Foods 1. English Using Your...
... the bowl. Remove the adapter. 7. The multipurpose blade can be removed from the bowl and blade with a spatula. 17 Unplug the Food Processor before the contents are emptied. Then remove food from the work bowl to the left and remove. 6. Holding the disc by the 2 finger grips, lift it before removing the... also leave the blade locked in place. If using the mini-bowl, grasp and remove the bowl using a disc, remove it straight up. Removing Processed Foods 1. English Using Your...
Use & Care Guide
Page 18
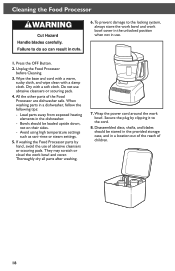
... storage case, and in the dishwasher. -- Wipe the base and cord with a warm, sudsy cloth, and wipe clean with a soft cloth. Cleaning the Food Processor 6. Thoroughly dry all parts after washing. 7. Bowls should be loaded upside down, not on their sides. -- Load parts away from exposed heating elements ...in a location out of the reach of children. 18 They may scratch or cloud the work bowl. If washing the Food Processor parts by clipping it to the locking system, always store the work bowl and work bowl cover in the unlocked position when not in...
... storage case, and in the dishwasher. -- Wipe the base and cord with a warm, sudsy cloth, and wipe clean with a soft cloth. Cleaning the Food Processor 6. Thoroughly dry all parts after washing. 7. Bowls should be loaded upside down, not on their sides. -- Load parts away from exposed heating elements ...in a location out of the reach of children. 18 They may scratch or cloud the work bowl. If washing the Food Processor parts by clipping it to the locking system, always store the work bowl and work bowl cover in the unlocked position when not in...
Use & Care Guide
Page 19
...sugar from recipe per cup (235 ml) of a sharp knife. Process until reaching desired texture. To chop dried (or sticky) fruits: The food should be cold. Add 1/4 cup (60 ml) flour from recipe in refrigerator. Process fruit, using short pulses, until smooth. You can also... be pierced with the tip of food. Pieces of nuts to desired texture, using short pulses, until reaching desired texture. Store in work bowl. Scrape sides of the bowl....
...sugar from recipe per cup (235 ml) of a sharp knife. Process until reaching desired texture. To chop dried (or sticky) fruits: The food should be cold. Add 1/4 cup (60 ml) flour from recipe in refrigerator. Process fruit, using short pulses, until smooth. You can also... be pierced with the tip of food. Pieces of nuts to desired texture, using short pulses, until reaching desired texture. Store in work bowl. Scrape sides of the bowl....
Use & Care Guide
Page 20
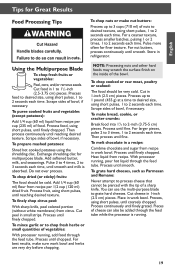
...pressure. Process, using even pressure. If not, allow to fit feed tube. Cut in feed tube. For best results with the tip of food. Re-stack slices and position vertically or horizontally in feed tube. Tips for Great Results Using a Slicing or Shredding Disc To slice or ...even pressure. To slice or shred fruits and vegetables that are small, such as strawberries, mushrooms, and radishes: Position food vertically or horizontally in halves or quarters to keep food positioned properly. Cut to thaw slightly. Cut in layers within the feed tube. Check to 2 hours, depending on ...
...pressure. Process, using even pressure. If not, allow to fit feed tube. Cut in feed tube. For best results with the tip of food. Re-stack slices and position vertically or horizontally in feed tube. Tips for Great Results Using a Slicing or Shredding Disc To slice or ...even pressure. To slice or shred fruits and vegetables that are small, such as strawberries, mushrooms, and radishes: Position food vertically or horizontally in halves or quarters to keep food positioned properly. Cut to thaw slightly. Cut in layers within the feed tube. Check to 2 hours, depending on ...
Use & Care Guide
Page 21
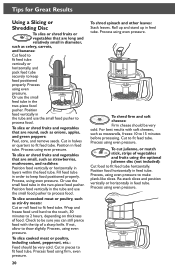
..., cut these by hand and add to mixture. • Organize processing tasks to 1/2 full. For the best results, do not process food that is so hard or firmly frozen that it upside down on top of flour mixture to prevent overchopping. For liquids, fill up to ... especially convenient. • When preparing a cake or cookie batter or quick bread, use light pressure for soft, delicate foods (strawberries, tomatoes, etc.), moderate pressure for medium foods (zucchini, potatoes, etc.), and firmer pressure for best shredding and slicing results. English Tips for Great Results Using the Dough...
..., cut these by hand and add to mixture. • Organize processing tasks to 1/2 full. For the best results, do not process food that is so hard or firmly frozen that it upside down on top of flour mixture to prevent overchopping. For liquids, fill up to ... especially convenient. • When preparing a cake or cookie batter or quick bread, use light pressure for soft, delicate foods (strawberries, tomatoes, etc.), moderate pressure for medium foods (zucchini, potatoes, etc.), and firmer pressure for best shredding and slicing results. English Tips for Great Results Using the Dough...
Use & Care Guide
Page 22
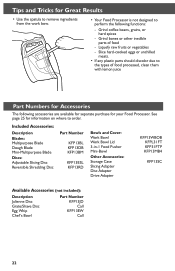
...to order. See page 25 for information on where to the types of food -- Grind bones or other inedible parts of food processed, clean them with lemon juice Part Numbers for your Food Processor. Grind coffee beans, grains, or hard spices -- Included Accessories: Description... Disc Reversible Shredding Disc Part Number KFP13BL KFP13DB KFP13BM KFP13ESL KFP13RD Bowls and Cover: Work Bowl Work Bowl Lid 3-in-1 Food Pusher Mini-Bowl Other Accessories: Storage Case Slicing Adapter Disc Adapter Drive Adapter KFP13WBOB KFPL31FT KFP31FTP KFP13MB4 KFP13SC Available Accessories (not...
...to order. See page 25 for information on where to the types of food -- Grind bones or other inedible parts of food processed, clean them with lemon juice Part Numbers for your Food Processor. Grind coffee beans, grains, or hard spices -- Included Accessories: Description... Disc Reversible Shredding Disc Part Number KFP13BL KFP13DB KFP13BM KFP13ESL KFP13RD Bowls and Cover: Work Bowl Work Bowl Lid 3-in-1 Food Pusher Mini-Bowl Other Accessories: Storage Case Slicing Adapter Disc Adapter Drive Adapter KFP13WBOB KFPL31FT KFP31FTP KFP13MB4 KFP13SC Available Accessories (not...


