Use & Care Guide
Page 3
... Slicing or Shredding Discs 13 Installing the Multipurpose Blade or Dough Blades 14 Installing the Mini-Bowl and Mini-Blade 14 Installing the Optional Chef's Bowl 15 Using the 3-in-1 Feed Tube 15 USING YOUR FOOD PROCESSOR Before Use...16 Maximum Liquid Level 16 Using the Low/High Speed Control 16 Using the Pulse Control 16 Removing Processed Foods 17 CARE AND CLEANING 18 TIPS FOR GREAT RESULTS Food Processing Tips 19 Helpful Hints...21 PART NUMBERS FOR ACCESSORIES 22 TROUBLESHOOTING 23 WARRANTY...24 Find recipes...
... Slicing or Shredding Discs 13 Installing the Multipurpose Blade or Dough Blades 14 Installing the Mini-Bowl and Mini-Blade 14 Installing the Optional Chef's Bowl 15 Using the 3-in-1 Feed Tube 15 USING YOUR FOOD PROCESSOR Before Use...16 Maximum Liquid Level 16 Using the Low/High Speed Control 16 Using the Pulse Control 16 Removing Processed Foods 17 CARE AND CLEANING 18 TIPS FOR GREAT RESULTS Food Processing Tips 19 Helpful Hints...21 PART NUMBERS FOR ACCESSORIES 22 TROUBLESHOOTING 23 WARRANTY...24 Find recipes...
Use & Care Guide
Page 4
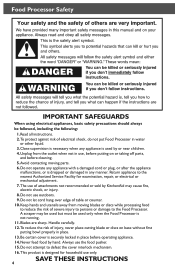
... water or other liquid. 3. Handle carefully. 12. Never feed food by or near children. 4. To protect against risk of injury, never place cutting blade or discs on or taking off parts, and before operating appliance. 14. Read all instructions. 2. Do not let cord hang over edge of attachments not recommended or sold by KitchenAid may be used but must be followed, including...
... water or other liquid. 3. Handle carefully. 12. Never feed food by or near children. 4. To protect against risk of injury, never place cutting blade or discs on or taking off parts, and before operating appliance. 14. Read all instructions. 2. Do not let cord hang over edge of attachments not recommended or sold by KitchenAid may be used but must be followed, including...
Use & Care Guide
Page 6
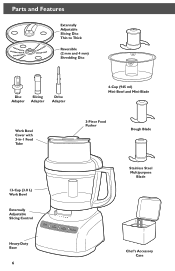
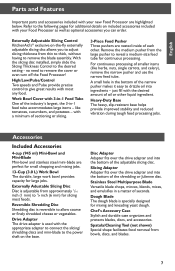
Parts and Features Externally Adjustable Slicing Disc Thin to Thick Reversible (2 mm and 4 mm) Shredding Disc Disc Slicing Adapter Adapter Drive Adapter Work Bowl Cover with 3-in-1 Feed Tube 4-Cup (945 ml) Mini-Bowl and Mini-Blade 3-Piece Food Pusher Dough Blade 13-Cup (3.0 L) Work Bowl Externally Adjustable Slicing Control Stainless Steel Multipurpose Blade Heavy-Duty Base 6 Chef's Accessory Case
Parts and Features Externally Adjustable Slicing Disc Thin to Thick Reversible (2 mm and 4 mm) Shredding Disc Disc Slicing Adapter Adapter Drive Adapter Work Bowl Cover with 3-in-1 Feed Tube 4-Cup (945 ml) Mini-Bowl and Mini-Blade 3-Piece Food Pusher Dough Blade 13-Cup (3.0 L) Work Bowl Externally Adjustable Slicing Control Stainless Steel Multipurpose Blade Heavy-Duty Base 6 Chef's Accessory Case
Use & Care Guide
Page 7
... durable case organizes and protects blades, discs, and accessories. no need to the desired setting - like herbs, nuts, single carrots, and celery), remove the narrow pusher and use the narrow feed tube. Drive Adapter The drive adapter is adjustable from approximately 1/16 inch (1 mm) to 1/4 inch (6 mm) for mixing and kneading yeast dough. With the slicing disc installed, simply slide the Slicing Thickness Control to remove the cover or even turn off the Food Processor! Work Bowl Cover...
... durable case organizes and protects blades, discs, and accessories. no need to the desired setting - like herbs, nuts, single carrots, and celery), remove the narrow pusher and use the narrow feed tube. Drive Adapter The drive adapter is adjustable from approximately 1/16 inch (1 mm) to 1/4 inch (6 mm) for mixing and kneading yeast dough. With the slicing disc installed, simply slide the Slicing Thickness Control to remove the cover or even turn off the Food Processor! Work Bowl Cover...
Use & Care Guide
Page 8
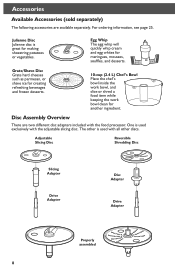
... different disc adapters included with the food processor. Grate/Shave Disc Grate hard cheeses such as parmesan, or shave ice for meringues, mousses, soufflés, and desserts. Julienne Disc Julienne disc is great for another ingredient. One is used exclusively with all other discs. The other is used with the adjustable slicing disc. Grate/Shave 10-cup (2.4 L) Chef's Bowl Place the chef's bowl inside the work bowl, and slice or shred a food item while keeping the work bowl clean...
... different disc adapters included with the food processor. Grate/Shave Disc Grate hard cheeses such as parmesan, or shave ice for meringues, mousses, soufflés, and desserts. Julienne Disc Julienne disc is great for another ingredient. One is used exclusively with all other discs. The other is used with the adjustable slicing disc. Grate/Shave 10-cup (2.4 L) Chef's Bowl Place the chef's bowl inside the work bowl, and slice or shred a food item while keeping the work bowl clean...
Use & Care Guide
Page 10
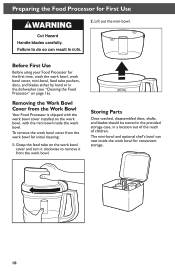
... Use Before using your Food Processor for convenient storage. 10 Removing the Work Bowl Cover from the work bowl. Preparing the Food Processor for initial cleaning: 1. Storing Parts Once washed, disassembled discs, shafts, and blades should be stored in the provided storage case, in the dishwasher (see "Cleaning the Food Processor" on page 16). Grasp the feed tube on the work bowl, with the work bowl cover installed on the work bowl cover and turn it clockwise to remove it from the Work Bowl Your Food Processor is shipped with the mini-bowl...
... Use Before using your Food Processor for convenient storage. 10 Removing the Work Bowl Cover from the work bowl. Preparing the Food Processor for initial cleaning: 1. Storing Parts Once washed, disassembled discs, shafts, and blades should be stored in the provided storage case, in the dishwasher (see "Cleaning the Food Processor" on page 16). Grasp the feed tube on the work bowl, with the work bowl cover installed on the work bowl cover and turn it clockwise to remove it from the Work Bowl Your Food Processor is shipped with the mini-bowl...
Use & Care Guide
Page 11
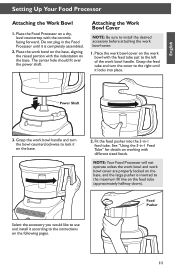
... to install the desired accessory before attaching the work bowl handle. Place the Food Processor on the base. The center hole should fit over the power shaft. Grasp the work bowl with different sized foods. Food Pusher Select the accessory you would like to use and install it according to lock it locks into the 3-in -1 Feed Tube" for details on the work bowl handle and turn the cover to the maximum fill line on the base, and the large pusher is completely assembled. 2.
... to install the desired accessory before attaching the work bowl handle. Place the Food Processor on the base. The center hole should fit over the power shaft. Grasp the work bowl with different sized foods. Food Pusher Select the accessory you would like to use and install it according to lock it locks into the 3-in -1 Feed Tube" for details on the work bowl handle and turn the cover to the maximum fill line on the base, and the large pusher is completely assembled. 2.
Use & Care Guide
Page 12
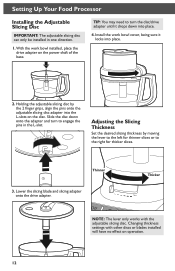
... turn the disc/drive adapter until it locks into place. 4. Changing thickness settings with the adjustable slicing disc. Thicker NOTE: The lever only works with other discs or blades installed will have no effect on the power shaft of the base. Holding the adjustable slicing disc by moving the lever to the left for thicker slices. Slide the disc down into place. 2. Thinner 3. Install the work bowl installed, place the drive adapter on operation. 12 Setting Up Your Food Processor Installing...
... turn the disc/drive adapter until it locks into place. 4. Changing thickness settings with the adjustable slicing disc. Thicker NOTE: The lever only works with other discs or blades installed will have no effect on the power shaft of the base. Holding the adjustable slicing disc by moving the lever to the left for thicker slices. Slide the disc down into place. 2. Thinner 3. Install the work bowl installed, place the drive adapter on operation. 12 Setting Up Your Food Processor Installing...
Use & Care Guide
Page 13
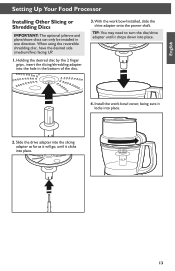
... place. 2. Install the work bowl installed, slide the drive adapter onto the power shaft. With the work bowl cover, being sure it locks into place. 13 TIP: You may need to turn the disc/drive adapter until it drops down into the hole in one direction. Holding the desired disc by the 2 finger grips, insert the slicing/shredding adapter into place. 4. English Setting Up Your Food Processor Installing Other Slicing or Shredding Discs IMPORTANT: The optional julienne and plane/shave discs can...
... place. 2. Install the work bowl installed, slide the drive adapter onto the power shaft. With the work bowl cover, being sure it locks into place. 13 TIP: You may need to turn the disc/drive adapter until it drops down into the hole in one direction. Holding the desired disc by the 2 finger grips, insert the slicing/shredding adapter into place. 4. English Setting Up Your Food Processor Installing Other Slicing or Shredding Discs IMPORTANT: The optional julienne and plane/shave discs can...
Use & Care Guide
Page 14
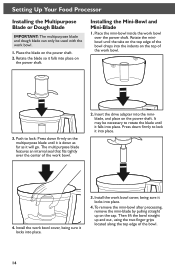
... the bowl straight up on the power shaft. Place the mini-bowl inside the work bowl. 1. To remove the mini-bowl after processing, remove the mini-blade by pulling straight up and out, using the two finger grips located along the top edge of the work bowl cover, being sure it locks into the miniblade, and place on the power shaft. 2. Setting Up Your Food Processor Installing the Multipurpose Blade or Dough Blade IMPORTANT: The multipurpose blade and dough blade can...
... the bowl straight up on the power shaft. Place the mini-bowl inside the work bowl. 1. To remove the mini-bowl after processing, remove the mini-blade by pulling straight up and out, using the two finger grips located along the top edge of the work bowl cover, being sure it locks into the miniblade, and place on the power shaft. 2. Setting Up Your Food Processor Installing the Multipurpose Blade or Dough Blade IMPORTANT: The multipurpose blade and dough blade can...
Use & Care Guide
Page 15
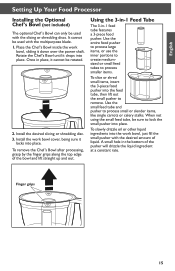
... small feed tubes to process smaller items. To slice or shred small items, insert the 3-piece food pusher into the feed tube, then lift out the small pusher to lock the small pusher into the work bowl cover, being sure it cannot be used with the desired amount of liquid. To slowly drizzle oil or other liquid ingredients into place. Install the work bowl, just fill the small pusher with the multipurpose blade. 1. English Setting Up Your Food Processor Installing the Optional Chef's Bowl...
... small feed tubes to process smaller items. To slice or shred small items, insert the 3-piece food pusher into the feed tube, then lift out the small pusher to lock the small pusher into the work bowl cover, being sure it cannot be used with the desired amount of liquid. To slowly drizzle oil or other liquid ingredients into place. Install the work bowl, just fill the small pusher with the multipurpose blade. 1. English Setting Up Your Food Processor Installing the Optional Chef's Bowl...
Use & Care Guide
Page 16
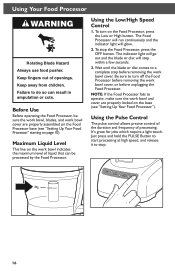
... require a light touch. To turn off the Food Processor before removing the work bowl cover, or before removing the work bowl cover are properly locked on the base (see "Setting Up Your Food Processor" starting on the Food Processor base (see "Setting Up Your Food Processor"). Using Your Food Processor WARNING Rotating Blade Hazard Always use food pusher. Maximum Liquid Level This line on the work bowl and cover are properly assembled on page 10). To stop . 16 Before Use Before operating the Food Processor, be processed by the Food Processor. Using the Pulse...
... require a light touch. To turn off the Food Processor before removing the work bowl cover, or before removing the work bowl cover are properly locked on the base (see "Setting Up Your Food Processor" starting on the Food Processor base (see "Setting Up Your Food Processor"). Using Your Food Processor WARNING Rotating Blade Hazard Always use food pusher. Maximum Liquid Level This line on the work bowl and cover are properly assembled on page 10). To stop . 16 Before Use Before operating the Food Processor, be processed by the Food Processor. Using the Pulse...
Use & Care Guide
Page 17
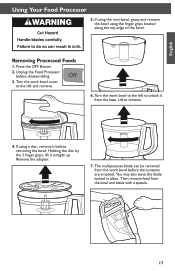
... adapter. 7. You may also leave the blade locked in place. If using the mini-bowl, grasp and remove the bowl using a disc, remove it before removing the bowl. Turn the work bowl to remove. 4. Holding the disc by the 2 finger grips, lift it from the base. Unplug the Food Processor before the contents are emptied. English Using Your Food Processor 5. Removing Processed Foods 1. The multipurpose blade can be removed from the bowl and blade with a spatula. 17 Then remove food from the work bowl before disassembling...
... adapter. 7. You may also leave the blade locked in place. If using the mini-bowl, grasp and remove the bowl using a disc, remove it before removing the bowl. Turn the work bowl to remove. 4. Holding the disc by the 2 finger grips, lift it from the base. Unplug the Food Processor before the contents are emptied. English Using Your Food Processor 5. Removing Processed Foods 1. The multipurpose blade can be removed from the bowl and blade with a spatula. 17 Then remove food from the work bowl before disassembling...
Use & Care Guide
Page 18
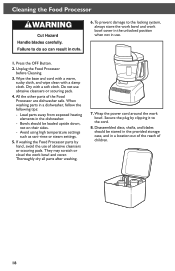
.... Wrap the power cord around the work bowl and cover. Disassembled discs, shafts, and blades should be stored in the provided storage case, and in a dishwasher, follow the following tips: -- Cleaning the Food Processor 6. All the other parts of abrasive cleansers or scouring pads. When washing parts in a location out of the reach of children. 18 Unplug the Food Processor before Cleaning. 3. Do not use of the Food Processor are dishwasher...
.... Wrap the power cord around the work bowl and cover. Disassembled discs, shafts, and blades should be stored in the provided storage case, and in a dishwasher, follow the following tips: -- Cleaning the Food Processor 6. All the other parts of abrasive cleansers or scouring pads. When washing parts in a location out of the reach of children. 18 Unplug the Food Processor before Cleaning. 3. Do not use of the Food Processor are dishwasher...
Use & Care Guide
Page 19
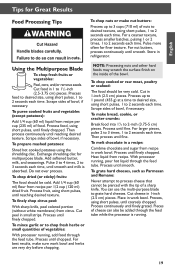
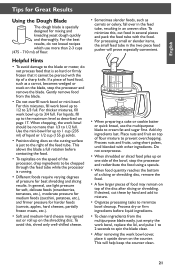
..., make sure work bowl. Cut cheese in refrigerator. Pieces of cheese can use the multi-purpose blade to 2-inch (3.75-5 cm) pieces. Process food, using short pulses, until reaching desired texture. Exchange shredding disc for finer texture. Process fruit, using short pulses, until finely chopped. Process, using short pulses, until chopped. English Tips for Great Results Food Processing Tips To chop nuts or make nut butters: Process up to 1 pound (455 g) at a time to desired size, using short...
..., make sure work bowl. Cut cheese in refrigerator. Pieces of cheese can use the multi-purpose blade to 2-inch (3.75-5 cm) pieces. Process food, using short pulses, until reaching desired texture. Exchange shredding disc for finer texture. Process fruit, using short pulses, until finely chopped. Process, using short pulses, until chopped. English Tips for Great Results Food Processing Tips To chop nuts or make nut butters: Process up to 1 pound (455 g) at a time to desired size, using short...
Use & Care Guide
Page 21
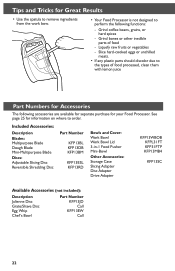
..., the small feed tube in the two piece food pusher will help keep the counter clean. 21 Do not overprocess. • When shredded or sliced food piles up to 1/2 full. Gently remove food from the multipurpose blade easily, just empty the work bowl, replace the lid, and pulse 1 to 2 seconds to spin the blade clean. • After removing the work bowl should be chopped through the feed tube while the processor is running. • Different foods require varying...
..., the small feed tube in the two piece food pusher will help keep the counter clean. 21 Do not overprocess. • When shredded or sliced food piles up to 1/2 full. Gently remove food from the multipurpose blade easily, just empty the work bowl, replace the lid, and pulse 1 to 2 seconds to spin the blade clean. • After removing the work bowl should be chopped through the feed tube while the processor is running. • Different foods require varying...
Use & Care Guide
Page 22
... Slicing Disc Reversible Shredding Disc Part Number KFP13BL KFP13DB KFP13BM KFP13ESL KFP13RD Bowls and Cover: Work Bowl Work Bowl Lid 3-in-1 Food Pusher Mini-Bowl Other Accessories: Storage Case Slicing Adapter Disc Adapter Drive Adapter KFP13WBOB KFPL31FT KFP31FTP KFP13MB4 KFP13SC Available Accessories (not included): Description Julienne Disc Grate/Shave Disc Egg Whip Chef's Bowl Part Number KFP13JD Call KFP13EW Call 22 See page 25 for information on where to order. Grind coffee beans, grains, or hard spices -- Grind bones or other inedible parts of food processed, clean...
... Slicing Disc Reversible Shredding Disc Part Number KFP13BL KFP13DB KFP13BM KFP13ESL KFP13RD Bowls and Cover: Work Bowl Work Bowl Lid 3-in-1 Food Pusher Mini-Bowl Other Accessories: Storage Case Slicing Adapter Disc Adapter Drive Adapter KFP13WBOB KFPL31FT KFP31FTP KFP13MB4 KFP13SC Available Accessories (not included): Description Julienne Disc Grate/Shave Disc Egg Whip Chef's Bowl Part Number KFP13JD Call KFP13EW Call 22 See page 25 for information on where to order. Grind coffee beans, grains, or hard spices -- Grind bones or other inedible parts of food processed, clean...
Use & Care Guide
Page 23
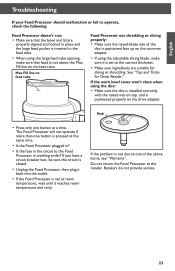
... the Food Processor is positioned properly on the drive adapter. Retailers do not provide service. 23 If the problem is not due to the Food Processor in working order? Max Fill line on the common adapter. • If using the adjustable slicing blade, make sure that the bowl and lid are properly aligned and locked in place and the large food pusher is inserted in the feed tube. • When using the large feed tube opening, make sure...
... the Food Processor is positioned properly on the drive adapter. Retailers do not provide service. 23 If the problem is not due to the Food Processor in working order? Max Fill line on the common adapter. • If using the adjustable slicing blade, make sure that the bowl and lid are properly aligned and locked in place and the large food pusher is inserted in the feed tube. • When using the large feed tube opening, make sure...
Use & Care Guide
Page 24
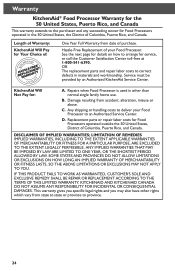
... succeeding owner for Food Processors operated in other rights which vary from date of purchase. Hassle-Free Replacement of your Food Processor to province. 24 OR The replacement parts and repair labor costs to arrange for service, or call the Customer Satisfaction Center toll-free at 1-800-541-6390. Replacement parts or repair labor costs for Your Choice of Columbia, Puerto Rico, and Canada. Length of Warranty: KitchenAid...
... succeeding owner for Food Processors operated in other rights which vary from date of purchase. Hassle-Free Replacement of your Food Processor to province. 24 OR The replacement parts and repair labor costs to arrange for service, or call the Customer Satisfaction Center toll-free at 1-800-541-6390. Replacement parts or repair labor costs for Your Choice of Columbia, Puerto Rico, and Canada. Length of Warranty: KitchenAid...

Use & Care Guide
Page 25
... of purchase will be covered by our one year limited warranty. Box numbers, please.) When you are unable to obtain satisfactory service in Canada: Call toll-free 1-800-807-6777. If you receive your replacement Food Processor, use the carton and packing materials to pack up your original Food Processor. Please follow these instructions to receive this quality service. In the carton, include...
... of purchase will be covered by our one year limited warranty. Box numbers, please.) When you are unable to obtain satisfactory service in Canada: Call toll-free 1-800-807-6777. If you receive your replacement Food Processor, use the carton and packing materials to pack up your original Food Processor. Please follow these instructions to receive this quality service. In the carton, include...


