
User Instructions
Page 1
... INSTALLATION INSTRUCTIONS 2 INSTRUCTIONS D'INSTALLATION 21 REFRIGERATOR USE 8 UTILISATION DU RÉFRIGÉRATEUR 27 REFRIGERATOR CARE 12 ENTRETIEN DU RÉFRIGÉRATEUR 32 TROUBLESHOOTING 13 DÉPANNAGE 33 WATER FILTER CERTIFICATIONS 15 FEUILLES DE DONNÉES SUR LA PERFORMANCE 36 PERFORMANCE DATA SHEETS 16 GARANTIE 38 WARRANTY 18 REFRIGERATOR SAFETY Your safety and the safety of injury, and tell you should experience a problem...
... INSTALLATION INSTRUCTIONS 2 INSTRUCTIONS D'INSTALLATION 21 REFRIGERATOR USE 8 UTILISATION DU RÉFRIGÉRATEUR 27 REFRIGERATOR CARE 12 ENTRETIEN DU RÉFRIGÉRATEUR 32 TROUBLESHOOTING 13 DÉPANNAGE 33 WATER FILTER CERTIFICATIONS 15 FEUILLES DE DONNÉES SUR LA PERFORMANCE 36 PERFORMANCE DATA SHEETS 16 GARANTIE 38 WARRANTY 18 REFRIGERATOR SAFETY Your safety and the safety of injury, and tell you should experience a problem...
User Instructions
Page 2
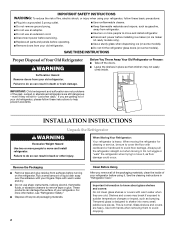
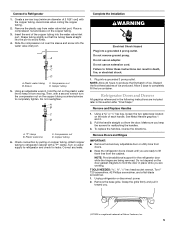
... with warm water and dry. ■ Do not use an extension cord. ■ Disconnect power before servicing. ■ Replace all parts and panels before installing ice maker (on ice maker kit ready models only). ■ Use a sturdy glass when dispensing ice (on some models). Use both hands when removing them to move and install refrigerator. ■ Disconnect power before operating. ■ Remove doors from your refrigerator, follow these basic precautions: ■ Plug into many small, pebble-size pieces. SAVE THESE INSTRUCTIONS Proper...
... with warm water and dry. ■ Do not use an extension cord. ■ Disconnect power before servicing. ■ Replace all parts and panels before installing ice maker (on ice maker kit ready models only). ■ Use a sturdy glass when dispensing ice (on some models). Use both hands when removing them to move and install refrigerator. ■ Disconnect power before operating. ■ Remove doors from your refrigerator, follow these basic precautions: ■ Plug into many small, pebble-size pieces. SAVE THESE INSTRUCTIONS Proper...
User Instructions
Page 3
.... When you are finished, reconnect the refrigerator to make sure you move your refrigerator be turned off by a switch. Do not remove ground prong. Do not use an extension cord. NOTE: Before performing any type of space behind the refrigerator. Before you have the proper electrical connection. When installing your refrigerator, allow the door to swing open. Use an outlet that a separate circuit serving only your...
.... When you are finished, reconnect the refrigerator to make sure you move your refrigerator be turned off by a switch. Do not remove ground prong. Do not use an extension cord. NOTE: Before performing any type of space behind the refrigerator. Before you have the proper electrical connection. When installing your refrigerator, allow the door to swing open. Use an outlet that a separate circuit serving only your...
User Instructions
Page 4
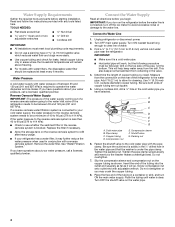
... the free end of copper tubing you need. Turn OFF the shutoff valve on the reverse osmosis system to the cold water pipe with any tools listed here. Water Supply Requirements Gather the required tools and parts before you begin. Replace the filter if necessary. ■ Allow the storage tank on the water pipe. 4 This will remain above freezing. ■ For models with water pressure of the refrigerator to...
... the free end of copper tubing you need. Turn OFF the shutoff valve on the reverse osmosis system to the cold water pipe with any tools listed here. Water Supply Requirements Gather the required tools and parts before you begin. Replace the filter if necessary. ■ Allow the storage tank on the water pipe. 4 This will remain above freezing. ■ For models with water pressure of the refrigerator to...
User Instructions
Page 5
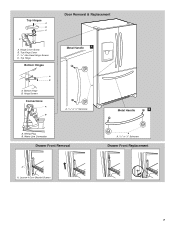
... these instructions can result in place while you are working. Unplug refrigerator or disconnect power. 2. "P" clamp B. Do not remove ground prong. Do not use an adapter. Create a service loop (minimum diameter of each handle. Using an adjustable wrench, hold the door in death, fire, or electrical shock. 1. Remove Doors and Hinges IMPORTANT: ■ Remove food and any leaks. Avoid kinks when coiling the copper tubing. 2. Copper tubing 6. To replace the handles, reverse...
... these instructions can result in place while you are working. Unplug refrigerator or disconnect power. 2. "P" clamp B. Do not remove ground prong. Do not use an adapter. Create a service loop (minimum diameter of each handle. Using an adjustable wrench, hold the door in death, fire, or electrical shock. 1. Remove Doors and Hinges IMPORTANT: ■ Remove food and any leaks. Avoid kinks when coiling the copper tubing. 2. Copper tubing 6. To replace the handles, reverse...
User Instructions
Page 6
... Hinge graphic. Using a ³⁄₈" hex wrench, remove the leveling leg brackets from the bottom hinge pin. 7. Replace the refrigerator door. Reconnect the water line by pulling back on top of the drawer front into the connector. 6. Replace the top hinge covers. Remove Drawer Front 1. Failure to four turns. Disconnect the wiring plug located on the locking collar while pulling the water line out of the left side refrigerator door. Lift the left-hand side door...
... Hinge graphic. Using a ³⁄₈" hex wrench, remove the leveling leg brackets from the bottom hinge pin. 7. Replace the refrigerator door. Reconnect the water line by pulling back on top of the drawer front into the connector. 6. Replace the top hinge covers. Remove Drawer Front 1. Failure to four turns. Disconnect the wiring plug located on the locking collar while pulling the water line out of the left side refrigerator door. Lift the left-hand side door...
User Instructions
Page 7
Hinge Cover Screw B. Water Line Connection Drawer Front Removal A A. 3/32" or 1/8" Setscrew Drawer Front Replacement A A. Wiring Plug B. Top Hinge Cover C. 5/16" Hex-Head Hinge Screws D. Loosen 4 Door Bracket Screws 7 Bottom Hinge B. Hinge Screws Connections A B Door Removal & Replacement Metal Handle 1 A A. 3/32" or 1/8" Setscrew Metal Handle 2 A. Top Hinge Bottom Hinges A B A. Top Hinges A B C D A.
Hinge Cover Screw B. Water Line Connection Drawer Front Removal A A. 3/32" or 1/8" Setscrew Drawer Front Replacement A A. Wiring Plug B. Top Hinge Cover C. 5/16" Hex-Head Hinge Screws D. Loosen 4 Door Bracket Screws 7 Bottom Hinge B. Hinge Screws Connections A B Door Removal & Replacement Metal Handle 1 A A. 3/32" or 1/8" Setscrew Metal Handle 2 A. Top Hinge Bottom Hinges A B A. Top Hinges A B C D A.
User Instructions
Page 8
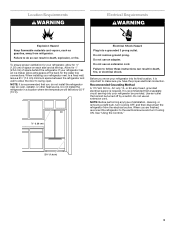
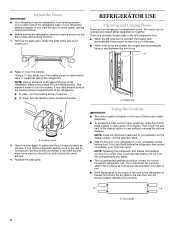
... like . A. Open the door again to close easier, use . Adjust the Doors IMPORTANT: ■ Your refrigerator has two adjustable, front leveling screws - There is a vertically-hinged seal on each side to the rear by turning both doors are two refrigerator compartment doors. Hinged seal A A. one on the left refrigerator door. ■ When the left side door is too warm or too cold in the refrigerator or freezer, first check the air vents to cool completely...
... like . A. Open the door again to close easier, use . Adjust the Doors IMPORTANT: ■ Your refrigerator has two adjustable, front leveling screws - There is a vertically-hinged seal on each side to the rear by turning both doors are two refrigerator compartment doors. Hinged seal A A. one on the left refrigerator door. ■ When the left side door is too warm or too cold in the refrigerator or freezer, first check the air vents to cool completely...

User Instructions
Page 9
... on the door hinge seal. Mode is turned off . 1. Press the touch pad next to "Done" to lock in the chart as a guide. If you to turn off all lights, disables the water and ice dispenser, disables all cooling functions, the control panel and the dispenser. The alarm will light up to indicate that cooling is activated. 1. Press the touch pad next to "Door Alarm Is On" to switch between ON...
... on the door hinge seal. Mode is turned off . 1. Press the touch pad next to "Done" to lock in the chart as a guide. If you to turn off all lights, disables the water and ice dispenser, disables all cooling functions, the control panel and the dispenser. The alarm will light up to indicate that cooling is activated. 1. Press the touch pad next to "Door Alarm Is On" to switch between ON...
User Instructions
Page 10
...." 3. Ice Maker and Ice Storage Bin IMPORTANT: ■ Flush the water system before turning on the lower right. 2. Removing and Replacing Ice Storage Bin To Remove the Ice Storage Bin: 1. Lift up the front of the control panel. 1. Slide the ice bin into the guide rails located on the display. 3. Temp Alarm The Temp Alarm feature alerts you to adjust the level at which the Light Sensor will detect darkness and activate the Auto On mode for the dispenser light...
...." 3. Ice Maker and Ice Storage Bin IMPORTANT: ■ Flush the water system before turning on the lower right. 2. Removing and Replacing Ice Storage Bin To Remove the Ice Storage Bin: 1. Lift up the front of the control panel. 1. Slide the ice bin into the guide rails located on the display. 3. Temp Alarm The Temp Alarm feature alerts you to adjust the level at which the Light Sensor will detect darkness and activate the Auto On mode for the dispenser light...
User Instructions
Page 11
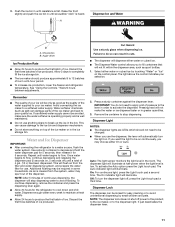
... control indicates your ice will automatically turn the dispenser light off power to the product, to the ice maker, or to be on . Remove the container to stop dispensing water to be required in a 24-hour period. ■ To increase ice production, lower the freezer and refrigerator temperature. If you want the light to the dispenser light. Dispenser Lock The dispenser can result in the ice storage bin. It just deactivates the dispenser lever. 11 See "Using...
... control indicates your ice will automatically turn the dispenser light off power to the product, to the ice maker, or to be on . Remove the container to stop dispensing water to be required in a 24-hour period. ■ To increase ice production, lower the freezer and refrigerator temperature. If you want the light to the dispenser light. Dispenser Lock The dispenser can result in the ice storage bin. It just deactivates the dispenser lever. 11 See "Using...

User Instructions
Page 12
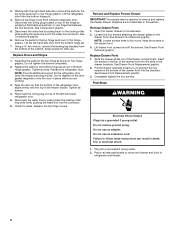
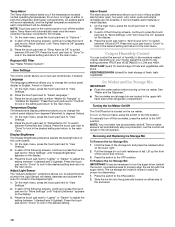
... is time to turn off the message. 1. Water Filter Status The control panel will illuminate when Lock is for stainless steel parts only! Always dispense water for at least 2 minutes before or after the system. Do not use with a soft cloth. 4. Dry thoroughly with water that you need for routine condenser cleaning in warm water. 3. The indicator light will transfer to clean the condenser: ■ Remove the base grille...
... is time to turn off the message. 1. Water Filter Status The control panel will illuminate when Lock is for stainless steel parts only! Always dispense water for at least 2 minutes before or after the system. Do not use with a soft cloth. 4. Dry thoroughly with water that you need for routine condenser cleaning in warm water. 3. The indicator light will transfer to clean the condenser: ■ Remove the base grille...
User Instructions
Page 13
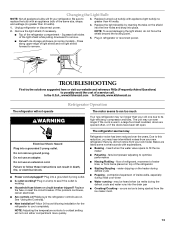
.... fans/compressor adjusting to fill the ice maker ■ Pulsating - Replace the light shield(s) by inserting the tabs on the shield into the liner holes and snap into a grounded 3 prong outlet. The refrigerator seems noisy Electrical Shock Hazard Plug into place. 2. Plug into the drain pan ■ Creaking/Cracking - Replace the fuse or reset the circuit breaker. Make sure the refrigerator controls are listed some models) - heard when the water valve opens to...
.... fans/compressor adjusting to fill the ice maker ■ Pulsating - Replace the light shield(s) by inserting the tabs on the shield into the liner holes and snap into a grounded 3 prong outlet. The refrigerator seems noisy Electrical Shock Hazard Plug into place. 2. Plug into the drain pan ■ Creaking/Cracking - Replace the fuse or reset the circuit breaker. Make sure the refrigerator controls are listed some models) - heard when the water valve opens to...
User Instructions
Page 14
... water pressure. ■ Water shutoff valve not fully open? Adjust the controls a setting colder. Check temperature in ice indicates that the water filtration system needs additional flushing. There is interior moisture buildup NOTE: Some moisture buildup is too cold in refrigerator ■ Refrigerator air vent blocked? See "Ice Maker and Ice Storage Bin." ■ New installation? Straighten the water source line. ■ Water filter installed on ? Wash ice bin. Gray or dark discoloration in 24 hours. Failure to moisture buildup. ■ Door(s) opened...
... water pressure. ■ Water shutoff valve not fully open? Adjust the controls a setting colder. Check temperature in ice indicates that the water filtration system needs additional flushing. There is interior moisture buildup NOTE: Some moisture buildup is too cold in refrigerator ■ Refrigerator air vent blocked? See "Ice Maker and Ice Storage Bin." ■ New installation? Straighten the water source line. ■ Water filter installed on ? Wash ice bin. Gray or dark discoloration in 24 hours. Failure to moisture buildup. ■ Door(s) opened...
User Instructions
Page 15
... the dispenser lever. ■ New installation? Allow 24 hours for the water supply to a cold water pipe. Connect refrigerator to your cold water supply? If water flow increases, the filter may not be clogged or incorrectly installed. See "Water Supply Requirements." Hold the glass under the dispenser long enough? See "Water and Ice Dispensers." The first glass of water? See "Refrigerator Doors and Drawer." ■ Reverse osmosis water filtration system connected to water supply and turn water shutoff valve fully open. ■ Kink in the water source line? Flush...
... the dispenser lever. ■ New installation? Allow 24 hours for the water supply to a cold water pipe. Connect refrigerator to your cold water supply? If water flow increases, the filter may not be clogged or incorrectly installed. See "Water Supply Requirements." Hold the glass under the dispenser long enough? See "Water and Ice Dispensers." The first glass of water? See "Refrigerator Doors and Drawer." ■ Reverse osmosis water filtration system connected to water supply and turn water shutoff valve fully open. ■ Kink in the water source line? Flush...
User Instructions
Page 16
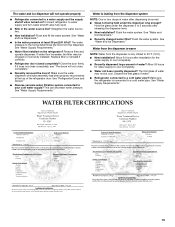
... Manufacturer's name and telephone number. ■ Refer to the "Warranty" section for the Manufacturer's limited warranty. ■ The filter monitor system measures the amount of water that is used, the yellow (Order) light comes on disinfected waters that you to NSF/ANSI Standards 42 and 53 for the reduction of the filter's rated life is used on . Use replacement filter model UKF8001AXX-750. 2010 suggested...
... Manufacturer's name and telephone number. ■ Refer to the "Warranty" section for the Manufacturer's limited warranty. ■ The filter monitor system measures the amount of water that is used, the yellow (Order) light comes on disinfected waters that you to NSF/ANSI Standards 42 and 53 for the reduction of the filter's rated life is used on . Use replacement filter model UKF8001AXX-750. 2010 suggested...

User Instructions
Page 17
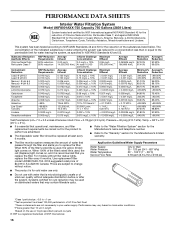
... to When 100% of the filter's rated life is for cold water use only. ■ Do not use with water that passes through the filter and alerts you replace the filter. Pressure = 60 psig (413.7 kPa). For models without adequate disinfection before or after the system. Interior Water Filtration System Model UKF8001AXX-200 Capacity 200 Gallons (757 Liters) System tested and certified by NSF International...
... to When 100% of the filter's rated life is for cold water use only. ■ Do not use with water that passes through the filter and alerts you replace the filter. Pressure = 60 psig (413.7 kPa). For models without adequate disinfection before or after the system. Interior Water Filtration System Model UKF8001AXX-200 Capacity 200 Gallons (757 Liters) System tested and certified by NSF International...
User Instructions
Page 18
... product, KitchenAid will pay for a replacement water filter to refrigerator or freezer product failures. 7. Damage resulting from accident, alteration, misuse, abuse, fire, flood, acts of God, improper installation, installation not in accordance with electrical or plumbing codes, or use of products not approved by an authorized KitchenAid servicer is not available. 10. On models with a water filter: 30 day limited warranty on major appliances with original model/serial numbers that...
... product, KitchenAid will pay for a replacement water filter to refrigerator or freezer product failures. 7. Damage resulting from accident, alteration, misuse, abuse, fire, flood, acts of God, improper installation, installation not in accordance with electrical or plumbing codes, or use of products not approved by an authorized KitchenAid servicer is not available. 10. On models with a water filter: 30 day limited warranty on major appliances with original model/serial numbers that...
Parts Diagram
Page 4
... Liner (Not A Serviceable Part) 2 12905803 Module, Light 5 13008201 Grille, Air 6 12466103 Switch, Light (2) 7 12905902 Cover, Light 8 12806601V Housing, Light 9 2255743N Bulb, Light 10 12570701V Socket, Light 11 12960101 Cover, Water Tank (Upper) 12 12960301 Lid, Water Filter 13 12960001 Cover, Water Tank (Lower) 14 UKF8001AXX Filter, Water 15 12955901 Bracket, Filter Base 17 12956001 Bracket, Water Tank & Valve 18 W10273376 Water Tank & Head Assembly 19 12664501SP Plug, Bypass 20 W10312696 Valve, Water Inlet 21 W10309869 Cover, Ice Box Harness 24 W10290356 Waterline...
... Liner (Not A Serviceable Part) 2 12905803 Module, Light 5 13008201 Grille, Air 6 12466103 Switch, Light (2) 7 12905902 Cover, Light 8 12806601V Housing, Light 9 2255743N Bulb, Light 10 12570701V Socket, Light 11 12960101 Cover, Water Tank (Upper) 12 12960301 Lid, Water Filter 13 12960001 Cover, Water Tank (Lower) 14 UKF8001AXX Filter, Water 15 12955901 Bracket, Filter Base 17 12956001 Bracket, Water Tank & Valve 18 W10273376 Water Tank & Head Assembly 19 12664501SP Plug, Bypass 20 W10312696 Valve, Water Inlet 21 W10309869 Cover, Ice Box Harness 24 W10290356 Waterline...
Parts Diagram
Page 14
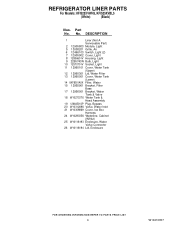
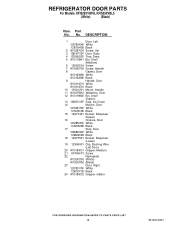
REFRIGERATOR DOOR PARTS For Models: KFIS25XVWH5, KFIS25XVBL5 (White) (Black) Illus. Part No. No. DESCRIPTION 1 Door, Left 12978040W White 12978040B Black 2 W10287054 Screw, Set 3 12804701SP Door, Dairy 4 12369502SP Tray, Dairy 5 W10119841 Bin, Shelf (Medium) 6 12990204 Screw 7 W10290759 Screw, Handle 8 Gasket, Door W10163896 White W10163898 Black 9 Handle, Door W10314515 White W10314516 Black 10 13001201 Mount, Handle 11 W10275942 Waterline, Door 12 W10119846 Bin, Shelf (Gallon) 13 12665101SP Seal, Ice Chute 14 Mullion, Door 12722813W White 12722813B...
REFRIGERATOR DOOR PARTS For Models: KFIS25XVWH5, KFIS25XVBL5 (White) (Black) Illus. Part No. No. DESCRIPTION 1 Door, Left 12978040W White 12978040B Black 2 W10287054 Screw, Set 3 12804701SP Door, Dairy 4 12369502SP Tray, Dairy 5 W10119841 Bin, Shelf (Medium) 6 12990204 Screw 7 W10290759 Screw, Handle 8 Gasket, Door W10163896 White W10163898 Black 9 Handle, Door W10314515 White W10314516 Black 10 13001201 Mount, Handle 11 W10275942 Waterline, Door 12 W10119846 Bin, Shelf (Gallon) 13 12665101SP Seal, Ice Chute 14 Mullion, Door 12722813W White 12722813B...


