Use & Care Guide
Page 2
... Outside these Locations 8 How to Order Accessories and Replacement Parts 9 Troubleshooting Problems 9 Tilt-Head Stand Mixer Features 10 Assembling Your Tilt-Head Stand Mixer 11 Using Your Pouring Shield 12 Using Your KitchenAid® Accessories 13 Mixing Time 13 Tilt-Head Stand Mixer Use 14 Care and Cleaning 14 Beater to Arrange for Service after the Warranty Expires - All Locations 8 How to Bowl Clearance 14 Speed Control Guide 15 Mixing Tips 16 Egg Whites 17 Whipped Cream 17 Attachments and Accessories 18 General Instructions 19 Appetizers and Entrées 60 Yeast...
... Outside these Locations 8 How to Order Accessories and Replacement Parts 9 Troubleshooting Problems 9 Tilt-Head Stand Mixer Features 10 Assembling Your Tilt-Head Stand Mixer 11 Using Your Pouring Shield 12 Using Your KitchenAid® Accessories 13 Mixing Time 13 Tilt-Head Stand Mixer Use 14 Care and Cleaning 14 Beater to Arrange for Service after the Warranty Expires - All Locations 8 How to Bowl Clearance 14 Speed Control Guide 15 Mixing Tips 16 Egg Whites 17 Whipped Cream 17 Attachments and Accessories 18 General Instructions 19 Appetizers and Entrées 60 Yeast...
Use & Care Guide
Page 6
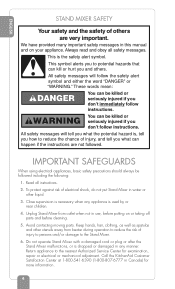
... if the instructions are very important. To protect against risk of electrical shock, do not put Stand Mixer in water or other utensils away from outlet when not in Canada) for examination, repair or electrical or mechanical adjustment. Do not operate Stand Mixer with a damaged cord or plug or after the Stand Mixer malfunctions, or is dropped or damaged in this manual and on...
... if the instructions are very important. To protect against risk of electrical shock, do not put Stand Mixer in water or other utensils away from outlet when not in Canada) for examination, repair or electrical or mechanical adjustment. Do not operate Stand Mixer with a damaged cord or plug or after the Stand Mixer malfunctions, or is dropped or damaged in this manual and on...
Use & Care Guide
Page 7
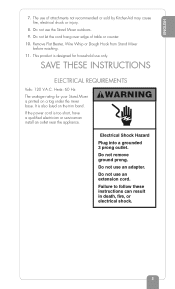
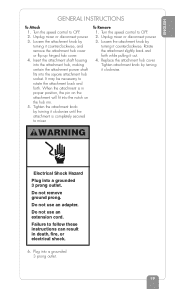
... Stand Mixer outdoors. 9. This product is also listed on a tag under the mixer base. Do not remove ground prong. If the power cord is printed on the trim band. Do not use of table or counter. 10. Hertz: 60 Hz The wattage rating for household use only. Failure to follow these instructions can result in death, fire, or electrical shock. 5 Remove Flat Beater, Wire Whip or Dough Hook from Stand Mixer...
... Stand Mixer outdoors. 9. This product is also listed on a tag under the mixer base. Do not remove ground prong. If the power cord is printed on the trim band. Do not use of table or counter. 10. Hertz: 60 Hz The wattage rating for household use only. Failure to follow these instructions can result in death, fire, or electrical shock. 5 Remove Flat Beater, Wire Whip or Dough Hook from Stand Mixer...

Use & Care Guide
Page 11
... the Flat Beater hits the bowl, stop the Stand Mixer. Proof of purchase will assure you of Columbia, and Puerto Rico, call toll-free 1- 800 - 807- 6777. Is the fuse in the circuit to : Customer Satisfaction Center KitchenAid Portable Appliances P.O. ENGLISH HOW TO ORDER ACCESSORIES AND REPLACEMENT PARTS To order accessories or replacement parts for your Stand Mixer in the 50 United States, District of in-warranty service. See "Beater...
... the Flat Beater hits the bowl, stop the Stand Mixer. Proof of purchase will assure you of Columbia, and Puerto Rico, call toll-free 1- 800 - 807- 6777. Is the fuse in the circuit to : Customer Satisfaction Center KitchenAid Portable Appliances P.O. ENGLISH HOW TO ORDER ACCESSORIES AND REPLACEMENT PARTS To order accessories or replacement parts for your Stand Mixer in the 50 United States, District of in-warranty service. See "Beater...
Use & Care Guide
Page 12
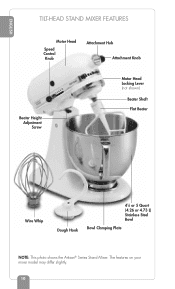
The features on your mixer model may differ slightly. 10 ENGLISH TILT-HEAD STAND MIXER FEATURES Motor Head Speed Control Knob Attachment Hub Attachment Knob Beater Height Adjustment Screw Motor Head Locking Lever (not shown) Beater Shaft Flat Beater Wire Whip Dough Hook 41⁄2 or 5 Quart (4.26 or 4.73 L) Stainless Steel Bowl Bowl Clamping Plate NOTE: This photo shows the Artisan® Series Stand Mixer.
The features on your mixer model may differ slightly. 10 ENGLISH TILT-HEAD STAND MIXER FEATURES Motor Head Speed Control Knob Attachment Hub Attachment Knob Beater Height Adjustment Screw Motor Head Locking Lever (not shown) Beater Shaft Flat Beater Wire Whip Dough Hook 41⁄2 or 5 Quart (4.26 or 4.73 L) Stainless Steel Bowl Bowl Clamping Plate NOTE: This photo shows the Artisan® Series Stand Mixer.
Use & Care Guide
Page 13
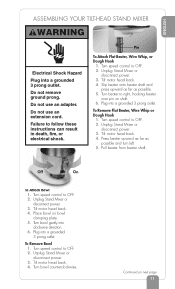
... Pin To Attach Flat Beater, Wire Whip, or Dough Hook 1. To Remove Flat Beater, Wire Whip or Dough Hook 1. Unplug Stand Mixer or disconnect power. 3. Turn bowl gently into a grounded 3 prong outlet. Press beater upward as far as possible. 5. To Remove Bowl 1. Tilt motor head back. 4. Turn speed control to OFF. 2. Tilt motor head back. 4. Turn bowl counterclockwise. Tilt motor head back. 4. Turn speed control to right, hooking beater over pin on next page 11 ENGLISH ASSEMBLING YOUR TILT-HEAD STAND MIXER WARNING Electrical Shock Hazard Plug into clockwise direction...
... Pin To Attach Flat Beater, Wire Whip, or Dough Hook 1. To Remove Flat Beater, Wire Whip or Dough Hook 1. Unplug Stand Mixer or disconnect power. 3. Turn bowl gently into a grounded 3 prong outlet. Press beater upward as far as possible. 5. To Remove Bowl 1. Tilt motor head back. 4. Turn speed control to OFF. 2. Tilt motor head back. 4. Turn bowl counterclockwise. Tilt motor head back. 4. Turn speed control to right, hooking beater over pin on next page 11 ENGLISH ASSEMBLING YOUR TILT-HEAD STAND MIXER WARNING Electrical Shock Hazard Plug into clockwise direction...
Use & Care Guide
Page 14
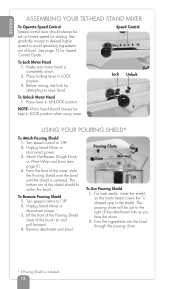
... pouring chute. * If Pouring Shield is completely down. 2. The bottom rim of the attachment hub as you face the mixer. 2. Remove attachment and bowl. ENGLISH ASSEMBLING YOUR TILT-HEAD STAND MIXER To Operate Speed Control Speed control lever should always be kept in LOCK position when using mixer. Before mixing, test lock by attempting to OFF. 2. Unplug Stand Mixer or disconnect power. 3. Turn speed control to raise head. NOTE: Motor head should always be set on lowest speed for Speed Control Guide. For best results, rotate the shield so the motor head covers...
... pouring chute. * If Pouring Shield is completely down. 2. The bottom rim of the attachment hub as you face the mixer. 2. Remove attachment and bowl. ENGLISH ASSEMBLING YOUR TILT-HEAD STAND MIXER To Operate Speed Control Speed control lever should always be kept in LOCK position when using mixer. Before mixing, test lock by attempting to OFF. 2. Unplug Stand Mixer or disconnect power. 3. Turn speed control to raise head. NOTE: Motor head should always be set on lowest speed for Speed Control Guide. For best results, rotate the shield so the motor head covers...
Use & Care Guide
Page 15
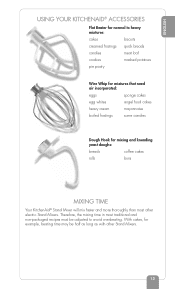
... USING YOUR KITCHENAID® ACCESSORIES Flat Beater for normal to heavy mixtures: cakes biscuits creamed frostings quick breads candies meat loaf cookies mashed potatoes pie pastry Wire Whip for mixtures that need air incorporated: eggs sponge cakes egg whites angel food cakes heavy cream mayonnaise boiled frostings some candies Dough Hook for example, beating time may be adjusted to avoid overbeating. With cakes, for mixing and kneading yeast doughs: breads coffee cakes rolls buns MIXING...
... USING YOUR KITCHENAID® ACCESSORIES Flat Beater for normal to heavy mixtures: cakes biscuits creamed frostings quick breads candies meat loaf cookies mashed potatoes pie pastry Wire Whip for mixtures that need air incorporated: eggs sponge cakes egg whites angel food cakes heavy cream mayonnaise boiled frostings some candies Dough Hook for example, beating time may be adjusted to avoid overbeating. With cakes, for mixing and kneading yeast doughs: breads coffee cakes rolls buns MIXING...
Use & Care Guide
Page 16
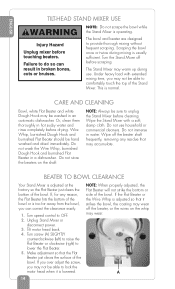
... beaters. Wire Whip, burnished Dough Hook and burnished Flat Beater should be able to lower the Flat Beater. 5. If, for any residue that may warm up during mixing is normal. Under heavy load with a soft, damp cloth. Do not immerse in a dishwasher. A Tilt motor head back. 4. Turn screw (A) SLIGHTLY counterclockwise (left) to raise the Flat Beater or clockwise (right) to comfortably touch the top of the Stand Mixer. Do not use . Turn...
... beaters. Wire Whip, burnished Dough Hook and burnished Flat Beater should be able to lower the Flat Beater. 5. If, for any residue that may warm up during mixing is normal. Under heavy load with a soft, damp cloth. Do not immerse in a dishwasher. A Tilt motor head back. 4. Turn screw (A) SLIGHTLY counterclockwise (left) to raise the Flat Beater or clockwise (right) to comfortably touch the top of the Stand Mixer. Do not use . Turn...
Use & Care Guide
Page 17
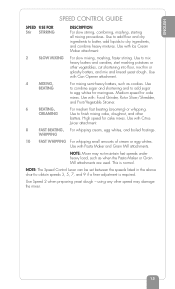
Use with : Food Grinder, Rotor Slicer/Shredder, and Fruit/Vegetable Strainer. 6 BEATING, CREAMING For medium fast beating (creaming) or whipping. Use with Ice Cream Maker attachment. 2 SLOW MIXING For slow mixing, mashing, faster stirring. Use with Pasta Maker and Grain Mill attachments. WHIPPING 10 FAST WHIPPING For whipping small amounts of cream or egg whites. NOTE: Mixer may damage the mixer. 15 NOTE: The Speed Control Lever can be set between the speeds listed in the above chart to finish mixing cake, doughnut...
Use with : Food Grinder, Rotor Slicer/Shredder, and Fruit/Vegetable Strainer. 6 BEATING, CREAMING For medium fast beating (creaming) or whipping. Use with Ice Cream Maker attachment. 2 SLOW MIXING For slow mixing, mashing, faster stirring. Use with Pasta Maker and Grain Mill attachments. WHIPPING 10 FAST WHIPPING For whipping small amounts of cream or egg whites. NOTE: Mixer may damage the mixer. 15 NOTE: The Speed Control Lever can be set between the speeds listed in the above chart to finish mixing cake, doughnut...
Use & Care Guide
Page 18
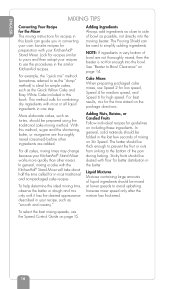
.... To help determine the ideal mixing time, observe the batter or dough and mix only until it has the desired appearance described in your KitchenAid® Stand Mixer works more quickly than other ingredients are not thoroughly mixed, then the beater is ideal for simple cakes, such as tortes, should be mixed at lower speeds to Bowl Clearance" on page 14. The Pouring Shield can guide you in...
.... To help determine the ideal mixing time, observe the batter or dough and mix only until it has the desired appearance described in your KitchenAid® Stand Mixer works more quickly than other ingredients are not thoroughly mixed, then the beater is ideal for simple cakes, such as tortes, should be mixed at lower speeds to Bowl Clearance" on page 14. The Pouring Shield can guide you in...
Use & Care Guide
Page 19
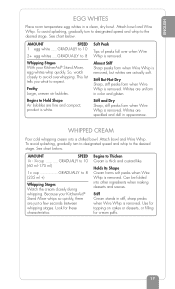
... and glisten. Because your KitchenAid® Stand Mixer, egg whites whip quickly. Soft Peak Tips of peaks fall over when Wire Whip is removed. WHIPPED CREAM Pour cold whipping cream into other ingredients when making desserts and sauces. Attach bowl and Wire Whip. To avoid splashing, gradually turn to designated speed and whip to expect. Stiff and Dry Sharp, stiff peaks form when Wire Whip is removed. See chart below . Whites are fine and...
... and glisten. Because your KitchenAid® Stand Mixer, egg whites whip quickly. Soft Peak Tips of peaks fall over when Wire Whip is removed. WHIPPED CREAM Pour cold whipping cream into other ingredients when making desserts and sauces. Attach bowl and Wire Whip. To avoid splashing, gradually turn to designated speed and whip to expect. Stiff and Dry Sharp, stiff peaks form when Wire Whip is removed. See chart below . Whites are fine and...
Use & Care Guide
Page 21
... it clockwise until the attachment is in death, fire, or electrical shock. 6. Tighten attachment knob by turning it counterclockwise. Do not use an adapter. Turn the speed control to OFF. 2. Plug into the square attachment hub socket. Unplug mixer or disconnect power. 3. Do not remove ground prong. Failure to follow these instructions can result in proper position, the pin on the attachment will fit into a grounded 3 prong outlet...
... it clockwise until the attachment is in death, fire, or electrical shock. 6. Tighten attachment knob by turning it counterclockwise. Do not use an adapter. Turn the speed control to OFF. 2. Plug into the square attachment hub socket. Unplug mixer or disconnect power. 3. Do not remove ground prong. Failure to follow these instructions can result in proper position, the pin on the attachment will fit into a grounded 3 prong outlet...
Use & Care Guide
Page 65
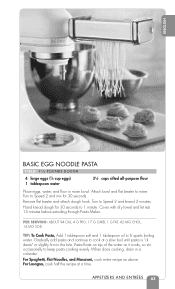
... Cook Pasta, Add 1 tablespoon salt and 1 tablespoon oil to Speed 2 and knead 2 minutes. Gradually add pasta and continue to 1 minute. For Spaghetti, Flat Noodles, and Macaroni, cook entire recipe as it cooks, so stir occasionally to mixer. Turn to Speed 2 and mix for 30 seconds to cook at a time. Attach bowl and flat beater and attach dough hook. Remove flat beater to keep pasta cooking evenly. Cover with...
... Cook Pasta, Add 1 tablespoon salt and 1 tablespoon oil to Speed 2 and knead 2 minutes. Gradually add pasta and continue to 1 minute. For Spaghetti, Flat Noodles, and Macaroni, cook entire recipe as it cooks, so stir occasionally to mixer. Turn to Speed 2 and mix for 30 seconds to cook at a time. Attach bowl and flat beater and attach dough hook. Remove flat beater to keep pasta cooking evenly. Cover with...
Use & Care Guide
Page 67
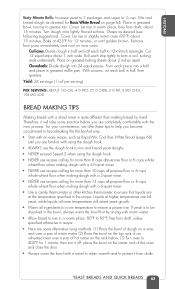
...a stand mixer is to mix and knead yeast doughs. • NEVER exceed Speed 2 when using the dough hook. • NEVER use recipes calling for more than making dough with a towel to retain warmth and to 400°F for 12 minutes, or until you become accustomed to 85°F, free from...the bowl on the rack below. (3) Turn oven to protect it off; Mix and knead dough as directed for more than 8 cups all-purpose flour or 6 cups whole wheat flour when making dough with a 41⁄2-quart mixer. • NEVER use recipes calling for Basic White Bread on wire racks. Cover....
...a stand mixer is to mix and knead yeast doughs. • NEVER exceed Speed 2 when using the dough hook. • NEVER use recipes calling for more than making dough with a towel to retain warmth and to 400°F for 12 minutes, or until you become accustomed to 85°F, free from...the bowl on the rack below. (3) Turn oven to protect it off; Mix and knead dough as directed for more than 8 cups all-purpose flour or 6 cups whole wheat flour when making dough with a 41⁄2-quart mixer. • NEVER use recipes calling for Basic White Bread on wire racks. Cover....

Use & Care Guide
Page 76
... wire rack. Remove from pans. or 9-inch round baking pans. Stop and scrape bowl. Cool 10 minutes. Pour batter into two greased and floured 8- PER SERVING: ABOUT 272 CAL, 4 G PRO, 42 G CARB, 10 G FAT, 37 MG CHOL, 175 MG SOD 74 CAKES AND FROSTINGS Stop and scrape bowl. Attach bowl and flat 350°F for 30 to mixer. Add eggs. Turn...
... wire rack. Remove from pans. or 9-inch round baking pans. Stop and scrape bowl. Cool 10 minutes. Pour batter into two greased and floured 8- PER SERVING: ABOUT 272 CAL, 4 G PRO, 42 G CARB, 10 G FAT, 37 MG CHOL, 175 MG SOD 74 CAKES AND FROSTINGS Stop and scrape bowl. Attach bowl and flat 350°F for 30 to mixer. Add eggs. Turn...

Use & Care Guide
Page 78
.... Add eggs and chocolate. Remove from pans. Add milk, 1 teaspoon at beater to Speed 2 and mix about 1 minute. Stop and scrape bowl. Add cream, vanilla, salt, and 1 cup powdered sugar. PER SERVING: ABOUT 208 CAL, 0 G PRO, 40 G CARB, 6 G FAT, 16 MG CHOL, 99 MG SOD 76 CAKES AND FROSTINGS Frost if desired. Stop and scrape bowl. Turn to mixer. Continuing on wire rack. or 9-inch...
.... Add eggs and chocolate. Remove from pans. Add milk, 1 teaspoon at beater to Speed 2 and mix about 1 minute. Stop and scrape bowl. Add cream, vanilla, salt, and 1 cup powdered sugar. PER SERVING: ABOUT 208 CAL, 0 G PRO, 40 G CARB, 6 G FAT, 16 MG CHOL, 99 MG SOD 76 CAKES AND FROSTINGS Frost if desired. Stop and scrape bowl. Turn to mixer. Continuing on wire rack. or 9-inch...

Use & Care Guide
Page 82
Attach bowl and flat 450°F for Baked Pastry Shell: Fold edge under . Turn to mixer. Wrap in refrigerator 15 minutes. Bake at beater to Stir Speed and mix until lightly browned. Line shell with second pastry crust. Continuing on wire rack and fill. Pat each half ...Turn to hold together. Divide dough in mixer bowl. Roll one half of dough to 45 seconds. or 9-inch pie plate and unfold, pressing firmly against bottom and sides. Crimp as directed. Bake as desired. For Two-Crust Pie: Trim pastry even with edge of waxed paper. Using...
Attach bowl and flat 450°F for Baked Pastry Shell: Fold edge under . Turn to mixer. Wrap in refrigerator 15 minutes. Bake at beater to Stir Speed and mix until lightly browned. Line shell with second pastry crust. Continuing on wire rack and fill. Pat each half ...Turn to hold together. Divide dough in mixer bowl. Roll one half of dough to 45 seconds. or 9-inch pie plate and unfold, pressing firmly against bottom and sides. Crimp as directed. Bake as desired. For Two-Crust Pie: Trim pastry even with edge of waxed paper. Using...

Use & Care Guide
Page 84
... scrape bowl. Turn to mixer. Turn to Speed 2 and mix about 1 minute. Bake at beater to Speed 4 and beat about 30 seconds. Stop and scrape bowl. Remove from baking sheets immediately and cool on ungreased baking sheets. Add sugars, egg and vanilla. Place about 10 to Speed 6 and beat until golden brown, about 2 inches apart on wire racks. Turn to 12 minutes. PER SERVING: 83 CAL, 2 G PRO...
... scrape bowl. Turn to mixer. Turn to Speed 2 and mix about 1 minute. Bake at beater to Speed 4 and beat about 30 seconds. Stop and scrape bowl. Remove from baking sheets immediately and cool on ungreased baking sheets. Add sugars, egg and vanilla. Place about 10 to Speed 6 and beat until golden brown, about 2 inches apart on wire racks. Turn to 12 minutes. PER SERVING: 83 CAL, 2 G PRO...
Warranty Information
Page 4
... Center KitchenAid Portable Appliances P.O. If the problem cannot be sure the circuit is normal. 2. The Stand Mixer may emit a pungent odor, especially when new. Under heavy loads with electric motors. 3. If the Flat Beater hits the bowl, stop the Stand Mixer. Turn the Stand Mixer off for 10-15 seconds, then turn it back on page 6 for additional details. Is the Stand Mixer plugged in working order? If you of the Stand Mixer. Proof...
... Center KitchenAid Portable Appliances P.O. If the problem cannot be sure the circuit is normal. 2. The Stand Mixer may emit a pungent odor, especially when new. Under heavy loads with electric motors. 3. If the Flat Beater hits the bowl, stop the Stand Mixer. Turn the Stand Mixer off for 10-15 seconds, then turn it back on page 6 for additional details. Is the Stand Mixer plugged in working order? If you of the Stand Mixer. Proof...


