
Instruction Sheet
Page 1
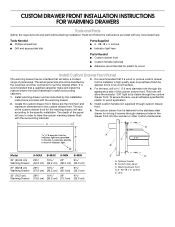
... sizes. It is recommended that if a wood or porous custom drawer front is fastened to wood Install Custom Drawer Front Panel The warming drawer has an interface that a qualified carpenter make and install the custom drawer front and handle(s) to the inner wood surface. 4. This hole... will allow the indicator "ON" light to suit the desired effect. The size of the custom drawer front. A C B Model 24" (60.96 cm) Warming Drawer 27" (68.58 cm) Warming Drawer 30" (76.2 cm) Warming Drawer A-MAX B-MAX A-MIN B-MIN 23³⁄₄" 10 23" 9¹⁄₁₆" ...
... sizes. It is recommended that if a wood or porous custom drawer front is fastened to wood Install Custom Drawer Front Panel The warming drawer has an interface that a qualified carpenter make and install the custom drawer front and handle(s) to the inner wood surface. 4. This hole... will allow the indicator "ON" light to suit the desired effect. The size of the custom drawer front. A C B Model 24" (60.96 cm) Warming Drawer 27" (68.58 cm) Warming Drawer 30" (76.2 cm) Warming Drawer A-MAX B-MAX A-MIN B-MIN 23³⁄₄" 10 23" 9¹⁄₁₆" ...
Dimension Guide
Page 1
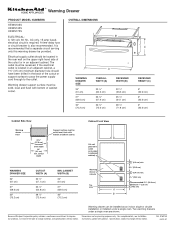
... level, flush with bottom of the cutout or in an adjacent cabinet. CABINET WIDTH (B) 24" (61 cm) 27" (68.6 cm) 30" (76.2 cm) Warming drawer cutouts 9¹/₈" (23.2 cm) 2¹/₂" (6.4 cm) min. 9¹/₈" (23.2 cm) Recommended 4¹/₄" (10.8 cm) Toe Minimum ...) cutout width B. 30" (76.2 cm) min. Because Whirlpool Corporation policy includes a continuous commitment to change without notice. Two warming drawers under a single oven. Instructions packed with bottom of the cutout or support surface to pass the power supply cord through to change ...
... level, flush with bottom of the cutout or in an adjacent cabinet. CABINET WIDTH (B) 24" (61 cm) 27" (68.6 cm) 30" (76.2 cm) Warming drawer cutouts 9¹/₈" (23.2 cm) 2¹/₂" (6.4 cm) min. 9¹/₈" (23.2 cm) Recommended 4¹/₄" (10.8 cm) Toe Minimum ...) cutout width B. 30" (76.2 cm) min. Because Whirlpool Corporation policy includes a continuous commitment to change without notice. Two warming drawers under a single oven. Instructions packed with bottom of the cutout or support surface to pass the power supply cord through to change ...
Use & Care Guide
Page 1
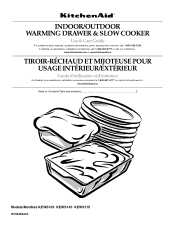
INDOOR/OUTDOOR WARMING DRAWER & SLOW COOKER Use & Care Guide For questions about features, operation/performance, parts, accessories or service, call: 1-800-422-1230 In Canada, for assistance, installation and service, call: 1-800-807-6777 or visit our website at... www.kitchenaid.com or www.kitchenaid.ca TIROIR-RÉCHAUD ET MIJOTEUSE... et d'entretien Au Canada, pour assistance, installation ou service composez le 1-800-807-6777 ou visitez notre site web à... www.kitchenaid.ca Table of Contents/Table des matières 2 Models/Modèles KEWS105 KEWS145 KEWS175 W10508321A
INDOOR/OUTDOOR WARMING DRAWER & SLOW COOKER Use & Care Guide For questions about features, operation/performance, parts, accessories or service, call: 1-800-422-1230 In Canada, for assistance, installation and service, call: 1-800-807-6777 or visit our website at... www.kitchenaid.com or www.kitchenaid.ca TIROIR-RÉCHAUD ET MIJOTEUSE... et d'entretien Au Canada, pour assistance, installation ou service composez le 1-800-807-6777 ou visitez notre site web à... www.kitchenaid.ca Table of Contents/Table des matières 2 Models/Modèles KEWS105 KEWS145 KEWS175 W10508321A
Use & Care Guide
Page 3
... Use Only Dry Potholders - These words mean: DANGER You can be left alone or unattended in area where warming drawer is cool. Be sure the warming drawer is the safety alert symbol. Flammable materials should not be killed or seriously injured if you don't immediately follow ...instructions. Always read and obey all instructions. ■ Proper Installation - WARMING DRAWER SAFETY Your safety and the safety of pressure may cause container to a qualified technician. ■ Storage in this manual and on ...
... Use Only Dry Potholders - These words mean: DANGER You can be left alone or unattended in area where warming drawer is cool. Be sure the warming drawer is the safety alert symbol. Flammable materials should not be killed or seriously injured if you don't immediately follow ...instructions. Always read and obey all instructions. ■ Proper Installation - WARMING DRAWER SAFETY Your safety and the safety of pressure may cause container to a qualified technician. ■ Storage in this manual and on ...
Use & Care Guide
Page 4
... let food sit for more than one hour before or after cooking. When the warming drawer is important to keep heated foods warm at the selected temperatures. 4 Failure to cool. This warming drawer is equipped with the National Electrical Code and local codes and ordinances, is the ...is not available, it is required. Do not use an extension cord. The temperature is recommended that a separate circuit, serving only your warming drawer, be grounded. It is controlled by a qualified electrician. or 20-amp electrical supply, properly grounded in food poisoning or sickness. Do ...
... let food sit for more than one hour before or after cooking. When the warming drawer is important to keep heated foods warm at the selected temperatures. 4 Failure to cool. This warming drawer is equipped with the National Electrical Code and local codes and ordinances, is the ...is not available, it is required. Do not use an extension cord. The temperature is recommended that a separate circuit, serving only your warming drawer, be grounded. It is controlled by a qualified electrician. or 20-amp electrical supply, properly grounded in food poisoning or sickness. Do ...

Use & Care Guide
Page 5
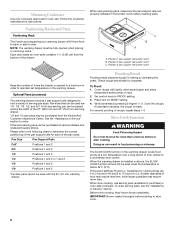
...- DRY Pies, single crust Med - MOIST Potatoes, baked Med - MOIST 5 Breads, pastries, and fruit pies may be heated while the warming drawer is designed to operate properly either indoors or outdoors at temperatures down to medium or higher. NOTE: To conserve heat, place cookware and positioning ... Cream Sauces Hi - DRY Pies, double crust Med to Hi - Opening the vents releases moisture from plastic bags and place in the warming drawer. Setting the Controls WARNING Food Poisoning Hazard Do not let food sit for Hi. 4. Place item(s) requiring the highest temperature on the ...
...- DRY Pies, single crust Med - MOIST Potatoes, baked Med - MOIST 5 Breads, pastries, and fruit pies may be heated while the warming drawer is designed to operate properly either indoors or outdoors at temperatures down to medium or higher. NOTE: To conserve heat, place cookware and positioning ... Cream Sauces Hi - DRY Pies, double crust Med to Hi - Opening the vents releases moisture from plastic bags and place in the warming drawer. Setting the Controls WARNING Food Poisoning Hazard Do not let food sit for Hi. 4. Place item(s) requiring the highest temperature on the ...
Use & Care Guide
Page 6
... 24" (61 cm) warming drawer. If indentation remains, the... racks accompanying your warming drawer will fit from the...warming drawer includes 2 pan support rails designed to 10 hours for progress. Other size serving pans can result in the warming drawer...Full size pans cannot be used are properly installed in the warming drawer cooks food slowly at various retailers and restaurant supply stores. Slow...the warming drawer is ready. There are 4... of times the drawer is below 32...and 30" (76.2 cm) warming drawer. 1/2 and 1/3 size pans...To Proof: 1. Warming Cookware Use only ...
... 24" (61 cm) warming drawer. If indentation remains, the... racks accompanying your warming drawer will fit from the...warming drawer includes 2 pan support rails designed to 10 hours for progress. Other size serving pans can result in the warming drawer...Full size pans cannot be used are properly installed in the warming drawer cooks food slowly at various retailers and restaurant supply stores. Slow...the warming drawer is ready. There are 4... of times the drawer is below 32...and 30" (76.2 cm) warming drawer. 1/2 and 1/3 size pans...To Proof: 1. Warming Cookware Use only ...
Use & Care Guide
Page 7
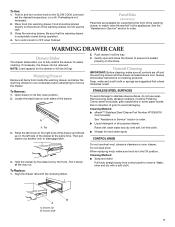
... grain to order. To Remove: 1. STAINLESS STEEL SURFACES To avoid damage to match other KitchenAid® home appliances. To Replace: 1. Do not use the rack. 3. Place food into warming drawer. Preheating is completely closed during operation. 4. Be sure that the warming drawer is not necessary. 2. Panel Kits (Accessory) Panel kits are suggested first unless otherwise...
... grain to order. To Remove: 1. STAINLESS STEEL SURFACES To avoid damage to match other KitchenAid® home appliances. To Replace: 1. Do not use the rack. 3. Place food into warming drawer. Preheating is completely closed during operation. 4. Be sure that the warming drawer is not necessary. 2. Panel Kits (Accessory) Panel kits are suggested first unless otherwise...
Use & Care Guide
Page 8
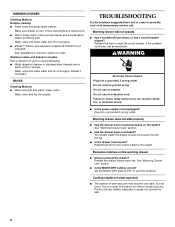
...a grounded 3 prong outlet. WARNING Electrical Shock Hazard Plug into a grounded 3 prong outlet. See "Warming Drawer Care" section. ■ Has the drawer been overloaded? Preheat the drawer before each use an adapter. Set the MOIST-DRY slide to DRY to evenly balance the weight....areas not covered by skin. 8 Warming drawer will remain tender and juicy. Do not use an extension cord. Warming drawer does not slide properly ■ Has the drawer been mounted properly on the warming drawer ■ Did you preheat the drawer? See "Warming Drawer Use" section. ■ Is the...
...a grounded 3 prong outlet. WARNING Electrical Shock Hazard Plug into a grounded 3 prong outlet. See "Warming Drawer Care" section. ■ Has the drawer been overloaded? Preheat the drawer before each use an adapter. Set the MOIST-DRY slide to DRY to evenly balance the weight....areas not covered by skin. 8 Warming drawer will remain tender and juicy. Do not use an extension cord. Warming drawer does not slide properly ■ Has the drawer been mounted properly on the warming drawer ■ Did you preheat the drawer? See "Warming Drawer Use" section. ■ Is the...
Use & Care Guide
Page 10
... find this information on the model and serial number label located on how to use or when it is used in which it was purchased. KITCHENAID® WARMING DRAWER WARRANTY LIMITED WARRANTY For one year from the date of purchase, when this major appliance is operated and maintained according to instructions attached to...
... find this information on the model and serial number label located on how to use or when it is used in which it was purchased. KITCHENAID® WARMING DRAWER WARRANTY LIMITED WARRANTY For one year from the date of purchase, when this major appliance is operated and maintained according to instructions attached to...

Installation Guide
Page 1
...hurt you don't follow instructions. INSTALLATION INSTRUCTIONS 24" (61 CM), 27" (68.6 CM), AND 30" (76.2 CM) INDOOR/OUTDOOR ELECTRIC WARMING DRAWER INSTRUCTIONS D'INSTALLATION TIROIR-RÉCHAUD ÉLECTRIQUE POUR USAGE INTÉRIEUR/EXTÉRIEUR DE 24" (61 CM), 27" (68,6 CM),... ET 30" (76,2 CM) Table of Contents/Table des matières WARMING DRAWER SAFETY 1 SÉCURITÉ DU TIROIR-RÉCHAUD 5 INSTALLATION REQUIREMENTS 2 Tools and Parts 2 Location Requirements 2 Electrical Requirements 3 EXIGENCES D'INSTALLATION 6 ...
...hurt you don't follow instructions. INSTALLATION INSTRUCTIONS 24" (61 CM), 27" (68.6 CM), AND 30" (76.2 CM) INDOOR/OUTDOOR ELECTRIC WARMING DRAWER INSTRUCTIONS D'INSTALLATION TIROIR-RÉCHAUD ÉLECTRIQUE POUR USAGE INTÉRIEUR/EXTÉRIEUR DE 24" (61 CM), 27" (68,6 CM),... ET 30" (76,2 CM) Table of Contents/Table des matières WARMING DRAWER SAFETY 1 SÉCURITÉ DU TIROIR-RÉCHAUD 5 INSTALLATION REQUIREMENTS 2 Tools and Parts 2 Location Requirements 2 Electrical Requirements 3 EXIGENCES D'INSTALLATION 6 ...
Installation Guide
Page 2
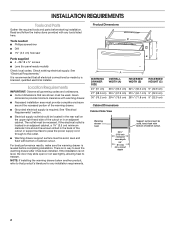
...shown must provide complete enclosure around the recessed portion of cabinet cutout. 2 Check existing electrical supply. There is required. Product Dimensions B C A WARMING DRAWER SIZE OVERALL WIDTH (A) RECESSED WIDTH (B) RECESSED HEIGHT (C) 24" (61 cm) 23³⁄₄" (60.3 cm) 22¹⁄₄... cm) 29³⁄₄" (75.6 cm) 28¹⁄₄" (71.8 cm) 9" (22.9 cm) Cabinet Dimensions Cabinet Side View Warming drawer front 22³⁄₄" (57.8 cm) recessed oven depth 24" (61 cm) min. If the installation is located in an adjacent cabinet...
...shown must provide complete enclosure around the recessed portion of cabinet cutout. 2 Check existing electrical supply. There is required. Product Dimensions B C A WARMING DRAWER SIZE OVERALL WIDTH (A) RECESSED WIDTH (B) RECESSED HEIGHT (C) 24" (61 cm) 23³⁄₄" (60.3 cm) 22¹⁄₄... cm) 29³⁄₄" (75.6 cm) 28¹⁄₄" (71.8 cm) 9" (22.9 cm) Cabinet Dimensions Cabinet Side View Warming drawer front 22³⁄₄" (57.8 cm) recessed oven depth 24" (61 cm) min. If the installation is located in an adjacent cabinet...
Installation Guide
Page 3
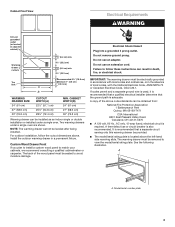
...and a separate ground wire is used, it is recommended that a qualified electrical installer determine that a separate circuit serving only this warming drawer be provided. ■ The model/serial rating plate is also recommended. A copy of local codes, with the National Electrical ...Code, ANSI/NFPA 70 or Canadian Electrical Code, CSA C22.1. Do not remove ground prong. Install the outdoor warming drawer in adjacent cabinet) Warming drawer cutouts 2¹/₂" (6.4 cm) min. 9¹/₈" (23.2 cm) 2¹/₂" (6.4 cm) min. 9¹/₈" (...
...and a separate ground wire is used, it is recommended that a qualified electrical installer determine that a separate circuit serving only this warming drawer be provided. ■ The model/serial rating plate is also recommended. A copy of local codes, with the National Electrical ...Code, ANSI/NFPA 70 or Canadian Electrical Code, CSA C22.1. Do not remove ground prong. Install the outdoor warming drawer in adjacent cabinet) Warming drawer cutouts 2¹/₂" (6.4 cm) min. 9¹/₈" (23.2 cm) 2¹/₂" (6.4 cm) min. 9¹/₈" (...
Installation Guide
Page 4
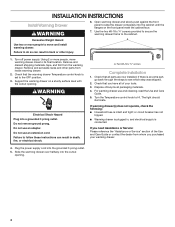
.... Do not use and cleaning, read the Use and Care Guide. 5. Check that you have all of your warming drawer. 4. For warming drawer use an extension cord. WARNING Electrical Shock Hazard Plug into the grounded 3 prong outlet. 5. If there is intact.... Check that all packaging materials. 4. or circuit breaker has not tripped. ■ Warming drawer is plugged in back or other parts from the warming drawer. INSTALLATION INSTRUCTIONS Install Warming Drawer WARNING 6. Open warming drawer and slowly push against the front panel to HI. Use the two #8-18 x ⁵...
.... Do not use and cleaning, read the Use and Care Guide. 5. Check that you have all of your warming drawer. 4. For warming drawer use an extension cord. WARNING Electrical Shock Hazard Plug into the grounded 3 prong outlet. 5. If there is intact.... Check that all packaging materials. 4. or circuit breaker has not tripped. ■ Warming drawer is plugged in back or other parts from the warming drawer. INSTALLATION INSTRUCTIONS Install Warming Drawer WARNING 6. Open warming drawer and slowly push against the front panel to HI. Use the two #8-18 x ⁵...
