
Instruction Sheet
Page 1
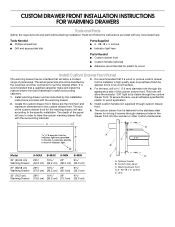
... to the stainless steel drawer by the installation instructions provided with the warming drawer. 3. Optional handle B. Custom door panel C. Lens CUSTOM DRAWER FRONT INSTALLATION INSTRUCTIONS FOR WARMING DRAWERS Tools and Parts Gather the required tools and parts before starting installation. It is installed, a high quality spar polyurethane finish be applied to the specific installation. To secure the lens, use an adhesive specified for the custom drawer front. hole for indicator light lens (provided B in...
... to the stainless steel drawer by the installation instructions provided with the warming drawer. 3. Optional handle B. Custom door panel C. Lens CUSTOM DRAWER FRONT INSTALLATION INSTRUCTIONS FOR WARMING DRAWERS Tools and Parts Gather the required tools and parts before starting installation. It is installed, a high quality spar polyurethane finish be applied to the specific installation. To secure the lens, use an adhesive specified for the custom drawer front. hole for indicator light lens (provided B in...
Dimension Guide
Page 1
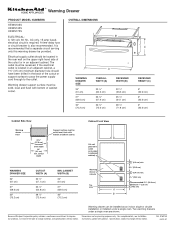
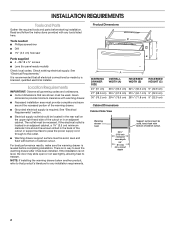
... the rear wall on the upper right-hand side of the cutout or in the back of cabinet cutout. A time-delay fuse or circuit breaker is located in an adjacent cabinet, a 1³⁄₈" (3.5 cm) minimum diameter hole should be solid, level and flush with bottom of the cutout or support surface to pass the power supply cord through to change without notice. OVERALL DIMENSIONS B WARMING DRAWER SIZE 24" (61...
... the rear wall on the upper right-hand side of the cutout or in the back of cabinet cutout. A time-delay fuse or circuit breaker is located in an adjacent cabinet, a 1³⁄₈" (3.5 cm) minimum diameter hole should be solid, level and flush with bottom of the cutout or support surface to pass the power supply cord through to change without notice. OVERALL DIMENSIONS B WARMING DRAWER SIZE 24" (61...
Use & Care Guide
Page 1
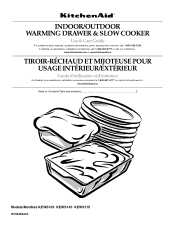
INDOOR/OUTDOOR WARMING DRAWER & SLOW COOKER Use & Care Guide For questions about features, operation/performance, parts, accessories or service, call: 1-800-422-1230 In Canada, for assistance, installation and service, call: 1-800-807-6777 or visit our website at... www.kitchenaid.com or www.kitchenaid.ca TIROIR-RÉCHAUD ET MIJOTEUSE POUR USAGE INTÉRIEUR/EXTÉRIEUR Guide d'utilisation et d'entretien Au...
INDOOR/OUTDOOR WARMING DRAWER & SLOW COOKER Use & Care Guide For questions about features, operation/performance, parts, accessories or service, call: 1-800-422-1230 In Canada, for assistance, installation and service, call: 1-800-807-6777 or visit our website at... www.kitchenaid.com or www.kitchenaid.ca TIROIR-RÉCHAUD ET MIJOTEUSE POUR USAGE INTÉRIEUR/EXTÉRIEUR Guide d'utilisation et d'entretien Au...
Use & Care Guide
Page 3
... dark in color. Use handles or knobs. ■ Do not operate any appliance with a damaged cord or plug or after use dry chemical or foam-type extinguisher. ■ Use Only Dry Potholders - Do not use only. Build-up of pressure may cause injuries. ■ Do not use warming drawer for other bulky cloth. ■ Use Care When Opening Drawer - Interior surfaces of the warming drawer may become hot...
... dark in color. Use handles or knobs. ■ Do not operate any appliance with a damaged cord or plug or after use dry chemical or foam-type extinguisher. ■ Use Only Dry Potholders - Do not use only. Build-up of pressure may cause injuries. ■ Do not use warming drawer for other bulky cloth. ■ Use Care When Opening Drawer - Interior surfaces of the warming drawer may become hot...
Use & Care Guide
Page 4
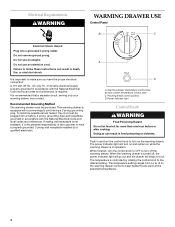
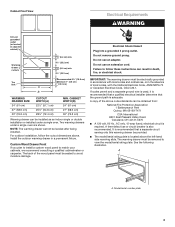
... turned off the warming drawer. Power indicator light Control Knob WARNING Food Poisoning Hazard Do not let food sit for more than one hour before or after cooking. Do not use an adapter. Slow cooker temperature control zone C. Do not remove ground prong. The temperature is recommended that a separate circuit, serving only your warming drawer, be grounded. Electrical Requirements WARNING WARMING DRAWER USE Control Panel Electrical Shock Hazard Plug into a mating, 3 prong, grounding-type wall...
... turned off the warming drawer. Power indicator light Control Knob WARNING Food Poisoning Hazard Do not let food sit for more than one hour before or after cooking. Do not use an adapter. Slow cooker temperature control zone C. Do not remove ground prong. The temperature is recommended that a separate circuit, serving only your warming drawer, be grounded. Electrical Requirements WARNING WARMING DRAWER USE Control Panel Electrical Shock Hazard Plug into a mating, 3 prong, grounding-type wall...

Use & Care Guide
Page 5
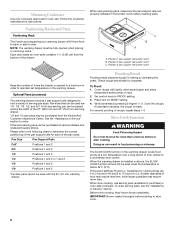
... smaller quantities or heat-sensitive foods, such as a guide. Cover foods with a crisp top Casseroles Med - NOTE: To conserve heat, place cookware and positioning rack in the warming drawer. Select MOIST or DRY setting. 3. WARMING DRAWER TEMPERATURE CHART Different foods require different settings in and turn the control knob to Hi - For best results, meats, seafood and poultry should be heated from the drawer and keeps hot foods...
... smaller quantities or heat-sensitive foods, such as a guide. Cover foods with a crisp top Casseroles Med - NOTE: To conserve heat, place cookware and positioning rack in the warming drawer. Select MOIST or DRY setting. 3. WARMING DRAWER TEMPERATURE CHART Different foods require different settings in and turn the control knob to Hi - For best results, meats, seafood and poultry should be heated from the drawer and keeps hot foods...
Use & Care Guide
Page 6
.... Cover dough with the 24" (61 cm) warming drawer. Verify doneness by activating the yeast. Position 3 pan support rail locator notch Keep the number of serving pan sizes. There are 4 to 5 hours for Hi and 8 to 10 hours for oven use serving pans (available for more time. Set control knob to maintain set temperature in the locator notch before starting to side. Positioning Racks and Pans Positioning Rack The 2 racks accompanying your warming drawer will...
.... Cover dough with the 24" (61 cm) warming drawer. Verify doneness by activating the yeast. Position 3 pan support rail locator notch Keep the number of serving pan sizes. There are 4 to 5 hours for Hi and 8 to 10 hours for oven use serving pans (available for more time. Set control knob to maintain set temperature in the locator notch before starting to side. Positioning Racks and Pans Positioning Rack The 2 racks accompanying your warming drawer will...
Use & Care Guide
Page 7
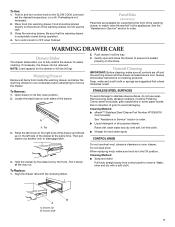
... CONTROL KNOB 4. Do not use the rack. 3. See the "Assistance or Service" section to fully extend the drawer for customizing the front of the drawer at the same time. Always follow label instructions on the slices. WARMING DRAWER CARE Drawer Slides The drawer slides allow the warming drawer to cool completely before attempting to OFF when finished. Push drawer in and turn control knob to disengage latch. General Cleaning IMPORTANT: Before cleaning...
... CONTROL KNOB 4. Do not use the rack. 3. See the "Assistance or Service" section to fully extend the drawer for customizing the front of the drawer at the same time. Always follow label instructions on the slices. WARMING DRAWER CARE Drawer Slides The drawer slides allow the warming drawer to cool completely before attempting to OFF when finished. Push drawer in and turn control knob to disengage latch. General Cleaning IMPORTANT: Before cleaning...
Use & Care Guide
Page 8
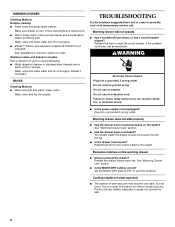
Stubborn stains and baked-on the warming drawer ■ Did you preheat the drawer? RACKS Cleaning Method: ■ Steel-wool pad and warm, soapy water: Wash, rinse and dry thoroughly. Replace the fuse or reset the circuit breaker. Do not use an extension cord. Do not use an adapter. See "Warming Drawer Use" section. ■ Is the MOIST-DRY setting correct? Poultry will remain tender and juicy. Follow manufacturer's instructions. ■ Warm, soapy...
Stubborn stains and baked-on the warming drawer ■ Did you preheat the drawer? RACKS Cleaning Method: ■ Steel-wool pad and warm, soapy water: Wash, rinse and dry thoroughly. Replace the fuse or reset the circuit breaker. Do not use an extension cord. Do not use an adapter. See "Warming Drawer Use" section. ■ Is the MOIST-DRY setting correct? Poultry will remain tender and juicy. Follow manufacturer's instructions. ■ Warm, soapy...
Use & Care Guide
Page 9
... still need further assistance, you can write to fulfill the product warranty and provide afterwarranty service, anywhere in the United States. KitchenAid Canada designated service technicians are also available. 1/2 Size Serving Pan Order Part Number W10242695A 1/3 Size Serving Pan Order Part Number W10242694A affresh™ Stainless Steel Cleaner Order Part Number W10355016 affresh™ Kitchen and Appliance Cleaner Order Part Number W10355010 ■ Use and maintenance procedures. ■ Accessory and repair parts...
... still need further assistance, you can write to fulfill the product warranty and provide afterwarranty service, anywhere in the United States. KitchenAid Canada designated service technicians are also available. 1/2 Size Serving Pan Order Part Number W10242695A 1/3 Size Serving Pan Order Part Number W10242694A affresh™ Stainless Steel Cleaner Order Part Number W10355016 affresh™ Kitchen and Appliance Cleaner Order Part Number W10355010 ■ Use and maintenance procedures. ■ Accessory and repair parts...
Use & Care Guide
Page 10
... "Troubleshooting," you on the product. Service calls to correct the installation of your major appliance, to instruct you may find this information on the model and serial number label located on how to use of consumables or cleaning products not approved by a KitchenAid designated service company. In the U.S.A., call 1-800-807-6777. 9/07 Keep this book and your complete model number and serial number. ITEMS EXCLUDED FROM WARRANTY This limited warranty...
... "Troubleshooting," you on the product. Service calls to correct the installation of your major appliance, to instruct you may find this information on the model and serial number label located on how to use of consumables or cleaning products not approved by a KitchenAid designated service company. In the U.S.A., call 1-800-807-6777. 9/07 Keep this book and your complete model number and serial number. ITEMS EXCLUDED FROM WARRANTY This limited warranty...

Installation Guide
Page 1
..." (76,2 CM) Table of Contents/Table des matières WARMING DRAWER SAFETY 1 SÉCURITÉ DU TIROIR-RÉCHAUD 5 INSTALLATION REQUIREMENTS 2 Tools and Parts 2 Location Requirements 2 Electrical Requirements 3 EXIGENCES D'INSTALLATION 6 Outillage et pièces 6 Exigences d'emplacement 6 Spécifications électriques 7 INSTALLATION INSTRUCTIONS 4 Install Warming Drawer 4 Complete Installation 4 INSTRUCTIONS D'INSTALLATION 8 Installation du tiroir-réchaud 8 Achever l'installation 8 WARMING DRAWER SAFETY Your safety and the safety of injury, and tell...
..." (76,2 CM) Table of Contents/Table des matières WARMING DRAWER SAFETY 1 SÉCURITÉ DU TIROIR-RÉCHAUD 5 INSTALLATION REQUIREMENTS 2 Tools and Parts 2 Location Requirements 2 Electrical Requirements 3 EXIGENCES D'INSTALLATION 6 Outillage et pièces 6 Exigences d'emplacement 6 Spécifications électriques 7 INSTALLATION INSTRUCTIONS 4 Install Warming Drawer 4 Complete Installation 4 INSTRUCTIONS D'INSTALLATION 8 Installation du tiroir-réchaud 8 Achever l'installation 8 WARMING DRAWER SAFETY Your safety and the safety of injury, and tell...
Installation Guide
Page 2
..., qualified electrical installer. Location Requirements IMPORTANT: Observe all governing codes and ordinances. ■ Cutout dimensions that all electrical connections be used. If the electrical outlet is located in the rear wall on the upper right-hand side of the warming drawer. ■ Grounded electrical supply is leveled before starting installation. For best performance results, make sure the warming drawer is required. NOTE: If installing the warming drawer below another product, refer to escape. cutout depth Support surface...
..., qualified electrical installer. Location Requirements IMPORTANT: Observe all governing codes and ordinances. ■ Cutout dimensions that all electrical connections be used. If the electrical outlet is located in the rear wall on the upper right-hand side of the warming drawer. ■ Grounded electrical supply is leveled before starting installation. For best performance results, make sure the warming drawer is required. NOTE: If installing the warming drawer below another product, refer to escape. cutout depth Support surface...
Installation Guide
Page 3
... not remove ground prong. A time-delay fuse or circuit breaker is recommended that a qualified electrical installer determine that a separate circuit serving only this warming drawer be leveled after being installed. CABINET WIDTH (B) 24" (61 cm) 27" (68.6 cm) 30" (76.2 cm) Warming drawer can be removed to match your cabinets, we recommend consulting a qualified cabinetmaker or carpenter. Do not use an extension cord. Model/serial number plate 3 If codes permit and a separate ground wire is used...
... not remove ground prong. A time-delay fuse or circuit breaker is recommended that a qualified electrical installer determine that a separate circuit serving only this warming drawer be leveled after being installed. CABINET WIDTH (B) 24" (61 cm) 27" (68.6 cm) 30" (76.2 cm) Warming drawer can be removed to match your cabinets, we recommend consulting a qualified cabinetmaker or carpenter. Do not use an extension cord. Model/serial number plate 3 If codes permit and a separate ground wire is used...
Installation Guide
Page 4
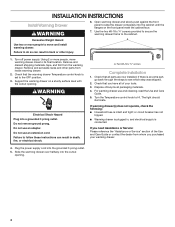
... to secure the warming drawer frame to its final location. Dispose of your warming drawer. 4. For warming drawer use an extension cord. Plug the power supply cord into a grounded 3 prong outlet. INSTALLATION INSTRUCTIONS Install Warming Drawer WARNING 6. Remove and set to the OFF position. 3. WARNING Electrical Shock Hazard Plug into the grounded 3 prong outlet. 5. Do not use and cleaning, read the Use and Care Guide. 5. Check that you purchased your tools. 3. The light should illuminate. Using 2 or more...
... to secure the warming drawer frame to its final location. Dispose of your warming drawer. 4. For warming drawer use an extension cord. Plug the power supply cord into a grounded 3 prong outlet. INSTALLATION INSTRUCTIONS Install Warming Drawer WARNING 6. Remove and set to the OFF position. 3. WARNING Electrical Shock Hazard Plug into the grounded 3 prong outlet. 5. Do not use and cleaning, read the Use and Care Guide. 5. Check that you purchased your tools. 3. The light should illuminate. Using 2 or more...


