

Dimension Guide
Page 1
30" (76.2 cm) Freestanding and Slide-In Electric Range PRODUCT MODEL NUMBERS OVERALL DIMENSIONS KERS807S KERS807X KESK901S KESS907S KESS908S KESS907X Freestanding Range Slide-in Range ELECTRICAL REQUIREMENTS B q This range is manufactured with 25" (63.5 cm) countertop; Range Rating* 120/240 Volts 120/208 Volts...;⁄₄" (4.4 cm) (2 5.5 cm] on models KESS907XSP and KERS807XSP) beyond 24" (61 cm) base cabinet. CABINET DIMENSIONS **When installed in range fit over the cutout edge of Power Supply Cord Kit and Circuit Protection Amps A F D* C B* G C 8.8 - 16.5 KW ...
30" (76.2 cm) Freestanding and Slide-In Electric Range PRODUCT MODEL NUMBERS OVERALL DIMENSIONS KERS807S KERS807X KESK901S KESS907S KESS908S KESS907X Freestanding Range Slide-in Range ELECTRICAL REQUIREMENTS B q This range is manufactured with 25" (63.5 cm) countertop; Range Rating* 120/240 Volts 120/208 Volts...;⁄₄" (4.4 cm) (2 5.5 cm] on models KESS907XSP and KERS807XSP) beyond 24" (61 cm) base cabinet. CABINET DIMENSIONS **When installed in range fit over the cutout edge of Power Supply Cord Kit and Circuit Protection Amps A F D* C B* G C 8.8 - 16.5 KW ...

Installation Guide
Page 2
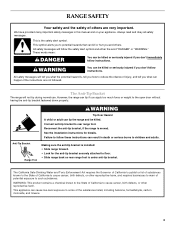
... the safety alert symbol and either the word "DANGER" or "WARNING." Failure to follow instructions. U.S.A. Canada Only 6 Countertop Preparation 7 INSTALLATION INSTRUCTIONS 7 Unpack Range 7 Measure for Proper Height 7 Adjust Leveling Legs 8 Install Anti-Tip Bracket 8 Electrical Connection - All safety messages will follow instructions. WARNING Tip Over Hazard A child or adult can result in this manual...
... the safety alert symbol and either the word "DANGER" or "WARNING." Failure to follow instructions. U.S.A. Canada Only 6 Countertop Preparation 7 INSTALLATION INSTRUCTIONS 7 Unpack Range 7 Measure for Proper Height 7 Adjust Leveling Legs 8 Install Anti-Tip Bracket 8 Electrical Connection - All safety messages will follow instructions. WARNING Tip Over Hazard A child or adult can result in this manual...

Installation Guide
Page 3
...;" screws (2) ■ Anti-tip bracket must be reduced by installing a range hood or microwave range hood combination that projects horizontally a minimum of 5" (12.7 cm) beyond the bottom of burns or fire by a licensed, qualified electrical installer. Thickness of the slide-in cooktop and the wall in the ... A UL listed strain relief. Rear filler strip B. Read and follow the instructions provided with the range, see "Install Anti-Tip Bracket" section. ■ Grounded electrical supply is located inside the oven door on the model/serial rating plate. Parts needed Rear Filler ...
...;" screws (2) ■ Anti-tip bracket must be reduced by installing a range hood or microwave range hood combination that projects horizontally a minimum of 5" (12.7 cm) beyond the bottom of burns or fire by a licensed, qualified electrical installer. Thickness of the slide-in cooktop and the wall in the ... A UL listed strain relief. Rear filler strip B. Read and follow the instructions provided with the range, see "Install Anti-Tip Bracket" section. ■ Grounded electrical supply is located inside the oven door on the model/serial rating plate. Parts needed Rear Filler ...

Installation Guide
Page 4
..., or local codes. In Canada, the installation of oven door protrudes 1³⁄₄" (4.4 cm) (2 5.5 cm] on the right-hand side oven door trim) *Range can be revised. Any method of range** G. A. 30 77.6 cm) B. 35⁵⁄₈...;" (90.5 cm) height to standoff at back of securing the range is not applicable, use the Standard for Mobile Home Construction and Safety, Title 24, HUD Part 280). from handle to underside of oven door protrudes 1" (2.5 cm) beyond 24" (61.0 cm) base cabinet. 4 See "Electrical...
..., or local codes. In Canada, the installation of oven door protrudes 1³⁄₄" (4.4 cm) (2 5.5 cm] on the right-hand side oven door trim) *Range can be revised. Any method of range** G. A. 30 77.6 cm) B. 35⁵⁄₈...;" (90.5 cm) height to standoff at back of securing the range is not applicable, use the Standard for Mobile Home Construction and Safety, Title 24, HUD Part 280). from handle to underside of oven door protrudes 1" (2.5 cm) beyond 24" (61.0 cm) base cabinet. 4 See "Electrical...

Installation Guide
Page 5
...installed by not less than No. 28 MSG sheet steel, 0.015" (0.4 mm) stainless steel, 0.024" (0.6 mm) aluminum or 0.020" (0.5 mm) copper. 30" (76.2 cm) minimum clearance between the top of the cooking platform and the bottom of the cooktop, see following Range Rating chart). D. 30" (76.2 cm) min. Electrical...countertop height. Freestanding Range A freestanding range may be connected to combustible walls with zero clearance. opening width E. Electrical Connection To properly install your range, you must be installed next to the proper electrical voltage and frequency as...
...installed by not less than No. 28 MSG sheet steel, 0.015" (0.4 mm) stainless steel, 0.024" (0.6 mm) aluminum or 0.020" (0.5 mm) copper. 30" (76.2 cm) minimum clearance between the top of the cooking platform and the bottom of the cooktop, see following Range Rating chart). D. 30" (76.2 cm) min. Electrical...countertop height. Freestanding Range A freestanding range may be connected to combustible walls with zero clearance. opening width E. Electrical Connection To properly install your range, you must be installed next to the proper electrical voltage and frequency as...

Installation Guide
Page 6
...connecting to a 4-wire system: This range is manufactured with a UL listed strain relief and be at least 4 ft (1.22 m) long. 4-wire receptacle (14-50R) The minimum conductor sized for new branch-circuit installations (1996 NEC); See the "Electrical Connection" section. This uses a 3-...: Canadian Standards Association 178 Rexdale Blvd. Grounding through the neutral conductor is recommended that a qualified electrical installer determine that the electrical connection and wire size are not sure the range is properly grounded. mobile homes; When a 4-wire receptacle of NEMA Type 14-50R is used...
...connecting to a 4-wire system: This range is manufactured with a UL listed strain relief and be at least 4 ft (1.22 m) long. 4-wire receptacle (14-50R) The minimum conductor sized for new branch-circuit installations (1996 NEC); See the "Electrical Connection" section. This uses a 3-...: Canadian Standards Association 178 Rexdale Blvd. Grounding through the neutral conductor is recommended that a qualified electrical installer determine that the electrical connection and wire size are not sure the range is properly grounded. mobile homes; When a 4-wire receptacle of NEMA Type 14-50R is used...

Installation Guide
Page 7
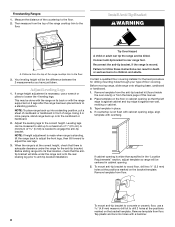
... satisfactory baking conditions. Measure at locations marked A, B, C, D. 2. If you have a square finish (flat) countertop and the opening . C D A B 30" (76.2 cm) 30 ¾" (78.1 cm) ³⁄₈" (1.0 cm) If countertop opening width is laid on its back. Failure to move and install range. Remove shipping materials, tape and film from the carton. To place...
... satisfactory baking conditions. Measure at locations marked A, B, C, D. 2. If you have a square finish (flat) countertop and the opening . C D A B 30" (76.2 cm) 30 ¾" (78.1 cm) ³⁄₈" (1.0 cm) If countertop opening width is laid on its back. Failure to move and install range. Remove shipping materials, tape and film from the carton. To place...
Installation Guide
Page 8
...against rear wall, molding or cabinet. 3. NOTE: If height adjustment is made when range is necessary, use a 4.8 mm) masonry drill bit to anti-tip bracket installation. Contact a qualified floor covering installer for the best procedure for the anti-tip bracket. Place template on the bracket template...cavity) or from the top of this manual. 2. Install Anti-Tip Bracket WARNING A A. Reconnect the anti-tip bracket, if the range is needed to the floor. Freestanding Ranges: 1. Your leveling height will be killed. When the range is at the correct height, check that the antitip ...
...against rear wall, molding or cabinet. 3. NOTE: If height adjustment is made when range is necessary, use a 4.8 mm) masonry drill bit to anti-tip bracket installation. Contact a qualified floor covering installer for the best procedure for the anti-tip bracket. Place template on the bracket template...cavity) or from the top of this manual. 2. Install Anti-Tip Bracket WARNING A A. Reconnect the anti-tip bracket, if the range is needed to the floor. Freestanding Ranges: 1. Your leveling height will be killed. When the range is at the correct height, check that the antitip ...

Installation Guide
Page 9
... the terminal block cover screws located on the thickness of the range. Fasten anti-tip bracket with holes in death, fire, or electrical shock. 1. Remove cardboard or hardboard from your range using the following installation instructions. Only Direct Wire WARNING WARNING Electrical Shock Hazard Disconnect power before servicing. Add strain relief. Longer screws are available...
... the terminal block cover screws located on the thickness of the range. Fasten anti-tip bracket with holes in death, fire, or electrical shock. 1. Remove cardboard or hardboard from your range using the following installation instructions. Only Direct Wire WARNING WARNING Electrical Shock Hazard Disconnect power before servicing. Add strain relief. Longer screws are available...
Installation Guide
Page 10
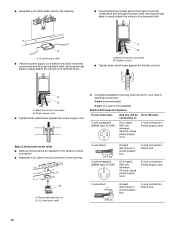
... wire 10 Flexible conduit ■ Tighten strain relief screw against the power supply cord. 5. Complete installation following instructions for your type of electrical connection: 4-wire (recommended) 3-wire (if 4-wire is not available) Electrical Connection Options If your home has: And you will be Go to Section: connecting to: 4-wire... A. A 4-wire direct 5" (12.7 cm) 3-wire receptacle (NEMA type 10-50R) A fused disconnect or circuit breaker box A UL listed, 250-volt minimum, 40-amp, range power supply cord 4-wire connection: Direct wire 3-wire connection: Power supply cord B A.
... wire 10 Flexible conduit ■ Tighten strain relief screw against the power supply cord. 5. Complete installation following instructions for your type of electrical connection: 4-wire (recommended) 3-wire (if 4-wire is not available) Electrical Connection Options If your home has: And you will be Go to Section: connecting to: 4-wire... A. A 4-wire direct 5" (12.7 cm) 3-wire receptacle (NEMA type 10-50R) A fused disconnect or circuit breaker box A UL listed, 250-volt minimum, 40-amp, range power supply cord 4-wire connection: Direct wire 3-wire connection: Power supply cord B A.
Installation Guide
Page 11
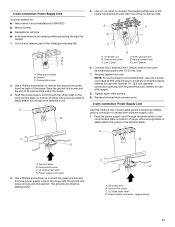
...link section. Securely tighten hex nuts. Replace terminal block access cover. 3-wire connection: Power Supply Cord Use this method for: ■ New branch-circuit installations (1996 NEC) ■ Mobile homes ■ Recreational vehicles ■ In an area where local codes prohibit grounding through the neutral. 1. A C...easily attach the wiring to the terminal block. Use a Phillips screwdriver to connect the green ground wire from the back of the range. Line 2 (red) D D. Tighten strain relief screws. 9. Terminal block B. Use ³⁄₈" nut driver to ...
...link section. Securely tighten hex nuts. Replace terminal block access cover. 3-wire connection: Power Supply Cord Use this method for: ■ New branch-circuit installations (1996 NEC) ■ Mobile homes ■ Recreational vehicles ■ In an area where local codes prohibit grounding through the neutral. 1. A C...easily attach the wiring to the terminal block. Use a Phillips screwdriver to connect the green ground wire from the back of the range. Line 2 (red) D D. Tighten strain relief screws. 9. Terminal block B. Use ³⁄₈" nut driver to ...

Installation Guide
Page 12
Line 2 (red) C. Line 1 (black) 3. Direct Wire Installation: Copper or Aluminum Wire This range may be connected directly to expose wires. Metal ground strap B. Cord/conduit plate D. Cut out and remove part of the ground link under the screw. 3. Depending on bottom of terminal lugs. Complete electrical connection according to the center terminal block post...
Line 2 (red) C. Line 1 (black) 3. Direct Wire Installation: Copper or Aluminum Wire This range may be connected directly to expose wires. Metal ground strap B. Cord/conduit plate D. Cut out and remove part of the ground link under the screw. 3. Depending on bottom of terminal lugs. Complete electrical connection according to the center terminal block post...

Installation Guide
Page 14
... residue caused by shipping material. or circuit breaker has not tripped. ■ Range is plugged into an outlet. ■ Electrical supply is moved. Moving the Range WARNING 3. Push range back into the guides in the range Use and Care Guide. 7. Complete Installation 1. NOTE: Range must be viewed from the anti-tip bracket. Verify Anti-Tip Bracket Location...
... residue caused by shipping material. or circuit breaker has not tripped. ■ Range is plugged into an outlet. ■ Electrical supply is moved. Moving the Range WARNING 3. Push range back into the guides in the range Use and Care Guide. 7. Complete Installation 1. NOTE: Range must be viewed from the anti-tip bracket. Verify Anti-Tip Bracket Location...

Installation Guide
Page 15
... or hardboard to perform cleaning or maintenance. 3. Check that anti-tip bracket is installed: ■ Look for the anti-tip bracket securely attached to floor. ■ Slide range back so rear range foot is under anti-tip bracket. 6. Plug in death or electrical shock. 1. Replace all parts and panels before servicing. If removing the...
... or hardboard to perform cleaning or maintenance. 3. Check that anti-tip bracket is installed: ■ Look for the anti-tip bracket securely attached to floor. ■ Slide range back so rear range foot is under anti-tip bracket. 6. Plug in death or electrical shock. 1. Replace all parts and panels before servicing. If removing the...

Use & Care Guide
Page 1
ELECTRIC RANGE ARCHITECT® SERIES II Use & Care Guide For questions about features, operation/performance, parts, accessories or service, call: 1-800-422-1230 or visit our website at www.kitchenaid.com In Canada, call for assistance, installation and service, call: 1-800-807-6777 or visit our website at www.KitchenAid.ca Table of Contents...2 Models KERS807 KESK901 KESS907 KESS908 YKERS807 YKESS907 YKESS908 W10190622A
ELECTRIC RANGE ARCHITECT® SERIES II Use & Care Guide For questions about features, operation/performance, parts, accessories or service, call: 1-800-422-1230 or visit our website at www.kitchenaid.com In Canada, call for assistance, installation and service, call: 1-800-807-6777 or visit our website at www.KitchenAid.ca Table of Contents...2 Models KERS807 KESK901 KESS907 KESS908 YKERS807 YKESS907 YKESS908 W10190622A
Use & Care Guide
Page 3
... You can be killed or seriously injured if you what can tip the range and be killed. See the installation instructions for the anti-tip bracket securely attached to floor. • Slide range back so rear range foot is under anti-tip bracket. Failure to children and adults. The Anti...word "DANGER" or "WARNING." All safety messages will follow these instructions can kill or hurt you what the potential hazard is installed: • Slide range forward. • Look for details. Anti-Tip Bracket Range Foot Making sure the anti-tip bracket is , tell you how to rear...
... You can be killed or seriously injured if you what can tip the range and be killed. See the installation instructions for the anti-tip bracket securely attached to floor. • Slide range back so rear range foot is under anti-tip bracket. Failure to children and adults. The Anti...word "DANGER" or "WARNING." All safety messages will follow these instructions can kill or hurt you what the potential hazard is installed: • Slide range forward. • Look for details. Anti-Tip Bracket Range Foot Making sure the anti-tip bracket is , tell you how to rear...

Use & Care Guide
Page 4
...9632; Use Proper Pan Size - Boilover causes smoking and greasy spillovers that it is in a risk of electric shock. Heating elements should be seriously injured. ■ Proper Installation - If rack must be immersed in temperature. ■ Utensil Handles Should Be Turned Inward and Not Extend... of glass, glass/ceramic, ceramic, earthenware, or other flammable materials contact heating elements or interior surfaces of different size. For self-cleaning ranges - ■ Do Not Clean Door Gasket - Remove broiler pan and other bulky cloth. ■ DO NOT TOUCH SURFACE UNITS OR ...
...9632; Use Proper Pan Size - Boilover causes smoking and greasy spillovers that it is in a risk of electric shock. Heating elements should be seriously injured. ■ Proper Installation - If rack must be immersed in temperature. ■ Utensil Handles Should Be Turned Inward and Not Extend... of glass, glass/ceramic, ceramic, earthenware, or other flammable materials contact heating elements or interior surfaces of different size. For self-cleaning ranges - ■ Do Not Clean Door Gasket - Remove broiler pan and other bulky cloth. ■ DO NOT TOUCH SURFACE UNITS OR ...
Use & Care Guide
Page 29
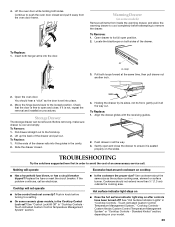
... ■ Does the hot surface indicator light stay on your model. 29 To Replace: 1. Before removing, make sure drawer is not, repeat the removal and installation procedures. Pull drawer straight out to push the oven door closed . 4. Holding the drawer by its sides, not its full open and close . Push drawer...
... ■ Does the hot surface indicator light stay on your model. 29 To Replace: 1. Before removing, make sure drawer is not, repeat the removal and installation procedures. Pull drawer straight out to push the oven door closed . 4. Holding the drawer by its sides, not its full open and close . Push drawer...

Use & Care Guide
Page 30
...parts sales. ■ Specialized customer assistance (Spanish speaking, hearing impaired, limited vision, etc.). 30 To locate factory specified parts in use only factory specified parts. In the U.S.A. Call the KitchenAid Customer eXperience Center toll free: 1-800-422-1230. See "Cookware" section. ■ Is.... Double-check the recipe in the pan? If you need help us or your model. ■ Is the range level? See "Oven Displays" section. See the Installation Instructions. See "Control Lock" section. ■ On some models, is the Control Lock set ? Display shows...
...parts sales. ■ Specialized customer assistance (Spanish speaking, hearing impaired, limited vision, etc.). 30 To locate factory specified parts in use only factory specified parts. In the U.S.A. Call the KitchenAid Customer eXperience Center toll free: 1-800-422-1230. See "Cookware" section. ■ Is.... Double-check the recipe in the pan? If you need help us or your model. ■ Is the range level? See "Oven Displays" section. See the Installation Instructions. See "Control Lock" section. ■ On some models, is the Control Lock set ? Display shows...
Use & Care Guide
Page 32
... workmanship and is reported to be repaired in the home and only in accordance with published installation instructions. 10. This major appliance is designed to KitchenAid within 30 days from the date of your major appliance, unless such damage results from accident, alteration,... of KitchenAid, U.S.A., KitchenAid Canada licensee in Canada 3/08 Printed in accordance with electrical or plumbing codes, or use your major appliance to correct house wiring or plumbing. 2. You will need service, first see the "Troubleshooting" section of purchase or installation date for...
... workmanship and is reported to be repaired in the home and only in accordance with published installation instructions. 10. This major appliance is designed to KitchenAid within 30 days from the date of your major appliance, unless such damage results from accident, alteration,... of KitchenAid, U.S.A., KitchenAid Canada licensee in Canada 3/08 Printed in accordance with electrical or plumbing codes, or use your major appliance to correct house wiring or plumbing. 2. You will need service, first see the "Troubleshooting" section of purchase or installation date for...


