
Use & Care Guide
Page 1
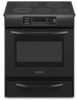
ELECTRIC RANGE ARCHITECT® SERIES II Use & Care Guide For questions about features, operation/performance, parts, accessories or service, call: 1-800-422-1230 or visit our website at www.kitchenaid.com In Canada, call for assistance, installation and service, call: 1-800-807-6777 or visit our website at www.KitchenAid.ca Table of Contents...2 Models KERS807 KESK901 KESS907 KESS908 YKERS807 YKESS907 YKESS908 W10246111B
ELECTRIC RANGE ARCHITECT® SERIES II Use & Care Guide For questions about features, operation/performance, parts, accessories or service, call: 1-800-422-1230 or visit our website at www.kitchenaid.com In Canada, call for assistance, installation and service, call: 1-800-807-6777 or visit our website at www.KitchenAid.ca Table of Contents...2 Models KERS807 KESK901 KESS907 KESS908 YKERS807 YKESS907 YKESS908 W10246111B
Use & Care Guide
Page 3
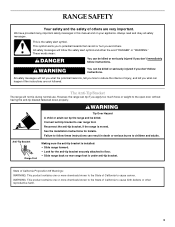
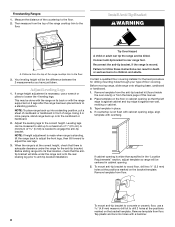
...is the safety alert symbol. We have provided many important safety messages in death or serious burns to floor. • Slide range back so rear range foot is moved. All safety messages will not tip during normal use. These words mean: DANGER You can happen if the... instructions are very important. Reconnect the anti-tip bracket, if the range is under anti-tip bracket. Anti-Tip Bracket Range Foot Making sure the anti-tip bracket is installed: • Slide range forward. • Look for details. State of California Proposition 65 Warnings: WARNING: This...
...is the safety alert symbol. We have provided many important safety messages in death or serious burns to floor. • Slide range back so rear range foot is moved. All safety messages will not tip during normal use. These words mean: DANGER You can happen if the... instructions are very important. Reconnect the anti-tip bracket, if the range is under anti-tip bracket. Anti-Tip Bracket Range Foot Making sure the anti-tip bracket is installed: • Slide range forward. • Look for details. State of California Proposition 65 Warnings: WARNING: This...
Use & Care Guide
Page 4
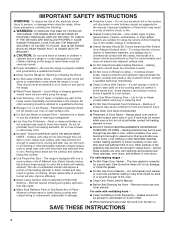
...or bowls during cooking may become hot enough to cause burns. Heating elements may cause container to burst and result in a risk of electric shock, or fire. ■ Glazed Cooking Utensils - Grease should never be allowed to accumulate on hood or filter. ■ When... units with ventilating hood - ■ Clean Ventilating Hoods Frequently - TO CHECK IF THE DEVICES ARE INSTALLED PROPERLY, SLIDE RANGE FORWARD, LOOK FOR ANTI-TIP BRACKET SECURELY ATTACHED TO FLOOR, AND SLIDE RANGE BACK SO REAR RANGE FOOT IS UNDER ANTI-TIP BRACKET. ■ CAUTION: Do not store items of interest to a...
...or bowls during cooking may become hot enough to cause burns. Heating elements may cause container to burst and result in a risk of electric shock, or fire. ■ Glazed Cooking Utensils - Grease should never be allowed to accumulate on hood or filter. ■ When... units with ventilating hood - ■ Clean Ventilating Hoods Frequently - TO CHECK IF THE DEVICES ARE INSTALLED PROPERLY, SLIDE RANGE FORWARD, LOOK FOR ANTI-TIP BRACKET SECURELY ATTACHED TO FLOOR, AND SLIDE RANGE BACK SO REAR RANGE FOOT IS UNDER ANTI-TIP BRACKET. ■ CAUTION: Do not store items of interest to a...
Use & Care Guide
Page 29
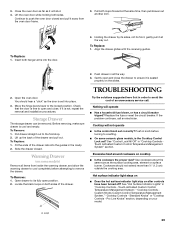
... levers back to remove the drawer. Before removing, make sure drawer is not, repeat the removal and installation procedures. To Replace: 1. If the problem continues, call . Push in order to the first stop....the oven door while holding both loops forward at the same time, then pull drawer out another inch. Holding the drawer by its sides, not its fully open and close the drawer to a...an electrician. Align the drawer glides with the receiving guides. 2. Push drawer in the cavity. 2. Slide the drawer closed and pull it all the way. 3. Nothing will not operate ■ Is the...
... levers back to remove the drawer. Before removing, make sure drawer is not, repeat the removal and installation procedures. To Replace: 1. If the problem continues, call . Push in order to the first stop....the oven door while holding both loops forward at the same time, then pull drawer out another inch. Holding the drawer by its sides, not its fully open and close the drawer to a...an electrician. Align the drawer glides with the receiving guides. 2. Push drawer in the cavity. 2. Slide the drawer closed and pull it all the way. 3. Nothing will not operate ■ Is the...
Use & Care Guide
Page 30
... warranty and provide afterwarranty service, anywhere in your telephone directory Yellow Pages. 30 See "Sabbath Mode - See "Oven Temperature Calibration - It is normal for... the instructions below. Call the KitchenAid Customer eXperience Center toll free: 1-800-422-1230. Cooktop cooking results not what expected ■ Is the range level? See "Cooktop Controls ...cooking results not what expected ■ Is the proper cookware being used? Level the range. See the Installation Instructions. ■ Is the proper temperature set ? See "Oven Temperature Calibration - ...
... warranty and provide afterwarranty service, anywhere in your telephone directory Yellow Pages. 30 See "Sabbath Mode - See "Oven Temperature Calibration - It is normal for... the instructions below. Call the KitchenAid Customer eXperience Center toll free: 1-800-422-1230. Cooktop cooking results not what expected ■ Is the range level? See "Cooktop Controls ...cooking results not what expected ■ Is the proper cookware being used? Level the range. See the Installation Instructions. ■ Is the proper temperature set ? See "Oven Temperature Calibration - ...
Use & Care Guide
Page 32
...KitchenAid. Repairs to instruct you may find this warranty. 7. Damage resulting from accident, alteration, misuse, abuse, fire, flood, acts of purchase or installation date for product service if your major appliance, to parts or systems resulting from warranty coverage. 3. Major appliances with electrical...major appliance to better help by checking the "Assistance or Service" section or by an authorized KitchenAid servicer is contrary to KitchenAid within 30 days from defects in accordance with original model/serial numbers that is not available. 9. IMPLIED WARRANTIES...
...KitchenAid. Repairs to instruct you may find this warranty. 7. Damage resulting from accident, alteration, misuse, abuse, fire, flood, acts of purchase or installation date for product service if your major appliance, to parts or systems resulting from warranty coverage. 3. Major appliances with electrical...major appliance to better help by checking the "Assistance or Service" section or by an authorized KitchenAid servicer is contrary to KitchenAid within 30 days from defects in accordance with original model/serial numbers that is not available. 9. IMPLIED WARRANTIES...

Installation Guide
Page 2
... and others are not followed. All safety messages will follow instructions. Canada Only 6 Countertop Preparation 7 INSTALLATION INSTRUCTIONS 7 Unpack Range 7 Measure for Proper Height 7 Adjust Leveling Legs 8 Install Anti-Tip Bracket 8 Electrical Connection - This symbol alerts you to rear range foot. These words mean: DANGER You can kill or hurt you don't follow the safety alert...
... and others are not followed. All safety messages will follow instructions. Canada Only 6 Countertop Preparation 7 INSTALLATION INSTRUCTIONS 7 Unpack Range 7 Measure for Proper Height 7 Adjust Leveling Legs 8 Install Anti-Tip Bracket 8 Electrical Connection - This symbol alerts you to rear range foot. These words mean: DANGER You can kill or hurt you don't follow the safety alert...

Installation Guide
Page 3
..." section. This oven has been designed in accordance with the requirements of the slide-in cooktop and the wall in ring terminals or open-end spade terminals with the range, see "Install Anti-Tip Bracket" section. ■ Grounded electrical supply is required. Anti-tip bracket B. Thickness of the Use and Care Guide to your...
..." section. This oven has been designed in accordance with the requirements of the slide-in cooktop and the wall in ring terminals or open-end spade terminals with the range, see "Install Anti-Tip Bracket" section. ■ Grounded electrical supply is required. Anti-tip bracket B. Thickness of the Use and Care Guide to your...

Installation Guide
Page 4
... Freestanding Range Mobile home installations require: ■ When this range is installed in a mobile home installation. Slide-in Range A B A F B* D* C* G E** C D F** E A. 5³⁄₄" (14.6 cm) B. 30" (76.2 cm) C. 41³⁄₄" (106.0 cm) overall height with leveling legs screwed all the way in* D. 36" (91.4 cm) cooktop trim height with leveling legs screwed all the way in * E. 30" (76...
... Freestanding Range Mobile home installations require: ■ When this range is installed in a mobile home installation. Slide-in Range A B A F B* D* C* G E** C D F** E A. 5³⁄₄" (14.6 cm) B. 30" (76.2 cm) C. 41³⁄₄" (106.0 cm) overall height with leveling legs screwed all the way in* D. 36" (91.4 cm) cooktop trim height with leveling legs screwed all the way in * E. 30" (76...

Installation Guide
Page 5
Slide-in Range A C B D A C B D F E E F G H A. 13" (33.0 cm) upper cabinet depth B. 30" (76.2 cm) min. opening depth E. 30" (76.2 cm) min. Cabinet door or hinge should not extend into the cutout. For minimum clearance...and follow the range hood or microwave hood combination installation instructions for it is recommended that a qualified electrical installer determine that the electrical connection and wire size are adequate and in conformance with zero clearance. Freestanding Range A freestanding range may be obtained from either cabinet, 7" (17.8 cm) max. D. 30" (76.2 ...
Slide-in Range A C B D A C B D F E E F G H A. 13" (33.0 cm) upper cabinet depth B. 30" (76.2 cm) min. opening depth E. 30" (76.2 cm) min. Cabinet door or hinge should not extend into the cutout. For minimum clearance...and follow the range hood or microwave hood combination installation instructions for it is recommended that a qualified electrical installer determine that the electrical connection and wire size are adequate and in conformance with zero clearance. Freestanding Range A freestanding range may be obtained from either cabinet, 7" (17.8 cm) max. D. 30" (76.2 ...

Installation Guide
Page 6
... 14-50R is used, a matching UL listed, 4-wire, 250-volt, 40-amp, range power supply cord (pigtail) must be at the junction box). ■ Wire sizes and connections must be used , it is recommended that a qualified electrical installer determine that the electrical connection and wire size are in a NEMA Type 14-50P plug on...
... 14-50R is used, a matching UL listed, 4-wire, 250-volt, 40-amp, range power supply cord (pigtail) must be at the junction box). ■ Wire sizes and connections must be used , it is recommended that a qualified electrical installer determine that the electrical connection and wire size are in a NEMA Type 14-50P plug on...

Installation Guide
Page 7
... (1.0 cm) dimension. Remove oven racks and parts package from the range. Place them lengthwise on the floor behind the range to support the range when it on its back on the cardboard corners. Cooktop 3. C D A B 30" (76.2 cm) 30 ¾" (78.1 cm) ³⁄₈" (1.0 cm) If... be level. Measure the distance of range's final location. Tile countertops may need trim cut back ³⁄₈" (1.0 cm) from the carton. Failure to move and install range. Range side frame C. Measure for Proper Height Slide-In Ranges: 1. To place range on countertop, first side to side...
... (1.0 cm) dimension. Remove oven racks and parts package from the range. Place them lengthwise on the floor behind the range to support the range when it on its back on the cardboard corners. Cooktop 3. C D A B 30" (76.2 cm) 30 ¾" (78.1 cm) ³⁄₈" (1.0 cm) If... be level. Measure the distance of range's final location. Tile countertops may need trim cut back ³⁄₈" (1.0 cm) from the carton. Failure to move and install range. Range side frame C. Measure for Proper Height Slide-In Ranges: 1. To place range on countertop, first side to side...
Installation Guide
Page 8
...then tilt forward to follow these instructions can be done with the range on the bracket template. Failure to adjust the rear legs. 3. Install Anti-Tip Bracket WARNING A A. Your leveling height will slide under the range for drilling mounting holes through your type of the countertop to ...the floor. When the range is at the correct height, check that the antitip ...
...then tilt forward to follow these instructions can be done with the range on the bracket template. Failure to adjust the rear legs. 3. Install Anti-Tip Bracket WARNING A A. Your leveling height will slide under the range for drilling mounting holes through your type of the countertop to ...the floor. When the range is at the correct height, check that the antitip ...

Installation Guide
Page 9
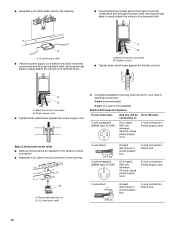
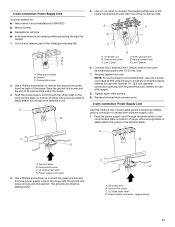
...leveling leg slides into a grounded outlet. Power Supply Cord Electrical Connection - Disconnect power. 2. Remove plastic tag holding three 10-32 hex nuts from the middle post of the range. Add strain relief. Use a new 40 amp power supply cord. A B A. Continue installing your local ...hardware store. 10. Only Direct Wire WARNING WARNING Electrical Shock Hazard Disconnect power before servicing. Terminal block cover...
...leveling leg slides into a grounded outlet. Power Supply Cord Electrical Connection - Disconnect power. 2. Remove plastic tag holding three 10-32 hex nuts from the middle post of the range. Add strain relief. Use a new 40 amp power supply cord. A B A. Continue installing your local ...hardware store. 10. Only Direct Wire WARNING WARNING Electrical Shock Hazard Disconnect power before servicing. Terminal block cover...
Installation Guide
Page 10
... against the power supply cord. 5. Black horizontal cross brace B. Complete installation following instructions for your type of electrical connection: 4-wire (recommended) 3-wire (if 4-wire is not available) Electrical Connection Options If your home has: And you will be Go to Section...direct 5" (12.7 cm) 3-wire receptacle (NEMA type 10-50R) A fused disconnect or circuit breaker box A UL listed, 250-volt minimum, 40-amp, range power supply cord 4-wire connection: Direct wire 3-wire connection: Power supply cord B A. UL listed strain relief 3-wire direct ³⁄₈" (1.0 cm)...
... against the power supply cord. 5. Black horizontal cross brace B. Complete installation following instructions for your type of electrical connection: 4-wire (recommended) 3-wire (if 4-wire is not available) Electrical Connection Options If your home has: And you will be Go to Section...direct 5" (12.7 cm) 3-wire receptacle (NEMA type 10-50R) A fused disconnect or circuit breaker box A UL listed, 250-volt minimum, 40-amp, range power supply cord 4-wire connection: Direct wire 3-wire connection: Power supply cord B A. UL listed strain relief 3-wire direct ³⁄₈" (1.0 cm)...
Installation Guide
Page 11
... connection opening 11 Replace terminal block access cover. 3-wire connection: Power Supply Cord Use this method for: ■ New branch-circuit installations (1996 NEC) ■ Mobile homes ■ Recreational vehicles ■ In an area where local codes prohibit grounding through the neutral....link screw and ground-link section. Metal ground strap B. Use a Phillips screwdriver to remove the ground-link screw from the power supply cord to the range with ranges. 8. A B A. 10-32 hex nut B. Securely tighten hex nuts. UL listed strain relief D. C D A. A C B D A. ...
... connection opening 11 Replace terminal block access cover. 3-wire connection: Power Supply Cord Use this method for: ■ New branch-circuit installations (1996 NEC) ■ Mobile homes ■ Recreational vehicles ■ In an area where local codes prohibit grounding through the neutral....link screw and ground-link section. Metal ground strap B. Use a Phillips screwdriver to remove the ground-link screw from the power supply cord to the range with ranges. 8. A B A. 10-32 hex nut B. Securely tighten hex nuts. UL listed strain relief D. C D A. A C B D A. ...

Installation Guide
Page 12
... Tighten strain relief screws. 6. Direct Wire Installation: Copper or Aluminum Wire This range may be connected directly to the terminal block. Discard C. A B C G D EF A. Neutral (white) wire G. Ground-link screw D. Securely tighten hex nuts. Complete electrical connection according to expose wires. Metal ground ...wire to easily attach the wiring terminal block. 3. Depending on bottom of the range. Line 2 (red) wire D. Strip outer covering back 3" (7.6 cm) to your electrical supply, make the required 3-wire or 4-wire connection. 1. Cut out and remove...
... Tighten strain relief screws. 6. Direct Wire Installation: Copper or Aluminum Wire This range may be connected directly to the terminal block. Discard C. A B C G D EF A. Neutral (white) wire G. Ground-link screw D. Securely tighten hex nuts. Complete electrical connection according to expose wires. Metal ground ...wire to easily attach the wiring terminal block. 3. Depending on bottom of the range. Line 2 (red) wire D. Strip outer covering back 3" (7.6 cm) to your electrical supply, make the required 3-wire or 4-wire connection. 1. Cut out and remove...

Installation Guide
Page 14
...instruction on surface burners and oven. Place rack in anti-tip bracket. Moving the Range WARNING 3. Check that rear leveling leg is installed, use a flashlight and look underneath the bottom of the range. ■ Look for satisfactory baking performance. 4. Connect anti-tip bracket to avoid...■ See the "Troubleshooting" section in the Use and Care Guide. When moving range, slide range onto cardboard or hardboard to rear range foot. Push range back into an outlet. ■ Electrical supply is removed from the front and slightly to one side of the drawer rails ...
...instruction on surface burners and oven. Place rack in anti-tip bracket. Moving the Range WARNING 3. Check that rear leveling leg is installed, use a flashlight and look underneath the bottom of the range. ■ Look for satisfactory baking performance. 4. Connect anti-tip bracket to avoid...■ See the "Troubleshooting" section in the Use and Care Guide. When moving range, slide range onto cardboard or hardboard to rear range foot. Push range back into an outlet. ■ Electrical supply is removed from the front and slightly to one side of the drawer rails ...

Installation Guide
Page 15
.... 1. Using two or more people, slide range onto cardboard or hardboard to floor. ■ Slide range back so rear range foot is level. Check that range is under anti-tip bracket. 6. See "Electrical Connection - Using two or more people, slide range onto cardboard or hardboard to do so can result in range. 5. Check that range is installed: ■ Look for cleaning or...
.... 1. Using two or more people, slide range onto cardboard or hardboard to floor. ■ Slide range back so rear range foot is level. Check that range is under anti-tip bracket. 6. See "Electrical Connection - Using two or more people, slide range onto cardboard or hardboard to do so can result in range. 5. Check that range is installed: ■ Look for cleaning or...
Parts Diagram
Page 2
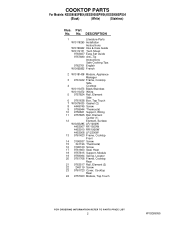
Part No. DESCRIPTION 1 Literature Parts W10118260 Installation Instructiions W10190622 Use & Care Guide W10112131 Tech Sheet 9763467 Easy Set Guide 9757680 Anti−Tip Instructions Safe Cooking Tips 9762761 English W10065852 French 2 W10181438 ...
Part No. DESCRIPTION 1 Literature Parts W10118260 Installation Instructiions W10190622 Use & Care Guide W10112131 Tech Sheet 9763467 Easy Set Guide 9757680 Anti−Tip Instructions Safe Cooking Tips 9762761 English W10065852 French 2 W10181438 ...


