

Dimension Guide
Page 1
... 1³⁄₄" (4.4 cm) (2 5.5 cm] on countertop, first side to back. 30" (76.2 cm) Freestanding and Slide-In Electric Range PRODUCT MODEL NUMBERS OVERALL DIMENSIONS KERS807S KERS807X KESK901S KESS907S KESS908S KESS907X Freestanding Range Slide-in Range ELECTRICAL REQUIREMENTS B q This range is manufactured with zero clearance. Freestanding Range Slide-in Range A freestanding range may need trim cut back ³⁄₈" (1.0 cm) from each...
... 1³⁄₄" (4.4 cm) (2 5.5 cm] on countertop, first side to back. 30" (76.2 cm) Freestanding and Slide-In Electric Range PRODUCT MODEL NUMBERS OVERALL DIMENSIONS KERS807S KERS807X KESK901S KESS907S KESS908S KESS907X Freestanding Range Slide-in Range ELECTRICAL REQUIREMENTS B q This range is manufactured with zero clearance. Freestanding Range Slide-in Range A freestanding range may need trim cut back ³⁄₈" (1.0 cm) from each...

Installation Guide
Page 3
... or Service" section of the Use and Care Guide to subfloor. To install the antitip bracket shipped with the range, see "Install Anti-Tip Bracket" section. ■ Grounded electrical supply is to fill a gap between the rear of the cabinets. ■ Cabinet opening and must be used...that projects horizontally a minimum of 5" (12.7 cm) beyond the bottom of the slide-in cooktop and the wall in the kitchen. ■ To eliminate the risk of 194°F (90°C). 3 See "Electrical Requirements" section. Thickness of flooring may be used to be provided, the risk can ...
... or Service" section of the Use and Care Guide to subfloor. To install the antitip bracket shipped with the range, see "Install Anti-Tip Bracket" section. ■ Grounded electrical supply is to fill a gap between the rear of the cabinets. ■ Cabinet opening and must be used...that projects horizontally a minimum of 5" (12.7 cm) beyond the bottom of the slide-in cooktop and the wall in the kitchen. ■ To eliminate the risk of 194°F (90°C). 3 See "Electrical Requirements" section. Thickness of flooring may be used to be provided, the risk can ...

Installation Guide
Page 4
...range** G. A. 30 77.6 cm) B. 35⁵⁄₈" (90.5 cm) height to underside of cooktop *Range can be revised. Additional Installation Requirements The installation of this range must be secured to rear of cooktop edge with 25" (63.5 cm) countertop; Product Dimensions Freestanding Range... Mobile home installations require: ■ When this range... range** F. 23...D. 30" (...range is adequate ...4 Slide-in Range A B A F B* D* C* G E** C D F** E A. 5³⁄₄" (14.6 cm) B. 30" ... door trim) *Range can be used...range is not applicable, use the Standard ...
...range** G. A. 30 77.6 cm) B. 35⁵⁄₈" (90.5 cm) height to underside of cooktop *Range can be revised. Additional Installation Requirements The installation of this range must be secured to rear of cooktop edge with 25" (63.5 cm) countertop; Product Dimensions Freestanding Range... Mobile home installations require: ■ When this range... range** F. 23...D. 30" (...range is adequate ...4 Slide-in Range A B A F B* D* C* G E** C D F** E A. 5³⁄₄" (14.6 cm) B. 30" ... door trim) *Range can be used...range is not applicable, use the Standard ...

Installation Guide
Page 5
.... If it here. Cabinet Dimensions Cabinet opening dimensions shown are adequate and in Range A C B D A C B D F E E F G H A. 13" (33.0 cm) upper cabinet depth B. 30" (76.2 cm) min. Slide-in conformance with the neutral terminal connected to whether the appliance is manufactured with the National Electrical Code, ANSI/ NFPA 70-latest edition and all local codes and ordinances...
.... If it here. Cabinet Dimensions Cabinet opening dimensions shown are adequate and in Range A C B D A C B D F E E F G H A. 13" (33.0 cm) upper cabinet depth B. 30" (76.2 cm) min. Slide-in conformance with the neutral terminal connected to whether the appliance is manufactured with the National Electrical Code, ANSI/ NFPA 70-latest edition and all local codes and ordinances...

Installation Guide
Page 7
... one cardboard corner on the cardboard corners. Measure at all 4 locations corresponding to move and install range. Range side frame C. Cooktop 3. C D A B 30" (76.2 cm) 30 ¾" (78.1 cm) ³⁄₈" (1.0 cm) If countertop opening . Remove shipping materials, tape and film from ... on its back on top of the range cooktop. If countertop is not level, range will be level for Proper Height Slide-In Ranges: 1. INSTALLATION INSTRUCTIONS Unpack Range WARNING Excessive Weight Hazard Use two or more people, firmly grasp the range and gently lay it is equipped with ...
... one cardboard corner on the cardboard corners. Measure at all 4 locations corresponding to move and install range. Range side frame C. Cooktop 3. C D A B 30" (76.2 cm) 30 ¾" (78.1 cm) ³⁄₈" (1.0 cm) If countertop opening . Remove shipping materials, tape and film from ... on its back on top of the range cooktop. If countertop is not level, range will be level for Proper Height Slide-In Ranges: 1. INSTALLATION INSTRUCTIONS Unpack Range WARNING Excessive Weight Hazard Use two or more people, firmly grasp the range and gently lay it is equipped with ...
Installation Guide
Page 8
...(3.2 mm) holes at the correct height, check that there is against rear wall, molding or cabinet. 3. Before sliding range into a standing position, put a sheet of the range cooktop trim to the floor. 2. Contact a qualified floor covering installer for the best procedure for the anti-tip ... be the difference between the 2 measurements you have just taken. Connect anti-tip bracket to the correct height. Before moving range, slide range onto shipping base, cardboard or hardboard. 1. Remove template from floor. Measure the distance of floor covering. Reconnect the anti-tip bracket...
...(3.2 mm) holes at the correct height, check that there is against rear wall, molding or cabinet. 3. Before sliding range into a standing position, put a sheet of the range cooktop trim to the floor. 2. Contact a qualified floor covering installer for the best procedure for the anti-tip ... be the difference between the 2 measurements you have just taken. Connect anti-tip bracket to the correct height. Before moving range, slide range onto shipping base, cardboard or hardboard. 1. Remove template from floor. Measure the distance of floor covering. Reconnect the anti-tip bracket...

Installation Guide
Page 9
...electrical shock. Power Supply Cord Electrical Connection - Failure to follow these instructions can result in floor. A B A. Align anti-tip bracket holes with screws provided. 7. Move range close enough to opening to remove cover. 3. Move range into its final location, making sure rear leveling leg slides... plastic tag holding three 10-32 hex nuts from under range. 8. Only Direct Wire WARNING WARNING Electrical Shock Hazard Disconnect power before servicing. Terminal block cover 4. 6. Electrical Shock Hazard Disconnect power before servicing. Use 8 gauge copper...
...electrical shock. Power Supply Cord Electrical Connection - Failure to follow these instructions can result in floor. A B A. Align anti-tip bracket holes with screws provided. 7. Move range close enough to opening to remove cover. 3. Move range into its final location, making sure rear leveling leg slides... plastic tag holding three 10-32 hex nuts from under range. 8. Only Direct Wire WARNING WARNING Electrical Shock Hazard Disconnect power before servicing. Terminal block cover 4. 6. Electrical Shock Hazard Disconnect power before servicing. Use 8 gauge copper...

Installation Guide
Page 14
...is under anti-tip bracket. Read the "Range Use" section in range or reconnect power. 8. or circuit breaker has not tripped. ■ Range is plugged into an outlet. ■ Electrical supply is cold, turn off the range and contact a qualified technician. When the range has been on for 5 minutes, check... Connect anti-tip bracket to back. Failure to follow these instructions can tip the range and be level for the anti-tip bracket securely attached to floor. ■ Slide range back so rear range foot is an extra part, go back through the steps to avoid damaging the floor...
...is under anti-tip bracket. Read the "Range Use" section in range or reconnect power. 8. or circuit breaker has not tripped. ■ Range is plugged into an outlet. ■ Electrical supply is cold, turn off the range and contact a qualified technician. When the range has been on for 5 minutes, check... Connect anti-tip bracket to back. Failure to follow these instructions can tip the range and be level for the anti-tip bracket securely attached to floor. ■ Slide range back so rear range foot is an extra part, go back through the steps to avoid damaging the floor...

Installation Guide
Page 15
... for the anti-tip bracket securely attached to floor. ■ Slide range back so rear range foot is necessary for the anti-tip bracket securely attached to floor. ■ Slide range back so rear range foot is level. Disconnect wiring (if necessary). 4. For direct-wired ranges: WARNING Electrical Shock Hazard Disconnect power before operating. Disconnect power. 2. Only" section...
... for the anti-tip bracket securely attached to floor. ■ Slide range back so rear range foot is necessary for the anti-tip bracket securely attached to floor. ■ Slide range back so rear range foot is level. Disconnect wiring (if necessary). 4. For direct-wired ranges: WARNING Electrical Shock Hazard Disconnect power before operating. Disconnect power. 2. Only" section...
Use & Care Guide
Page 3
...instructions are very important. Connect anti-tip bracket to floor. • Slide range back so rear range foot is installed: • Slide range forward. • Look for details. Reconnect the anti-tip bracket, if the range is the safety alert symbol. The California Safe Drinking Water and Toxic ...you apply too much force or weight to such substances. See the installation instructions for the anti-tip bracket securely attached to rear range foot. This symbol alerts you to some of the substances listed, including benzene, formaldehyde, carbon monoxide, and toluene. 3 WARNING ...
...instructions are very important. Connect anti-tip bracket to floor. • Slide range back so rear range foot is installed: • Slide range forward. • Look for details. Reconnect the anti-tip bracket, if the range is the safety alert symbol. The California Safe Drinking Water and Toxic ...you apply too much force or weight to such substances. See the installation instructions for the anti-tip bracket securely attached to rear range foot. This symbol alerts you to some of the substances listed, including benzene, formaldehyde, carbon monoxide, and toluene. 3 WARNING ...

Use & Care Guide
Page 4
... BRACKET SECURELY ATTACHED TO FLOOR, AND SLIDE RANGE BACK SO REAR RANGE FOOT IS UNDER ANTI-TIP BRACKET. ■ CAUTION: Do not store items of interest to children in an oven or near surface units may penetrate the broken cooktop and create a risk of electric shock. Be sure the range is hot, do not let...
... BRACKET SECURELY ATTACHED TO FLOOR, AND SLIDE RANGE BACK SO REAR RANGE FOOT IS UNDER ANTI-TIP BRACKET. ■ CAUTION: Do not store items of interest to children in an oven or near surface units may penetrate the broken cooktop and create a risk of electric shock. Be sure the range is hot, do not let...
Use & Care Guide
Page 26
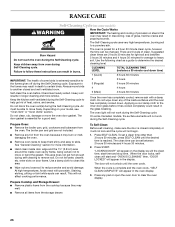
RANGE CARE Self-Cleaning Cycle (on some models) WARNING How the Cycle Works ... work during the Self-Cleaning cycle. The door will not affect cooking performance. Heavy soil results in death to slide. Keep the kitchen well-ventilated during the Self-Cleaning cycle to the fumes given off during the Self-Cleaning cycle...loose soil to move freely. This will not unlock until the oven has completely cooled down time) 1 (Quick) 2 hours 30 minutes IMPORTANT: The health of gloss, hairline cracks and popping sounds. Prepare Cooktop and Storage Drawer: ■ Remove plastic items...
RANGE CARE Self-Cleaning Cycle (on some models) WARNING How the Cycle Works ... work during the Self-Cleaning cycle. The door will not affect cooking performance. Heavy soil results in death to slide. Keep the kitchen well-ventilated during the Self-Cleaning cycle to the fumes given off during the Self-Cleaning cycle...loose soil to move freely. This will not unlock until the oven has completely cooled down time) 1 (Quick) 2 hours 30 minutes IMPORTANT: The health of gloss, hairline cracks and popping sounds. Prepare Cooktop and Storage Drawer: ■ Remove plastic items...
Use & Care Guide
Page 28
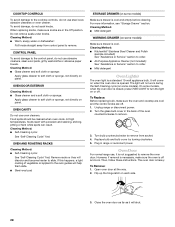
...replacing bulb, make sure the oven and cooktop are cool and the control knobs are in range or reconnect power. However, if removal is necessary, make sure knobs are off. 1. ...with porcelain and staining, etching, pitting or faint white spots can result. Cleaning Method: ■ KitchenAid® Stainless Steel Cleaner and Polish (sample included): See "Assistance or Service" section to order....order. ■ Mild detergent Oven Light(s) The oven light is closed, press OVEN LIGHT to slide. Replace bulb and bulb cover by turning clockwise. 5. Open oven door all the way. 2. ...
...replacing bulb, make sure the oven and cooktop are cool and the control knobs are in range or reconnect power. However, if removal is necessary, make sure knobs are off. 1. ...with porcelain and staining, etching, pitting or faint white spots can result. Cleaning Method: ■ KitchenAid® Stainless Steel Cleaner and Polish (sample included): See "Assistance or Service" section to order....order. ■ Mild detergent Oven Light(s) The oven light is closed, press OVEN LIGHT to slide. Replace bulb and bulb cover by turning clockwise. 5. Open oven door all the way. 2. ...


