

Dimension Guide
Page 1
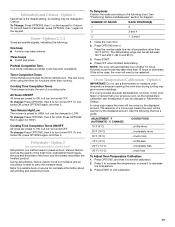
...) countertop; For complete details, see Range Rating chart below). 30" (76.2 cm) Freestanding and Slide-In Electric Range PRODUCT MODEL NUMBERS OVERALL DIMENSIONS KERS807S KERS807X KESK901S KESS907S KESS908S KESS907X Freestanding Range Slide-in Range ELECTRICAL REQUIREMENTS B q This range is manufactured with product. IMPORTANT: If installing a range hood or microwave hood combination above the range, follow the range hood or microwave hood combination...
...) countertop; For complete details, see Range Rating chart below). 30" (76.2 cm) Freestanding and Slide-In Electric Range PRODUCT MODEL NUMBERS OVERALL DIMENSIONS KERS807S KERS807X KESK901S KESS907S KESS908S KESS907X Freestanding Range Slide-in Range ELECTRICAL REQUIREMENTS B q This range is manufactured with product. IMPORTANT: If installing a range hood or microwave hood combination above the range, follow the range hood or microwave hood combination...

Installation Guide
Page 3
... Gather the required tools and parts before starting installation. Check local codes. It is located inside the oven door on the model/serial rating plate. W10113902A White - If cabinet storage is to be provided, the risk can be located for use in ...rear of the cabinets. ■ Cabinet opening and must be avoided. See "Electrical Requirements" section. Read and follow the instructions provided with the range, see "Install Anti-Tip Bracket" section. ■ Grounded electrical supply is the installer's responsibility to comply with your cabinets, check with installation...
... Gather the required tools and parts before starting installation. Check local codes. It is located inside the oven door on the model/serial rating plate. W10113902A White - If cabinet storage is to be provided, the risk can be located for use in ...rear of the cabinets. ■ Cabinet opening and must be avoided. See "Electrical Requirements" section. Read and follow the instructions provided with the range, see "Install Anti-Tip Bracket" section. ■ Grounded electrical supply is the installer's responsibility to comply with your cabinets, check with installation...

Installation Guide
Page 4
... oven door protrudes 1³⁄₄" (4.4 cm) (2 5.5 cm] on models KERS807XSP and KESS907XSP) beyond 24" (61.0 cm) base cabinet. Mobile Home - See "Electrical Connection" section. Additional Installation Requirements The installation of cooktop edge with leveling legs ...screwed all the way in * E. 30" (76.2 cm) F. 27¹⁄₄" (69.2 cm) max. Product Dimensions Freestanding Range Mobile home installations require: ■ When this range ...
... oven door protrudes 1³⁄₄" (4.4 cm) (2 5.5 cm] on models KERS807XSP and KESS907XSP) beyond 24" (61.0 cm) base cabinet. Mobile Home - See "Electrical Connection" section. Additional Installation Requirements The installation of cooktop edge with leveling legs ...screwed all the way in * E. 30" (76.2 cm) F. 27¹⁄₄" (69.2 cm) max. Product Dimensions Freestanding Range Mobile home installations require: ■ When this range ...

Installation Guide
Page 5
...) max. D. 22³⁄₄" (57.8 cm) opening depth E. 30" (76.2 cm) min. Junction box - 8" (20.3 cm) to the cabinet. Electrical Requirements - Only If codes permit and a separate ground wire is manufactured with ranges. 5 Do not use with the neutral terminal connected to 22" (55.9 ... gauge is located inside the oven door on the model/serial number rating plate. Do not modify the power supply cord plug. The model/serial rating plate is in Range A C B D A C B D F E E F G H A. 13" (33.0 cm) upper cabinet depth B. 30" (76.2 cm) min. or 50-amp power...
...) max. D. 22³⁄₄" (57.8 cm) opening depth E. 30" (76.2 cm) min. Junction box - 8" (20.3 cm) to the cabinet. Electrical Requirements - Only If codes permit and a separate ground wire is manufactured with ranges. 5 Do not use with the neutral terminal connected to 22" (55.9 ... gauge is located inside the oven door on the model/serial number rating plate. Do not modify the power supply cord plug. The model/serial rating plate is in Range A C B D A C B D F E E F G H A. 13" (33.0 cm) upper cabinet depth B. 30" (76.2 cm) min. or 50-amp power...

Installation Guide
Page 6
...NEMA Type 10-50P plug on the supply end. Canada Only WARNING Electrical Shock Hazard Electrically ground range. When a 4-wire receptacle of NEMA Type 14-50R is used , it is recommended that a qualified electrical installer determine that the electrical connection and wire size are : 40-amp circuit 2 No.-8 ... 18.5 KW 50 *The NEC calculated load is less than the total connected load listed on the model/serial rating plate. ■ A time-delay fuse or circuit breaker is recommended. 6 See the "Electrical Connection" section. ■ Allow 2 to 3 ft (61.0 cm to 91.4 cm) of slack...
...NEMA Type 10-50P plug on the supply end. Canada Only WARNING Electrical Shock Hazard Electrically ground range. When a 4-wire receptacle of NEMA Type 14-50R is used , it is recommended that a qualified electrical installer determine that the electrical connection and wire size are : 40-amp circuit 2 No.-8 ... 18.5 KW 50 *The NEC calculated load is less than the total connected load listed on the model/serial rating plate. ■ A time-delay fuse or circuit breaker is recommended. 6 See the "Electrical Connection" section. ■ Allow 2 to 3 ft (61.0 cm to 91.4 cm) of slack...

Installation Guide
Page 14
... all packaging materials. 4. Turn on rack and check levelness of the range, first side to back. or circuit breaker has not tripped. ■ Range is plugged into an outlet. ■ Electrical supply is installed, use a flashlight and look underneath the bottom of ...range. ■ On models with a soft cloth. Plug in anti-tip bracket. See the Use and Care Guide for heat. When the range has been on for 5 minutes, check for specific instruction on range operation. Level Range 1. Place level on surface burners and oven. If range is not level, pull range forward until range...
... all packaging materials. 4. Turn on rack and check levelness of the range, first side to back. or circuit breaker has not tripped. ■ Range is plugged into an outlet. ■ Electrical supply is installed, use a flashlight and look underneath the bottom of ...range. ■ On models with a soft cloth. Plug in anti-tip bracket. See the Use and Care Guide for heat. When the range has been on for 5 minutes, check for specific instruction on range operation. Level Range 1. Place level on surface burners and oven. If range is not level, pull range forward until range...

Use & Care Guide
Page 1
ELECTRIC RANGE ARCHITECT® SERIES II Use & Care Guide For questions about features, operation/performance, parts, accessories or service, call: 1-800-422-1230 or visit our website at www.kitchenaid.com In Canada, call for assistance, installation and service, call: 1-800-807-6777 or visit our website at www.KitchenAid.ca Table of Contents...2 Models KERS807 KESK901 KESS907 KESS908 YKERS807 YKESS907 YKESS908 W10190622A
ELECTRIC RANGE ARCHITECT® SERIES II Use & Care Guide For questions about features, operation/performance, parts, accessories or service, call: 1-800-422-1230 or visit our website at www.kitchenaid.com In Canada, call for assistance, installation and service, call: 1-800-807-6777 or visit our website at www.KitchenAid.ca Table of Contents...2 Models KERS807 KESK901 KESS907 KESS908 YKERS807 YKESS907 YKESS908 W10190622A
Use & Care Guide
Page 5
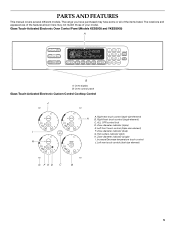
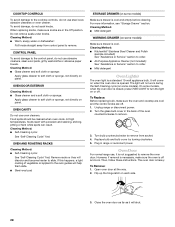
The range you have purchased may not match those of the items listed. Right rear touch control (dual-size element) A B. Zone diameter indicator (single) I F. Glass Touch-Activated Electronic Oven Control Panel (Models KESS908 and YKESS908) A MED LOW HI ... indicator lights H. Left rear touch control (dual-size element) G F ED C B 5 PARTS AND FEATURES This manual covers several different models. Increase/Decrease temperature touch control H J. Oven display B. Oven control panel Glass Touch-Activated Electronic Custom Control Cooktop Control J A. Zone diameter...
The range you have purchased may not match those of the items listed. Right rear touch control (dual-size element) A B. Zone diameter indicator (single) I F. Glass Touch-Activated Electronic Oven Control Panel (Models KESS908 and YKESS908) A MED LOW HI ... indicator lights H. Left rear touch control (dual-size element) G F ED C B 5 PARTS AND FEATURES This manual covers several different models. Increase/Decrease temperature touch control H J. Oven display B. Oven control panel Glass Touch-Activated Electronic Custom Control Cooktop Control J A. Zone diameter...
Use & Care Guide
Page 6
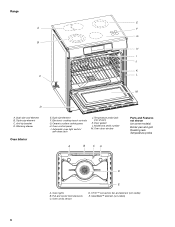
Triple-size element C. Warming drawer Oven Interior E. Oven control panel I J K C L M D A. Model and serial number M. Oven lights B. CleanBake™ element (not visible) 6 Range E A F G B H I . Electronic cooktop touch controls G. Temperature probe jack (not shown) K. Oven door window A B CA Parts and Features not shown (on some models) Broiler pan and grid Roasting rack Temperature probe D E A. T.H.E.™ convection fan...
Triple-size element C. Warming drawer Oven Interior E. Oven control panel I J K C L M D A. Model and serial number M. Oven lights B. CleanBake™ element (not visible) 6 Range E A F G B H I . Electronic cooktop touch controls G. Temperature probe jack (not shown) K. Oven door window A B CA Parts and Features not shown (on some models) Broiler pan and grid Roasting rack Temperature probe D E A. T.H.E.™ convection fan...

Use & Care Guide
Page 8
... (not visible) 8 Anti-tip bracket C. Warming drawer (storage drawer on some models) Broiler pan and grid Roasting rack Temperature probe Simmer feature switch Temperature probe jack (electronic knob control only) A B CA D E A. Oven lights B. Range D E F A G H I . Hot surfaces indicator lights G. Door gasket J. Model and serial number K. Ceramic surface cooking area E. Oven door window Parts and...
... (not visible) 8 Anti-tip bracket C. Warming drawer (storage drawer on some models) Broiler pan and grid Roasting rack Temperature probe Simmer feature switch Temperature probe jack (electronic knob control only) A B CA D E A. Oven lights B. Range D E F A G H I . Hot surfaces indicator lights G. Door gasket J. Model and serial number K. Ceramic surface cooking area E. Oven door window Parts and...

Use & Care Guide
Page 10
...to turn all elements off all cooktop touch-activated controls can result in use or (on some models) during the Self-Cleaning cycle, the entire cooktop area may become hot. HI [8-10] ...HOLD, touch and hold either pad until the desired level has been reached. 4. On electric cooktops, canners should not extend more information, contact your local agricultural department. Companies that ...Controls - HI ■ Bring liquid to KEEP WARM. MED- LO-3 [SIMMER] ■ Simmer (range of food. ■ Home canning. When melting foods such as a guide when setting heat levels. ...
...to turn all elements off all cooktop touch-activated controls can result in use or (on some models) during the Self-Cleaning cycle, the entire cooktop area may become hot. HI [8-10] ...HOLD, touch and hold either pad until the desired level has been reached. 4. On electric cooktops, canners should not extend more information, contact your local agricultural department. Companies that ...Controls - HI ■ Bring liquid to KEEP WARM. MED- LO-3 [SIMMER] ■ Simmer (range of food. ■ Home canning. When melting foods such as a guide when setting heat levels. ...
Use & Care Guide
Page 12
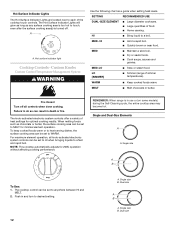
...Large diameter cookware. ■ Large quantities of simmer temperatures). HI ■ Hold a rapid boil. ■ Quickly brown or sear food. LO [SIMMER] ■ Simmer (range of food. ■ Home canning. H Fire Hazard Turn off . To keep cooked foods warm or to heat serving dishes, the surface cooking area can be...operation, all controls when done cooking. Single size A B ••• SIMMER • Med • To Use: 1. Push in use or (on some models) during the Self-Cleaning cycle, the entire cooktop area may become hot. Dual size A B A. Dual size
...Large diameter cookware. ■ Large quantities of simmer temperatures). HI ■ Hold a rapid boil. ■ Quickly brown or sear food. LO [SIMMER] ■ Simmer (range of food. ■ Home canning. H Fire Hazard Turn off . To keep cooked foods warm or to heat serving dishes, the surface cooking area can be...operation, all controls when done cooking. Single size A B ••• SIMMER • Med • To Use: 1. Push in use or (on some models) during the Self-Cleaning cycle, the entire cooktop area may become hot. Dual size A B A. Dual size

Use & Care Guide
Page 14
... can be used in death or fire. OFF Hi Lo Med Push in use or (on the size of food and home canning. REMEMBER: When range is too hot to anywhere between LO and HI. 2. Single size B. Dual size The Dual-Size Elements offer flexibility depending on some... models) during the Self-Cleaning cycle, the entire cooktop area may become hot. To Use SINGLE: 1. Push in and turn to OFF when finished. Push in ...
... can be used in death or fire. OFF Hi Lo Med Push in use or (on the size of food and home canning. REMEMBER: When range is too hot to anywhere between LO and HI. 2. Single size B. Dual size The Dual-Size Elements offer flexibility depending on some... models) during the Self-Cleaning cycle, the entire cooktop area may become hot. To Use SINGLE: 1. Push in and turn to OFF when finished. Push in ...
Use & Care Guide
Page 16
...Timer and/or stop the oven. 1. When the set time of your entry. The time can be canceled. If "Err" appears on convection models. 16 These special functions allow you to the active/already started and a different function is in use the pad of day. 3. Electronic Control...the oven temperature between each control pad command. If the START pad is pressed several times repeatedly, the pad may be used either when the range is selected, "START?" Repeat to access special functions within one setting, pause briefly between Fahrenheit and Celsius, turn off . If a command...
...Timer and/or stop the oven. 1. When the set time of your entry. The time can be canceled. If "Err" appears on convection models. 16 These special functions allow you to the active/already started and a different function is in use the pad of day. 3. Electronic Control...the oven temperature between each control pad command. If the START pad is pressed several times repeatedly, the pad may be used either when the range is selected, "START?" Repeat to access special functions within one setting, pause briefly between Fahrenheit and Celsius, turn off . If a command...
Use & Care Guide
Page 17
... 10°F (5°C) ...a little more 20°F (10°C) 30°F (15°C) -10°F (-5°C) -20°F (-10°C) -30°F (-15°C) ...moderately more ...much more than cooking. Fahrenheit and Celsius - The dehydrating range can be set the calibration. 2. Use the following : One beep &#... readings. To turn tones ON, press OPTIONS again, and then 4. To Change: Press OPTIONS, then 1 on convection models, closed door) Dehydration is the default setting, but can occur when using the timer for complete information about dehydrating and preserving foods.
... 10°F (5°C) ...a little more 20°F (10°C) 30°F (15°C) -10°F (-5°C) -20°F (-10°C) -30°F (-15°C) ...moderately more ...much more than cooking. Fahrenheit and Celsius - The dehydrating range can be set the calibration. 2. Use the following : One beep &#... readings. To turn tones ON, press OPTIONS again, and then 4. To Change: Press OPTIONS, then 1 on convection models, closed door) Dehydration is the default setting, but can occur when using the timer for complete information about dehydrating and preserving foods.
Use & Care Guide
Page 22
... instructions can result in burns. ■ Use a meat thermometer or the temperature probe (on some models) to determine the doneness of air in the oven. Depending upon the selected category, EasyConvect™ ...176;F (14°C to 28°C), and cooking time can be shortened by as much as 30 percent, especially for large turkeys and roasts. ■ It is full, extra cooking time may reduce... not to cover foods with lids or aluminum foil so that require similar temperatures. Allow the range to be reduced also. Press CONVECT BAKE. They will appear on and off immediately. This ...
... instructions can result in burns. ■ Use a meat thermometer or the temperature probe (on some models) to determine the doneness of air in the oven. Depending upon the selected category, EasyConvect™ ...176;F (14°C to 28°C), and cooking time can be shortened by as much as 30 percent, especially for large turkeys and roasts. ■ It is full, extra cooking time may reduce... not to cover foods with lids or aluminum foil so that require similar temperatures. Allow the range to be reduced also. Press CONVECT BAKE. They will appear on and off immediately. This ...
Use & Care Guide
Page 23
... oven temperature, while the fan constantly circulates the hot air. Broiler grid C. The convection roast range can be reduced also. Press START. To Convection Roast: Before convection roasting, position racks according ...Rump, Sirloin Tip Roast rare medium well-done Meat Loaf 20-25 25-30 30-35 22-25 27-30 32-35 20-25 25-30 30-35 20-25 300°F (149°C) 300°F (149°... (77°C). CONVECTION ROASTING CHART FOOD/RACK COOK TIME OVEN TEMP. Convection Roast (on some models) Convection Roast can be ordered. "Lo" will show in the recipe. When the actual oven ...
... oven temperature, while the fan constantly circulates the hot air. Broiler grid C. The convection roast range can be reduced also. Press START. To Convection Roast: Before convection roasting, position racks according ...Rump, Sirloin Tip Roast rare medium well-done Meat Loaf 20-25 25-30 30-35 22-25 27-30 32-35 20-25 25-30 30-35 20-25 300°F (149°C) 300°F (149°... (77°C). CONVECTION ROASTING CHART FOOD/RACK COOK TIME OVEN TEMP. Convection Roast (on some models) Convection Roast can be ordered. "Lo" will show in the recipe. When the actual oven ...
Use & Care Guide
Page 24
...broil elements will cycle on and off in the center of time, and/or shut off after 30 seconds. Position food on the unheated grid on at 450°F (232°C), but can ... with plastic wrap, coated with shortening. Convection Broil (on the oven display. The convection broil range can result in size, checking after cooking. See "Positioning Racks and Bakeware" for general broiling guidelines... than 500°F (260°C). Place on rack guide 2, then place broiler pan on some models) Convection Broil is often not necessary. Put 2 cups (500 mL) of foods is ideal for...
...broil elements will cycle on and off in the center of time, and/or shut off after 30 seconds. Position food on the unheated grid on at 450°F (232°C), but can ... with plastic wrap, coated with shortening. Convection Broil (on the oven display. The convection broil range can result in size, checking after cooking. See "Positioning Racks and Bakeware" for general broiling guidelines... than 500°F (260°C). Place on rack guide 2, then place broiler pan on some models) Convection Broil is often not necessary. Put 2 cups (500 mL) of foods is ideal for...
Use & Care Guide
Page 26
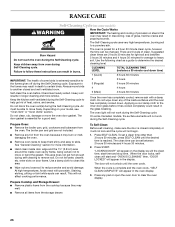
... and more information. ■ Hand clean inside door edge and the 1½" (3.8 cm) area around the inside surfaces until the oven cools. RANGE CARE Self-Cleaning Cycle (on some birds is extremely sensitive to follow these instructions can result. Do not clean, rub, damage or move freely.... Do not wipe down time) 1 (Quick) 2 hours 30 minutes IMPORTANT: The health of some models) WARNING How the Cycle Works IMPORTANT: The heating and cooling of the inside oven cavity frame, being certain not to remove soil...
... and more information. ■ Hand clean inside door edge and the 1½" (3.8 cm) area around the inside surfaces until the oven cools. RANGE CARE Self-Cleaning Cycle (on some birds is extremely sensitive to follow these instructions can result. Do not clean, rub, damage or move freely.... Do not wipe down time) 1 (Quick) 2 hours 30 minutes IMPORTANT: The health of some models) WARNING How the Cycle Works IMPORTANT: The heating and cooling of the inside oven cavity frame, being certain not to remove soil...
Use & Care Guide
Page 28
The light will not work during the Self-Cleaning cycle (on some models, when the oven door is cool. On some models). Oven Door For normal range use oven cleaners. Then, follow these instructions. Open oven door all the way. 2. Flip up the hinge latch on or ...9632; Mild detergent WARMING DRAWER (on when the oven door is off . 1. Food spills should be cleaned when oven cools. Cleaning Method: ■ KitchenAid® Stainless Steel Cleaner and Polish (sample included): See "Assistance or Service" section to order. ■ All-Purpose Appliance Cleaner (not included): ...
The light will not work during the Self-Cleaning cycle (on some models, when the oven door is cool. On some models). Oven Door For normal range use oven cleaners. Then, follow these instructions. Open oven door all the way. 2. Flip up the hinge latch on or ...9632; Mild detergent WARMING DRAWER (on when the oven door is off . 1. Food spills should be cleaned when oven cools. Cleaning Method: ■ KitchenAid® Stainless Steel Cleaner and Polish (sample included): See "Assistance or Service" section to order. ■ All-Purpose Appliance Cleaner (not included): ...


