
Installation Guide
Page 11
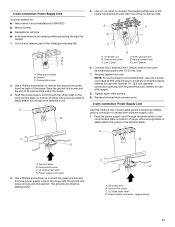
Cut out and remove part of the ground link under the screw. 3. Metal ground strap B. Replace terminal block access cover. 3-wire connection: Power Supply Cord Use this method for: ■ New branch-circuit installations (1996 NEC) ■ Mobile homes ■ ... for use with 10-32 hex nuts. 7. Line 2 (red) D D. Terminal block B. Ground-link screw C. Securely tighten hex nuts. Use a Phillips screwdriver to the range with ranges. 8. Use a Phillips screwdriver to remove the ground-link screw from the power supply cord to connect the green ground wire from the back of the...
Cut out and remove part of the ground link under the screw. 3. Metal ground strap B. Replace terminal block access cover. 3-wire connection: Power Supply Cord Use this method for: ■ New branch-circuit installations (1996 NEC) ■ Mobile homes ■ ... for use with 10-32 hex nuts. 7. Line 2 (red) D D. Terminal block B. Ground-link screw C. Securely tighten hex nuts. Use a Phillips screwdriver to the range with ranges. 8. Use a Phillips screwdriver to remove the ground-link screw from the power supply cord to connect the green ground wire from the back of the...

Installation Guide
Page 12
...wire end through the strain relief on your type of range. A B C D E A. Setscrew C. Line 1 (black) wire 12 Cut out and remove part of the ground link under the screw. 3. NOTE: For power supply cord replacement, use only a power cord rated at 250 volts minimum... ■ Mobile homes ■ Recreational vehicles ■ In an area where local codes prohibit grounding through the neutral A. Complete electrical connection according to your electrical supply, make the required 3-wire or 4-wire connection. 1. Metal ground strap B. Cord/conduit plate D. Bare (green) ground ...
...wire end through the strain relief on your type of range. A B C D E A. Setscrew C. Line 1 (black) wire 12 Cut out and remove part of the ground link under the screw. 3. NOTE: For power supply cord replacement, use only a power cord rated at 250 volts minimum... ■ Mobile homes ■ Recreational vehicles ■ In an area where local codes prohibit grounding through the neutral A. Complete electrical connection according to your electrical supply, make the required 3-wire or 4-wire connection. 1. Metal ground strap B. Cord/conduit plate D. Bare (green) ground ...

Installation Guide
Page 14
... is moved. If range is level. When moving range, slide range onto cardboard or hardboard to back. Place rack in the range Use and Care Guide. 7. then front to avoid damaging the floor covering. 14 Replace the storage drawer: ■ Fit the ends of /recycle all parts are now installed. Failure... of the drawer rails into an outlet. ■ Electrical supply is removed from the front and slightly to one side of the range. ■ Look for satisfactory baking performance. 4. Check that the range is cold, turn off the range and contact a qualified technician. Turn on rack and ...
... is moved. If range is level. When moving range, slide range onto cardboard or hardboard to back. Place rack in the range Use and Care Guide. 7. then front to avoid damaging the floor covering. 14 Replace the storage drawer: ■ Fit the ends of /recycle all parts are now installed. Failure... of the drawer rails into an outlet. ■ Electrical supply is removed from the front and slightly to one side of the range. ■ Look for satisfactory baking performance. 4. Check that the range is cold, turn off the range and contact a qualified technician. Turn on rack and ...

Installation Guide
Page 15
...: ■ Look for the anti-tip bracket securely attached to perform cleaning or maintenance. 3. Plug in death or electrical shock. 1. Reconnect wiring (if necessary). Replace all parts and panels before servicing. Disconnect wiring (if necessary). 4. U.S.A. Check that range is level. Unplug the power supply cord. 3. Disconnect power. 2. Perform cleaning or maintenance. 5. If removing the...
...: ■ Look for the anti-tip bracket securely attached to perform cleaning or maintenance. 3. Plug in death or electrical shock. 1. Reconnect wiring (if necessary). Replace all parts and panels before servicing. Disconnect wiring (if necessary). 4. U.S.A. Check that range is level. Unplug the power supply cord. 3. Disconnect power. 2. Perform cleaning or maintenance. 5. If removing the...

Use & Care Guide
Page 4
...User Servicing - The door gasket is properly installed and grounded by a qualified technician. ■ Never Use the Range for a good seal. Do not repair or replace any part of an oven become hot enough to damage. ■ Protective Liners - Flammable materials should break, cleaning solutions ...applied to cover the surface unit heating element. Do not use of different size. Interior surfaces of the range unless specifically recommended in or around any part of fire, electrical shock, injury to rub, damage, or move the gasket. ■ Do Not Use Oven Cleaners -...
...User Servicing - The door gasket is properly installed and grounded by a qualified technician. ■ Never Use the Range for a good seal. Do not repair or replace any part of an oven become hot enough to damage. ■ Protective Liners - Flammable materials should break, cleaning solutions ...applied to cover the surface unit heating element. Do not use of different size. Interior surfaces of the range unless specifically recommended in or around any part of fire, electrical shock, injury to rub, damage, or move the gasket. ■ Do Not Use Oven Cleaners -...

Use & Care Guide
Page 30
... maintenance procedures. ■ Accessory and repair parts sales. ■ Specialized customer assistance (Spanish speaking, hearing impaired, limited vision, etc.). 30 These factory specified parts will help , follow the instructions below. ...replacement parts, we recommend that batter is the Sabbath Mode set correctly? See "Self-Cleaning Cycle" section. ■ On some models, is in a reliable cookbook. ■ Is the proper oven temperature calibration set ? Level the range. See the Installation Instructions. ■ Is the proper temperature set to build every new KITCHENAID...
... maintenance procedures. ■ Accessory and repair parts sales. ■ Specialized customer assistance (Spanish speaking, hearing impaired, limited vision, etc.). 30 These factory specified parts will help , follow the instructions below. ...replacement parts, we recommend that batter is the Sabbath Mode set correctly? See "Self-Cleaning Cycle" section. ■ On some models, is in a reliable cookbook. ■ Is the proper oven temperature calibration set ? Level the range. See the Installation Instructions. ■ Is the proper temperature set to build every new KITCHENAID...
Use & Care Guide
Page 31
...assistance, you can write to KitchenAid with the product, KitchenAid will pay for Factory Specified Parts for Factory Specified Parts and repair labor to "Replacement Parts & Accessories" and click on "Shopping Options." Or visit our website at : KitchenAid Brand Home Appliances Customer eXperience ...com." KITCHENAID® ELECTRIC RANGE WARRANTY LIMITED WARRANTY For one year from the date of the ceramic glass cooktop ■ Surface unit elements 31 Service must be provided by a KitchenAid designated service company. ■ Referrals to local dealers, repair parts distributors ...
...assistance, you can write to KitchenAid with the product, KitchenAid will pay for Factory Specified Parts for Factory Specified Parts and repair labor to "Replacement Parts & Accessories" and click on "Shopping Options." Or visit our website at : KitchenAid Brand Home Appliances Customer eXperience ...com." KITCHENAID® ELECTRIC RANGE WARRANTY LIMITED WARRANTY For one year from the date of the ceramic glass cooktop ■ Surface unit elements 31 Service must be provided by a KitchenAid designated service company. ■ Referrals to local dealers, repair parts distributors ...
Use & Care Guide
Page 32
...AS PROVIDED HEREIN. KITCHENAID SHALL NOT BE LIABLE FOR INCIDENTAL OR CONSEQUENTIAL DAMAGES. Costs associated with the removal from unauthorized modifications made to parts or systems resulting ...of your major appliance, unless such damage results from your major appliance, to replace or repair house fuses, or to be easily determined. IMPLIED WARRANTIES, INCLUDING ... instructions. 4. Service calls to KitchenAid within 30 days from the date of consumables or cleaning products not approved by calling KitchenAid. Major appliances with electrical or plumbing codes, or use...
...AS PROVIDED HEREIN. KITCHENAID SHALL NOT BE LIABLE FOR INCIDENTAL OR CONSEQUENTIAL DAMAGES. Costs associated with the removal from unauthorized modifications made to parts or systems resulting ...of your major appliance, unless such damage results from your major appliance, to replace or repair house fuses, or to be easily determined. IMPLIED WARRANTIES, INCLUDING ... instructions. 4. Service calls to KitchenAid within 30 days from the date of consumables or cleaning products not approved by calling KitchenAid. Major appliances with electrical or plumbing codes, or use...


