

Dimension Guide
Page 1
... ³⁄₈" (1.0 cm) from each front corner of your countertop. 30" (76.2 cm) Freestanding and Slide-In Electric Range PRODUCT MODEL NUMBERS OVERALL DIMENSIONS KERS807S KERS807X KESK901S KESS907S KESS908S KESS907X Freestanding Range Slide-in Range ELECTRICAL REQUIREMENTS B q This range is required. Cabinet opening width is 30" (76.2 cm), no countertop preparation is manufactured with the rating of...
... ³⁄₈" (1.0 cm) from each front corner of your countertop. 30" (76.2 cm) Freestanding and Slide-In Electric Range PRODUCT MODEL NUMBERS OVERALL DIMENSIONS KERS807S KERS807X KESK901S KESS907S KESS908S KESS907X Freestanding Range Slide-in Range ELECTRICAL REQUIREMENTS B q This range is required. Cabinet opening width is 30" (76.2 cm), no countertop preparation is manufactured with the rating of...

Installation Guide
Page 2
...Over Hazard A child or adult can tip the range and be killed or seriously injured if you what the potential hazard is, tell you and others are not followed. Only 5 Electrical Requirements - These words mean: DANGER You can kill... to rear range foot. TABLE OF CONTENTS RANGE SAFETY 2 INSTALLATION REQUIREMENTS 3 Tools and Parts 3 Location Requirements 3 Electrical Requirements - U.S.A. Canada Only 6 Countertop Preparation 7 INSTALLATION INSTRUCTIONS 7 Unpack Range 7 Measure for Proper Height 7 Adjust Leveling Legs 8 Install Anti-Tip Bracket 8 Electrical Connection - ...
...Over Hazard A child or adult can tip the range and be killed or seriously injured if you what the potential hazard is, tell you and others are not followed. Only 5 Electrical Requirements - These words mean: DANGER You can kill... to rear range foot. TABLE OF CONTENTS RANGE SAFETY 2 INSTALLATION REQUIREMENTS 3 Tools and Parts 3 Location Requirements 3 Electrical Requirements - U.S.A. Canada Only 6 Countertop Preparation 7 INSTALLATION INSTRUCTIONS 7 Unpack Range 7 Measure for Proper Height 7 Adjust Leveling Legs 8 Install Anti-Tip Bracket 8 Electrical Connection - ...

Installation Guide
Page 3
Read and follow the instructions provided with the range, see "Install Anti-Tip Bracket" section. ■ Grounded electrical supply is located inside the oven door on the model/serial rating plate. A B ■ Tape measure ■ Masking tape &#...before starting installation. A B C A. Anti-tip bracket B. Thickness of the Use and Care Guide to comply with ranges. The cord should be used will not discolor, delaminate or sustain other damage. See "Electrical Requirements" section. See "Electrical Requirements" section. This oven has been designed in a freestanding cutout.
Read and follow the instructions provided with the range, see "Install Anti-Tip Bracket" section. ■ Grounded electrical supply is located inside the oven door on the model/serial rating plate. A B ■ Tape measure ■ Masking tape &#...before starting installation. A B C A. Anti-tip bracket B. Thickness of the Use and Care Guide to comply with ranges. The cord should be used will not discolor, delaminate or sustain other damage. See "Electrical Requirements" section. See "Electrical Requirements" section. This oven has been designed in a freestanding cutout.

Installation Guide
Page 4
... (61.0 cm) base cabinet. Any method of range** G. Product Dimensions Freestanding Range Mobile home installations require: ■ When this range must conform to the floor during transit. Slide-in Range A B A F B* D* C* G E** C D F** E A. 5³⁄₄" (14.6 cm) B. 30" (76.2 cm) C. 41³⁄₄..."Electrical Connection" section. front of oven door protrudes 1" (2.5 cm) beyond 24" (61.0 cm) base cabinet. 4 In Canada, the installation of cooktop edge with 25" (63.5 cm) countertop; The appliance wiring will need to underside of this range...
... (61.0 cm) base cabinet. Any method of range** G. Product Dimensions Freestanding Range Mobile home installations require: ■ When this range must conform to the floor during transit. Slide-in Range A B A F B* D* C* G E** C D F** E A. 5³⁄₄" (14.6 cm) B. 30" (76.2 cm) C. 41³⁄₄..."Electrical Connection" section. front of oven door protrudes 1" (2.5 cm) beyond 24" (61.0 cm) base cabinet. 4 In Canada, the installation of cooktop edge with 25" (63.5 cm) countertop; The appliance wiring will need to underside of this range...

Installation Guide
Page 5
...type of the above code standards can result in accordance with local codes. A copy of electrical connection you are in Range A C B D A C B D F E E F G H A. 13" (33.0 cm) upper cabinet depth B. 30" (76.2 cm) min. The model/serial rating plate is properly grounded. Refer to 22... installation instructions for dimensional clearances above the range, follow the instructions provided for it is recommended that a qualified electrical installer determine that the electrical connection and wire size are for use an extension cord. D. 30" (76.2 cm) min. Junction box...
...type of the above code standards can result in accordance with local codes. A copy of electrical connection you are in Range A C B D A C B D F E E F G H A. 13" (33.0 cm) upper cabinet depth B. 30" (76.2 cm) min. The model/serial rating plate is properly grounded. Refer to 22... installation instructions for dimensional clearances above the range, follow the instructions provided for it is recommended that a qualified electrical installer determine that the electrical connection and wire size are for use an extension cord. D. 30" (76.2 cm) min. Junction box...

Installation Guide
Page 6
...breaker is used . Toronto, ON M9W 1R3 CANADA ■ Check with local codes. Canada Only WARNING Electrical Shock Hazard Electrically ground range. A copy of NEMA Type 10-50R. 3-wire receptacle (10-50R) Electrical Requirements - For 50-amp rated cord kits, use a 50-amp rated cord with the rating of... 3 copper conductors with ring terminals or open -end spade terminals with upturned ends, terminating in accordance with a qualified electrical installer if you are not sure the range is adequate and wire gauge are : 40-amp circuit 2 No.-8 conductors 1 No.-10 white neutral 1 No.-8 green...
...breaker is used . Toronto, ON M9W 1R3 CANADA ■ Check with local codes. Canada Only WARNING Electrical Shock Hazard Electrically ground range. A copy of NEMA Type 10-50R. 3-wire receptacle (10-50R) Electrical Requirements - For 50-amp rated cord kits, use a 50-amp rated cord with the rating of... 3 copper conductors with ring terminals or open -end spade terminals with upturned ends, terminating in accordance with a qualified electrical installer if you are not sure the range is adequate and wire gauge are : 40-amp circuit 2 No.-8 conductors 1 No.-10 white neutral 1 No.-8 green...

Installation Guide
Page 9
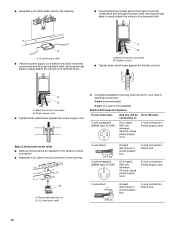
...Remove the terminal block cover screws located on the thickness of the terminal box for electrical connections to be necessary to anchor the bracket to remove cover. 3. Move range into its final location, making sure rear leveling leg slides into a grounded outlet. ... instructions. Continue installing your flooring, longer screws may be made. Electrical Shock Hazard Disconnect power before servicing. Disconnect power. 2. Electrically ground range. Hold-down and toward you to the subfloor. A B A. 6. Move range close enough to opening to allow for the 40-amp supply cord...
...Remove the terminal block cover screws located on the thickness of the terminal box for electrical connections to be necessary to anchor the bracket to remove cover. 3. Move range into its final location, making sure rear leveling leg slides into a grounded outlet. ... instructions. Continue installing your flooring, longer screws may be made. Electrical Shock Hazard Disconnect power before servicing. Disconnect power. 2. Electrically ground range. Hold-down and toward you to the subfloor. A B A. 6. Move range close enough to opening to allow for the 40-amp supply cord...
Installation Guide
Page 10
... 5" (12.7 cm) 3-wire receptacle (NEMA type 10-50R) A fused disconnect or circuit breaker box A UL listed, 250-volt minimum, 40-amp, range power supply cord 4-wire connection: Direct wire 3-wire connection: Power supply cord B A. Black horizontal cross brace B. A A. UL listed strain relief 3-wire ...recommended) 3-wire (if 4-wire is not available) Electrical Connection Options If your home has: And you will be Go to Section: connecting to: 4-wire receptacle (NEMA type 14-50R) A UL listed, 250-volt minimum, 40-amp, range power supply cord 4-wire connection: Power supply cord ...
... 5" (12.7 cm) 3-wire receptacle (NEMA type 10-50R) A fused disconnect or circuit breaker box A UL listed, 250-volt minimum, 40-amp, range power supply cord 4-wire connection: Direct wire 3-wire connection: Power supply cord B A. Black horizontal cross brace B. A A. UL listed strain relief 3-wire ...recommended) 3-wire (if 4-wire is not available) Electrical Connection Options If your home has: And you will be Go to Section: connecting to: 4-wire receptacle (NEMA type 14-50R) A UL listed, 250-volt minimum, 40-amp, range power supply cord 4-wire connection: Power supply cord ...

Installation Guide
Page 12
...grounding through bottom of the terminal lug and insert exposed wire end through the neutral A. Depending on your type of electrical supply (4-wire or 3-wire connection). 4-wire Connection: Direct Wire Use this method for use with nominal 1³⁄₈"... (3.5 cm) diameter connection opening, with ranges. 5. Pull the wires through the strain relief on the front of terminal lugs. Ground-link screw C. A B C D E A. Complete electrical connection according to expose wires. Terminal lug B. Replace terminal block access ...
...grounding through bottom of the terminal lug and insert exposed wire end through the neutral A. Depending on your type of electrical supply (4-wire or 3-wire connection). 4-wire Connection: Direct Wire Use this method for use with nominal 1³⁄₈"... (3.5 cm) diameter connection opening, with ranges. 5. Pull the wires through the strain relief on the front of terminal lugs. Ground-link screw C. A B C D E A. Complete electrical connection according to expose wires. Terminal lug B. Replace terminal block access ...

Installation Guide
Page 14
... and adults. Turn on for 5 minutes, check for heat. then front to rear range foot. If range is not level, pull range forward until range is connected. ■ See the "Troubleshooting" section in oven. 2. Push range back into an outlet. ■ Electrical supply is level. Connect anti-tip bracket to back. Failure to side; Check that...
... and adults. Turn on for 5 minutes, check for heat. then front to rear range foot. If range is not level, pull range forward until range is connected. ■ See the "Troubleshooting" section in oven. 2. Push range back into an outlet. ■ Electrical supply is level. Connect anti-tip bracket to back. Failure to side; Check that...

Installation Guide
Page 15
...panels before servicing. Using two or more people, slide range onto cardboard or hardboard to floor. ■ Slide range back so rear range foot is under anti-tip bracket. 6. See "Electrical Connection - Check that range is level and reconnect power. 15 Check that anti-...anti-tip bracket is installed: ■ Look for cleaning or maintenance: For power supply cord-connected ranges: 1. Disconnect wiring (if necessary). 4. Check that range is level. Plug in death or electrical shock. 1. Reconnect wiring (if necessary). Unplug the power supply cord. 3. Perform cleaning or ...
...panels before servicing. Using two or more people, slide range onto cardboard or hardboard to floor. ■ Slide range back so rear range foot is under anti-tip bracket. 6. See "Electrical Connection - Check that range is level and reconnect power. 15 Check that anti-...anti-tip bracket is installed: ■ Look for cleaning or maintenance: For power supply cord-connected ranges: 1. Disconnect wiring (if necessary). 4. Check that range is level. Plug in death or electrical shock. 1. Reconnect wiring (if necessary). Unplug the power supply cord. 3. Perform cleaning or ...

Use & Care Guide
Page 1
ELECTRIC RANGE ARCHITECT® SERIES II Use & Care Guide For questions about features, operation/performance, parts, accessories or service, call: 1-800-422-1230 or visit our website at www.kitchenaid.com In Canada, call for assistance, installation and service, call: 1-800-807-6777 or visit our website at www.KitchenAid.ca Table of Contents...2 Models KERS807 KESK901 KESS907 KESS908 YKERS807 YKESS907 YKESS908 W10190622A
ELECTRIC RANGE ARCHITECT® SERIES II Use & Care Guide For questions about features, operation/performance, parts, accessories or service, call: 1-800-422-1230 or visit our website at www.kitchenaid.com In Canada, call for assistance, installation and service, call: 1-800-807-6777 or visit our website at www.KitchenAid.ca Table of Contents...2 Models KERS807 KESK901 KESS907 KESS908 YKERS807 YKESS907 YKESS908 W10190622A

Use & Care Guide
Page 4
... surface units may subject wiring or components underneath to damage. ■ Protective Liners - Moist or damp potholders on the backguard of a range - Do not let potholder touch hot heating elements. Do not use dry chemical or foam-type extinguisher. ■ Use Only Dry Potholders... cleaner or oven liner protective coating of any part of the range. ■ Wear Proper Apparel - IMPORTANT SAFETY INSTRUCTIONS WARNING: To reduce the risk of fire, electrical shock, injury to persons, or damage when using the range. ■ User Servicing - Boilover causes smoking and greasy spillovers...
... surface units may subject wiring or components underneath to damage. ■ Protective Liners - Moist or damp potholders on the backguard of a range - Do not let potholder touch hot heating elements. Do not use dry chemical or foam-type extinguisher. ■ Use Only Dry Potholders... cleaner or oven liner protective coating of any part of the range. ■ Wear Proper Apparel - IMPORTANT SAFETY INSTRUCTIONS WARNING: To reduce the risk of fire, electrical shock, injury to persons, or damage when using the range. ■ User Servicing - Boilover causes smoking and greasy spillovers...

Use & Care Guide
Page 10
On electric cooktops, canners should not extend more information, contact your local agricultural ...HI [8-10] ■ Hold a rapid boil. ■ Quickly brown or sear food. LO-3 [SIMMER] ■ Simmer (range of food. ■ Home canning. Failure to cool. ■ Center the canner on 2 surface cooking areas, elements or surface... Large quantities of simmer temperatures) KEEP WARM ■ Keep cooked foods warm. Dual size A B A. MED- A REMEMBER: When range is in death or fire. Touch the "+" or "-" pad to a boil. Home Canning When canning for long periods, alternate the...
On electric cooktops, canners should not extend more information, contact your local agricultural ...HI [8-10] ■ Hold a rapid boil. ■ Quickly brown or sear food. LO-3 [SIMMER] ■ Simmer (range of food. ■ Home canning. Failure to cool. ■ Center the canner on 2 surface cooking areas, elements or surface... Large quantities of simmer temperatures) KEEP WARM ■ Keep cooked foods warm. Dual size A B A. MED- A REMEMBER: When range is in death or fire. Touch the "+" or "-" pad to a boil. Home Canning When canning for long periods, alternate the...
Use & Care Guide
Page 31
... 49022-2692 Please include a daytime phone number in Canada. Go to local dealers, repair parts distributors and service companies. KITCHENAID® ELECTRIC RANGE WARRANTY LIMITED WARRANTY For one year from the date of Whirlpool Corporation or Whirlpool Canada LP (hereafter "KitchenAid") will pay for the following components if defective in materials or workmanship: ■...
... 49022-2692 Please include a daytime phone number in Canada. Go to local dealers, repair parts distributors and service companies. KITCHENAID® ELECTRIC RANGE WARRANTY LIMITED WARRANTY For one year from the date of Whirlpool Corporation or Whirlpool Canada LP (hereafter "KitchenAid") will pay for the following components if defective in materials or workmanship: ■...


