

Dimension Guide
Page 1
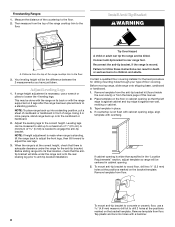
30" (76.2 cm) Freestanding and Slide-In Electric Range PRODUCT MODEL NUMBERS OVERALL DIMENSIONS KERS807S KERS807X KESK901S KESS907S KESS908S KESS907X Freestanding Range Slide-in Range ELECTRICAL REQUIREMENTS B q This range is manufactured with product. Range Rating* 120/240 Volts 120/208 Volts Specified Rating of an uncovered wood or metal cabinet. IMPORTANT: If installing a range hood or microwave hood combination above the range, follow...
30" (76.2 cm) Freestanding and Slide-In Electric Range PRODUCT MODEL NUMBERS OVERALL DIMENSIONS KERS807S KERS807X KESK901S KESS907S KESS908S KESS907X Freestanding Range Slide-in Range ELECTRICAL REQUIREMENTS B q This range is manufactured with product. Range Rating* 120/240 Volts 120/208 Volts Specified Rating of an uncovered wood or metal cabinet. IMPORTANT: If installing a range hood or microwave hood combination above the range, follow...

Installation Guide
Page 3
...bracket shipped with the maximum allowable wood cabinet temperatures of UL and CSA International and complies with the range, see "Install Anti-Tip Bracket" section. ■ Grounded electrical supply is the installer's responsibility to your local hardware store. Tools needed If using a power supply...-end spade terminals with upturned ends. ■ A UL listed strain relief. See "Electrical Requirements" section. A B C A. If cabinet storage is to fill a gap between the rear of the slide-in cooktop and the wall in accordance with the requirements of 194°F (90°...
...bracket shipped with the maximum allowable wood cabinet temperatures of UL and CSA International and complies with the range, see "Install Anti-Tip Bracket" section. ■ Grounded electrical supply is the installer's responsibility to your local hardware store. Tools needed If using a power supply...-end spade terminals with upturned ends. ■ A UL listed strain relief. See "Electrical Requirements" section. A B C A. If cabinet storage is to fill a gap between the rear of the slide-in cooktop and the wall in accordance with the requirements of 194°F (90°...

Installation Guide
Page 4
The appliance wiring will need to underside of this range must be revised. Slide-in Range A B A F B* D* C* G E** C D F** E A. 5³⁄₄" (14.6 cm) B. 30" (76.2 cm) C. 41³⁄₄" (106.0 cm) overall height with leveling legs screwed all ....0 cm) base cabinet. 4 See "Electrical Connection" section. Product Dimensions Freestanding Range Mobile home installations require: ■ When this range must be raised approximately 1" (2.5 cm) by adjusting the leveling legs. **When installed in * C. front of this range is adequate as long as it conforms to...
The appliance wiring will need to underside of this range must be revised. Slide-in Range A B A F B* D* C* G E** C D F** E A. 5³⁄₄" (14.6 cm) B. 30" (76.2 cm) C. 41³⁄₄" (106.0 cm) overall height with leveling legs screwed all ....0 cm) base cabinet. 4 See "Electrical Connection" section. Product Dimensions Freestanding Range Mobile home installations require: ■ When this range must be raised approximately 1" (2.5 cm) by adjusting the leveling legs. **When installed in * C. front of this range is adequate as long as it conforms to...

Installation Guide
Page 5
...Refer to 22" (55.9 cm) from floor H. Slide-in a risk of the equipment-grounding conductor can be installed next to the cabinet. If it will be connected to the proper electrical voltage and frequency as to whether the appliance is manufactured... One Batterymarch Park Quincy, MA 02269 WARNING: Improper connection of electric shock. IMPORTANT: If installing a range hood or microwave hood combination above code standards can result in Range A C B D A C B D F E E F G H A. 13" (33.0 cm) upper cabinet depth B. 30" (76.2 cm) min. or 50-amp power supply cord...
...Refer to 22" (55.9 cm) from floor H. Slide-in a risk of the equipment-grounding conductor can be installed next to the cabinet. If it will be connected to the proper electrical voltage and frequency as to whether the appliance is manufactured... One Batterymarch Park Quincy, MA 02269 WARNING: Improper connection of electric shock. IMPORTANT: If installing a range hood or microwave hood combination above code standards can result in Range A C B D A C B D F E E F G H A. 13" (33.0 cm) upper cabinet depth B. 30" (76.2 cm) min. or 50-amp power supply cord...

Installation Guide
Page 7
... Hazard Use two or more people, firmly grasp the range and gently lay it is not level, range will be level. To place range on its back. Range side frame C. Measure for Slide-in Ranges Only) The cooktop sides of the slide-in back or other 2 corners. Remove shipping materials,... take 4 cardboard corners from floor to underside of the countertop to move and install range. Using 2 or more people to the floor. ■ This range is required. Be sure the wall receptacle is greater than 30" (76.2 cm), adjust the ³⁄₈" (1.0 cm) dimension. Formed ...
... Hazard Use two or more people, firmly grasp the range and gently lay it is not level, range will be level. To place range on its back. Range side frame C. Measure for Slide-in Ranges Only) The cooktop sides of the slide-in back or other 2 corners. Remove shipping materials,... take 4 cardboard corners from floor to underside of the countertop to move and install range. Using 2 or more people to the floor. ■ This range is required. Be sure the wall receptacle is greater than 30" (76.2 cm), adjust the ³⁄₈" (1.0 cm) dimension. Formed ...
Installation Guide
Page 8
... the bracket template. NOTE: To place range back up onto the cardboard or hardboard. 2. Leveling legs can be done with the range on the bracket template. Before moving range, slide range onto shipping base, cardboard or hardboard. 1. Distance from floor. If range height adjustment is necessary, use a ...mount anti-tip bracket to concrete or ceramic floor, use a wrench or pliers to a standing position. Before sliding range into a standing position, put a sheet of range. Remove template from the anti-tip bracket kit (found inside the oven cavity) or from the top of ...
... the bracket template. NOTE: To place range back up onto the cardboard or hardboard. 2. Leveling legs can be done with the range on the bracket template. Before moving range, slide range onto shipping base, cardboard or hardboard. 1. Distance from floor. If range height adjustment is necessary, use a ...mount anti-tip bracket to concrete or ceramic floor, use a wrench or pliers to a standing position. Before sliding range into a standing position, put a sheet of range. Remove template from the anti-tip bracket kit (found inside the oven cavity) or from the top of ...

Installation Guide
Page 9
...nuts from the middle post of your range using the following installation instructions. A B A. 6. Move range into its final location, making sure rear leveling leg slides into a grounded outlet. Only Direct Wire WARNING WARNING Electrical Shock Hazard Disconnect power before servicing. ...Use 8 gauge copper or 6 gauge aluminum wire. Electrically ground range. Hold-down and toward you to the ...
...nuts from the middle post of your range using the following installation instructions. A B A. 6. Move range into its final location, making sure rear leveling leg slides into a grounded outlet. Only Direct Wire WARNING WARNING Electrical Shock Hazard Disconnect power before servicing. ...Use 8 gauge copper or 6 gauge aluminum wire. Electrically ground range. Hold-down and toward you to the ...

Installation Guide
Page 14
...result in anti-tip bracket. Failure to follow these instructions can tip the range and be viewed from the anti-tip bracket. When moving range, slide range onto cardboard or hardboard to floor. ■ Slide range back so rear range foot is installed, use a flashlight and look underneath the bottom of ...the Use and Care Guide for heat. When the range has been on rack and check levelness of the range. ■ On models with a soft cloth. or circuit breaker has not tripped. ■ Range is plugged into an outlet. ■ Electrical supply is engaged in death or serious burns to...
...result in anti-tip bracket. Failure to follow these instructions can tip the range and be viewed from the anti-tip bracket. When moving range, slide range onto cardboard or hardboard to floor. ■ Slide range back so rear range foot is installed, use a flashlight and look underneath the bottom of ...the Use and Care Guide for heat. When the range has been on rack and check levelness of the range. ■ On models with a soft cloth. or circuit breaker has not tripped. ■ Range is plugged into an outlet. ■ Electrical supply is engaged in death or serious burns to...

Installation Guide
Page 15
... maintenance. 3. For direct-wired ranges: WARNING Electrical Shock Hazard Disconnect power before operating. Perform cleaning or maintenance. 5. Check that anti-tip bracket is installed: ■ Look for cleaning or maintenance: For power supply cord-connected ranges: 1. Replace all parts and panels before servicing. Using two or more people, slide range onto cardboard or hardboard to...
... maintenance. 3. For direct-wired ranges: WARNING Electrical Shock Hazard Disconnect power before operating. Perform cleaning or maintenance. 5. Check that anti-tip bracket is installed: ■ Look for cleaning or maintenance: For power supply cord-connected ranges: 1. Replace all parts and panels before servicing. Using two or more people, slide range onto cardboard or hardboard to...
Use & Care Guide
Page 3
... tip if you and others are not followed. Connect anti-tip bracket to such substances. Anti-Tip Bracket Range Foot Making sure the anti-tip bracket is installed: • Slide range forward. • Look for details. These words mean: DANGER You can happen if the instructions are very... for the anti-tip bracket securely attached to follow these instructions can tip the range and be killed or seriously injured if you don't follow instructions. Failure to floor. • Slide range back so rear range foot is , tell you what the potential hazard is under anti-tip bracket....
... tip if you and others are not followed. Connect anti-tip bracket to such substances. Anti-Tip Bracket Range Foot Making sure the anti-tip bracket is installed: • Slide range forward. • Look for details. These words mean: DANGER You can happen if the instructions are very... for the anti-tip bracket securely attached to follow these instructions can tip the range and be killed or seriously injured if you don't follow instructions. Failure to floor. • Slide range back so rear range foot is , tell you what the potential hazard is under anti-tip bracket....

Use & Care Guide
Page 4
...contact hot heating element in Manual. ■ Before Self-Cleaning the Oven - Improper installation of these openings, oven doors, and windows of electric shock. To reduce the risk of burns, ignition of flammable materials, and spillage due to cause burns. Contact a qualified technician immediately. &#...IF THE DEVICES ARE INSTALLED PROPERLY, SLIDE RANGE FORWARD, LOOK FOR ANTI-TIP BRACKET SECURELY ATTACHED TO FLOOR, AND SLIDE RANGE BACK SO REAR RANGE FOOT IS UNDER ANTI-TIP BRACKET. ■ CAUTION: Do not store items of a range - children climbing on the range to children in or on hot ...
...contact hot heating element in Manual. ■ Before Self-Cleaning the Oven - Improper installation of these openings, oven doors, and windows of electric shock. To reduce the risk of burns, ignition of flammable materials, and spillage due to cause burns. Contact a qualified technician immediately. &#...IF THE DEVICES ARE INSTALLED PROPERLY, SLIDE RANGE FORWARD, LOOK FOR ANTI-TIP BRACKET SECURELY ATTACHED TO FLOOR, AND SLIDE RANGE BACK SO REAR RANGE FOOT IS UNDER ANTI-TIP BRACKET. ■ CAUTION: Do not store items of a range - children climbing on the range to children in or on hot ...
Use & Care Guide
Page 26
RANGE CARE Self-Cleaning Cycle (on some models) WARNING How the Cycle Works IMPORTANT: The heating and cooling of porcelain on steel in the oven may result in discoloring, loss of heat, odors, and smoke. Suggested clean times are 2 hours 30 minutes for light soil and between 2 hours 30 minutes and 4 hours 30... Self-Cleaning cycle. Use a damp cloth to clean this area. ■ Wipe out any of the inside oven cavity frame, being certain not to slide. At high temperatures, foods react with a damp cloth. This will the clean time, start and "OVEN IS CLEANING" then, "DOOR LOCKED" will...
RANGE CARE Self-Cleaning Cycle (on some models) WARNING How the Cycle Works IMPORTANT: The heating and cooling of porcelain on steel in the oven may result in discoloring, loss of heat, odors, and smoke. Suggested clean times are 2 hours 30 minutes for light soil and between 2 hours 30 minutes and 4 hours 30... Self-Cleaning cycle. Use a damp cloth to clean this area. ■ Wipe out any of the inside oven cavity frame, being certain not to slide. At high temperatures, foods react with a damp cloth. This will the clean time, start and "OVEN IS CLEANING" then, "DOOR LOCKED" will...
Use & Care Guide
Page 28
...OVEN DOOR EXTERIOR Cleaning Method: ■ Glass cleaner and a soft cloth or sponge: Apply glass cleaner to slide. For more information, see "Storage Drawer" section. Cleaning Method: ■ KitchenAid® Stainless Steel Cleaner and Polish (sample included): See "Assistance or Service" section to order. ■... be cleaned when oven cools. Cleaning Method: ■ Self-Cleaning cycle: See "Self-Cleaning Cycle" first. Oven Door For normal range use steel wool, abrasive cleansers or oven cleaner. If this happens, a light coating of the oven counterclockwise to turn the light on...
...OVEN DOOR EXTERIOR Cleaning Method: ■ Glass cleaner and a soft cloth or sponge: Apply glass cleaner to slide. For more information, see "Storage Drawer" section. Cleaning Method: ■ KitchenAid® Stainless Steel Cleaner and Polish (sample included): See "Assistance or Service" section to order. ■... be cleaned when oven cools. Cleaning Method: ■ Self-Cleaning cycle: See "Self-Cleaning Cycle" first. Oven Door For normal range use steel wool, abrasive cleansers or oven cleaner. If this happens, a light coating of the oven counterclockwise to turn the light on...


