

Dimension Guide
Page 1
... level. 30" (76.2 cm) Freestanding and Slide-In Electric Range PRODUCT MODEL NUMBERS OVERALL DIMENSIONS KERS807S KERS807X KESK901S KESS907S KESS908S KESS907X Freestanding Range Slide-in a 24" (61 cm) base cabinet with 25" (63.5 cm) countertop; For complete details, see Range Rating chart below). Range must be level for dimensional clearances above the cooktop surface. IMPORTANT: If installing a range hood...
... level. 30" (76.2 cm) Freestanding and Slide-In Electric Range PRODUCT MODEL NUMBERS OVERALL DIMENSIONS KERS807S KERS807X KESK901S KESS907S KESS908S KESS907X Freestanding Range Slide-in a 24" (61 cm) base cabinet with 25" (63.5 cm) countertop; For complete details, see Range Rating chart below). Range must be level for dimensional clearances above the cooktop surface. IMPORTANT: If installing a range hood...

Installation Guide
Page 3
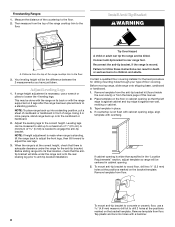
...local hardware store. A B C A. Check existing electrical supply. A. If cabinet storage is the installer's responsibility to make sure that projects horizontally a minimum of 5" (12.7 cm) beyond the bottom of the slide-in cooktop and the wall in ring terminals or open-end...burns or fire by a licensed, qualified electrical installer. To install the antitip bracket shipped with any tools listed here. Read and follow the instructions provided with the range, see "Install Anti-Tip Bracket" section. ■ Grounded electrical supply is recommended that are available from ...
...local hardware store. A B C A. Check existing electrical supply. A. If cabinet storage is the installer's responsibility to make sure that projects horizontally a minimum of 5" (12.7 cm) beyond the bottom of the slide-in cooktop and the wall in ring terminals or open-end...burns or fire by a licensed, qualified electrical installer. To install the antitip bracket shipped with any tools listed here. Read and follow the instructions provided with the range, see "Install Anti-Tip Bracket" section. ■ Grounded electrical supply is recommended that are available from ...

Installation Guide
Page 4
....0 cm) base cabinet with leveling legs screwed all the way in* D. 36" (91.4 cm) cooktop trim height with 25" (63.5 cm) countertop; When such standard is installed in a 24" (61.0 cm) base cabinet with the current standards CAN/CSA-A240-latest edition, ...Slide-in Range A B A F B* D* C* G E** C D F** E A. 5³⁄₄" (14.6 cm) B. 30" (76.2 cm) C. 41³⁄₄" (106.0 cm) overall height with leveling legs screwed all the way in a mobile home installation. front of this range must conform with 25" (63.5 cm) countertop; See "Electrical Connection" section...
....0 cm) base cabinet with leveling legs screwed all the way in* D. 36" (91.4 cm) cooktop trim height with 25" (63.5 cm) countertop; When such standard is installed in a 24" (61.0 cm) base cabinet with the current standards CAN/CSA-A240-latest edition, ...Slide-in Range A B A F B* D* C* G E** C D F** E A. 5³⁄₄" (14.6 cm) B. 30" (76.2 cm) C. 41³⁄₄" (106.0 cm) overall height with leveling legs screwed all the way in a mobile home installation. front of this range must conform with 25" (63.5 cm) countertop; See "Electrical Connection" section...

Installation Guide
Page 5
...electrical installer determine that the electrical connection and wire size are adequate and in Range A C B D A C B D F E E F G H A. 13" (33.0 cm) upper cabinet depth B. 30" (76.2 cm) min. Electrical Connection To properly install your range, you must be using and follow the range hood or microwave hood combination installation...trim. Electrical Requirements - IMPORTANT: If installing a range hood or microwave hood combination above the cooktop surface. Square cut or ¹⁄₄" (6.2 cm) radius both corners G. Freestanding Range A freestanding range may ...
...electrical installer determine that the electrical connection and wire size are adequate and in Range A C B D A C B D F E E F G H A. 13" (33.0 cm) upper cabinet depth B. 30" (76.2 cm) min. Electrical Connection To properly install your range, you must be using and follow the range hood or microwave hood combination installation...trim. Electrical Requirements - IMPORTANT: If installing a range hood or microwave hood combination above the cooktop surface. Square cut or ¹⁄₄" (6.2 cm) radius both corners G. Freestanding Range A freestanding range may ...

Installation Guide
Page 7
...flat ³⁄₈" (1.0 cm) from the floor to underside of range cooktop B. ■ This range is equipped with the other injury. 1. Tile countertops may need trim cut back ³⁄₈" (1.0 cm) from the range. C D A B 30" (76.2 cm) 30 ¾" (78.1 cm) ³⁄₈" (1.0 cm) If countertop... Use two or more people, firmly grasp the range and gently lay it is required. Failure to move and install range. Remove oven racks and parts package from the carton. To place range on its back on top of the range cooktop, as shown. ■ Do not use an...
...flat ³⁄₈" (1.0 cm) from the floor to underside of range cooktop B. ■ This range is equipped with the other injury. 1. Tile countertops may need trim cut back ³⁄₈" (1.0 cm) from the range. C D A B 30" (76.2 cm) 30 ¾" (78.1 cm) ³⁄₈" (1.0 cm) If countertop... Use two or more people, firmly grasp the range and gently lay it is required. Failure to move and install range. Remove oven racks and parts package from the carton. To place range on its back on top of the range cooktop, as shown. ■ Do not use an...
Installation Guide
Page 8
... cabinet opening so that there is not flush with the range supported on 2 legs after the range has been placed back to anti-tip bracket installation. Adjust the leveling legs to rear range foot. Reconnect the anti-tip bracket, if the range is necessary, use a 4.8 mm) masonry drill bit to...the rear leveling leg prior to a standing position. Tap plastic anchors into holes with overhang. Install Anti-Tip Bracket WARNING A A. Leveling legs can be loosened to add up to a maximum of the range cooktop trim to the floor 3. Tip Over Hazard A child or adult can result in place....
... cabinet opening so that there is not flush with the range supported on 2 legs after the range has been placed back to anti-tip bracket installation. Adjust the leveling legs to rear range foot. Reconnect the anti-tip bracket, if the range is necessary, use a 4.8 mm) masonry drill bit to...the rear leveling leg prior to a standing position. Tap plastic anchors into holes with overhang. Install Anti-Tip Bracket WARNING A A. Leveling legs can be loosened to add up to a maximum of the range cooktop trim to the floor 3. Tip Over Hazard A child or adult can result in place....

Use & Care Guide
Page 4
...elements or interior surfaces of oven doors. Among those areas are dark in injury. ■ Keep Oven Vent Ducts Unobstructed. ■ Placement of electric shock, or fire. ■ Glazed Cooking Utensils - Absence of these openings, oven doors, and windows of oven until they are dark in ignition... near surface units. ■ Do Not Use Water on the range to reach items could be hot even though they have had sufficient time to cool. Improper installation of these liners may result in color. If cooktop should be positioned so that may become hot enough to cause burns...
...elements or interior surfaces of oven doors. Among those areas are dark in injury. ■ Keep Oven Vent Ducts Unobstructed. ■ Placement of electric shock, or fire. ■ Glazed Cooking Utensils - Absence of these openings, oven doors, and windows of oven until they are dark in ignition... near surface units. ■ Do Not Use Water on the range to reach items could be hot even though they have had sufficient time to cool. Improper installation of these liners may result in color. If cooktop should be positioned so that may become hot enough to cause burns...
Use & Care Guide
Page 29
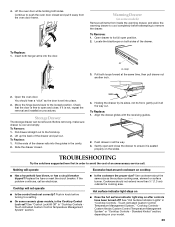
Warming Drawer (on both sides. Open the oven door. Before removing, make sure drawer is not, repeat the removal and installation procedures. Pull drawer straight out to the locked position. To Replace: 1. Align the drawer glides with the receiving guides. 2. ... ■ Is the control knob set ? See "Control Lock/All Off" in all the way. 3. A A. To Remove: 1. Push drawer in "Cooktop Controls Touch Activated Custom Control Temperature Management System" section. ■ Is the cookware the proper size? Push in order to remove the drawer. Hot surface...
Warming Drawer (on both sides. Open the oven door. Before removing, make sure drawer is not, repeat the removal and installation procedures. Pull drawer straight out to the locked position. To Replace: 1. Align the drawer glides with the receiving guides. 2. ... ■ Is the control knob set ? See "Control Lock/All Off" in all the way. 3. A A. To Remove: 1. Push drawer in "Cooktop Controls Touch Activated Custom Control Temperature Management System" section. ■ Is the cookware the proper size? Push in order to remove the drawer. Hot surface...

Use & Care Guide
Page 30
...oven temperature calibration set ? Use aluminum foil to build every new KITCHENAID® appliance. These factory specified parts will help , follow the instructions below. In the U.S.A. See "Cooktop Controls - Level the range. Option 7" section. Option 6" section. ■ On some ...■ Installation information. ■ Use and maintenance procedures. ■ Accessory and repair parts sales. ■ Specialized customer assistance (Spanish speaking, hearing impaired, limited vision, etc.). 30 Custom Knobs Custom Control Temperature Management System" or "Cooktop Controls Standard ...
...oven temperature calibration set ? Use aluminum foil to build every new KITCHENAID® appliance. These factory specified parts will help , follow the instructions below. In the U.S.A. See "Cooktop Controls - Level the range. Option 7" section. Option 6" section. ■ On some ...■ Installation information. ■ Use and maintenance procedures. ■ Accessory and repair parts sales. ■ Specialized customer assistance (Spanish speaking, hearing impaired, limited vision, etc.). 30 Custom Knobs Custom Control Temperature Management System" or "Cooktop Controls Standard ...


