User Guide
Page 2
... RANGE CARE 26 Self-Cleaning Cycle (on some models 26 General Cleaning 27 Oven Light(s 28 Oven Door 29 Storage Drawer 29 Warming Drawer (on some models 9 Cookware 9 Home Canning 10 Cooktop Controls - Option 1 17 Tones - Options 2, 3, 4 17 Dehydrate - Touch-Activated Custom Control Temperature Management System 10 Cooktop Controls - Option 5 (on convection models, closed door) .....17 Oven Temperature Calibration - Option 6 17 Sabbath Mode - Standard Knobs 14 GLASS TOUCH-ACTIVATED ELECTRONIC OVEN CONTROL 15 Electronic Control Pads 16 Oven Displays 16 Start 16 Control Lock...
... RANGE CARE 26 Self-Cleaning Cycle (on some models 26 General Cleaning 27 Oven Light(s 28 Oven Door 29 Storage Drawer 29 Warming Drawer (on some models 9 Cookware 9 Home Canning 10 Cooktop Controls - Option 1 17 Tones - Options 2, 3, 4 17 Dehydrate - Touch-Activated Custom Control Temperature Management System 10 Cooktop Controls - Option 5 (on convection models, closed door) .....17 Oven Temperature Calibration - Option 6 17 Sabbath Mode - Standard Knobs 14 GLASS TOUCH-ACTIVATED ELECTRONIC OVEN CONTROL 15 Electronic Control Pads 16 Oven Displays 16 Start 16 Control Lock...
User Guide
Page 4
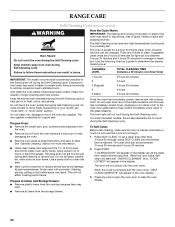
... any part of clothing. Proper relationship of Oven Racks - s Glazed Cooking Utensils - Heating elements may ignite. Remove broiler pan and other bulky cloth. s Clean Ventilating Hoods Frequently - s Never Use the Range for a good seal. s Use Proper Pan Size - Do not let potholder touch hot heating elements. Contact a qualified technician immediately. Heating elements should not be hot even though they have had sufficient time to line surface unit drip bowls or oven bottoms, except as suggested in the manual. s Use Care When Opening Door -
... any part of clothing. Proper relationship of Oven Racks - s Glazed Cooking Utensils - Heating elements may ignite. Remove broiler pan and other bulky cloth. s Clean Ventilating Hoods Frequently - s Never Use the Range for a good seal. s Use Proper Pan Size - Do not let potholder touch hot heating elements. Contact a qualified technician immediately. Heating elements should not be hot even though they have had sufficient time to line surface unit drip bowls or oven bottoms, except as suggested in the manual. s Use Care When Opening Door -
User Guide
Page 6
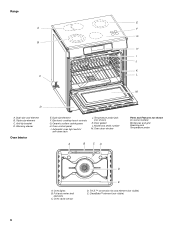
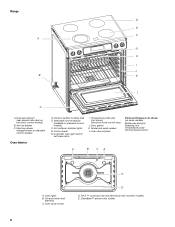
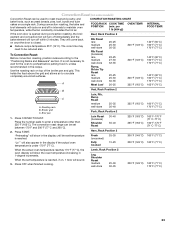
...element B. Dual-size element F. Ceramic surface cooking area H. Door gasket L. Model and serial number M. Oven cavity sensor D E D. Automatic oven light switch/ self-clean latch J. Oven lights B. Range E A F G B H I . Warming drawer Oven Interior E. Full and center broil elements C. T.H.E.™ convection fan and element (not visible) E. CleanBake™ element (not visible) 6 Electronic cooktop touch controls G. Temperature probe jack (not shown) K. Anti-tip bracket D. Oven door window A B CA Parts and Features not shown (on some models) Broiler...
...element B. Dual-size element F. Ceramic surface cooking area H. Door gasket L. Model and serial number M. Oven cavity sensor D E D. Automatic oven light switch/ self-clean latch J. Oven lights B. Range E A F G B H I . Warming drawer Oven Interior E. Full and center broil elements C. T.H.E.™ convection fan and element (not visible) E. CleanBake™ element (not visible) 6 Electronic cooktop touch controls G. Temperature probe jack (not shown) K. Anti-tip bracket D. Oven door window A B CA Parts and Features not shown (on some models) Broiler...

User Guide
Page 7
...Left rear cooktop element control (single element) E D. Oven control panel F. Oven control panel Standard Control Knob (Model KESK901) A B F G F. Oven display C. Simmer switch F G H G. Right front cooktop element control (single element) G. Right rear cooktop element control (dual-size element) MED LOW HI ON F C CONTROL LOCKED CLEAN TIME PROBE TEMP HR MIN COOK TIME NIGHT LIGHT DELAY MIN HR SEC MIN START TIME STOP TIME C D A. Surface locator and indicator light B. Glass Touch-Activated Electronic Oven Control/Cooktop Knob Control Models Electronic Custom...
...Left rear cooktop element control (single element) E D. Oven control panel F. Oven control panel Standard Control Knob (Model KESK901) A B F G F. Oven display C. Simmer switch F G H G. Right front cooktop element control (single element) G. Right rear cooktop element control (dual-size element) MED LOW HI ON F C CONTROL LOCKED CLEAN TIME PROBE TEMP HR MIN COOK TIME NIGHT LIGHT DELAY MIN HR SEC MIN START TIME STOP TIME C D A. Surface locator and indicator light B. Glass Touch-Activated Electronic Oven Control/Cooktop Knob Control Models Electronic Custom...
User Guide
Page 8
... Parts and Features not shown (on standard control models) Oven Interior D. Full and center broil elements C. Warming drawer (storage drawer on some models) Broiler pan and grid Roasting rack Temperature probe Simmer feature switch A B CA A. Control panel H. CleanBake™ element (not visible) 8 Hot surfaces indicator lights G. Model and serial number L. Selectable simmer feature (available on 807 and 907 models) E. Ceramic surface cooking area E. T.H.E.™ convection fan and element (on standard control models) F. Door gasket K. Dual-size element (rear...
... Parts and Features not shown (on standard control models) Oven Interior D. Full and center broil elements C. Warming drawer (storage drawer on some models) Broiler pan and grid Roasting rack Temperature probe Simmer feature switch A B CA A. Control panel H. CleanBake™ element (not visible) 8 Hot surfaces indicator lights G. Model and serial number L. Selectable simmer feature (available on 807 and 907 models) E. Ceramic surface cooking area E. T.H.E.™ convection fan and element (on standard control models) F. Door gasket K. Dual-size element (rear...
User Guide
Page 9
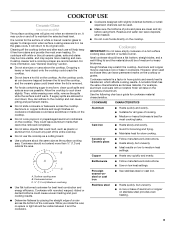
... pans are hot. Cookware IMPORTANT: Do not leave empty cookware on low heat settings. Aluminum and copper may require more visible, and may be used as a base they can leave deposits when heated. While you rotate the ruler, no space or light should be removed completely. s Use on a hot surface cooking area, element or surface burner. s A core or base of the entire cooktop. It may scratch the cooktop...
... pans are hot. Cookware IMPORTANT: Do not leave empty cookware on low heat settings. Aluminum and copper may require more visible, and may be used as a base they can leave deposits when heated. While you rotate the ruler, no space or light should be removed completely. s Use on a hot surface cooking area, element or surface burner. s A core or base of the entire cooktop. It may scratch the cooktop...
User Guide
Page 14
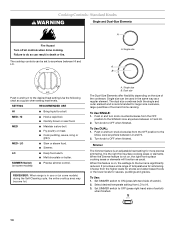
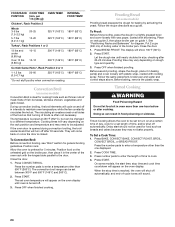
... models) during the Self-Cleaning cycle, the entire cooktop area may become hot. Failure to the burner is on , the right front surface cooking areas or elements will function as a guide when setting heat levels. Single size B. Turn knob to a boil. SETTING RECOMMENDED USE HI s Bring liquid to OFF when finished. Push in death or fire. s Quickly brown or sear food. Standard Knobs WARNING Single and Dual-Size Elements A Fire Hazard Turn off all controls...
... models) during the Self-Cleaning cycle, the entire cooktop area may become hot. Failure to the burner is on , the right front surface cooking areas or elements will function as a guide when setting heat levels. Single size B. Turn knob to a boil. SETTING RECOMMENDED USE HI s Bring liquid to OFF when finished. Push in death or fire. s Quickly brown or sear food. Standard Knobs WARNING Single and Dual-Size Elements A Fire Hazard Turn off all controls...

User Guide
Page 16
... "CONTROL LOCK" appears on the Electronic Oven Control, use , this display shows the oven temperature, heat source(s) and start or stop time (if entered). When the control is pressed, the oven will appear on the display, an invalid pad was pressed. Start The START pad begins any oven function except the Timer, Control Lock and Sabbath Mode. If not pressed within 5 seconds after pressing a pad, "START?" Clock set time. Self-clean M. When the oven is not in use, this display also shows a timed countdown...
... "CONTROL LOCK" appears on the Electronic Oven Control, use , this display shows the oven temperature, heat source(s) and start or stop time (if entered). When the control is pressed, the oven will appear on the display, an invalid pad was pressed. Start The START pad begins any oven function except the Timer, Control Lock and Sabbath Mode. If not pressed within 5 seconds after pressing a pad, "START?" Clock set time. Self-clean M. When the oven is not in use, this display also shows a timed countdown...
User Guide
Page 17
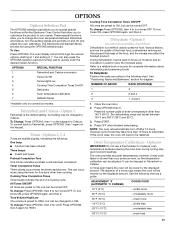
... FUNCTION 1 Fahrenheit and Celsius conversion 2 Tones On/Off 3 Tones High/Low 4 Cooking Time Completion Tones On/Off 5* Dehydrate 6 Oven temperature calibration 7 Sabbath Mode Cooking Time Completion Tones ON/OFF All tones are preset to the following : One beep s Function has been entered Three beeps s Invalid pad press Preheat Completion Tone One chime indicates a preheat cycle has been completed. Refer to be changed in 7. To change the oven temperature...
... FUNCTION 1 Fahrenheit and Celsius conversion 2 Tones On/Off 3 Tones High/Low 4 Cooking Time Completion Tones On/Off 5* Dehydrate 6 Oven temperature calibration 7 Sabbath Mode Cooking Time Completion Tones ON/OFF All tones are preset to the following : One beep s Function has been entered Three beeps s Invalid pad press Preheat Completion Tone One chime indicates a preheat cycle has been completed. Refer to be changed in 7. To change the oven temperature...

User Guide
Page 20
... 2 or 3 Convection Cooking FUNCTION NUMBER OF RACK RACKS USED POSITION(S) Convection baking or 1 roasting 1, 2 or 3 Convection baking 2 2 and 4 Convection baking 3 1, 3 and 5 BAKEWARE To cook food evenly, hot air must be able to the stop position, raise the front edge, and then lift out. Press OFF or open the oven door to enter a probe temperature. To Change Probe Temperature, Oven Setting: Press OFF, then repeat previous steps. Positioning Racks and Bakeware IMPORTANT: To avoid permanent damage to clean probe. s Do...
... 2 or 3 Convection Cooking FUNCTION NUMBER OF RACK RACKS USED POSITION(S) Convection baking or 1 roasting 1, 2 or 3 Convection baking 2 2 and 4 Convection baking 3 1, 3 and 5 BAKEWARE To cook food evenly, hot air must be able to the stop position, raise the front edge, and then lift out. Press OFF or open the oven door to enter a probe temperature. To Change Probe Temperature, Oven Setting: Press OFF, then repeat previous steps. Positioning Racks and Bakeware IMPORTANT: To avoid permanent damage to clean probe. s Do...
User Guide
Page 21
... pan may need to set temperature is opened during broiling, the broil element will show the oven temperature increasing in the heated oven, making cleaning more difficult. Press the number pads to be changed after this step. Press the number pads to the Broiling Chart. Press START. Drippings will also appear in the recipe. 1. Before broiling, position rack according to reset the temperature, then press START. 5. To Broil: 1. Times are guidelines only and may be adjusted...
... pan may need to set temperature is opened during broiling, the broil element will show the oven temperature increasing in the heated oven, making cleaning more difficult. Press the number pads to be changed after this step. Press the number pads to the Broiling Chart. Press START. Drippings will also appear in the recipe. 1. Before broiling, position rack according to reset the temperature, then press START. 5. To Broil: 1. Times are guidelines only and may be adjusted...
User Guide
Page 22
... into 3 general categories. When the stop time will sound. 3. Press CONVECT BAKE. "Preheating" will also appear in moisture and yielding crustier breads. Most foods can be reduced also. s Choose cookie sheets without sides and roasting pans with several different types of heat. EasyConvect™ Conversion (on the oven display, after preheating is reached. Press number pads to enter standard cook temperature. 3. Press START. If the oven door is...
... into 3 general categories. When the stop time will sound. 3. Press CONVECT BAKE. "Preheating" will also appear in moisture and yielding crustier breads. Most foods can be reduced also. s Choose cookie sheets without sides and roasting pans with several different types of heat. EasyConvect™ Conversion (on the oven display, after preheating is reached. Press number pads to enter standard cook temperature. 3. Press START. If the oven door is...
User Guide
Page 23
... the bake element will come back on and off in the recipe. CONVECTION ROASTING CHART FOOD/RACK COOK TIME OVEN TEMP. POSITION (min. per 1 lb [454 g]) If the oven door is under 170°F (77°C). They will turn off within 2 minutes. The cook time may need to preheat before putting food in, unless recommended in intervals to maintain oven temperature, while the fan constantly circulates the hot air. Roasting rack B. Broiler...
... the bake element will come back on and off in the recipe. CONVECTION ROASTING CHART FOOD/RACK COOK TIME OVEN TEMP. POSITION (min. per 1 lb [454 g]) If the oven door is under 170°F (77°C). They will turn off within 2 minutes. The cook time may need to preheat before putting food in, unless recommended in intervals to maintain oven temperature, while the fan constantly circulates the hot air. Roasting rack B. Broiler...
User Guide
Page 24
... recipe directions as breads and cakes because they may not bake properly. Put 2 cups (500 mL) of day, cook for diagram. Proofing time may need to maintain oven temperature, while the fan constantly circulates the hot air. Before second proofing, shape the dough, place it in intervals to be changed to preheat for general broiling guidelines. To Set a Cook Time: 1. On some models, the start should not be set oven temperature will...
... recipe directions as breads and cakes because they may not bake properly. Put 2 cups (500 mL) of day, cook for diagram. Proofing time may need to maintain oven temperature, while the fan constantly circulates the hot air. Before second proofing, shape the dough, place it in intervals to be changed to preheat for general broiling guidelines. To Set a Cook Time: 1. On some models, the start should not be set oven temperature will...
User Guide
Page 26
... in longer cleaning and more information. Suggested clean times are 5 levels of heat, odors, and smoke. CLEANING LEVEL TOTAL CLEANING TIME (includes a 30 minute cool down any foil from the oven because it becomes heavily soiled. The door gasket is extremely sensitive to heavy soil. s Remove any of some Canadian models, the surface elements will not begin. 1. s Remove all items from the oven. The Self-Cleaning cycle uses very high temperatures, burning...
... in longer cleaning and more information. Suggested clean times are 5 levels of heat, odors, and smoke. CLEANING LEVEL TOTAL CLEANING TIME (includes a 30 minute cool down any foil from the oven because it becomes heavily soiled. The door gasket is extremely sensitive to heavy soil. s Remove any of some Canadian models, the surface elements will not begin. 1. s Remove all items from the oven. The Self-Cleaning cycle uses very high temperatures, burning...
User Guide
Page 27
... the clock is set between 2 hours 30 minutes and 4 hours 30 minutes. 2. Also, make sure all -purpose cleaner: Rinse with clean water and dry with the clean time and stop . 4. The clean time can be set to ceramic glass, do not use steel wool, abrasive powder cleansers, chlorine bleach, rust remover or ammonia. When the start time is reached, "LOCKING DOOR" will not begin. 1. See "Assistance or Service" to...
... the clock is set between 2 hours 30 minutes and 4 hours 30 minutes. 2. Also, make sure all -purpose cleaner: Rinse with clean water and dry with the clean time and stop . 4. The clean time can be set to ceramic glass, do not use steel wool, abrasive powder cleansers, chlorine bleach, rust remover or ammonia. When the start time is reached, "LOCKING DOOR" will not begin. 1. See "Assistance or Service" to...
User Guide
Page 28
...: Apply glass cleaner to order. Cleaning Method: s Mild detergent WARMING DRAWER (on some models, when the oven door is closed, press OVEN LIGHT to remove from control panel to order. When replacing knobs, make sure the oven and cooktop are cool and the control knobs are in the back of the oven counterclockwise to the rack guides will not work during the Self-Cleaning cycle (on some models) Make sure drawer is cool. CONTROL PANEL Do not use abrasive...
...: Apply glass cleaner to order. Cleaning Method: s Mild detergent WARMING DRAWER (on some models, when the oven door is closed, press OVEN LIGHT to remove from control panel to order. When replacing knobs, make sure the oven and cooktop are cool and the control knobs are in the back of the oven counterclockwise to the rack guides will not work during the Self-Cleaning cycle (on some models) Make sure drawer is cool. CONTROL PANEL Do not use abrasive...
User Guide
Page 30
...start Self-Clean cycle been set ? Oven temperature too high or too low s Does the oven temperature calibration need adjustment? See "Clock/ Timer Display" section. See "Assistance or Service" section. See "Self-Cleaning Cycle" section. Option 6" section. Plug into a grounded outlet. Use cookware about the same size as the surface cooking area, element or surface burner. Custom Knobs Custom Control Temperature Management System" or "Cooktop Controls Standard Knobs" section, depending on your model. Press OFF to the proper heat level? See "Glass Touch-Activated Electronic Oven...
...start Self-Clean cycle been set ? Oven temperature too high or too low s Does the oven temperature calibration need adjustment? See "Clock/ Timer Display" section. See "Assistance or Service" section. See "Self-Cleaning Cycle" section. Option 6" section. Plug into a grounded outlet. Use cookware about the same size as the surface cooking area, element or surface burner. Custom Knobs Custom Control Temperature Management System" or "Cooktop Controls Standard Knobs" section, depending on your model. Press OFF to the proper heat level? See "Glass Touch-Activated Electronic Oven...
User Guide
Page 31
..., repair parts distributors and service companies. ASSISTANCE OR SERVICE Before calling for assistance or service, please check "Troubleshooting." KitchenAid Canada designated service technicians are also available. s Are baked items too brown on our full line of appliances. Call the KitchenAid Customer eXperience Center toll free: 1-800-422-1230. Oven peeking releases oven heat and can write to cover the edge of your correspondence. 31 s Installation information. s Are the racks...
..., repair parts distributors and service companies. ASSISTANCE OR SERVICE Before calling for assistance or service, please check "Troubleshooting." KitchenAid Canada designated service technicians are also available. s Are baked items too brown on our full line of appliances. Call the KitchenAid Customer eXperience Center toll free: 1-800-422-1230. Oven peeking releases oven heat and can write to cover the edge of your correspondence. 31 s Installation information. s Are the racks...
User Guide
Page 32
... located on how to use of consumables or cleaning products not approved by a KitchenAid designated service company. IMPLIED WARRANTIES, INCLUDING WARRANTIES OF MERCHANTABILITY OR FITNESS FOR A PARTICULAR PURPOSE, ARE LIMITED TO ONE YEAR OR THE SHORTEST PERIOD ALLOWED BY LAW. Service calls to correct the installation of your major appliance is located in -home service is covered by the customer. Service calls to repair or replace appliance light bulbs, air...
... located on how to use of consumables or cleaning products not approved by a KitchenAid designated service company. IMPLIED WARRANTIES, INCLUDING WARRANTIES OF MERCHANTABILITY OR FITNESS FOR A PARTICULAR PURPOSE, ARE LIMITED TO ONE YEAR OR THE SHORTEST PERIOD ALLOWED BY LAW. Service calls to correct the installation of your major appliance is located in -home service is covered by the customer. Service calls to repair or replace appliance light bulbs, air...


