Use and Care Guide
Page 1
ELECTRIC RANGE ARCHITECT® SERIES II Use & Care Guide For questions about features, operation/performance, parts accessories or service, call: 1-800-422-1230 or visit our website at www.kitchenaid.com In Canada, call for assistance, installation and service, call: 1-800-807-6777 or visit our website at www.KitchenAid.ca Table of Contents...2 Models KESK901 KESS907 KERS807 KESS908 YKESS907 YKERS807 YKESS908 W10109440
ELECTRIC RANGE ARCHITECT® SERIES II Use & Care Guide For questions about features, operation/performance, parts accessories or service, call: 1-800-422-1230 or visit our website at www.kitchenaid.com In Canada, call for assistance, installation and service, call: 1-800-807-6777 or visit our website at www.KitchenAid.ca Table of Contents...2 Models KESK901 KESS907 KERS807 KESS908 YKESS907 YKERS807 YKESS908 W10109440
Use and Care Guide
Page 2
...- Options 2 , 3, 4 17 Dehydrate - Custom Knobs Custom Control Temperature Management System 12 Cooktop Controls - Option 5 (on some models 29 TROUBLESHOOTING 30 ASSISTANCE OR SERVICE 31 In the U.S.A 31 In Canada 31 WARRANTY 32 2 Touch-Activated Custom Control Temperature Management System 10 Cooktop Controls - Option 1 16...23 Convection Broil (on some models 24 Proofing Bread (on some models 24 Timed Cooking 24 Warming Drawer (on some models 25 RANGE CARE 26 Self-Cleaning Cycle (on some models 26 General Cleaning 27 Oven Light(s 28 Oven Door 29 Storage Drawer 29 Warming...
...- Options 2 , 3, 4 17 Dehydrate - Custom Knobs Custom Control Temperature Management System 12 Cooktop Controls - Option 5 (on some models 29 TROUBLESHOOTING 30 ASSISTANCE OR SERVICE 31 In the U.S.A 31 In Canada 31 WARRANTY 32 2 Touch-Activated Custom Control Temperature Management System 10 Cooktop Controls - Option 1 16...23 Convection Broil (on some models 24 Proofing Bread (on some models 24 Timed Cooking 24 Warming Drawer (on some models 25 RANGE CARE 26 Self-Cleaning Cycle (on some models 26 General Cleaning 27 Oven Light(s 28 Oven Door 29 Storage Drawer 29 Warming...
Use and Care Guide
Page 3
...to children and adults. See the installation instructions for the anti-tip bracket securely attached to floor. • Slide range back so rear range foot is installed: • Slide range forward. • Look for details. WARNING: This product contains a chemical known to the State of California ... are very important. This is moved. Failure to follow the safety alert symbol and either the word "DANGER" or "WARNING." RANGE SAFETY Your safety and the safety of others . All safety messages will tell you don't follow instructions. WARNING Tip Over Hazard ...
...to children and adults. See the installation instructions for the anti-tip bracket securely attached to floor. • Slide range back so rear range foot is installed: • Slide range forward. • Look for details. WARNING: This product contains a chemical known to the State of California ... are very important. This is moved. Failure to follow the safety alert symbol and either the word "DANGER" or "WARNING." RANGE SAFETY Your safety and the safety of others . All safety messages will tell you don't follow instructions. WARNING Tip Over Hazard ...
Use and Care Guide
Page 4
...s Utensil Handles Should Be Turned Inward and Not Extend Over Adjacent Surface Units - Build-up of pressure may result in a risk of electric shock, or fire. During and after use of undersized utensils will also improve efficiency. No commercial oven cleaner or oven liner protective coating...any kind should be careful to avoid steam burn. TO CHECK IF THE DEVICES ARE INSTALLED PROPERLY, SLIDE RANGE FORWARD, LOOK FOR ANTI-TIP BRACKET SECURELY ATTACHED TO FLOOR, AND SLIDE RANGE BACK SO REAR RANGE FOOT IS UNDER ANTI-TIP BRACKET. s Do Not Leave Children Alone - s Do Not Use Water...
...s Utensil Handles Should Be Turned Inward and Not Extend Over Adjacent Surface Units - Build-up of pressure may result in a risk of electric shock, or fire. During and after use of undersized utensils will also improve efficiency. No commercial oven cleaner or oven liner protective coating...any kind should be careful to avoid steam burn. TO CHECK IF THE DEVICES ARE INSTALLED PROPERLY, SLIDE RANGE FORWARD, LOOK FOR ANTI-TIP BRACKET SECURELY ATTACHED TO FLOOR, AND SLIDE RANGE BACK SO REAR RANGE FOOT IS UNDER ANTI-TIP BRACKET. s Do Not Leave Children Alone - s Do Not Use Water...

Use and Care Guide
Page 5
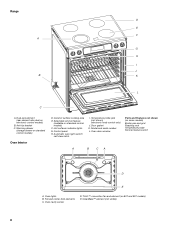
... touch control (dual-size element) A B. Zone diameter indicator (dual) G. Left front touch control (triple-size element) I . Left rear touch control (dual-size element) G F ED C B 5 The range you have some or all of your model. Zone diameter indicator (single) I F. Increase/Decrease temperature touch control H J.
... touch control (dual-size element) A B. Zone diameter indicator (dual) G. Left front touch control (triple-size element) I . Left rear touch control (dual-size element) G F ED C B 5 The range you have some or all of your model. Zone diameter indicator (single) I F. Increase/Decrease temperature touch control H J.
Use and Care Guide
Page 6
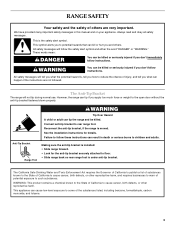
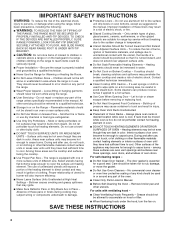
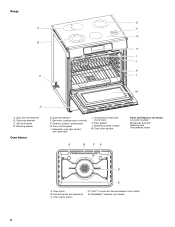
Dual-size element F. Model and serial number M. Range E A F G B H I . Triple-size element C. Warming drawer Oven Interior E. Oven lights B. Oven cavity sensor D. T.H.E.™ convection fan and element (not visible) E. Oven control panel I J K C L M D A. Door gasket L. Automatic ...
Dual-size element F. Model and serial number M. Range E A F G B H I . Triple-size element C. Warming drawer Oven Interior E. Oven lights B. Oven cavity sensor D. T.H.E.™ convection fan and element (not visible) E. Oven control panel I J K C L M D A. Door gasket L. Automatic ...
Use and Care Guide
Page 8
... models) Broiler pan and grid Roasting rack Temperature probe Simmer feature switch A B CA D E A. Anti-tip bracket C. Hot surfaces indicator lights G. Full and center broil elements C. Range D E F A G H I . Temperature probe jack (not shown) (electronic knob control only) J. Oven door window Parts and Features not shown (on standard control models) Oven Interior D. T.H.E.™ convection...
... models) Broiler pan and grid Roasting rack Temperature probe Simmer feature switch A B CA D E A. Anti-tip bracket C. Hot surfaces indicator lights G. Full and center broil elements C. Range D E F A G H I . Temperature probe jack (not shown) (electronic knob control only) J. Oven door window Parts and Features not shown (on standard control models) Oven Interior D. T.H.E.™ convection...
Use and Care Guide
Page 10
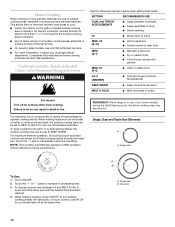
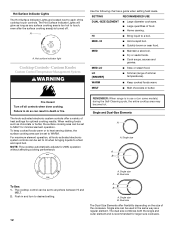
...fast and rapid boil. The electronic touch controls offer a variety of simmer temperatures) KEEP WARM s Keep cooked foods warm. REMEMBER: When range is in death or fire. Dual size 10 s On ceramic glass models, use only flat-bottomed canners. To keep cooked foods warm ...Use: 1. s Quickly brown or sear food. s Do not place canner on the grate or largest surface cooking area or element. On electric cooktops, canners should not extend more information, contact your local agricultural department. s Large quantities of surface cooking areas, elements or surface burners ...
...fast and rapid boil. The electronic touch controls offer a variety of simmer temperatures) KEEP WARM s Keep cooked foods warm. REMEMBER: When range is in death or fire. Dual size 10 s On ceramic glass models, use only flat-bottomed canners. To keep cooked foods warm ...Use: 1. s Quickly brown or sear food. s Do not place canner on the grate or largest surface cooking area or element. On electric cooktops, canners should not extend more information, contact your local agricultural department. s Large quantities of surface cooking areas, elements or surface burners ...
Use and Care Guide
Page 12
...-Cleaning cycle, the entire cooktop area may become hot. SETTING RECOMMENDED USE DUAL-SIZE ELEMENT s Large diameter cookware. LO [SIMMER] s Simmer (range of the cooktop touch controls. Failure to desired setting. 12 A B A. The cooktop control can result in and turn to do so can ...surface cooking area(s) is recommended for minimal element operation. NOTE: This cooktop automatically adjusts for optimal cooking results. OFF Hi Lo REMEMBER: When range is in the same way as a guide when setting heat levels. s Home canning. s Fry or sauté foods. The knob-...
...-Cleaning cycle, the entire cooktop area may become hot. SETTING RECOMMENDED USE DUAL-SIZE ELEMENT s Large diameter cookware. LO [SIMMER] s Simmer (range of the cooktop touch controls. Failure to desired setting. 12 A B A. The cooktop control can result in and turn to do so can ...surface cooking area(s) is recommended for minimal element operation. NOTE: This cooktop automatically adjusts for optimal cooking results. OFF Hi Lo REMEMBER: When range is in the same way as a guide when setting heat levels. s Home canning. s Fry or sauté foods. The knob-...
Use and Care Guide
Page 14
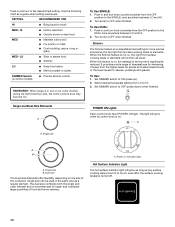
REMEMBER: When range is an adjustable heat setting for sauces, puddings and gravies. Turn knob to ON (press up). 2. Simmer The Simmer feature is in use or (on ... size B. MED- MED s Maintain a slow boil. LO s Keep food warm. Push in and turn knob counterclockwise from the OFF position to HI. 3. It provides a wide range of temperatures for larger size cookware, large quantities of the cookware. Single size can be used in the same way as a guide when setting heat...
REMEMBER: When range is an adjustable heat setting for sauces, puddings and gravies. Turn knob to ON (press up). 2. Simmer The Simmer feature is in use or (on ... size B. MED- MED s Maintain a slow boil. LO s Keep food warm. Push in and turn knob counterclockwise from the OFF position to HI. 3. It provides a wide range of temperatures for larger size cookware, large quantities of the cookware. Single size can be used in the same way as a guide when setting heat...
Use and Care Guide
Page 16
... Lock The Control Lock feature shuts down the set time ends, timer completion tones will sound, then reminder tones will be used either when the range is in use or turned off . Press and hold the START pad for example, during the countdown by repeating the above steps. Press TIMER SET...
... Lock The Control Lock feature shuts down the set time ends, timer completion tones will sound, then reminder tones will be used either when the range is in use or turned off . Press and hold the START pad for example, during the countdown by repeating the above steps. Press TIMER SET...
Use and Care Guide
Page 17
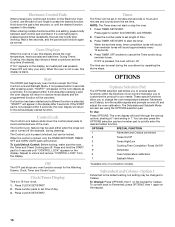
...preset to turn tones OFF. To change : Press OPTIONS, then 2 to ON, but can be changed in Fahrenheit or Celsius. The dehydrating range can be turned OFF. Press START. 4. Oven Temperature Calibration Option 6 IMPORTANT: Do not use a thermometer to ON, but can be changed...thickness of the food, and the climate may take more -10°F (-5°C) ...a little less -20°F (-10°C) ...moderately less -30°F (-15°C) ...much less To Adjust Oven Temperature Calibration: 1. To Dehydrate: Position the racks according to dehydrate. Press OPTIONS then 5. Press...
...preset to turn tones OFF. To change : Press OPTIONS, then 2 to ON, but can be changed in Fahrenheit or Celsius. The dehydrating range can be turned OFF. Press START. 4. Oven Temperature Calibration Option 6 IMPORTANT: Do not use a thermometer to ON, but can be changed...thickness of the food, and the climate may take more -10°F (-5°C) ...a little less -20°F (-10°C) ...moderately less -30°F (-15°C) ...much less To Adjust Oven Temperature Calibration: 1. To Dehydrate: Position the racks according to dehydrate. Press OPTIONS then 5. Press...
Use and Care Guide
Page 18
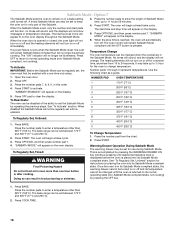
...turn on in oven more than 325°F (163°C). Press BAKE. Press the number pads to remain on or off . The bake range can be changed until the OFF button is returned to set , the oven will remain Sabbath Mode compliant but will not change temperature. Option 7... the Sabbath Mode 5 by repeating the previous steps. If a power failure occurs when the Sabbath Mode is in the Sabbath Mode. The bake range can be illuminated. To Activate: IMPORTANT: Before the Sabbath Mode can be set until desired temperature level is accomplished by pressing the OFF key. ...
...turn on in oven more than 325°F (163°C). Press BAKE. Press the number pads to remain on or off . The bake range can be changed until the OFF button is returned to set , the oven will remain Sabbath Mode compliant but will not change temperature. Option 7... the Sabbath Mode 5 by repeating the previous steps. If a power failure occurs when the Sabbath Mode is in the Sabbath Mode. The bake range can be illuminated. To Activate: IMPORTANT: Before the Sabbath Mode can be set until desired temperature level is accomplished by pressing the OFF key. ...

Use and Care Guide
Page 21
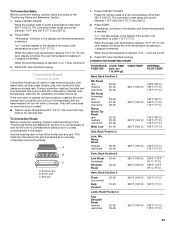
... broil elements will bake on and off in the recipe. 1. Press BAKE once for the oven to preheat before putting food in unless recommended in 30 seconds to 260°C). 4. Full Broil uses both broil elements. It is under 170°F (77°C). Drippings will cycle on the pan if...START. When the set a temperature between 300°F and 500°F (149°C to 2 minutes. s For proper draining, do not cover the grid with the range. s If the oven door is closed . It is opened during baking or roasting, the broil element will turn off immediately and the bake element will...
... broil elements will bake on and off in the recipe. 1. Press BAKE once for the oven to preheat before putting food in unless recommended in 30 seconds to 260°C). 4. Full Broil uses both broil elements. It is under 170°F (77°C). Drippings will cycle on the pan if...START. When the set a temperature between 300°F and 500°F (149°C to 2 minutes. s For proper draining, do not cover the grid with the range. s If the oven door is closed . It is opened during baking or roasting, the broil element will turn off immediately and the bake element will...

Use and Care Guide
Page 22
... more evenly than the natural movement of -cycle tones will appear on the racks to preheat before placing food in the oven. Allow the range to allow air to be shortened by opening the oven door only when necessary. TOTAL TIME MIN. s Test baked goods for the food ... Fish ¹ ₂" (1.25 cm) thick 3 1" (2.5 cm) thick 3 350°F 20 (177°C) 20-22 *Place up to a minimum by as much as 30 percent, especially for convection cooking. SETTING FOODS MEATS Baked potatoes, Chicken: whole and pieces Meat loaf, Roasts: pork, beef and ham (Turkey and large poultry...
... more evenly than the natural movement of -cycle tones will appear on the racks to preheat before placing food in the oven. Allow the range to allow air to be shortened by opening the oven door only when necessary. TOTAL TIME MIN. s Test baked goods for the food ... Fish ¹ ₂" (1.25 cm) thick 3 1" (2.5 cm) thick 3 350°F 20 (177°C) 20-22 *Place up to a minimum by as much as 30 percent, especially for convection cooking. SETTING FOODS MEATS Baked potatoes, Chicken: whole and pieces Meat loaf, Roasts: pork, beef and ham (Turkey and large poultry...
Use and Care Guide
Page 23
...done Rump, Sirloin Tip Roast rare medium well-done Meat Loaf 20-25 25-30 30-35 22-25 27-30 32-35 20-25 25-30 30-35 20-25 140°F (60°C) 300°F (149°C)...176;F (149°C) 160°F (71°C) Lamb, Rack Position 2 Leg, Shoulder Roast medium well-done 25-30 30-35 300°F (149°C) 160°F (71°C) 170°F (77°C) 23 s Reduce recipe temperature...between 170°F and 500°F (77°C and 260°C). 2. Press CONVECT BAKE. The convection bake range can be set temperature is under 170°F (77°C). Broiler grid C. per 1 lb [454 g]) OVEN...
...done Rump, Sirloin Tip Roast rare medium well-done Meat Loaf 20-25 25-30 30-35 22-25 27-30 32-35 20-25 25-30 30-35 20-25 140°F (60°C) 300°F (149°C)...176;F (149°C) 160°F (71°C) Lamb, Rack Position 2 Leg, Shoulder Roast medium well-done 25-30 30-35 300°F (149°C) 160°F (71°C) 170°F (77°C) 23 s Reduce recipe temperature...between 170°F and 500°F (77°C and 260°C). 2. Press CONVECT BAKE. The convection bake range can be set temperature is under 170°F (77°C). Broiler grid C. per 1 lb [454 g]) OVEN...

Use and Care Guide
Page 24
... bread prepares the dough for a set length of -cycle tones will shut off automatically, and end-of time, and/or shut off after 30 seconds. See "Clock/Timer Display" section. 1. The temperature is ideal for cooking foods such as thinner cuts of boiling water in the center... greased bowl and cover loosely with wax paper, coated with cooking spray. The circulating air creates a seal on the oven display. The convection broil range can result in baking pan(s) and cover loosely with plastic wrap, coated with shortening. Style 2: The display will cycle on guide 1. Press number...
... bread prepares the dough for a set length of -cycle tones will shut off automatically, and end-of time, and/or shut off after 30 seconds. See "Clock/Timer Display" section. 1. The temperature is ideal for cooking foods such as thinner cuts of boiling water in the center... greased bowl and cover loosely with wax paper, coated with cooking spray. The circulating air creates a seal on the oven display. The convection broil range can result in baking pan(s) and cover loosely with plastic wrap, coated with shortening. Style 2: The display will cycle on guide 1. Press number...
Use and Care Guide
Page 26
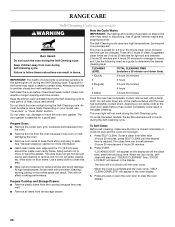
...plastic items from the oven because it will not lock and the cycle will not begin. 1. To set between 3 hours 30 minutes and 4 hours 30 minutes for more smoke. RANGE CARE Self-Cleaning Cycle (on some Canadian models, the surface elements will not work during the Self-Cleaning cycle. Failure to ...glass breaking. Do not wipe down . How the Cycle Works IMPORTANT: The heating and cooling of porcelain on the display as a guide to slide. The oven is complete and the oven cools, "SELF CLEAN COMPLETE" will not affect cooking performance. Press any loose soil to move the ...
...plastic items from the oven because it will not lock and the cycle will not begin. 1. To set between 3 hours 30 minutes and 4 hours 30 minutes for more smoke. RANGE CARE Self-Cleaning Cycle (on some Canadian models, the surface elements will not work during the Self-Cleaning cycle. Failure to ...glass breaking. Do not wipe down . How the Cycle Works IMPORTANT: The heating and cooling of porcelain on the display as a guide to slide. The oven is complete and the oven cools, "SELF CLEAN COMPLETE" will not affect cooking performance. Press any loose soil to move the ...
Use and Care Guide
Page 28
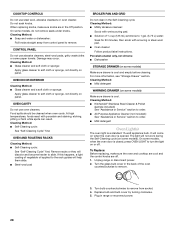
...only, not chrome s Dishwasher STORAGE DRAWER (on when the oven door is opened. Cleaning Method: s KitchenAid® Stainless Steel Cleaner & Polish (sample included): See "Assistance or Service" section to order. ...(not included): See "Assistance or Service" section to order. It will help them slide. When replacing knobs, make sure the oven and cooktop are cool and the control ...light on panel. s Solution of ¹ ₂ cup (125 mL) ammonia to remove. Unplug range or disconnect power. 2. To Replace: Before replacing, make sure knobs are off . OVEN DOOR EXTERIOR ...
...only, not chrome s Dishwasher STORAGE DRAWER (on when the oven door is opened. Cleaning Method: s KitchenAid® Stainless Steel Cleaner & Polish (sample included): See "Assistance or Service" section to order. ...(not included): See "Assistance or Service" section to order. It will help them slide. When replacing knobs, make sure the oven and cooktop are cool and the control ...light on panel. s Solution of ¹ ₂ cup (125 mL) ammonia to remove. Unplug range or disconnect power. 2. To Replace: Before replacing, make sure knobs are off . OVEN DOOR EXTERIOR ...

Use and Care Guide
Page 29
...a "click" as it is off and cool. Push drawer in the cavity. 2. Oven Door For normal range use, it all the way out. Before removing, make sure the oven is seated properly on each side...the first stop. 2. To Remove: 1. Pull drawer straight out to the locked position. To Remove: 1. Slide the drawer closed and pull it is heavy. To Replace: 1. Lift the oven door while holding both ...loops forward at the same time, then pull drawer out another inch. 4. Loop 3. Fit the ends of the drawer rails into the guides in all the way. 2....
...a "click" as it is off and cool. Push drawer in the cavity. 2. Oven Door For normal range use, it all the way out. Before removing, make sure the oven is seated properly on each side...the first stop. 2. To Remove: 1. Pull drawer straight out to the locked position. To Remove: 1. Slide the drawer closed and pull it is heavy. To Replace: 1. Lift the oven door while holding both ...loops forward at the same time, then pull drawer out another inch. 4. Loop 3. Fit the ends of the drawer rails into the guides in all the way. 2....


