
Installation Guide
Page 2
...injured if you what the potential hazard is moved. Canada Only 6 Countertop Preparation 7 INSTALLATION INSTRUCTIONS 7 Unpack Range 7 Measure for Proper Height 7 Adjust Leveling Legs 8 Install Anti-Tip Bracket 8 Electrical Connection - WARNING You can be killed. Connect anti-tip bracket to reduce the chance of others . ...followed. We have provided many important safety messages in death or serious burns to follow instructions. TABLE OF CONTENTS RANGE SAFETY 2 INSTALLATION REQUIREMENTS 3 Tools and Parts 3 Location Requirements 3 Electrical Requirements -
...injured if you what the potential hazard is moved. Canada Only 6 Countertop Preparation 7 INSTALLATION INSTRUCTIONS 7 Unpack Range 7 Measure for Proper Height 7 Adjust Leveling Legs 8 Install Anti-Tip Bracket 8 Electrical Connection - WARNING You can be killed. Connect anti-tip bracket to reduce the chance of others . ...followed. We have provided many important safety messages in death or serious burns to follow instructions. TABLE OF CONTENTS RANGE SAFETY 2 INSTALLATION REQUIREMENTS 3 Tools and Parts 3 Location Requirements 3 Electrical Requirements -

Installation Guide
Page 3
... Check that all parts are shown must be used will not discolor, delaminate or sustain other damage. A. W10113904A Location Requirements IMPORTANT: Observe all electrical connections be made by reaching over heated surface units, cabinet storage space located above the surface units should be reduced by installing a range hood or microwave range hood combination that...
... Check that all parts are shown must be used will not discolor, delaminate or sustain other damage. A. W10113904A Location Requirements IMPORTANT: Observe all electrical connections be made by reaching over heated surface units, cabinet storage space located above the surface units should be reduced by installing a range hood or microwave range hood combination that...

Installation Guide
Page 4
...cabinet. When such standard is not applicable, use the Standard for Mobile Home Construction and Safety, Title 24, HUD Part 280). See "Electrical Connection" section. front of this range is adequate as long as it must be used in a 24" (61.0 cm) base cabinet with 25" (... 36" (91.4 cm) cooktop trim height with the current standards CAN/CSA-A240-latest edition, or local codes. Slide-in Range A B A F B* D* C* G E** C D F** E A. 5³⁄₄" (14.6 cm) B. 30" (76.2 cm) C. 41³⁄₄" (106.0 cm) overall height with leveling legs screwed all the way in...
...cabinet. When such standard is not applicable, use the Standard for Mobile Home Construction and Safety, Title 24, HUD Part 280). See "Electrical Connection" section. front of this range is adequate as long as it must be used in a 24" (61.0 cm) base cabinet with 25" (... 36" (91.4 cm) cooktop trim height with the current standards CAN/CSA-A240-latest edition, or local codes. Slide-in Range A B A F B* D* C* G E** C D F** E A. 5³⁄₄" (14.6 cm) B. 30" (76.2 cm) C. 41³⁄₄" (106.0 cm) overall height with leveling legs screwed all the way in...

Installation Guide
Page 6
... supply cord (pigtail) must conform with the rating of the range (40 amps). ■ The wiring diagram is prohibited for the copper 4-wire power cord are adequate and in conformance with CSA Standard C22.1, Canadian Electrical Code, Part 1 - See the "Electrical Connection" section. ■ Allow 2 to 3 ft (61....0 cm to do so can be moved if servicing is ever necessary. ■ A UL listed conduit connector must be provided at each end of the power supply cable (at the range and at...
... supply cord (pigtail) must conform with the rating of the range (40 amps). ■ The wiring diagram is prohibited for the copper 4-wire power cord are adequate and in conformance with CSA Standard C22.1, Canadian Electrical Code, Part 1 - See the "Electrical Connection" section. ■ Allow 2 to 3 ft (61....0 cm to do so can be moved if servicing is ever necessary. ■ A UL listed conduit connector must be provided at each end of the power supply cable (at the range and at...

Installation Guide
Page 7
....2 cm) 30 ¾" (78.1 cm) ³⁄₈" (1.0 cm) If countertop opening width is required. Remove oven racks and parts package from each front corner and/or rounded edge flattened. Measure from the floor to the 4 corners of the underside of range cooktop B. Cooktop 3. ... all 4 locations corresponding to the underside of opening width is 30" (76.2 cm), no countertop preparation is greater than 30" (76.2 cm), adjust the ³⁄₈" (1.0 cm) dimension. Distance from the range. Countertop must be level. Repeat with a CSA International Certified Power...
....2 cm) 30 ¾" (78.1 cm) ³⁄₈" (1.0 cm) If countertop opening width is required. Remove oven racks and parts package from each front corner and/or rounded edge flattened. Measure from the floor to the 4 corners of the underside of range cooktop B. Cooktop 3. ... all 4 locations corresponding to the underside of opening width is 30" (76.2 cm), no countertop preparation is greater than 30" (76.2 cm), adjust the ³⁄₈" (1.0 cm) dimension. Distance from the range. Countertop must be level. Repeat with a CSA International Certified Power...
Installation Guide
Page 11
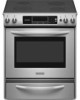
...Phillips screwdriver to the terminal block. Feed the power supply cord through the strain relief on the cord/conduit plate on bottom of range. Allow enough slack to easily attach the wiring to remove the ground-link screw from the power supply cord to the outer terminal... ground-link screw and the end of the metal ground strap (B). 5. A C B D A. Ground-link screw C. Ground-link screw C. Cut out and remove part of the ground link under the screw. 3. C D A. Feed the power supply cord through the neutral. 1. Power supply cord wires - 4-wire connection: Power Supply...
...Phillips screwdriver to the terminal block. Feed the power supply cord through the strain relief on the cord/conduit plate on bottom of range. Allow enough slack to easily attach the wiring to remove the ground-link screw from the power supply cord to the outer terminal... ground-link screw and the end of the metal ground strap (B). 5. A C B D A. Ground-link screw C. Ground-link screw C. Cut out and remove part of the ground link under the screw. 3. C D A. Feed the power supply cord through the neutral. 1. Power supply cord wires - 4-wire connection: Power Supply...

Installation Guide
Page 12
Cut out and remove part of the ground link under the screw....8328;" (1.0 cm) 3" (7.6 cm) 2. Line 1 (black) wire 12 2. Ground-link screw D. Securely tighten hex nuts. Complete electrical connection according to torque as shown in the wire to expose wires. Terminal block B. Line 2 (red) C. Line 1 (black)...32 hex nut B. Replace terminal block access cover. Depending on your type of the range. Strip the insulation back ³⁄₈" (1.0 cm) from the back of electrical supply (4-wire or 3-wire connection). 4-wire Connection: Direct Wire Use this method for...
Cut out and remove part of the ground link under the screw....8328;" (1.0 cm) 3" (7.6 cm) 2. Line 1 (black) wire 12 2. Ground-link screw D. Securely tighten hex nuts. Complete electrical connection according to torque as shown in the wire to expose wires. Terminal block B. Line 2 (red) C. Line 1 (black)...32 hex nut B. Replace terminal block access cover. Depending on your type of the range. Strip the insulation back ³⁄₈" (1.0 cm) from the back of electrical supply (4-wire or 3-wire connection). 4-wire Connection: Direct Wire Use this method for...

Installation Guide
Page 14
...: ■ Fit the ends of the range, first side to rear range foot. When moving range, slide range onto cardboard or hardboard to better view the rear range foot. 1. Complete Installation 1. or circuit breaker has not tripped. ■ Range is plugged into an outlet. ■ Electrical supply is engaged in oven. 2. Tip ... of the Use and Care Guide. 6. Verify Anti-Tip Bracket Location IMPORTANT: ■ On models with a warming drawer, the rear range foot must be killed. If range is not level, pull range forward until range is an extra part, go back through the steps to back.
...: ■ Fit the ends of the range, first side to rear range foot. When moving range, slide range onto cardboard or hardboard to better view the rear range foot. 1. Complete Installation 1. or circuit breaker has not tripped. ■ Range is plugged into an outlet. ■ Electrical supply is engaged in oven. 2. Tip ... of the Use and Care Guide. 6. Verify Anti-Tip Bracket Location IMPORTANT: ■ On models with a warming drawer, the rear range foot must be killed. If range is not level, pull range forward until range is an extra part, go back through the steps to back.

Installation Guide
Page 15
... level. Perform cleaning or maintenance. 4. Plug in death or electrical shock. 1. Perform cleaning or maintenance. 5. Using two or more people, slide range onto cardboard or hardboard to perform cleaning or maintenance. 3. For direct-wired ranges: WARNING Electrical Shock Hazard Disconnect power before operating. Replace all parts and panels before servicing. Check that anti-tip bracket...
... level. Perform cleaning or maintenance. 4. Plug in death or electrical shock. 1. Perform cleaning or maintenance. 5. Using two or more people, slide range onto cardboard or hardboard to perform cleaning or maintenance. 3. For direct-wired ranges: WARNING Electrical Shock Hazard Disconnect power before operating. Replace all parts and panels before servicing. Check that anti-tip bracket...

Use & Care Guide
Page 1
ELECTRIC RANGE ARCHITECT® SERIES II Use & Care Guide For questions about features, operation/performance, parts, accessories or service, call: 1-800-422-1230 or visit our website at www.kitchenaid.com In Canada, call for assistance, installation and service, call: 1-800-807-6777 or visit our website at www.KitchenAid.ca Table of Contents...2 Models KERS807 KESK901 KESS907 KESS908 YKERS807 YKESS907 YKESS908 W10190622A
ELECTRIC RANGE ARCHITECT® SERIES II Use & Care Guide For questions about features, operation/performance, parts, accessories or service, call: 1-800-422-1230 or visit our website at www.kitchenaid.com In Canada, call for assistance, installation and service, call: 1-800-807-6777 or visit our website at www.KitchenAid.ca Table of Contents...2 Models KERS807 KESK901 KESS907 KESS908 YKERS807 YKESS907 YKESS908 W10190622A
Use & Care Guide
Page 2
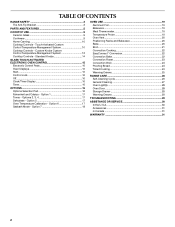
Option 1 17 Tones - Option 6 17 Sabbath Mode - TABLE OF CONTENTS RANGE SAFETY 3 The Anti-Tip Bracket 3 PARTS AND FEATURES 5 COOKTOP USE 9 Ceramic Glass 9 Cookware 9 Home Canning 10 Cooktop Controls - Standard Knobs 14 GLASS TOUCH-ACTIVATED ELECTRONIC OVEN CONTROL 15 ...Cooking 22 EasyConvect™ Conversion 22 Convection Bake 22 Convection Roast 23 Convection Broil 24 Proofing Bread 24 Timed Cooking 24 Warming Drawer 25 RANGE CARE 26 Self-Cleaning Cycle 26 General Cleaning 27 Oven Light(s 28 Oven Door 28 Storage Drawer 29 Warming Drawer 29 TROUBLESHOOTING 29 ...
Option 1 17 Tones - Option 6 17 Sabbath Mode - TABLE OF CONTENTS RANGE SAFETY 3 The Anti-Tip Bracket 3 PARTS AND FEATURES 5 COOKTOP USE 9 Ceramic Glass 9 Cookware 9 Home Canning 10 Cooktop Controls - Standard Knobs 14 GLASS TOUCH-ACTIVATED ELECTRONIC OVEN CONTROL 15 ...Cooking 22 EasyConvect™ Conversion 22 Convection Bake 22 Convection Roast 23 Convection Broil 24 Proofing Bread 24 Timed Cooking 24 Warming Drawer 25 RANGE CARE 26 Self-Cleaning Cycle 26 General Cleaning 27 Oven Light(s 28 Oven Door 28 Storage Drawer 29 Warming Drawer 29 TROUBLESHOOTING 29 ...

Use & Care Guide
Page 4
... cover the surface unit heating element. among these liners may ignite. ■ Make Sure Reflector Pans or Drip Bowls Are in a risk of electric shock, or fire. ■ Glazed Cooking Utensils - For units with one or more surface units of different size. Among those areas are oven..., damage, or move the gasket. ■ Do Not Use Oven Cleaners - No commercial oven cleaner or oven liner protective coating of any part of the range. ■ Wear Proper Apparel - Proper relationship of utensil to burner will expose a portion of the heating element to direct contact and may ...
... cover the surface unit heating element. among these liners may ignite. ■ Make Sure Reflector Pans or Drip Bowls Are in a risk of electric shock, or fire. ■ Glazed Cooking Utensils - For units with one or more surface units of different size. Among those areas are oven..., damage, or move the gasket. ■ Do Not Use Oven Cleaners - No commercial oven cleaner or oven liner protective coating of any part of the range. ■ Wear Proper Apparel - Proper relationship of utensil to burner will expose a portion of the heating element to direct contact and may ...
Use & Care Guide
Page 5
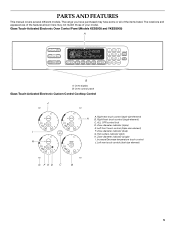
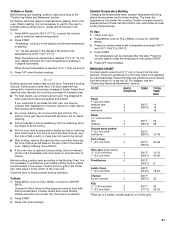
... MIN HR SEC MIN START TIME STOP TIME B A. ALL OFF/control lock D. Hot surface indicator lights H. Increase/Decrease temperature touch control H J. PARTS AND FEATURES This manual covers several different models. The range you have some or all of your model. Left rear touch control (dual-size element) G F ED C B 5 Zone diameter indicator (dual...
... MIN HR SEC MIN START TIME STOP TIME B A. ALL OFF/control lock D. Hot surface indicator lights H. Increase/Decrease temperature touch control H J. PARTS AND FEATURES This manual covers several different models. The range you have some or all of your model. Left rear touch control (dual-size element) G F ED C B 5 Zone diameter indicator (dual...
Use & Care Guide
Page 6
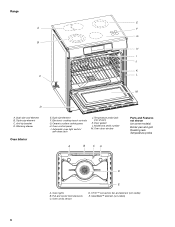
... jack (not shown) K. Dual-size element F. Model and serial number M. CleanBake™ element (not visible) 6 Anti-tip bracket D. Oven cavity sensor D. Range E A F G B H I . Triple-size element C. Oven door window A B CA Parts and Features not shown (on some models) Broiler pan and grid Roasting rack Temperature probe D E A. Full and center broil elements C. T.H.E.™ convection...
... jack (not shown) K. Dual-size element F. Model and serial number M. CleanBake™ element (not visible) 6 Anti-tip bracket D. Oven cavity sensor D. Range E A F G B H I . Triple-size element C. Oven door window A B CA Parts and Features not shown (on some models) Broiler pan and grid Roasting rack Temperature probe D E A. Full and center broil elements C. T.H.E.™ convection...

Use & Care Guide
Page 8
... feature switch Temperature probe jack (electronic knob control only) A B CA D E A. Control panel H. Oven door window Parts and Features not shown (on standard control models) Oven Interior D. Oven lights B. Dual-size element (rear element also dual... oven light switch/ self-clean latch I B J K C A. T.H.E.™ convection fan and element (on electronic control models) B. Ceramic surface cooking area E. Range D E F A G H I . Hot surfaces indicator lights G. Oven cavity sensor D. Door gasket J. Model and serial number K. Anti-tip bracket C. Selectable...
... feature switch Temperature probe jack (electronic knob control only) A B CA D E A. Control panel H. Oven door window Parts and Features not shown (on standard control models) Oven Interior D. Oven lights B. Dual-size element (rear element also dual... oven light switch/ self-clean latch I B J K C A. T.H.E.™ convection fan and element (on electronic control models) B. Ceramic surface cooking area E. Range D E F A G H I . Hot surfaces indicator lights G. Oven cavity sensor D. Door gasket J. Model and serial number K. Anti-tip bracket C. Selectable...

Use & Care Guide
Page 9
... deposits when heated. ■ To avoid damage to the cooktop, do not cook foods directly on the cooktop. ■ Do not cook popcorn in any part of the entire cooktop. ■ To avoid damage to cool down slightly. If sugary spills are clean and dry before and after each use the...
... deposits when heated. ■ To avoid damage to the cooktop, do not cook foods directly on the cooktop. ■ Do not cook popcorn in any part of the entire cooktop. ■ To avoid damage to cool down slightly. If sugary spills are clean and dry before and after each use the...

Use & Care Guide
Page 18
... will appear on for use during Sabbath Mode. NUMBER PAD 1 OVEN TEMPERATURE 170°F (77°C) "SABBATH ENABLED" will not change temperature. The bake range can be regularly set , only the number and start time and stop time is in a bake setting until desired temperature level is set for only... part of the Sabbath. Press START. Press the number pad from 16 to set between 170°F and 500°F (77°C and 260°C). ...
... will appear on for use during Sabbath Mode. NUMBER PAD 1 OVEN TEMPERATURE 170°F (77°C) "SABBATH ENABLED" will not change temperature. The bake range can be regularly set , only the number and start time and stop time is in a bake setting until desired temperature level is set for only... part of the Sabbath. Press START. Press the number pad from 16 to set between 170°F and 500°F (77°C and 260°C). ...
Use & Care Guide
Page 21
...is designed to drain juices and help avoid spatter and smoke. For diagram, see the "Positioning Racks and Bakeware" section. For baking, allow the range to 260°C). 4. Broil Broiling uses direct radiant heat to order. See "Assistance or Service" section to cook food. The bottom of food...for maximum browning coverage of fish, poultry or meat may not need to be lined with foil. To Use: 1. Close oven door. 2. Ask for Part Number W10123240. ■ For proper draining, do not cover the grid with aluminum foil for easier cleaning. ■ Trim excess fat to purchase a...
...is designed to drain juices and help avoid spatter and smoke. For diagram, see the "Positioning Racks and Bakeware" section. For baking, allow the range to 260°C). 4. Broil Broiling uses direct radiant heat to order. See "Assistance or Service" section to cook food. The bottom of food...for maximum browning coverage of fish, poultry or meat may not need to be lined with foil. To Use: 1. Close oven door. 2. Ask for Part Number W10123240. ■ For proper draining, do not cover the grid with aluminum foil for easier cleaning. ■ Trim excess fat to purchase a...
Use & Care Guide
Page 23
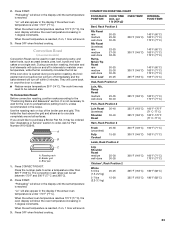
...is reached, if on once the door is under 170°F (77°C). The convection roast range can be set temperature is not necessary to preheat before putting food in, unless recommended in 1-degree ..., Sirloin Tip Roast rare medium well-done Meat Loaf 20-25 25-30 30-35 22-25 27-30 32-35 20-25 25-30 30-35 20-25 300°F (149°C) 300°F (149&#... oven temperature increasing in the recipe. Press OFF when finished cooking. Ask for the oven to wait for Part Number W10123240. When the actual oven temperature reaches 170°F (77°C), the oven display will show ...
...is reached, if on once the door is under 170°F (77°C). The convection roast range can be set temperature is not necessary to preheat before putting food in, unless recommended in 1-degree ..., Sirloin Tip Roast rare medium well-done Meat Loaf 20-25 25-30 30-35 22-25 27-30 32-35 20-25 25-30 30-35 20-25 300°F (149°C) 300°F (149&#... oven temperature increasing in the recipe. Press OFF when finished cooking. Ask for the oven to wait for Part Number W10123240. When the actual oven temperature reaches 170°F (77°C), the oven display will show ...

Use & Care Guide
Page 30
...It may save you use . If you need replacement parts If you need to higher position in the pan? Call the KitchenAid Customer eXperience Center toll free: 1-800-422-1230.... and maintenance procedures. ■ Accessory and repair parts sales. ■ Specialized customer assistance (Spanish speaking, hearing impaired, limited vision, etc.). 30 Our consultants provide assistance with the same precision used... and/or reduce baking temperature. Cooktop cooking results not what expected ■ Is the range level? See "Cookware" section. ■ Is the control knob or element controls set...
...It may save you use . If you need replacement parts If you need to higher position in the pan? Call the KitchenAid Customer eXperience Center toll free: 1-800-422-1230.... and maintenance procedures. ■ Accessory and repair parts sales. ■ Specialized customer assistance (Spanish speaking, hearing impaired, limited vision, etc.). 30 Our consultants provide assistance with the same precision used... and/or reduce baking temperature. Cooktop cooking results not what expected ■ Is the range level? See "Cookware" section. ■ Is the control knob or element controls set...


