Use & Care Guide
Page 3
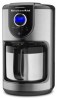
... the instructions are very important. Use handles or knobs. ■ To protect against electrical shock, do not immerse cord, plugs, or coffee maker in water or other than intended use. ■ Do not use appliance without lid properly placed on container (carafe). ■ The container (carafe) is the safety alert symbol. We have provided many important safety messages in a microwave oven. 3 COFFEE MAKER...
... the instructions are very important. Use handles or knobs. ■ To protect against electrical shock, do not immerse cord, plugs, or coffee maker in water or other than intended use. ■ Do not use appliance without lid properly placed on container (carafe). ■ The container (carafe) is the safety alert symbol. We have provided many important safety messages in a microwave oven. 3 COFFEE MAKER...
Use & Care Guide
Page 4
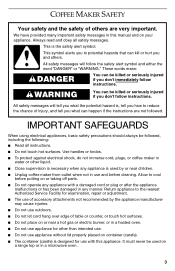
... a grounding-type 3-wire cord. ■ Do not set a hot container (carafe) on by children or tripped over unintentionally. Do not modify the plug in an outlet only one way. SAVE THESE INSTRUCTIONS ELECTRICAL REQUIREMENTS WARNING Do not use only. If a longer detachable power supply cord or extension cord is designed for household use an extension cord. NOTE: This coffee maker has a 3-prong...
... a grounding-type 3-wire cord. ■ Do not set a hot container (carafe) on by children or tripped over unintentionally. Do not modify the plug in an outlet only one way. SAVE THESE INSTRUCTIONS ELECTRICAL REQUIREMENTS WARNING Do not use only. If a longer detachable power supply cord or extension cord is designed for household use an extension cord. NOTE: This coffee maker has a 3-prong...
Use & Care Guide
Page 5
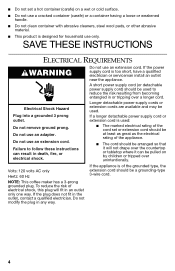
Removable water tank B. Gold Tone permanent filter H. Brew basket E. Glass carafe (on thermal carafe models only) 5 Water tank lid C. Thermal carafe (on glass carafe models only) G. Brew cavity lid D. KITCHENAID® COFFEE MAKER FEATURES B C A D E F H G A. Programmable display F.
Removable water tank B. Gold Tone permanent filter H. Brew basket E. Glass carafe (on thermal carafe models only) 5 Water tank lid C. Thermal carafe (on glass carafe models only) G. Brew cavity lid D. KITCHENAID® COFFEE MAKER FEATURES B C A D E F H G A. Programmable display F.
Use & Care Guide
Page 6
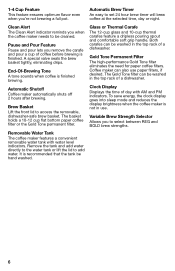
... clock display goes into sleep mode and reduces the display brightness when the coffee maker is finished. Brew Basket Lift the front lid to add water. The basket holds a 10-12 cup flat bottom paper coffee filter or the Gold Tone permanent filter. Gold Tone Permanent Filter The high-performance Gold Tone filter eliminates the need for paper coffee filters. The Gold Tone filter can be cleaned. Remove the tank and add water directly to the water tank or...
... clock display goes into sleep mode and reduces the display brightness when the coffee maker is finished. Brew Basket Lift the front lid to add water. The basket holds a 10-12 cup flat bottom paper coffee filter or the Gold Tone permanent filter. Gold Tone Permanent Filter The high-performance Gold Tone filter eliminates the need for paper coffee filters. The Gold Tone filter can be cleaned. Remove the tank and add water directly to the water tank or...
Use & Care Guide
Page 7
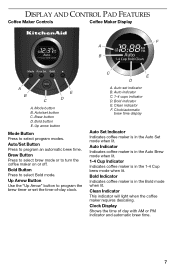
... Coffee Maker Controls Coffee Maker Display F A B A B E C D A. Auto/Set Button Press to turn the coffee maker on or off. C E D A. Clock Display Shows the time of -day clock. Mode button B. Brew Button Press to select brew mode or to program an automatic brew time. Brew button D. Bold button E. Clean indicator F. Clean Indicator This indicator will light when the coffee maker requires descaling. Auto indicator C. 1-4 cups indicator D. Up arrow button Mode Button Press to select Bold mode. Clock/automatic brew time display Auto Set Indicator Indicates coffee maker...
... Coffee Maker Controls Coffee Maker Display F A B A B E C D A. Auto/Set Button Press to turn the coffee maker on or off. C E D A. Clock Display Shows the time of -day clock. Mode button B. Brew Button Press to select brew mode or to program an automatic brew time. Brew button D. Bold button E. Clean indicator F. Clean Indicator This indicator will light when the coffee maker requires descaling. Auto indicator C. 1-4 cups indicator D. Up arrow button Mode Button Press to select Bold mode. Clock/automatic brew time display Auto Set Indicator Indicates coffee maker...
Use & Care Guide
Page 8
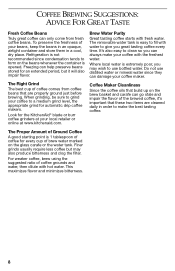
... tasting coffee starts with water to give you great tasting coffee every time. The removable water tank is easy to fill with fresh water. This maximizes flavor and minimizes bitterness. 8 It's also easy to clean so you may also produce bitterness and clog the filter. Look for the KitchenAid® blade or burr coffee grinders at your coffee to a medium grind level, the appropriate grind for automatic drip coffee makers. For weaker coffee, brew using...
... tasting coffee starts with water to give you great tasting coffee every time. The removable water tank is easy to fill with fresh water. This maximizes flavor and minimizes bitterness. 8 It's also easy to clean so you may also produce bitterness and clog the filter. Look for the KitchenAid® blade or burr coffee grinders at your coffee to a medium grind level, the appropriate grind for automatic drip coffee makers. For weaker coffee, brew using...
Use & Care Guide
Page 9
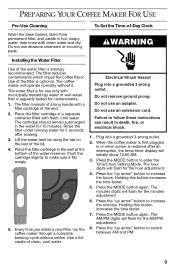
PREPARING YOUR COFFEE MAKER FOR USE Pre-Use Cleaning Wash the brew basket, Gold Tone permanent filter, and carafe in a separate container filled with fresh, cool water. Do not use an extension cord. Use of clean, cool water. Rinse the filter under running water for contaminants. 1. Press the "up arrow" button to enter the Time/Clock Setting Mode. The filter reduces contaminants which impair the coffee flavor. Place the filter cartridge in hot, soapy water, then rinse...
PREPARING YOUR COFFEE MAKER FOR USE Pre-Use Cleaning Wash the brew basket, Gold Tone permanent filter, and carafe in a separate container filled with fresh, cool water. Do not use an extension cord. Use of clean, cool water. Rinse the filter under running water for contaminants. 1. Press the "up arrow" button to enter the Time/Clock Setting Mode. The filter reduces contaminants which impair the coffee flavor. Place the filter cartridge in hot, soapy water, then rinse...
Use & Care Guide
Page 10
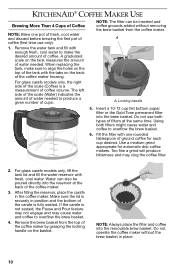
KITCHENAID® COFFEE MAKER USE Brewing More Than 4 Cups of Coffee NOTE: Brew one rounded tablespoon of coffee. A 1. A graduated scale on the tank measures the amount of coffee (first time use both filters might cause water and coffee to overflow the brew basket. 4. The left side of the scale (Water) indicates the amount of water needed . Insert a 10-12 cup flat bottom paper filter or the Gold Tone permanent filter into the removable brew basket. For glass carafe models only, lift the tank lid and...
KITCHENAID® COFFEE MAKER USE Brewing More Than 4 Cups of Coffee NOTE: Brew one rounded tablespoon of coffee. A 1. A graduated scale on the tank measures the amount of coffee (first time use both filters might cause water and coffee to overflow the brew basket. 4. The left side of the scale (Water) indicates the amount of water needed . Insert a 10-12 cup flat bottom paper filter or the Gold Tone permanent filter into the removable brew basket. For glass carafe models only, lift the tank lid and...
Use & Care Guide
Page 11
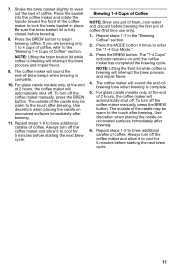
... brew basket slightly to begin brewing coffee. Press the BREW button to even out the bed of 2 hours, the coffee maker will automatically shut off the coffee maker manually, press the BREW button. Press the BREW button. The coffee maker will interrupt the brew process and impair flavor. 4. For glass carafe models only, at the end of coffee. Repeat steps 1-5 to the "Brewing 1-4 Cups of coffee (first time use only). 1. Be sure the brew basket lid is complete. 5. Repeat steps 1-7 in place. The "1-4 Cups...
... brew basket slightly to begin brewing coffee. Press the BREW button to even out the bed of 2 hours, the coffee maker will automatically shut off the coffee maker manually, press the BREW button. Press the BREW button. The coffee maker will interrupt the brew process and impair flavor. 4. For glass carafe models only, at the end of coffee. Repeat steps 1-5 to the "Brewing 1-4 Cups of coffee (first time use only). 1. Be sure the brew basket lid is complete. 5. Repeat steps 1-7 in place. The "1-4 Cups...

Use & Care Guide
Page 12
... the BREW button. Once the set brew time is complete to switch between AM and PM. 5. Holding this button increases the time faster. 3. Press the BREW button 1 time. Auto Brew 1. NOTE: The warming plate is turned off . Press the "up to remove the carafe from the coffee maker and pour a cup of coffee from the brew basket. Immediate Brew 1. The coffee maker will beep, and the Brew button light will flash. NOTE: The warming plate is removed, a special valve stops the flow of coffee before brewing...
... the BREW button. Once the set brew time is complete to switch between AM and PM. 5. Holding this button increases the time faster. 3. Press the BREW button 1 time. Auto Brew 1. NOTE: The warming plate is turned off . Press the "up to remove the carafe from the coffee maker and pour a cup of coffee from the brew basket. Immediate Brew 1. The coffee maker will beep, and the Brew button light will flash. NOTE: The warming plate is removed, a special valve stops the flow of coffee before brewing...
Use & Care Guide
Page 13
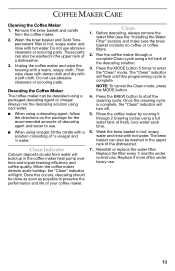
... "Clean" indicator will flash until this occurs, descaling should be descaled using a packaged descaling agent or vinegar. Before descaling, always remove the water filter (see the "Installing the Water Filter" section) and make sure the brew basket contains no coffee or coffee filters. 2. Press the BREW button to enter the "Clean" mode. Rinse the coffee maker by running it more often under normal use. Reinstall or replace the water filter. These parts can also be washed in the coffee maker heat pump over time...
... "Clean" indicator will flash until this occurs, descaling should be descaled using a packaged descaling agent or vinegar. Before descaling, always remove the water filter (see the "Installing the Water Filter" section) and make sure the brew basket contains no coffee or coffee filters. 2. Press the BREW button to enter the "Clean" mode. Rinse the coffee maker by running it more often under normal use. Reinstall or replace the water filter. These parts can also be washed in the coffee maker heat pump over time...
Use & Care Guide
Page 14
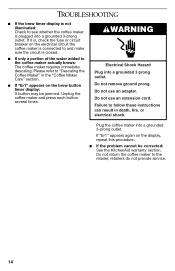
... these instructions can result in the "Coffee Maker Care" section. ■ If "Er1" appears on the brew button timer display: A button may be corrected: See the KitchenAid warranty section. Do not return the coffee maker to and make sure the circuit is plugged into a grounded 3 prong outlet. WARNING Electrical Shock Hazard Plug into a grounded 3-prong outlet. Do not use an extension cord. TROUBLESHOOTING ■ If the brew timer display...
... these instructions can result in the "Coffee Maker Care" section. ■ If "Er1" appears on the brew button timer display: A button may be corrected: See the KitchenAid warranty section. Do not return the coffee maker to and make sure the circuit is plugged into a grounded 3 prong outlet. WARNING Electrical Shock Hazard Plug into a grounded 3-prong outlet. Do not use an extension cord. TROUBLESHOOTING ■ If the brew timer display...
Use & Care Guide
Page 15
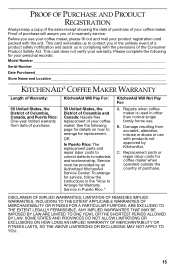
... -warranty service. KitchenAid Will Pay For: 50 United States, the District of Columbia and Canada: Hassle-free replacement of your warranty. B. KitchenAid Will Not Pay For: A. PROOF OF PURCHASE AND PRODUCT REGISTRATION Always keep a copy of the sales receipt showing the date of purchase of your personal records: Model Number Serial Number Date Purchased Store Name and Location KITCHENAID® COFFEE MAKER WARRANTY Length of Warranty: 50 United States...
... -warranty service. KitchenAid Will Pay For: 50 United States, the District of Columbia and Canada: Hassle-free replacement of your warranty. B. KitchenAid Will Not Pay For: A. PROOF OF PURCHASE AND PRODUCT REGISTRATION Always keep a copy of the sales receipt showing the date of purchase of your personal records: Model Number Serial Number Date Purchased Store Name and Location KITCHENAID® COFFEE MAKER WARRANTY Length of Warranty: 50 United States...
Use & Care Guide
Page 16
... BE REPAIR OR REPLACEMENT ACCORDING TO THE TERMS OF THIS LIMITED WARRANTY. If you are defects in Puerto Rico Your KitchenAid® coffee maker is covered by an Authorized manner, call our toll-free Customer eXperience Centre at fail within the first year of ownership, take the the KitchenAid® brand that , if your original coffee maker. numbers, please.) Your replacement unit will pay for Warranty Service...
... BE REPAIR OR REPLACEMENT ACCORDING TO THE TERMS OF THIS LIMITED WARRANTY. If you are defects in Puerto Rico Your KitchenAid® coffee maker is covered by an Authorized manner, call our toll-free Customer eXperience Centre at fail within the first year of ownership, take the the KitchenAid® brand that , if your original coffee maker. numbers, please.) Your replacement unit will pay for Warranty Service...
Use & Care Guide
Page 17
... Time), or Saturday, 10 a.m. to : Mississauga, ON L5N 0B7 Customer Satisfaction Center KitchenAid Portable Appliances P.O. Joseph, MI 49085-0218 For service information in the 50 parts for service, please review the Or contact an Authorized Service Center "Troubleshooting" section. Or write to : Customer Satisfaction Center KitchenAid Portable Appliances P.O. Joseph, MI 49085-0218 To order accessories or replacement parts for Service Outside these Locations Consult your coffee maker...
... Time), or Saturday, 10 a.m. to : Mississauga, ON L5N 0B7 Customer Satisfaction Center KitchenAid Portable Appliances P.O. Joseph, MI 49085-0218 For service information in the 50 parts for service, please review the Or contact an Authorized Service Center "Troubleshooting" section. Or write to : Customer Satisfaction Center KitchenAid Portable Appliances P.O. Joseph, MI 49085-0218 To order accessories or replacement parts for Service Outside these Locations Consult your coffee maker...


