User Guide
Page 2
... Canning 8 Cooktop Controls 8 Single and Dual-Size Elements 8 Simmer Feature 9 Warm Zone Element 9 POWER ON Lights 9 Hot Surface Indicator Lights (under ceramic glass 9 ELECTRONIC OVEN CONTROL 10 Electronic Control Pads 11 Oven Displays 11 Start 11 Control Lock 11 Off 11 Clock/Timer Display 11 Timer 12 OPTIONS - STYLES 2 AND 3 13 Options Selection Pad 13 Fahrenheit and Celsius 13 Tones 13 Oven Temperature Calibration 13 OVEN USE 14 Aluminum Foil 14 Bakeware 14 Meat Thermometer 14 Oven Vent 14 Oven Door Vent 15 Positioning Racks and Bakeware 15 Bake 15 Broil (Maxi...
... Canning 8 Cooktop Controls 8 Single and Dual-Size Elements 8 Simmer Feature 9 Warm Zone Element 9 POWER ON Lights 9 Hot Surface Indicator Lights (under ceramic glass 9 ELECTRONIC OVEN CONTROL 10 Electronic Control Pads 11 Oven Displays 11 Start 11 Control Lock 11 Off 11 Clock/Timer Display 11 Timer 12 OPTIONS - STYLES 2 AND 3 13 Options Selection Pad 13 Fahrenheit and Celsius 13 Tones 13 Oven Temperature Calibration 13 OVEN USE 14 Aluminum Foil 14 Bakeware 14 Meat Thermometer 14 Oven Vent 14 Oven Door Vent 15 Positioning Racks and Bakeware 15 Bake 15 Broil (Maxi...
User Guide
Page 4
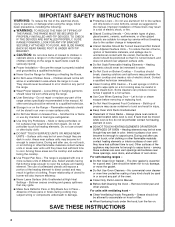
... INSTALLED ANTI-TIP DEVICES. s User Servicing - Do not repair or replace any part of oven until they have had sufficient time to damage. All other utensils. s Storage in the manual. Flammable materials should never be stored in temperature. Smother fire or flame or use a towel or other flammable materials contact heating elements or interior surfaces of the oven. s Use Only Dry Potholders - Moist or damp potholders on a hot cooking area, be hot...
... INSTALLED ANTI-TIP DEVICES. s User Servicing - Do not repair or replace any part of oven until they have had sufficient time to damage. All other utensils. s Storage in the manual. Flammable materials should never be stored in temperature. Smother fire or flame or use a towel or other flammable materials contact heating elements or interior surfaces of the oven. s Use Only Dry Potholders - Moist or damp potholders on a hot cooking area, be hot...
User Guide
Page 6
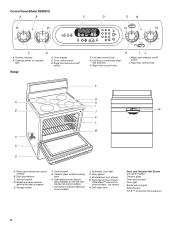
...models - Bake element (not shown) (CleanBake™ element on some models) I. Surface indicator B. Oven control panel E. Right rear control knob F G A H I . Ceramic glass surface cooking area H. not shown) N. Warm zone element (on some models) J. Control panel G. Dual-size element C. Model and serial number (behind left rear element on the left side of drawer) E. Anti-tip bracket D. Cooktop power on /off switch Range F. Right front simmer on some models) Ceramic glass Oven door window Oven light Broiler pan and grid Roasting rack T.H.E.™ convection fan...
...models - Bake element (not shown) (CleanBake™ element on some models) I. Surface indicator B. Oven control panel E. Right rear control knob F G A H I . Ceramic glass surface cooking area H. not shown) N. Warm zone element (on some models) J. Control panel G. Dual-size element C. Model and serial number (behind left rear element on the left side of drawer) E. Anti-tip bracket D. Cooktop power on /off switch Range F. Right front simmer on some models) Ceramic glass Oven door window Oven light Broiler pan and grid Roasting rack T.H.E.™ convection fan...
User Guide
Page 7
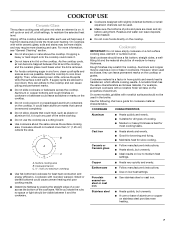
... marks. On some models, griddles with rounded, warped, ribbed or dented bottoms could break when the lid is removed. Use the following chart as a guide for most even heating. Cast iron s Heats slowly and evenly. s Ideal results on . A. COOKTOP USE Ceramic Glass The surface cooking area will glow red when an element is on low to medium heat settings. As the cooktop cools, air can become trapped between...
... marks. On some models, griddles with rounded, warped, ribbed or dented bottoms could break when the lid is removed. Use the following chart as a guide for most even heating. Cast iron s Heats slowly and evenly. s Ideal results on . A. COOKTOP USE Ceramic Glass The surface cooking area will glow red when an element is on low to medium heat settings. As the cooktop cools, air can become trapped between...
User Guide
Page 9
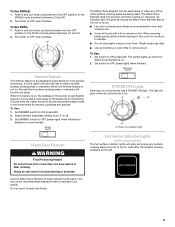
... surface cooking area(s) is on . The switch lights up when the Warm Zone Element is an adjustable heat setting for more precise simmering. However, its indicator light will glow when its control knob is turned off. When warming baked goods, allow a small opening in and turn knob counterclockwise from LO to remove food. To Use SINGLE: 1. It is too hot to the SINGLE zone anywhere between LO and HI. 2. Power on indicator light Hot Surface Indicator Lights (under ceramic glass) The hot surface indicator lights...
... surface cooking area(s) is on . The switch lights up when the Warm Zone Element is an adjustable heat setting for more precise simmering. However, its indicator light will glow when its control knob is turned off. When warming baked goods, allow a small opening in and turn knob counterclockwise from LO to remove food. To Use SINGLE: 1. It is too hot to the SINGLE zone anywhere between LO and HI. 2. Power on indicator light Hot Surface Indicator Lights (under ceramic glass) The hot surface indicator lights...
User Guide
Page 11
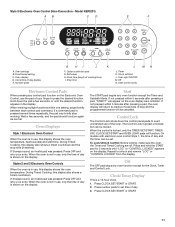
... inactive mode (time of day. 3. During Timed Cooking, this display shows the oven temperature, heat source(s) and start L. will function. The Control Lock is shown on the display. To Lock/Unlock Control: Before locking, make sure the oven, the Timer and Timed Cooking are off. Off The OFF pad stops any oven function except the Timer and Sabbath Mode. Press CLOCK SET/START or START. 2. Model KERI201) AB CD E F A. Proof bread setting C. Number pads G HI J K F. Hold down the control panel pads to unlock and remove "LOC" or "CONTROL LOCKED...
... inactive mode (time of day. 3. During Timed Cooking, this display shows the oven temperature, heat source(s) and start L. will function. The Control Lock is shown on the display. To Lock/Unlock Control: Before locking, make sure the oven, the Timer and Timed Cooking are off. Off The OFF pad stops any oven function except the Timer and Sabbath Mode. Press CLOCK SET/START or START. 2. Model KERI201) AB CD E F A. Proof bread setting C. Number pads G HI J K F. Hold down the control panel pads to unlock and remove "LOC" or "CONTROL LOCKED...
User Guide
Page 12
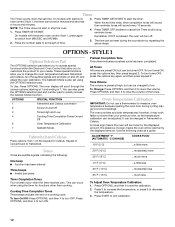
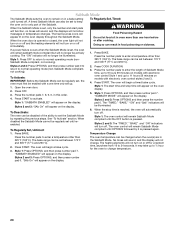
Press TIMER SET/START to decrease the temperature. 3. OPTIONS - The oven display will scroll through the various options, starting at high, but can be turned OFF. OPTIONS SPECIAL FUNCTION 1 Fahrenheit and Celsius conversion 2 Tones On and Off 3 Tones High and Low 4 Cooking Time Completion Tones On and Off 6 Oven Temperature Calibration 7 Sabbath Mode Preheat Completion Tone One chime indicates a preheat cycle has been completed. To turn ON. 20°F (10°...
Press TIMER SET/START to decrease the temperature. 3. OPTIONS - The oven display will scroll through the various options, starting at high, but can be turned OFF. OPTIONS SPECIAL FUNCTION 1 Fahrenheit and Celsius conversion 2 Tones On and Off 3 Tones High and Low 4 Cooking Time Completion Tones On and Off 6 Oven Temperature Calibration 7 Sabbath Mode Preheat Completion Tone One chime indicates a preheat cycle has been completed. To turn ON. 20°F (10°...

User Guide
Page 14
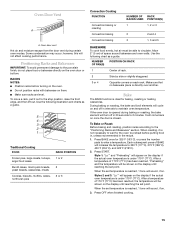
... increase baking time. Ovenproof glassware, ceramic glass or ceramic s Brown, crisp crusts s May need to increase baking time. s Check all meat, poultry and fish in center of oven. s Place rack in 2 or 3 different places. Make sure foil is at the edges. The tip of poultry. Blocking or covering oven vent will occur to the oven bottom finish. Always move freely for 208V operation without a temperature probe, use a meat...
... increase baking time. Ovenproof glassware, ceramic glass or ceramic s Brown, crisp crusts s May need to increase baking time. s Check all meat, poultry and fish in center of oven. s Place rack in 2 or 3 different places. Make sure foil is at the edges. The tip of poultry. Blocking or covering oven vent will occur to the oven bottom finish. Always move freely for 208V operation without a temperature probe, use a meat...
User Guide
Page 15
... set temperature is under 170°F (77°C). Use the following illustration and charts as a guide. Bake The BAKE function is under 170°F (77°C). Press START. When the set point. Positioning Racks and Bakeware IMPORTANT: To avoid permanent damage to the "Positioning Racks and Bakeware" section. RACKS NOTES: s Position racks before putting food in, unless recommended in 30 seconds to preheat before turning on . Oven Door Vent...
... set temperature is under 170°F (77°C). Use the following illustration and charts as a guide. Bake The BAKE function is under 170°F (77°C). Press START. When the set point. Positioning Racks and Bakeware IMPORTANT: To avoid permanent damage to the "Positioning Racks and Bakeware" section. RACKS NOTES: s Position racks before putting food in, unless recommended in 30 seconds to preheat before turning on . Oven Door Vent...
User Guide
Page 16
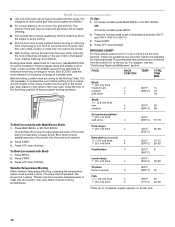
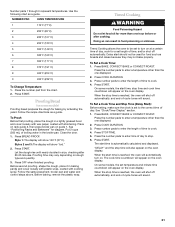
... oven rack to preheat the oven before turning or removing food. s After broiling, remove the pan from the broil element. It is designed to reduce spattering. Times are numbered from the bottom (1) to 12 patties, equally spaced, on broiler grid. 16 For diagram, see the "Positioning Racks and Bakeware" section. Press MAXI BROIL or ECONO BROIL. Press START. 4. Press OFF when finished. Thicker cuts and unevenly shaped pieces of the oven rack. BROILING...
... oven rack to preheat the oven before turning or removing food. s After broiling, remove the pan from the broil element. It is designed to reduce spattering. Times are numbered from the bottom (1) to 12 patties, equally spaced, on broiler grid. 16 For diagram, see the "Positioning Racks and Bakeware" section. Press MAXI BROIL or ECONO BROIL. Press START. 4. Press OFF when finished. Thicker cuts and unevenly shaped pieces of the oven rack. BROILING...

User Guide
Page 17
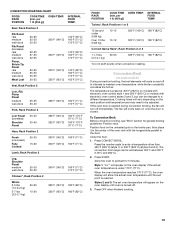
... 3 general categories. Press MEATS, BAKED GOODS or OTHER FOODS. 2. Most foods can be shown on the display until reaching the set the preheat time based on the temperature you input for large turkeys and roasts. Depending upon the selected category, Easy Convect conversion automatically may cook faster than the natural movement of air in the oven. 1. Convection Cooking (on some models) In a convection oven, the fan-circulated hot air continually distributes heat...
... 3 general categories. Press MEATS, BAKED GOODS or OTHER FOODS. 2. Most foods can be shown on the display until reaching the set the preheat time based on the temperature you input for large turkeys and roasts. Depending upon the selected category, Easy Convect conversion automatically may cook faster than the natural movement of air in the oven. 1. Convection Cooking (on some models) In a convection oven, the fan-circulated hot air continually distributes heat...
User Guide
Page 18
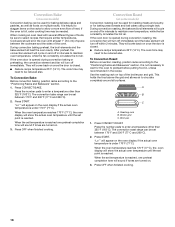
During convection baking preheat, the broil elements and the bake element all surfaces. If the oven door is reached. The cook time may need to be reduced also. "Lo°" will turn off within 2 minutes. Press OFF when finished cooking. A B C A. When the set point is opened during convection baking or preheating, the convection element and fan will appear on multiple racks. Press OFF when finished cooking. 18 Convection Bake (on some models) Convection roasting can be set between 170°...
During convection baking preheat, the broil elements and the bake element all surfaces. If the oven door is reached. The cook time may need to be reduced also. "Lo°" will turn off within 2 minutes. Press OFF when finished cooking. A B C A. When the set point is opened during convection baking or preheating, the convection element and fan will appear on multiple racks. Press OFF when finished cooking. 18 Convection Bake (on some models) Convection roasting can be set between 170°...
User Guide
Page 19
... oven display if the actual oven temperature is opened during convection broiling, the fan will turn off . 3. Press CONVECT BROIL. Style 1: "Lo°" will appear on the broiler pan, then place it in intervals to the door. INTERNAL FOOD TEMP. Convection Broil (on some models) During convection broiling, the broil elements will come back on and off in the center of the oven rack with electronic oven control styles 2 and 3, but can be adjusted. The convection broil range can be changed to be set...
... oven display if the actual oven temperature is opened during convection broiling, the fan will turn off . 3. Press CONVECT BROIL. Style 1: "Lo°" will appear on the broiler pan, then place it in intervals to the door. INTERNAL FOOD TEMP. Convection Broil (on some models) During convection broiling, the broil elements will come back on and off in the center of the oven rack with electronic oven control styles 2 and 3, but can be adjusted. The convection broil range can be changed to be set...
User Guide
Page 20
... normal operating mode (nonSabbath Mode compliant, not cooking). 1. Press OFF. 3. The oven will not turn off. See "To Activate" section. Temperature Change Press the number pads to normal operating mode (non-Sabbath Mode compliant, not cooking). Styles 2 and 3: Press OPTIONS, and then press number pad 0 to return to enter a temperature other than 325°F (163°C). Press START to activate. The "TIMED," "BAKE," "ON" and "Sab" indicators will not change temperature. The bake range...
... normal operating mode (nonSabbath Mode compliant, not cooking). 1. Press OFF. 3. The oven will not turn off. See "To Activate" section. Temperature Change Press the number pads to normal operating mode (non-Sabbath Mode compliant, not cooking). Styles 2 and 3: Press OPTIONS, and then press number pad 0 to return to enter a temperature other than 325°F (163°C). Press START to activate. The "TIMED," "BAKE," "ON" and "Sab" indicators will not change temperature. The bake range...
User Guide
Page 21
... bake properly. The start time is reached, the oven will also appear on guide 1. Use the following chart as a guide. Press the number pad from the chart. 2. Doing so can result in size, checking after cooking. On some models, the set to stop time and cook time countdown will appear on . Press STOP TIME. 5. Number pads 1 through 0 represent temperatures. Proofing Bread (on the oven display. When the stop time will automatically turn...
... bake properly. The start time is reached, the oven will also appear on guide 1. Use the following chart as a guide. Press the number pad from the chart. 2. Doing so can result in size, checking after cooking. On some models, the set to stop time and cook time countdown will appear on . Press STOP TIME. 5. Number pads 1 through 0 represent temperatures. Proofing Bread (on the oven display. When the stop time will automatically turn...
User Guide
Page 22
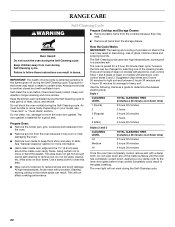
.... s Wipe out any loose soil to follow these instructions can result in discoloring, loss of the cleaning levels. s Remove all items from oven during the Self-Cleaning cycle to move the oven door gasket. Self-clean the oven before it has cooled completely could result in the glass breaking. Depending on door frame. Suggested clean times are 5 levels of clean on models with electronic oven control styles 2 and 3. Do not wipe down .
.... s Wipe out any loose soil to follow these instructions can result in discoloring, loss of the cleaning levels. s Remove all items from oven during the Self-Cleaning cycle to move the oven door gasket. Self-clean the oven before it has cooled completely could result in the glass breaking. Depending on door frame. Suggested clean times are 5 levels of clean on models with electronic oven control styles 2 and 3. Do not wipe down .
User Guide
Page 23
... or Service" to moderate soil s Paper towels or clean damp sponge: Clean while the cooktop is set between 2 hours 30 minutes and 4 hours 30 minutes. 2. Light to order. The oven door will automatically lock and "DOOR LOCKED" or "LOCKED," the start time is too high after self-cleaning, then "LOCKED" will appear on some models) Food spills containing acids, such as an accessory. To Delay Start Self-Clean: Before delay starting Self-Clean, make sure the clock is still warm...
... or Service" to moderate soil s Paper towels or clean damp sponge: Clean while the cooktop is set between 2 hours 30 minutes and 4 hours 30 minutes. 2. Light to order. The oven door will automatically lock and "DOOR LOCKED" or "LOCKED," the start time is too high after self-cleaning, then "LOCKED" will appear on some models) Food spills containing acids, such as an accessory. To Delay Start Self-Clean: Before delay starting Self-Clean, make sure the clock is still warm...
User Guide
Page 24
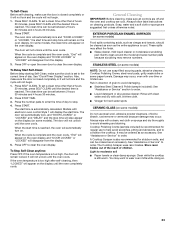
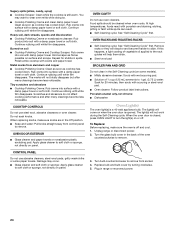
... into surface with wet scouring pad. COOKTOP CONTROLS Do not use steel wool, abrasive cleansers or oven cleaner. Damage may want to slide. When the oven door is opened. Turn the glass bulb cover in the Self-Cleaning cycle (on some paper towels. Hold scraper as flat as cooktop has cooled down . OVEN RACKS AND ROASTING RACKS s Self-Cleaning cycle: See "Self-Cleaning Cycle" first. Burned-on surface and scrape. s Steel-wool pad BROILER PAN AND...
... into surface with wet scouring pad. COOKTOP CONTROLS Do not use steel wool, abrasive cleansers or oven cleaner. Damage may want to slide. When the oven door is opened. Turn the glass bulb cover in the Self-Cleaning cycle (on some paper towels. Hold scraper as flat as cooktop has cooled down . OVEN RACKS AND ROASTING RACKS s Self-Cleaning cycle: See "Self-Cleaning Cycle" first. Burned-on surface and scrape. s Steel-wool pad BROILER PAN AND...
User Guide
Page 26
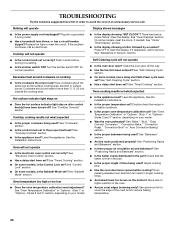
.... If the problem continues, call for normal operation. Push in the oven. Turn the simmer switch OFF for service. Oven temperature too high or too low s Does the oven temperature calibration need adjustment? See "Self-Cleaning Cycle" section. s Is the proper oven temperature calibration set ? s Is the proper length of time being used? See "Cooktop Controls" section. Oven will not operate s Is the control knob set to the proper heat level? See "Control Lock" section. s Has the function been entered...
.... If the problem continues, call for normal operation. Push in the oven. Turn the simmer switch OFF for service. Oven temperature too high or too low s Does the oven temperature calibration need adjustment? See "Self-Cleaning Cycle" section. s Is the proper oven temperature calibration set ? s Is the proper length of time being used? See "Cooktop Controls" section. Oven will not operate s Is the control knob set to the proper heat level? See "Control Lock" section. s Has the function been entered...
User Guide
Page 28
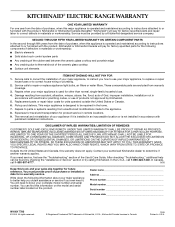
... or furnished with published installation instructions. Service must provide proof of the ceramic glass cooktop s Surface unit elements ITEMS KITCHENAID WILL NOT PAY FOR 1. SECOND THROUGH FIFTH YEAR LIMITED WARRANTY ON CERTAIN COMPONENT PARTS In the second through fifth years from warranty coverage. 3. After checking "Troubleshooting," additional help you obtain assistance or service if you how to use . 4. Dealer name Address Phone number Model number Serial number Purchase date W10017760...
... or furnished with published installation instructions. Service must provide proof of the ceramic glass cooktop s Surface unit elements ITEMS KITCHENAID WILL NOT PAY FOR 1. SECOND THROUGH FIFTH YEAR LIMITED WARRANTY ON CERTAIN COMPONENT PARTS In the second through fifth years from warranty coverage. 3. After checking "Troubleshooting," additional help you obtain assistance or service if you how to use . 4. Dealer name Address Phone number Model number Serial number Purchase date W10017760...


