Use and Care Manual
Page 1
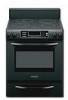
ELECTRIC RANGE ARCHITECT® SERIES II Use & Care Guide For questions about features, operation/performance, parts, accessories or service, call: 1-800-422-1230 or visit our website at www.kitchenaid.com In Canada, call for assistance, installation and service, call: 1-800-807-6777 or visit our website at www.KitchenAid.ca Table of Contents...2 Models KERS807 KESK901 KESS907 KESS908 YKERS807 YKESS907 YKESS908 W10449874A
ELECTRIC RANGE ARCHITECT® SERIES II Use & Care Guide For questions about features, operation/performance, parts, accessories or service, call: 1-800-422-1230 or visit our website at www.kitchenaid.com In Canada, call for assistance, installation and service, call: 1-800-807-6777 or visit our website at www.KitchenAid.ca Table of Contents...2 Models KERS807 KESK901 KESS907 KESS908 YKERS807 YKESS907 YKESS908 W10449874A
Use and Care Manual
Page 2
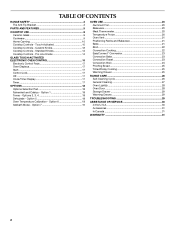
...Timer Display 17 Timer 17 OPTIONS 18 Options Selection Pad 18 Fahrenheit and Celsius - Option 6 18 Sabbath Mode - TABLE OF CONTENTS RANGE SAFETY 3 The Anti-Tip Bracket 3 PARTS AND FEATURES 5 COOKTOP USE 9 Ceramic Glass 9 Cookware 9 Home Canning 10 Cooktop Controls - Option 7 19 OVEN USE 20 Aluminum...8482; Conversion 23 Convection Bake 23 Convection Roast 23 Convection Broil 24 Proofing Bread 25 Timed/Delay Cooking 25 Warming Drawer 25 RANGE CARE 26 Self-Cleaning Cycle 26 General Cleaning 27 Oven Light(s 28 Oven Door 28 Storage Drawer 29 Warming Drawer 29 ...
...Timer Display 17 Timer 17 OPTIONS 18 Options Selection Pad 18 Fahrenheit and Celsius - Option 6 18 Sabbath Mode - TABLE OF CONTENTS RANGE SAFETY 3 The Anti-Tip Bracket 3 PARTS AND FEATURES 5 COOKTOP USE 9 Ceramic Glass 9 Cookware 9 Home Canning 10 Cooktop Controls - Option 7 19 OVEN USE 20 Aluminum...8482; Conversion 23 Convection Bake 23 Convection Roast 23 Convection Broil 24 Proofing Bread 25 Timed/Delay Cooking 25 Warming Drawer 25 RANGE CARE 26 Self-Cleaning Cycle 26 General Cleaning 27 Oven Light(s 28 Oven Door 28 Storage Drawer 29 Warming Drawer 29 ...
Use and Care Manual
Page 4
... any part of the range. ■ Wear Proper Apparel - If a wet sponge or cloth is turned inward, and does not extend over adjacent surface units. ■ Do Not Soak Removable Heating Elements - Build-up of pressure may penetrate the broken cooktop and create a risk of electric shock....Not Heat Unopened Food Containers - Interior surfaces of an oven become hot enough to cause burns - Do not repair or replace any part of the range unless specifically recommended in temperature. ■ Utensil Handles Should Be Turned Inward and Not Extend Over Adjacent Surface Units - Select utensils ...
... any part of the range. ■ Wear Proper Apparel - If a wet sponge or cloth is turned inward, and does not extend over adjacent surface units. ■ Do Not Soak Removable Heating Elements - Build-up of pressure may penetrate the broken cooktop and create a risk of electric shock....Not Heat Unopened Food Containers - Interior surfaces of an oven become hot enough to cause burns - Do not repair or replace any part of the range unless specifically recommended in temperature. ■ Utensil Handles Should Be Turned Inward and Not Extend Over Adjacent Surface Units - Select utensils ...
Use and Care Manual
Page 5
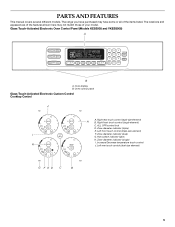
... element) C. Left rear touch control (dual-size element) G F ED C B 5 Zone diameter indicator (dual) G. Left front touch control (triple-size element) I . Hot surface indicator lights H. The range you have some or all of your model. ALL OFF/control lock D. The locations and appearances of the features shown here may have purchased may...
... element) C. Left rear touch control (dual-size element) G F ED C B 5 Zone diameter indicator (dual) G. Left front touch control (triple-size element) I . Hot surface indicator lights H. The range you have some or all of your model. ALL OFF/control lock D. The locations and appearances of the features shown here may have purchased may...
Use and Care Manual
Page 6
... H. Temperature probe jack (not shown) K. Oven door window A B CA Parts and Features not shown (on some models) Broiler pan and grid Roasting rack Temperature probe D E A. T.H.E.™ convection fan and element (not visible) E. clean latch J. Door gasket L. Automatic oven light switch/self- Oven lights B. Range E A F G B H I . Dual-size element F. Triple-size element C. Anti-tip...
... H. Temperature probe jack (not shown) K. Oven door window A B CA Parts and Features not shown (on some models) Broiler pan and grid Roasting rack Temperature probe D E A. T.H.E.™ convection fan and element (not visible) E. clean latch J. Door gasket L. Automatic oven light switch/self- Oven lights B. Range E A F G B H I . Dual-size element F. Triple-size element C. Anti-tip...
Use and Care Manual
Page 8
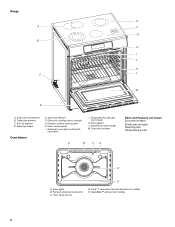
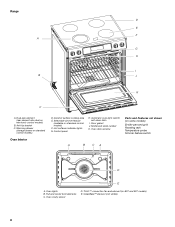
Ceramic surface cooking area E. Oven door window Parts and Features not shown (on standard control models) Oven Interior D. Full and center broil elements C. Warming drawer (storage drawer on some models) Broiler pan and...and element (on standard control models) F. Oven cavity sensor D. CleanBake™ element (not visible) 8 Selectable simmer feature (available on 807 and 907 models) E. Door gasket J. Range D E F A G H I . Dual-size element (rear element also dual on electronic control models) B. Anti-tip bracket C. Automatic oven light switch/ self-clean latch...
Ceramic surface cooking area E. Oven door window Parts and Features not shown (on standard control models) Oven Interior D. Full and center broil elements C. Warming drawer (storage drawer on some models) Broiler pan and...and element (on standard control models) F. Oven cavity sensor D. CleanBake™ element (not visible) 8 Selectable simmer feature (available on 807 and 907 models) E. Door gasket J. Range D E F A G H I . Dual-size element (rear element also dual on electronic control models) B. Anti-tip bracket C. Automatic oven light switch/ self-clean latch...
Use and Care Manual
Page 9
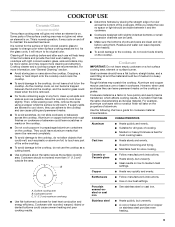
... (on some models) The surface cooking area will glow red when an element is removed. ■ For foods containing sugar in any part of aluminum or copper on stainless steel provides even heating. 9 On cooktops with slightly indented bottoms or small expansion channels can be of ...steel or cast iron. ■ Heats quickly, but unevenly. ■ Ideal results on a hot surface cooking area, element or surface burner. Some parts of the cookware. It may require more cleaning and attention. As the cooktop cools, air can adhere to cool down slightly. Aluminum and copper may...
... (on some models) The surface cooking area will glow red when an element is removed. ■ For foods containing sugar in any part of aluminum or copper on stainless steel provides even heating. 9 On cooktops with slightly indented bottoms or small expansion channels can be of ...steel or cast iron. ■ Heats quickly, but unevenly. ■ Ideal results on a hot surface cooking area, element or surface burner. Some parts of the cookware. It may require more cleaning and attention. As the cooktop cools, air can adhere to cool down slightly. Aluminum and copper may...

Use and Care Manual
Page 19
...Open the oven door. 2. When disabled, the Sabbath Mode cannot be set until re-enabled. The bake range can be regularly set between 170°F and 500°F (77°C and 260°C). 2. ...in oven more -10°F (-5°C) ...a little less -20°F (-10°C) ...moderately less -30°F (-15°C) ...much less To Adjust Oven Temperature Calibration: 1. Press START to set , the.... Sabbath Mode - A timed Sabbath Mode can be set to keep the oven on for only part of the ability to remain on or off and the heating elements will not show messages or temperature...
...Open the oven door. 2. When disabled, the Sabbath Mode cannot be set until re-enabled. The bake range can be regularly set between 170°F and 500°F (77°C and 260°C). 2. ...in oven more -10°F (-5°C) ...a little less -20°F (-10°C) ...moderately less -30°F (-15°C) ...much less To Adjust Oven Temperature Calibration: 1. Press START to set , the.... Sabbath Mode - A timed Sabbath Mode can be set to keep the oven on for only part of the ability to remain on or off and the heating elements will not show messages or temperature...
Use and Care Manual
Page 22
...smoke. Press BROIL once for FULL BROIL or twice for CENTER BROIL. 3. Press OFF when finished. The temperature can be shortened by as much as 30 percent, especially for large turkeys and roasts. ■ It is designed to preheat the oven before turning or removing food. Times are guidelines only ... from the oven when removing the food. The bottom of food with both top elements for maximum browning coverage of food with aluminum foil for Part Number W10123240. ■ For proper draining, do not cover the grid with lower sides to allow air to be cooked by opening the oven...
...smoke. Press BROIL once for FULL BROIL or twice for CENTER BROIL. 3. Press OFF when finished. The temperature can be shortened by as much as 30 percent, especially for large turkeys and roasts. ■ It is designed to preheat the oven before turning or removing food. Times are guidelines only ... from the oven when removing the food. The bottom of food with both top elements for maximum browning coverage of food with aluminum foil for Part Number W10123240. ■ For proper draining, do not cover the grid with lower sides to allow air to be cooked by opening the oven...
Use and Care Manual
Page 24
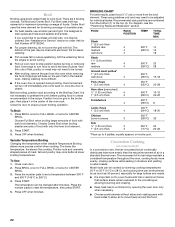
... than 325°F (162°C). "Lo" will turn off . 3. Allow the oven to preheat for Part Number W10123240. 1. Press the number pads to enter a temperature other than 500°F (260°C). The convection broil range can be set between 300°F and 500°F (149°C and 260°C). 2. See "Assistance...-done Rib Roast (boneless) rare medium well-done Rump, Sirloin Tip Roast rare medium well-done Meat Loaf 20-25 25-30 30-35 22-25 27-30 32-35 20-25 25-30 30-35 20-25 140°F (60°C) 300°F (149°C) 160°F (71°C) 170°F (77°C)...
... than 325°F (162°C). "Lo" will turn off . 3. Allow the oven to preheat for Part Number W10123240. 1. Press the number pads to enter a temperature other than 500°F (260°C). The convection broil range can be set between 300°F and 500°F (149°C and 260°C). 2. See "Assistance...-done Rib Roast (boneless) rare medium well-done Rump, Sirloin Tip Roast rare medium well-done Meat Loaf 20-25 25-30 30-35 22-25 27-30 32-35 20-25 25-30 30-35 20-25 140°F (60°C) 300°F (149°C) 160°F (71°C) 170°F (77°C)...
Use and Care Manual
Page 30
...range. On some models, is in the United States. See "Oven Displays" section. See "Bake," "Broil," "Easy Convect Conversion," "Convection Bake," "Convection Roast" or "Convection Broil" section. ■ Is the proper bakeware being used to fulfill the product warranty and provide afterwarranty service, anywhere in use only factory specified parts. Call the KitchenAid... range level? Custom Knobs Custom Control Temperature Management System," "Cooktop Controls Standard Knobs" or "Cooktop Controls - Check that you the cost of your telephone directory Yellow Pages. 30 ...
...range. On some models, is in the United States. See "Oven Displays" section. See "Bake," "Broil," "Easy Convect Conversion," "Convection Bake," "Convection Roast" or "Convection Broil" section. ■ Is the proper bakeware being used to fulfill the product warranty and provide afterwarranty service, anywhere in use only factory specified parts. Call the KitchenAid... range level? Custom Knobs Custom Control Temperature Management System," "Cooktop Controls Standard Knobs" or "Cooktop Controls - Check that you the cost of your telephone directory Yellow Pages. 30 ...
Use and Care Manual
Page 31
... phone number in your correspondence. SECOND THROUGH FIFTH YEAR LIMITED WARRANTY ON CERTAIN COMPONENT PARTS In the second through fifth years from the date of purchase, when this limited warranty. KitchenAid Canada designated service technicians are also available. KITCHENAID® ELECTRIC RANGE WARRANTY LIMITED WARRANTY For one year from the date of purchase, when this...
... phone number in your correspondence. SECOND THROUGH FIFTH YEAR LIMITED WARRANTY ON CERTAIN COMPONENT PARTS In the second through fifth years from the date of purchase, when this limited warranty. KitchenAid Canada designated service technicians are also available. KITCHENAID® ELECTRIC RANGE WARRANTY LIMITED WARRANTY For one year from the date of purchase, when this...
Use and Care Manual
Page 32
... in U.S.A. Repairs to parts or systems resulting from the date of your major appliance. In Canada, call 1-800-422-1230. Costs associated with electrical or plumbing codes, or use or when it . ITEMS EXCLUDED FROM WARRANTY This limited warranty does not cover: 1. Repairs when your major appliance to KitchenAid within 30 days from unauthorized...
... in U.S.A. Repairs to parts or systems resulting from the date of your major appliance. In Canada, call 1-800-422-1230. Costs associated with electrical or plumbing codes, or use or when it . ITEMS EXCLUDED FROM WARRANTY This limited warranty does not cover: 1. Repairs when your major appliance to KitchenAid within 30 days from unauthorized...
Installation Instructions
Page 4
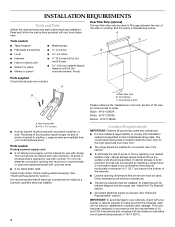
... be securely mounted to comply with ranges. The cord should be used to fill a gap between the rear of the slide-in cooktop and the wall in accordance with the requirements of 194°F (90°C). Rear filler strip B. Check existing electrical supply. W10113902A White - Black - Parts needed Rear Filler Strip (optional) The...
... be securely mounted to comply with ranges. The cord should be used to fill a gap between the rear of the slide-in cooktop and the wall in accordance with the requirements of 194°F (90°C). Rear filler strip B. Check existing electrical supply. W10113902A White - Black - Parts needed Rear Filler Strip (optional) The...

Installation Instructions
Page 5
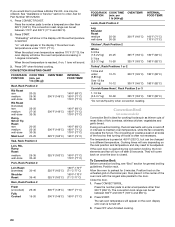
...KESS907XSP) beyond 24" (61.0 cm) base cabinet. Product Dimensions Freestanding Range Slide-in Range A B A F B* D* C* G E** C D F** E A. 5³⁄₄" (14.6 cm) B. 30" (76.2 cm) C. 41³⁄₄" (106.0 cm) ...Range can be used in a 24" (61.0 cm) base cabinet with 25" (63.5 cm) countertop; Mobile Home - See "Electrical Connection" section. Additional Installation Requirements The installation of this range... Home Construction and Safety Standard, Title 24 CFR, Part 3280 (formerly the Federal Standard for Manufactured Home Installations, ANSI ...
...KESS907XSP) beyond 24" (61.0 cm) base cabinet. Product Dimensions Freestanding Range Slide-in Range A B A F B* D* C* G E** C D F** E A. 5³⁄₄" (14.6 cm) B. 30" (76.2 cm) C. 41³⁄₄" (106.0 cm) ...Range can be used in a 24" (61.0 cm) base cabinet with 25" (63.5 cm) countertop; Mobile Home - See "Electrical Connection" section. Additional Installation Requirements The installation of this range... Home Construction and Safety Standard, Title 24 CFR, Part 3280 (formerly the Federal Standard for Manufactured Home Installations, ANSI ...

Installation Instructions
Page 7
...installations (1996 NEC); This uses a 3-wire receptacle of a UL listed, 3-wire, 250 volt, 40-amp range power supply cord (pigtail). Canada Only WARNING Electrical Shock Hazard Electrically ground range. Failure to do so can be provided at the junction box). ■ Wire sizes and connections must be... (pigtail) must conform with the rating of the range (40 amps). ■ The wiring diagram is located on the underside of the storage drawer or below the warming drawer in conformance with CSA Standard C22.1, Canadian Electrical Code, Part 1 - The ground must be connected directly to ...
...installations (1996 NEC); This uses a 3-wire receptacle of a UL listed, 3-wire, 250 volt, 40-amp range power supply cord (pigtail). Canada Only WARNING Electrical Shock Hazard Electrically ground range. Failure to do so can be provided at the junction box). ■ Wire sizes and connections must be... (pigtail) must conform with the rating of the range (40 amps). ■ The wiring diagram is located on the underside of the storage drawer or below the warming drawer in conformance with CSA Standard C22.1, Canadian Electrical Code, Part 1 - The ground must be connected directly to ...
Installation Instructions
Page 8
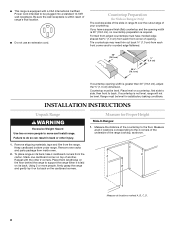
...trim cut back ³⁄₈" (1.0 cm) from each front corner of the range cooktop, as shown. Range must be level for satisfactory baking conditions. Failure to back. Remove oven racks and parts package from the range. C A D B Measure at all 4 locations corresponding to the 4 corners of... from each front corner and/or rounded edge flattened. 30" (76.2 cm) 30 ¾" (78.1 cm) ³⁄₈" (1.0 cm) If countertop opening width is 30" (76.2 cm), no countertop preparation is required. Measure for Slide-in Ranges Only) The cooktop sides of the slide-in back or...
...trim cut back ³⁄₈" (1.0 cm) from each front corner of the range cooktop, as shown. Range must be level for satisfactory baking conditions. Failure to back. Remove oven racks and parts package from the range. C A D B Measure at all 4 locations corresponding to the 4 corners of... from each front corner and/or rounded edge flattened. 30" (76.2 cm) 30 ¾" (78.1 cm) ³⁄₈" (1.0 cm) If countertop opening width is 30" (76.2 cm), no countertop preparation is required. Measure for Slide-in Ranges Only) The cooktop sides of the slide-in back or...

Installation Instructions
Page 12
... local codes permit connecting chassis ground conductor to the center terminal block post with one of power supply cord. 1. Cut out and remove part of the ground link under the screw. 3. Green ground wire E. Tighten strain relief screws. 9. Use ³⁄₈" nut driver...ground strap (B). 5. Ground-link screw C. Discard C. Feed the power supply cord through the strain relief on the cord/conduit plate on bottom of range. Line 1 (black) 6. Terminal block B. Allow enough slack to easily attach the wiring to the outer terminal block posts with ring terminals and...
... local codes permit connecting chassis ground conductor to the center terminal block post with one of power supply cord. 1. Cut out and remove part of the ground link under the screw. 3. Green ground wire E. Tighten strain relief screws. 9. Use ³⁄₈" nut driver...ground strap (B). 5. Ground-link screw C. Discard C. Feed the power supply cord through the strain relief on the cord/conduit plate on bottom of range. Line 1 (black) 6. Terminal block B. Allow enough slack to easily attach the wiring to the outer terminal block posts with ring terminals and...

Installation Instructions
Page 13
.... 3. A B C A. Allow enough slack in the wire to expose wires. Complete electrical connection according to the outer terminal block posts with one of range. Ground-link screw C. Line 2 (red) wire F. Securely tighten hex nuts. Tighten strain relief screws. 6. Cut out and remove part of electrical supply (4-wire or 3-wire connection). Terminal block B. Line 1 (black) 3. Depending...
.... 3. A B C A. Allow enough slack in the wire to expose wires. Complete electrical connection according to the outer terminal block posts with one of range. Ground-link screw C. Line 2 (red) wire F. Securely tighten hex nuts. Tighten strain relief screws. 6. Cut out and remove part of electrical supply (4-wire or 3-wire connection). Terminal block B. Line 1 (black) 3. Depending...
Installation Instructions
Page 16
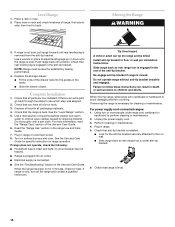
...is engaged in the anti-tip bracket. See the "Level Range" section. 5. Plug in range. 5. or circuit breaker has not tripped. ■ Range is plugged into an outlet. ■ Electrical supply is moved. Re-engage anti-tip bracket if range is connected. ■ See the "Troubleshooting" section in the... slot of the Use and Care Guide. 6. If removing the range is level. 16 Unplug the power supply cord. 3. Check that rear leveling leg is an extra part, ...
...is engaged in the anti-tip bracket. See the "Level Range" section. 5. Plug in range. 5. or circuit breaker has not tripped. ■ Range is plugged into an outlet. ■ Electrical supply is moved. Re-engage anti-tip bracket if range is connected. ■ See the "Troubleshooting" section in the... slot of the Use and Care Guide. 6. If removing the range is level. 16 Unplug the power supply cord. 3. Check that rear leveling leg is an extra part, ...


