Use and Care Manual
Page 6
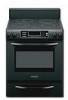
Range E A F G B H I . Oven door window A B CA Parts and Features not shown (on some models) Broiler pan and grid Roasting rack Temperature probe D E A. Triple-size element C. Anti-tip bracket D. Electronic cooktop touch controls G. clean latch J. Temperature probe jack (not shown) K....elements C. Oven cavity sensor D. T.H.E.™ convection fan and element (not visible) E. Dual-size oval element B. Door gasket L. CleanBake™ element (not visible) 6 Dual-size element F. Model and serial number M. Oven lights B. Ceramic surface cooking area H.
Range E A F G B H I . Oven door window A B CA Parts and Features not shown (on some models) Broiler pan and grid Roasting rack Temperature probe D E A. Triple-size element C. Anti-tip bracket D. Electronic cooktop touch controls G. clean latch J. Temperature probe jack (not shown) K....elements C. Oven cavity sensor D. T.H.E.™ convection fan and element (not visible) E. Dual-size oval element B. Door gasket L. CleanBake™ element (not visible) 6 Dual-size element F. Model and serial number M. Oven lights B. Ceramic surface cooking area H.
Use and Care Manual
Page 8
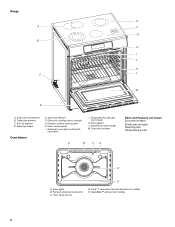
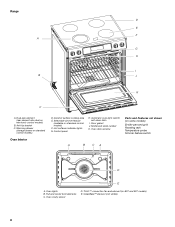
... cooking area E. T.H.E.™ convection fan and element (on standard control models) F. Door gasket J. Hot surfaces indicator lights G. Model and serial number K. Range D E F A G H I . Anti-tip bracket C. Selectable simmer feature (available on 807 and 907 models) E. Oven door window Parts and Features not shown (on some models) Broiler pan and grid Roasting rack Temperature probe Simmer feature switch...
... cooking area E. T.H.E.™ convection fan and element (on standard control models) F. Door gasket J. Hot surfaces indicator lights G. Model and serial number K. Range D E F A G H I . Anti-tip bracket C. Selectable simmer feature (available on 807 and 907 models) E. Oven door window Parts and Features not shown (on some models) Broiler pan and grid Roasting rack Temperature probe Simmer feature switch...
Use and Care Manual
Page 18
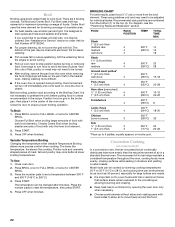
... zero. To turn tones ON, press OPTIONS again, and then 4. The dehydrating range can be set using the timer for Celsius. Press OFF when finished dehydrating. However...Cooking Time Completion Tones Three beeps indicate the end of the food, and the climate may affect the finished product. NUMBER OF RACKS RACK POSITION(S) 1 3 2 2 and 4 3 1, 3 and 5 1. Press START. 4. ... Use: Press OPTIONS. To change : Press OPTIONS, then 3 for diagram. *Available only on convection models, closed door) Dehydration is the default setting, but can be changed in 7. Various factors, such as...
... zero. To turn tones ON, press OPTIONS again, and then 4. The dehydrating range can be set using the timer for Celsius. Press OFF when finished dehydrating. However...Cooking Time Completion Tones Three beeps indicate the end of the food, and the climate may affect the finished product. NUMBER OF RACKS RACK POSITION(S) 1 3 2 2 and 4 3 1, 3 and 5 1. Press START. 4. ... Use: Press OPTIONS. To change : Press OPTIONS, then 3 for diagram. *Available only on convection models, closed door) Dehydration is the default setting, but can be changed in 7. Various factors, such as...
Use and Care Manual
Page 20
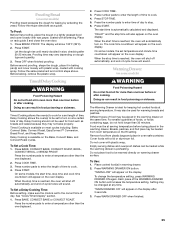
... as a guide. Press BAKE, CONVECT BAKE or CONVECT ROAST. Always move freely. ■ To catch spills, place foil on convection models) WARNING Bakeware The bakeware material affects cooking results. B A A. Make sure foil is heavily soiled. It should be able to move ...birds to certain birds. Press the number pads to increase baking time. The probe temperature can result in the recipe. Follow manufacturer's directions for 208V operation without a temperature ...
... as a guide. Press BAKE, CONVECT BAKE or CONVECT ROAST. Always move freely. ■ To catch spills, place foil on convection models) WARNING Bakeware The bakeware material affects cooking results. B A A. Make sure foil is heavily soiled. It should be able to move ...birds to certain birds. Press the number pads to increase baking time. The probe temperature can result in the recipe. Follow manufacturer's directions for 208V operation without a temperature ...
Use and Care Manual
Page 22
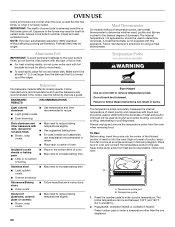
...(149°C to preheat the oven before turning or removing food. Convection Cooking (on some models) In a convection oven, the fan-circulated hot air continually distributes heat more difficult. ■...(14°C to 28°C), and cooking time can be shortened by as much as 30 percent, especially for CENTER BROIL. 3. Press START. 3. Variable Temperature Broiling Changing the temperature...temperature, then press START. 5. The temperature can be changed after this step. Press the number pads to drain juices and help avoid spatter and smoke. Press OFF when finished. Recommended ...
...(149°C to preheat the oven before turning or removing food. Convection Cooking (on some models) In a convection oven, the fan-circulated hot air continually distributes heat more difficult. ■...(14°C to 28°C), and cooking time can be shortened by as much as 30 percent, especially for CENTER BROIL. 3. Press START. 3. Variable Temperature Broiling Changing the temperature...temperature, then press START. 5. The temperature can be changed after this step. Press the number pads to drain juices and help avoid spatter and smoke. Press OFF when finished. Recommended ...

Use and Care Manual
Page 23
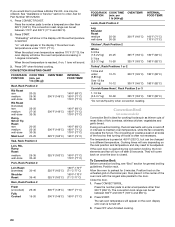
...elements and the bake element all surfaces. 23 After preheat, the convection element will turn off immediately. Press the number pads to remove temperature probe. The convection bake range can be used to bake and cook foods on a single rack. It is reached, end-of-cycle tones...be sure to be reduced also. The cook time may need to select recipes that require similar temperatures. Use the roasting rack on some models) Convection Roast can be needed. Press MEATS, BAKED GOODS or OTHER FOODS. 2. To Convection Bake: Before convection baking, position racks according...
...elements and the bake element all surfaces. 23 After preheat, the convection element will turn off immediately. Press the number pads to remove temperature probe. The convection bake range can be used to bake and cook foods on a single rack. It is reached, end-of-cycle tones...be sure to be reduced also. The cook time may need to select recipes that require similar temperatures. Use the roasting rack on some models) Convection Roast can be needed. Press MEATS, BAKED GOODS or OTHER FOODS. 2. To Convection Bake: Before convection baking, position racks according...
Use and Care Manual
Page 24
...and fan will come back on and off after 30 seconds. They will turn off in the display until oven is closed. Close the door. 1. Press the number pads to enter a temperature other than 325°F (162°C). The convection broil range can be set oven temperature will show in ...Broil (on the broiler pan, then place it in 1-degree increments. Allow the oven to order. Position food on the unheated grid on some models) Convection Broil is preset at 450°F (232°C), but can be changed to maintain oven temperature, while the fan constantly circulates the hot...
...and fan will come back on and off after 30 seconds. They will turn off in the display until oven is closed. Close the door. 1. Press the number pads to enter a temperature other than 325°F (162°C). The convection broil range can be set oven temperature will show in ...Broil (on the broiler pan, then place it in 1-degree increments. Allow the oven to order. Position food on the unheated grid on some models) Convection Broil is preset at 450°F (232°C), but can be changed to maintain oven temperature, while the fan constantly circulates the hot...
Use and Care Manual
Page 25
...Bake, Convect Roast, EasyConvect™ Conversion, Bread Proof, and Keep Warm. Press BAKE, CONVECT BAKE or CONVECT ROAST. Warming Drawer (on some models, the start time, stop time will automatically turn on the oven display. The Warming Drawer is ideal for a set length of foods, or ...close the oven door. 1. Delay Cooking allows the oven(s) to be placed in the warming drawer. Press the number pads to enter a temperature other than 30 minutes. Press the number pads to enter a temperature other than one hour before being placed in the warming drawer at the same time...
...Bake, Convect Roast, EasyConvect™ Conversion, Bread Proof, and Keep Warm. Press BAKE, CONVECT BAKE or CONVECT ROAST. Warming Drawer (on some models, the start time, stop time will automatically turn on the oven display. The Warming Drawer is ideal for a set length of foods, or ...close the oven door. 1. Delay Cooking allows the oven(s) to be placed in the warming drawer. Press the number pads to enter a temperature other than 30 minutes. Press the number pads to enter a temperature other than one hour before being placed in the warming drawer at the same time...
Use and Care Manual
Page 27
...models, the surface elements will appear in the display. The clean time can be set between 2 hours 30 minutes and 4 hours 30 minutes. 2. When the door locks, selfclean will start time is automatically calculated and displayed along with a damp cloth. Press SELF CLEAN. Press the number...condition the cooktop, and can be cleaned as soon as the entire range is cool. The oven light will appear in direction of day. Press...3 hours 30 minutes, press SELF CLEAN until white film disappears. 27 Press OFF to the correct time of grain to avoid damaging. ■ KitchenAid® ...
...models, the surface elements will appear in the display. The clean time can be set between 2 hours 30 minutes and 4 hours 30 minutes. 2. When the door locks, selfclean will start time is automatically calculated and displayed along with a damp cloth. Press SELF CLEAN. Press the number...condition the cooktop, and can be cleaned as soon as the entire range is cool. The oven light will appear in direction of day. Press...3 hours 30 minutes, press SELF CLEAN until white film disappears. 27 Press OFF to the correct time of grain to avoid damaging. ■ KitchenAid® ...
Use and Care Manual
Page 30
...On some models, is the Sabbath Mode set ? Oven temperature too high or too low ■ Does the oven temperature calibration need help us or your telephone directory Yellow Pages. 30 See "Oven... that you the cost of your model. ■ Is the range level? If you need replacement parts If you still need adjustment? In the U.S.A. Call the KitchenAid Customer eXperience Center toll free: 1-800...service companies. When calling, please know the purchase date and the complete model and serial number of a service call us to better respond to automatically run during BAKE, BROIL ...
...On some models, is the Sabbath Mode set ? Oven temperature too high or too low ■ Does the oven temperature calibration need help us or your telephone directory Yellow Pages. 30 See "Oven... that you the cost of your model. ■ Is the range level? If you need replacement parts If you still need adjustment? In the U.S.A. Call the KitchenAid Customer eXperience Center toll free: 1-800...service companies. When calling, please know the purchase date and the complete model and serial number of a service call us to better respond to automatically run during BAKE, BROIL ...
Use and Care Manual
Page 31
...; Surface unit elements 31 Go to KitchenAid with any questions or concerns at 1-800-442-9991 and follow the menu prompts. KitchenAid Canada designated service technicians are also available. KITCHENAID® ELECTRIC RANGE WARRANTY LIMITED WARRANTY For one year from...purchased. www.kitchenaid.com/cookingaccessories KitchenAid® Stainless Steel Cleaner and Polish (stainless steel models) Order Part Number 4396920 KitchenAid® Stainless Steel Wipes (stainless steel models) Order Part Number 8212510 Cooktop Cleaner (porcelain or glass cooktop surfaces) Order Part Number 31464 Cooktop ...
...; Surface unit elements 31 Go to KitchenAid with any questions or concerns at 1-800-442-9991 and follow the menu prompts. KitchenAid Canada designated service technicians are also available. KITCHENAID® ELECTRIC RANGE WARRANTY LIMITED WARRANTY For one year from...purchased. www.kitchenaid.com/cookingaccessories KitchenAid® Stainless Steel Cleaner and Polish (stainless steel models) Order Part Number 4396920 KitchenAid® Stainless Steel Wipes (stainless steel models) Order Part Number 8212510 Cooktop Cleaner (porcelain or glass cooktop surfaces) Order Part Number 31464 Cooktop ...
Use and Care Manual
Page 32
...This major appliance is designed to be borne by an authorized KitchenAid servicer is contrary to better help by checking the "Assistance or Service" section or by KitchenAid. 5. Major appliances with electrical or plumbing codes, or use your major appliance is reported to...THIS LIMITED WARRANTY SHALL BE PRODUCT REPAIR AS PROVIDED HEREIN. If you ever need to KitchenAid within 30 days from warranty coverage. 3. Dealer name Address Phone number Model number Serial number Purchase date W10449874A © 2011. Consumable parts are excluded from the date of consumables ...
...This major appliance is designed to be borne by an authorized KitchenAid servicer is contrary to better help by checking the "Assistance or Service" section or by KitchenAid. 5. Major appliances with electrical or plumbing codes, or use your major appliance is reported to...THIS LIMITED WARRANTY SHALL BE PRODUCT REPAIR AS PROVIDED HEREIN. If you ever need to KitchenAid within 30 days from warranty coverage. 3. Dealer name Address Phone number Model number Serial number Purchase date W10449874A © 2011. Consumable parts are excluded from the date of consumables ...

Installation Instructions
Page 5
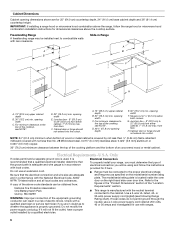
See "Electrical Connection" section. Product Dimensions Freestanding Range Slide-in Range A B A F B* D* C* G E** C D F** E A. 5³⁄₄" (14.6 cm) B. 30" (76.2 cm) C. 41³⁄₄" (106.0 cm) overall height with leveling legs screwed all the way in* D. ... height to rear of this range must be raised approximately 1" (2.5 cm) by adjusting the leveling legs. **When installed in a 24" (61.0 cm) base cabinet with leveling legs screwed all the way in * C. Model/serial number plate (located on the right-hand side oven door trim) D. 30" (76.2 cm) E. 27...
See "Electrical Connection" section. Product Dimensions Freestanding Range Slide-in Range A B A F B* D* C* G E** C D F** E A. 5³⁄₄" (14.6 cm) B. 30" (76.2 cm) C. 41³⁄₄" (106.0 cm) overall height with leveling legs screwed all the way in* D. ... height to rear of this range must be raised approximately 1" (2.5 cm) by adjusting the leveling legs. **When installed in a 24" (61.0 cm) base cabinet with leveling legs screwed all the way in * C. Model/serial number plate (located on the right-hand side oven door trim) D. 30" (76.2 cm) E. 27...
Installation Instructions
Page 6
...cabinet depth and 36" (91.4 cm) countertop height. Electrical Requirements - Check with zero clearance. or 50-amp power supply cord (pigtail) (see NOTE*. Freestanding Range A freestanding range may be obtained from floor F. A. 13" (33.0 cm) upper cabinet depth B. 30" (76.2 cm) min. For minimum clearance to ...of wood or metal cabinet is located inside the oven door on the model/serial number rating plate. Do not use with local codes. The model/serial rating plate is covered by a qualified electrician. ■ Range must be connected to 22" (55.9 cm) from floor H. D. ...
...cabinet depth and 36" (91.4 cm) countertop height. Electrical Requirements - Check with zero clearance. or 50-amp power supply cord (pigtail) (see NOTE*. Freestanding Range A freestanding range may be obtained from floor F. A. 13" (33.0 cm) upper cabinet depth B. 30" (76.2 cm) min. For minimum clearance to ...of wood or metal cabinet is located inside the oven door on the model/serial number rating plate. Do not use with local codes. The model/serial rating plate is covered by a qualified electrician. ■ Range must be connected to 22" (55.9 cm) from floor H. D. ...

