Use & Care Guide
Page 4
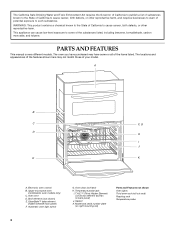
... serial number plate (on right mounting rail) Parts and Features not shown Oven lights Third oven rack (roll out rack) Roasting rack Temperature probe 4 Upper microwave oven (combination oven models only) C. CleanBake™ bake element (hidden beneath floor panel) F. WARNING: This product contains a chemical known to the State of California to...
... serial number plate (on right mounting rail) Parts and Features not shown Oven lights Third oven rack (roll out rack) Roasting rack Temperature probe 4 Upper microwave oven (combination oven models only) C. CleanBake™ bake element (hidden beneath floor panel) F. WARNING: This product contains a chemical known to the State of California to...

Use & Care Guide
Page 5
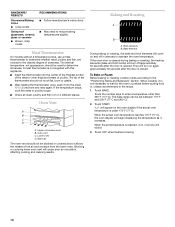
...Timed Cooking, this display shows the upper oven heat source(s), cooking power, quantities, weights and/or help prompts and time countdown. Microwave oven cavity symbol B. If "Err" appears on the lower oven display, an error condition has occurred. Start START key begins ...Err" appears on the lower oven display, an error condition has occurred. Lower oven display C. Self-clean I J KL F. Timed cooking J. will be flashing the message "clock-enter time." Start/control lock L. Microwave controls (see separate Use and Care Guide) O. See the "Assistance or Service" section. ...
...Timed Cooking, this display shows the upper oven heat source(s), cooking power, quantities, weights and/or help prompts and time countdown. Microwave oven cavity symbol B. If "Err" appears on the lower oven display, an error condition has occurred. Start START key begins ...Err" appears on the lower oven display, an error condition has occurred. Lower oven display C. Self-clean I J KL F. Timed cooking J. will be flashing the message "clock-enter time." Start/control lock L. Microwave controls (see separate Use and Care Guide) O. See the "Assistance or Service" section. ...
Use & Care Guide
Page 10
Upper microwave oven B. Lower oven D. If the oven door is not supplied with this appliance. ■ Insert the thermometer into the meat ½" (1.3 cm) more and read ... the actual oven temperature reaches 170°F (77°C), the oven display will turn on , one tone will cause poor air circulation, affecting cooking and cleaning results. A meat thermometer is opened . If the temperature drops, cook the meat or poultry longer. ■ Check all meat, poultry and fish in the recipe...
Upper microwave oven B. Lower oven D. If the oven door is not supplied with this appliance. ■ Insert the thermometer into the meat ½" (1.3 cm) more and read ... the actual oven temperature reaches 170°F (77°C), the oven display will turn on , one tone will cause poor air circulation, affecting cooking and cleaning results. A meat thermometer is opened . If the temperature drops, cook the meat or poultry longer. ■ Check all meat, poultry and fish in the recipe...
Use & Care Guide
Page 21
... damage to the finish of your major appliance, to instruct you on how to use of consumables or cleaning products not approved by an authorized KitchenAid servicer is not available. 9. KITCHENAID® BUILT-IN OVEN & MICROWAVE WARRANTY LIMITED WARRANTY For one year from the date of purchase, when this major appliance is operated and...
... damage to the finish of your major appliance, to instruct you on how to use of consumables or cleaning products not approved by an authorized KitchenAid servicer is not available. 9. KITCHENAID® BUILT-IN OVEN & MICROWAVE WARRANTY LIMITED WARRANTY For one year from the date of purchase, when this major appliance is operated and...
Installation Guide
Page 1
...instructions. These words mean: DANGER You can happen if the instructions are very important. INSTALLATION INSTRUCTIONS 27" (68.6 CM) AND 30" (76.2 CM) ELECTRIC BUILT-IN MICROWAVE/OVEN COMBINATION INSTRUCTIONS D'INSTALLATION FOUR CONVENTIONNEL ET FOUR À MICRO-ONDES ÉLECTRIQUES, COMBIN&#...201;S ET ENCASTRÉS DE 27" (68,6 CM) ET 30" (76,2 CM) Table of Contents/Table des matières BUILT-IN MICROWAVE/OVEN COMBINATION SAFETY...........1 INSTALLATION REQUIREMENTS 2 Tools and Parts 2 Location Requirements 2 Electrical ...
...instructions. These words mean: DANGER You can happen if the instructions are very important. INSTALLATION INSTRUCTIONS 27" (68.6 CM) AND 30" (76.2 CM) ELECTRIC BUILT-IN MICROWAVE/OVEN COMBINATION INSTRUCTIONS D'INSTALLATION FOUR CONVENTIONNEL ET FOUR À MICRO-ONDES ÉLECTRIQUES, COMBIN&#...201;S ET ENCASTRÉS DE 27" (68,6 CM) ET 30" (76,2 CM) Table of Contents/Table des matières BUILT-IN MICROWAVE/OVEN COMBINATION SAFETY...........1 INSTALLATION REQUIREMENTS 2 Tools and Parts 2 Location Requirements 2 Electrical ...
Installation Guide
Page 2
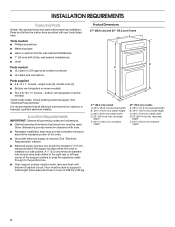
...; Oven support surface must be used. INSTALLATION REQUIREMENTS Tools and Parts Gather the required tools and parts before starting installation. Product Dimensions 27" (68.6 cm) and 30" (76.2 cm) Ovens A B E D C 27" (68.6 cm) models A. 25 64.3 cm) recessed width B. 42 107.5 cm) overall height C. 26³⁄₄" (67.9 cm) overall width...; Recessed installation area must provide complete enclosure around the recessed portion of the support surface to pass the appliance cable through to support a total weight (microwave and built-in a wall cabinet.
...; Oven support surface must be used. INSTALLATION REQUIREMENTS Tools and Parts Gather the required tools and parts before starting installation. Product Dimensions 27" (68.6 cm) and 30" (76.2 cm) Ovens A B E D C 27" (68.6 cm) models A. 25 64.3 cm) recessed width B. 42 107.5 cm) overall height C. 26³⁄₄" (67.9 cm) overall width...; Recessed installation area must provide complete enclosure around the recessed portion of the support surface to pass the appliance cable through to support a total weight (microwave and built-in a wall cabinet.
Installation Guide
Page 4
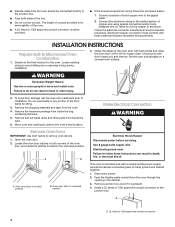
Connect the aluminum wiring to the unlocked position. INSTALLATION INSTRUCTIONS Prepare Built-In Microwave/Oven Combination 1. Decide on a covered work surface. Lift and pull oven door toward you and remove. To avoid floor damage, set aside racks and other ...
Connect the aluminum wiring to the unlocked position. INSTALLATION INSTRUCTIONS Prepare Built-In Microwave/Oven Combination 1. Decide on a covered work surface. Lift and pull oven door toward you and remove. To avoid floor damage, set aside racks and other ...
Installation Guide
Page 6
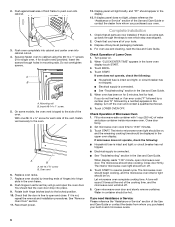
...hinge slots in as far as they will go back through holes in the display, turn off . 5. Complete Installation 1. For oven use and cleaning, read the Use and Care Guide. If you do not feel heat or if an error code ("F" followed by a number plus "E" followed ... 2. Rotate both hinge latches back to push oven into cabinet cutout. 4. Touch BROIL. 4. When display reads "1:00" minute, open and close. Let microwave oven complete cooking time. Check that the door is connected. ■ See "Troubleshooting" section in the lower oven display touch START. 3. Check Operation of...
...hinge slots in as far as they will go back through holes in the display, turn off . 5. Complete Installation 1. For oven use and cleaning, read the Use and Care Guide. If you do not feel heat or if an error code ("F" followed by a number plus "E" followed ... 2. Rotate both hinge latches back to push oven into cabinet cutout. 4. Touch BROIL. 4. When display reads "1:00" minute, open and close. Let microwave oven complete cooking time. Check that the door is connected. ■ See "Troubleshooting" section in the lower oven display touch START. 3. Check Operation of...

