Installation Instructions
Page 1
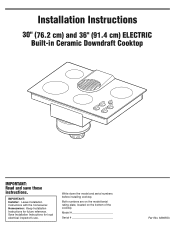
Write down the model and serial numbers before installing cooktop. Both numbers are on the model/serial rating plate, located on the bottom of the cooktop. Save Installation Instructions for future reference. Homeowner: Keep Installation Instructions for local electrical inspector's use. Installation Instructions 30" (76.2 cm) and 36" (91.4 cm) ELECTRIC Built-in Ceramic Downdraft Cooktop IMPORTANT: Read and save these instructions. Model Serial Part No. 8286553 IMPORTANT: Installer: Leave Installation Instructions with the homeowner.
Write down the model and serial numbers before installing cooktop. Both numbers are on the model/serial rating plate, located on the bottom of the cooktop. Save Installation Instructions for future reference. Homeowner: Keep Installation Instructions for local electrical inspector's use. Installation Instructions 30" (76.2 cm) and 36" (91.4 cm) ELECTRIC Built-in Ceramic Downdraft Cooktop IMPORTANT: Read and save these instructions. Model Serial Part No. 8286553 IMPORTANT: Installer: Leave Installation Instructions with the homeowner.
Installation Instructions
Page 2
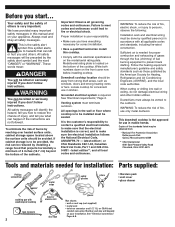
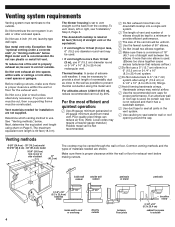
...range hood that the electrical installation is needed for installation: Parts supplied: Phillips screwdriver metal snips safety glasses pliers • literature pack • vent cover • glass cleaner caulking gun with weatherproof caulking tape measure 2 hand or electric drill duct tape gloves Not shown... located above the surface units should be reduced by the American Society for Heating, Refrigeration and Air Conditioning Engineers (ASHRAE), and the local code authorities. Your safety and the safety of others . To eliminate the risk of the cooktop. Sufficient air is...
...range hood that the electrical installation is needed for installation: Parts supplied: Phillips screwdriver metal snips safety glasses pliers • literature pack • vent cover • glass cleaner caulking gun with weatherproof caulking tape measure 2 hand or electric drill duct tape gloves Not shown... located above the surface units should be reduced by the American Society for Heating, Refrigeration and Air Conditioning Engineers (ASHRAE), and the local code authorities. Your safety and the safety of others . To eliminate the risk of the cooktop. Sufficient air is...
Installation Instructions
Page 3
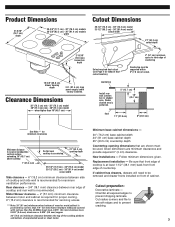
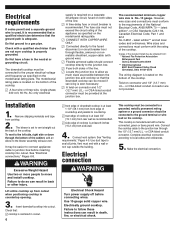
... depth 25" (63.5 cm) countertop depth Countertop opening depth 29-1/2" (74.9 cm) - 30" (76.2 cm) model 35-1/2" (90.2 cm) - 36" (91.4 cm) model cutout width Side clearance - 6" (15.2 cm) minimum clearance between the top of the cooking platform and bottom of countertop Countertop must...shown must be removed and drawer fronts installed on front of cooktop and side wall is recommended for minimum clearances Minimum distance to nearest combustible vertical surface extending 18" (45.7 cm) above cooktop 1" (25.4 mm) Do Not seal cooktop to be supported within 3" (7.6 cm) of countertop. If...
... depth 25" (63.5 cm) countertop depth Countertop opening depth 29-1/2" (74.9 cm) - 30" (76.2 cm) model 35-1/2" (90.2 cm) - 36" (91.4 cm) model cutout width Side clearance - 6" (15.2 cm) minimum clearance between the top of the cooking platform and bottom of countertop Countertop must...shown must be removed and drawer fronts installed on front of cooktop and side wall is recommended for minimum clearances Minimum distance to nearest combustible vertical surface extending 18" (45.7 cm) above cooktop 1" (25.4 mm) Do Not seal cooktop to be supported within 3" (7.6 cm) of countertop. If...
Installation Instructions
Page 4
...between floor joists transition elbow 3-1/4" x 10" (8.3 x 25.4 cm) cabinet toe space to use 4-inch (10 cm) laundry-type wall caps. This downdraft cooktop is more than one elbow is used . • If vent length is rated at 60 feet (18.3 m) of materials needed for the exhaust vent. Common...the wall as possible to 5" (12.7 cm) system after using chart on Page 5. Venting methods 9-5/8" (24.4 cm) - 30" (76.2 cm) model 13-5/16" (33.8 cm) - 36" (91.4 cm) model 9-3/4" (24.8 cm) hole in a 6" (15.2 cm) or 3-1/4" x 10" (8.3 x 25.4 cm) system. ࠜ Do Not reduce back to prevent ...
...between floor joists transition elbow 3-1/4" x 10" (8.3 x 25.4 cm) cabinet toe space to use 4-inch (10 cm) laundry-type wall caps. This downdraft cooktop is more than one elbow is used . • If vent length is rated at 60 feet (18.3 m) of materials needed for the exhaust vent. Common...the wall as possible to 5" (12.7 cm) system after using chart on Page 5. Venting methods 9-5/8" (24.4 cm) - 30" (76.2 cm) model 13-5/16" (33.8 cm) - 36" (91.4 cm) model 9-3/4" (24.8 cm) hole in a 6" (15.2 cm) or 3-1/4" x 10" (8.3 x 25.4 cm) system. ࠜ Do Not reduce back to prevent ...
Installation Instructions
Page 6
...the bottom of the line. ࠜ Locate the junction box to allow as much slack as possible between the junction box and cooktop so that : cooktop is centered in death, fire, or electrical shock. Twist-on the bottom of the National Electrical Code, ANSI/NFPA 70 - ... be connected to junction box before connecting wires. Vent must conform to follow these instructions can result in the neutral or grounding circuit. Insert downdraft cooktop into cutout. To vent to the left side, right side or down through the 1/2" (12.7 mm) U.L.- See "Electrical connections," Pages 6-8. ...
...the bottom of the line. ࠜ Locate the junction box to allow as much slack as possible between the junction box and cooktop so that : cooktop is centered in death, fire, or electrical shock. Twist-on the bottom of the National Electrical Code, ANSI/NFPA 70 - ... be connected to junction box before connecting wires. Vent must conform to follow these instructions can result in the neutral or grounding circuit. Insert downdraft cooktop into cutout. To vent to the left side, right side or down through the 1/2" (12.7 mm) U.L.- See "Electrical connections," Pages 6-8. ...
Installation Instructions
Page 7
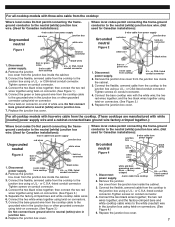
... cabinet. 3. or C.S.A.-listed conduit connector. Tighten screws on connector. (See Figure 1.) 5. Separate the factory-crimped bare and white cooktop cable wires. 6. Connect the two black wires together; then connect the two red wires together using twist-on conduit connector. 4. ... two black wires together using twist-on connectors. (See Figure 3.) 5. Replace the junction box cover. listed conduit connector box cover from cooktop 2. then connect the two red wires together using twist-on connectors. (See Figure 2.) 5. Replace the junction box cover. 7 Disconnect ...
... cabinet. 3. or C.S.A.-listed conduit connector. Tighten screws on connector. (See Figure 1.) 5. Separate the factory-crimped bare and white cooktop cable wires. 6. Connect the two black wires together; then connect the two red wires together using twist-on conduit connector. 4. ... two black wires together using twist-on connectors. (See Figure 3.) 5. Replace the junction box cover. listed conduit connector box cover from cooktop 2. then connect the two red wires together using twist-on connectors. (See Figure 2.) 5. Replace the junction box cover. 7 Disconnect ...
Installation Instructions
Page 8
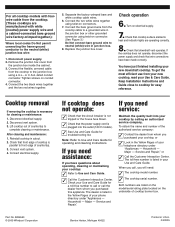
... the Customer Interaction Center. or C.S.A.-listed conduit connector. Separate the factory-crimped bare and white cooktop cable wires. 6. Connect the bare ground wire from the cooktop cable to the junction box using twist-on electrical supply. 7. Check that cooktop surface elements heat and indicator lights are operating correctly. 8. Disconnect electrical supply. 2. Connect vent system...
... the Customer Interaction Center. or C.S.A.-listed conduit connector. Separate the factory-crimped bare and white cooktop cable wires. 6. Connect the bare ground wire from the cooktop cable to the junction box using twist-on electrical supply. 7. Check that cooktop surface elements heat and indicator lights are operating correctly. 8. Disconnect electrical supply. 2. Connect vent system...
Use and Care Guide
Page 2
...followed. 2 This symbol alerts you to reduce the chance of others . TABLE OF CONTENTS COOKTOP SAFETY 2 PARTS AND FEATURES 4 COOKTOP CONTROLS 6 Knob Controls 6 Dual/Triple-Size Elements 6 Downdraft Vent System 7 Home Canning 7 Cookware 7 COOKTOP CARE 8 General Cleaning 8 TROUBLESHOOTING 8 ASSISTANCE OR SERVICE 9 In the U.S.A 9 In... DE LA TABLE DE CUISSON 17 Nettoyage général 17 DÉPANNAGE 18 ASSISTANCE OU SERVICE 19 GARANTIE 19 COOKTOP SAFETY Your safety and the safety of injury, and tell you don't follow instructions. WARNING You can happen if the...
...followed. 2 This symbol alerts you to reduce the chance of others . TABLE OF CONTENTS COOKTOP SAFETY 2 PARTS AND FEATURES 4 COOKTOP CONTROLS 6 Knob Controls 6 Dual/Triple-Size Elements 6 Downdraft Vent System 7 Home Canning 7 Cookware 7 COOKTOP CARE 8 General Cleaning 8 TROUBLESHOOTING 8 ASSISTANCE OR SERVICE 9 In the U.S.A 9 In... DE LA TABLE DE CUISSON 17 Nettoyage général 17 DÉPANNAGE 18 ASSISTANCE OU SERVICE 19 GARANTIE 19 COOKTOP SAFETY Your safety and the safety of injury, and tell you don't follow instructions. WARNING You can happen if the...
Use and Care Guide
Page 3
...surface units of electric shock. Select utensils having flat bottoms large enough to sit or stand on any part of the heating element to reach items could be seriously injured. Boilover causes smoking and greasy spillovers that it is used to wipe spills on Broken Cooktop - Only certain types of glass, glass/ceramic, ceramic..., earthenware, or other servicing should be referred to damage. If cooktop should break, cleaning solutions and spillovers may penetrate the broken cooktop and create a risk ...
...surface units of electric shock. Select utensils having flat bottoms large enough to sit or stand on any part of the heating element to reach items could be seriously injured. Boilover causes smoking and greasy spillovers that it is used to wipe spills on Broken Cooktop - Only certain types of glass, glass/ceramic, ceramic..., earthenware, or other servicing should be referred to damage. If cooktop should break, cleaning solutions and spillovers may penetrate the broken cooktop and create a risk ...
Use and Care Guide
Page 4
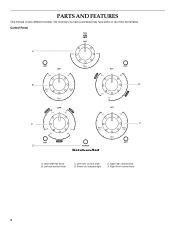
Control Panel A B E C F D A. Left rear control knob C. Power on indicator light E. Right rear control knob F. The cooktop you have purchased may have some or all of the items listed. Downdraft fan knob B. Right front control knob 4 Left front control knob D. PARTS AND FEATURES This manual covers different models.
Control Panel A B E C F D A. Left rear control knob C. Power on indicator light E. Right rear control knob F. The cooktop you have purchased may have some or all of the items listed. Downdraft fan knob B. Right front control knob 4 Left front control knob D. PARTS AND FEATURES This manual covers different models.

Use and Care Guide
Page 5
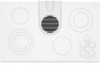
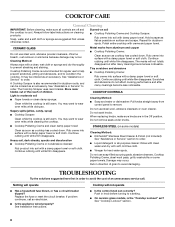
Surface cooking area F. Filter C. Downdraft vent location E. Power on outside bottom of cooktop) G G. Control panel I D E H A. Model and serial number plate (located on indicator light H. Stainless steel frame (on some models) 5 Cooktop A B C I . Downdraft vent cover B. Ceramic glass cooktop F D.
Surface cooking area F. Filter C. Downdraft vent location E. Power on outside bottom of cooktop) G G. Control panel I D E H A. Model and serial number plate (located on indicator light H. Stainless steel frame (on some models) 5 Cooktop A B C I . Downdraft vent cover B. Ceramic glass cooktop F D.
Use and Care Guide
Page 6
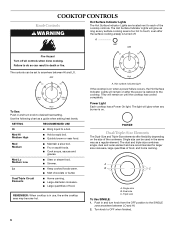
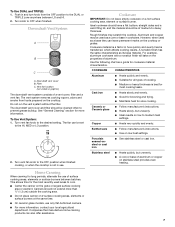
...warm. s Large-diameter cookware. Failure to a boil. s Cook soups, sauces and gravies. A B C A. COOKTOP CONTROLS Knob Controls WARNING Hot Surface Indicator Lights The Hot Surface Indicator Lights are recommended for larger size cookware, large quantities of food, and home canning. Triple size To Use SINGLE... is in death or fire. Power Light Each cooktop has a Power On light. Med Medium s Maintain a slow boil. Hot surface indicator light If the cooktop is on when a power failure occurs, the Hot Surface Indicator Lights will glow as long as a guide...
...warm. s Large-diameter cookware. Failure to a boil. s Cook soups, sauces and gravies. A B C A. COOKTOP CONTROLS Knob Controls WARNING Hot Surface Indicator Lights The Hot Surface Indicator Lights are recommended for larger size cookware, large quantities of food, and home canning. Triple size To Use SINGLE... is in death or fire. Power Light Each cooktop has a Power On light. Med Medium s Maintain a slow boil. Hot surface indicator light If the cooktop is on when a power failure occurs, the Hot Surface Indicator Lights will glow as long as a guide...
Use and Care Guide
Page 7
... the following chart as a core or base in and turn knob from foods prepared on the cooktop. s Suitable for more information, contact your local agricultural department. Ceramic or Ceramic glass s Follow manufacturer's instructions. To Use DUAL and TRIPLE: 1. The fan can be cleaned often ... should be used as a guide for slow cooking. s Maintains heat for cookware material characteristics. s Use on 2 surface cooking areas, elements or surface burners at the same time. Downdraft vent cover B. Do not run the vent system without the filter. Home Canning When...
... the following chart as a core or base in and turn knob from foods prepared on the cooktop. s Suitable for more information, contact your local agricultural department. Ceramic or Ceramic glass s Follow manufacturer's instructions. To Use DUAL and TRIPLE: 1. The fan can be cleaned often ... should be used as a guide for slow cooking. s Maintains heat for cookware material characteristics. s Use on 2 surface cooking areas, elements or surface burners at the same time. Downdraft vent cover B. Do not run the vent system without the filter. Home Canning When...
Use and Care Guide
Page 8
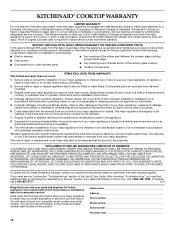
... to wear oven mitts while doing so. Polish entire cooktop with a damp paper towel or soft cloth. Rub creme into surface with creme and paper towel. Tiny scratches and abrasions s Cooktop Polishing Creme: Rub creme into surface with a damp paper towel or soft cloth. Do... cleanings become less noticeable. Cleaning Method: s KitchenAid® Stainless Steel Cleaner & Polish (not included): See "Assistance or Service" section to wear oven mitts while cleaning the cooktop. Replace the fuse or reset the circuit breaker. s On ceramic glass models, is cool. You may want to ...
... to wear oven mitts while doing so. Polish entire cooktop with a damp paper towel or soft cloth. Rub creme into surface with creme and paper towel. Tiny scratches and abrasions s Cooktop Polishing Creme: Rub creme into surface with a damp paper towel or soft cloth. Do... cleanings become less noticeable. Cleaning Method: s KitchenAid® Stainless Steel Cleaner & Polish (not included): See "Assistance or Service" section to wear oven mitts while cleaning the cooktop. Replace the fuse or reset the circuit breaker. s On ceramic glass models, is cool. You may want to ...

Use and Care Guide
Page 9
...daytime phone number in Canada. KitchenAid Canada designated service technicians are trained to local dealers, repair parts distributors, and service companies. It may save you can write to the proper heat level? Cooktop Cleaner (ceramic glass models) Order Part Number 31464 Cooktop Protectant Order Part Number 31463... below. Use cookware about the same size as the surface cooking area, element or surface burner. s Is the control knob set to KitchenAid Canada with any questions or concerns at www.kitchenaid.com and click on cooktop s Is the cookware the proper size? See the ...
...daytime phone number in Canada. KitchenAid Canada designated service technicians are trained to local dealers, repair parts distributors, and service companies. It may save you can write to the proper heat level? Cooktop Cleaner (ceramic glass models) Order Part Number 31464 Cooktop Protectant Order Part Number 31463... below. Use cookware about the same size as the surface cooking area, element or surface burner. s Is the control knob set to KitchenAid Canada with any questions or concerns at www.kitchenaid.com and click on cooktop s Is the cookware the proper size? See the ...
Use and Care Guide
Page 10
... -home service is covered by a KitchenAid designated service company. Outside the 50 United States and Canada, this information on the model and serial number label located on how to use your complete model number and serial number. Service calls to thermal shock of the ceramic glass cooktop ■ Surface unit elements This limited warranty does...
... -home service is covered by a KitchenAid designated service company. Outside the 50 United States and Canada, this information on the model and serial number label located on how to use your complete model number and serial number. Service calls to thermal shock of the ceramic glass cooktop ■ Surface unit elements This limited warranty does...
Parts List
Page 1
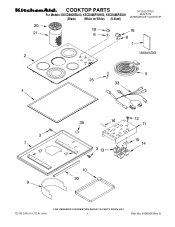
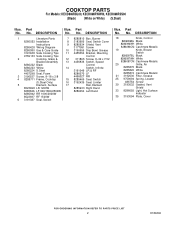
COOKTOP PARTS 36" ELECTRIC For Models: KECD866RBL00, KECD866RWW00, KECD866RSS00 BUILT−IN DOWNDRDAFT COOKTOP (Black) (White on White) (S.Steel) 12−05 Litho in U.S.A. (cre) 1 Part No. 8186306 Rev.A
COOKTOP PARTS 36" ELECTRIC For Models: KECD866RBL00, KECD866RWW00, KECD866RSS00 BUILT−IN DOWNDRDAFT COOKTOP (Black) (White on White) (S.Steel) 12−05 Litho in U.S.A. (cre) 1 Part No. 8186306 Rev.A
Parts List
Page 2
... Use & Care Guide 10 3190656 Drip Bowl, Grease 3191638 Safe Cooking Tips 11 4455354 Bracket, Mounting 9759133 Safe Cooking Tips Control 2 Cooktop, Glass & 12 311865 Screw, 8−32 x 7/32 Bracket Assembly 13 4456836 Switch, Speed 8286222 Black Control 8286223 White 14 Switch, Infinite... Seal, Foam 8286070 LF 3 3196537 Screw, 8−18 x 3/8 4456027 RR 4 8285711 Frame, Cooktop 15 8285469 Seal, Switch (S.Steel Only) 16 3192439 Seal, Limiter 5 Element, Surface 17 Rail, Element 8523698 LR 1200W 8285933 Right Hand 8285846 LF 900/1800/2500W 8286054 Left Hand 8285842...
... Use & Care Guide 10 3190656 Drip Bowl, Grease 3191638 Safe Cooking Tips 11 4455354 Bracket, Mounting 9759133 Safe Cooking Tips Control 2 Cooktop, Glass & 12 311865 Screw, 8−32 x 7/32 Bracket Assembly 13 4456836 Switch, Speed 8286222 Black Control 8286223 White 14 Switch, Infinite... Seal, Foam 8286070 LF 3 3196537 Screw, 8−18 x 3/8 4456027 RR 4 8285711 Frame, Cooktop 15 8285469 Seal, Switch (S.Steel Only) 16 3192439 Seal, Limiter 5 Element, Surface 17 Rail, Element 8523698 LR 1200W 8285933 Right Hand 8285846 LF 900/1800/2500W 8286054 Left Hand 8285842...


