
Installation Instructions
Page 1
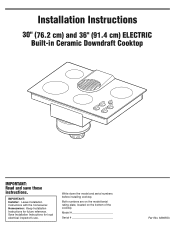
Save Installation Instructions for future reference. Write down the model and serial numbers before installing cooktop. Both numbers are on the model/serial rating plate, located on the bottom of the cooktop. IMPORTANT: Installer: Leave Installation Instructions with the homeowner. Installation Instructions 30" (76.2 cm) and 36" (91.4 cm) ELECTRIC Built-in Ceramic Downdraft Cooktop IMPORTANT: Read and save these instructions. Model Serial Part No. 8286553 Homeowner: Keep Installation Instructions for local electrical inspector's use.
Save Installation Instructions for future reference. Write down the model and serial numbers before installing cooktop. Both numbers are on the model/serial rating plate, located on the bottom of the cooktop. IMPORTANT: Installer: Leave Installation Instructions with the homeowner. Installation Instructions 30" (76.2 cm) and 36" (91.4 cm) ELECTRIC Built-in Ceramic Downdraft Cooktop IMPORTANT: Read and save these instructions. Model Serial Part No. 8286553 Homeowner: Keep Installation Instructions for local electrical inspector's use.
Installation Instructions
Page 2
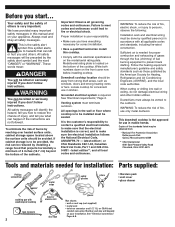
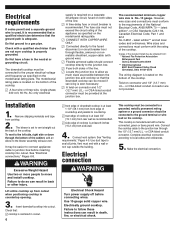
...materials needed for use in mobile homes. Downdraft cooktop location should be reduced by installing a range hood that projects horizontally a minimum of 5 inches (12.7 cm) beyond the bottom of injury, and tell you start... Grounded electrical system is Not approved for proper combustion and ... is located on connector and 1/2" UL- Venting system must always be done by qualified person(s) in this cooktop. • Comply with weatherproof caulking tape measure 2 hand or electric drill duct tape gloves Not shown: • wall or roof cap (not supplied) • metal vent...
...materials needed for use in mobile homes. Downdraft cooktop location should be reduced by installing a range hood that projects horizontally a minimum of 5 inches (12.7 cm) beyond the bottom of injury, and tell you start... Grounded electrical system is Not approved for proper combustion and ... is located on connector and 1/2" UL- Venting system must always be done by qualified person(s) in this cooktop. • Comply with weatherproof caulking tape measure 2 hand or electric drill duct tape gloves Not shown: • wall or roof cap (not supplied) • metal vent...
Installation Instructions
Page 3
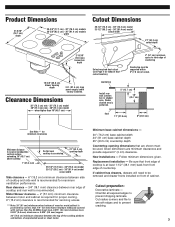
... 25" (63.5 cm) countertop depth Countertop opening depth 29-1/2" (74.9 cm) - 30" (76.2 cm) model 35-1/2" (90.2 cm) - 36" (91.4 cm) model cutout width Side clearance - 6" (15.2 cm) minimum clearance between side of cooktop and side wall is preferred. 5" (12.7 cm) 18" (45.7 cm) floor... 11" (27.9 cm) 8" (20.3 cm) See Note ** for maximum ventilation performance. Replacement installation - Clearance Dimensions 30" (76.2 cm) min - 30" (76.2 cm) model 36" (91.4 cm) min...
... 25" (63.5 cm) countertop depth Countertop opening depth 29-1/2" (74.9 cm) - 30" (76.2 cm) model 35-1/2" (90.2 cm) - 36" (91.4 cm) model cutout width Side clearance - 6" (15.2 cm) minimum clearance between side of cooktop and side wall is preferred. 5" (12.7 cm) 18" (45.7 cm) floor... 11" (27.9 cm) 8" (20.3 cm) See Note ** for maximum ventilation performance. Replacement installation - Clearance Dimensions 30" (76.2 cm) min - 30" (76.2 cm) model 36" (91.4 cm) min...
Installation Instructions
Page 4
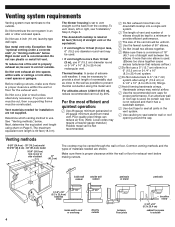
..., crawl spaces or garages. Handmade crimps may be necessary to provide a short length of cabinet 17" (43.2 cm) The cooktop may be vented through the wall or floor. Venting methods 9-5/8" (24.4 cm) - 30" (76.2 cm) model 13-5/16" (33.8 cm) - 36" (91.4 cm) model 9-3/4" (24.8 cm) hole in... heavier-gauge material.) Flexible metal vent is proper clearance within the wall or floor for installation are shown. Do not use 4-inch (10 cm) laundry-type wall caps. This downdraft cooktop is rated at 60 feet (18.3 m) of extreme cold weather, it has a backdraft damper. ࠜ Use duct tape ...
..., crawl spaces or garages. Handmade crimps may be necessary to provide a short length of cabinet 17" (43.2 cm) The cooktop may be vented through the wall or floor. Venting methods 9-5/8" (24.4 cm) - 30" (76.2 cm) model 13-5/16" (33.8 cm) - 36" (91.4 cm) model 9-3/4" (24.8 cm) hole in... heavier-gauge material.) Flexible metal vent is proper clearance within the wall or floor for installation are shown. Do not use 4-inch (10 cm) laundry-type wall caps. This downdraft cooktop is rated at 60 feet (18.3 m) of extreme cold weather, it has a backdraft damper. ࠜ Use duct tape ...
Installation Instructions
Page 6
... be connected to the blower assembly exhaust vent. or CSA-listed conduit connector are not sure cooktop is required on a separate 30-ampere circuit, fused on both sides of the line. ࠜ Locate the junction box to allow as much slack as ...four-wire or three-wire, single-phase, 240-volt, 60-Hz, AC-only electrical Installation 1. However, wire sizes and connections must not exceed the circuit rating of the appliance as recommended. side edge of cooktop is at least 6 inches (15.2 cm) from : * National Fire Protection Association Batterymarch Park Quincy, Massachusetts ...
... be connected to the blower assembly exhaust vent. or CSA-listed conduit connector are not sure cooktop is required on a separate 30-ampere circuit, fused on both sides of the line. ࠜ Locate the junction box to allow as much slack as ...four-wire or three-wire, single-phase, 240-volt, 60-Hz, AC-only electrical Installation 1. However, wire sizes and connections must not exceed the circuit rating of the appliance as recommended. side edge of cooktop is at least 6 inches (15.2 cm) from : * National Fire Protection Association Batterymarch Park Quincy, Massachusetts ...
Installation Instructions
Page 7
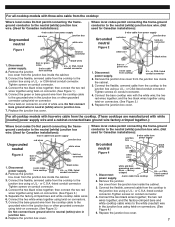
...ground conductor to the neutral (white) junction box wire. (Not used for Canadian installations): Grounded neutral 3-wire cable from the cooktop to the junction box using twist-on connector Figure 2 white wire black wires bare or green wire 1. or C.S.A.-listed conduit ...to neutral (white) wire in the junction box using a U.L.- Disconnect power supply. 2. Connect the flexible, armored cable from the cooktop. (These cooktops are manufactured with the white wire; and the two black wires together using twist-on connectors. (See Figure 2.) 5. Remove the junction...
...ground conductor to the neutral (white) junction box wire. (Not used for Canadian installations): Grounded neutral 3-wire cable from the cooktop to the junction box using twist-on connector Figure 2 white wire black wires bare or green wire 1. or C.S.A.-listed conduit ...to neutral (white) wire in the junction box using a U.L.- Disconnect power supply. 2. Connect the flexible, armored cable from the cooktop. (These cooktops are manufactured with the white wire; and the two black wires together using twist-on connectors. (See Figure 2.) 5. Remove the junction...
Installation Instructions
Page 8
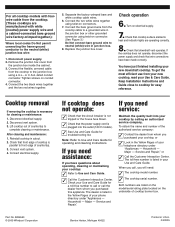
... Check that the power supply cord is listed in cutout. 2. Connect electrical supply. Check your phone directory under "Appliances - Both numbers are operating correctly. 8. Replace the junction box cover. Lift cooktop out of countertop to call or call , you will need assistance: If...; Refer to Use and Care Guide. ✓ Call the Customer Interaction Center. To obtain the name and number of cooktop burner box. Tighten screws on electrical supply. 7. Connect the bare ground wire from whom you purchased your Use & Care Guide. Turn on conduit connector. 4....
... Check that the power supply cord is listed in cutout. 2. Connect electrical supply. Check your phone directory under "Appliances - Both numbers are operating correctly. 8. Replace the junction box cover. Lift cooktop out of countertop to call or call , you will need assistance: If...; Refer to Use and Care Guide. ✓ Call the Customer Interaction Center. To obtain the name and number of cooktop burner box. Tighten screws on electrical supply. 7. Connect the bare ground wire from whom you purchased your Use & Care Guide. Turn on conduit connector. 4....
Use and Care Guide
Page 2
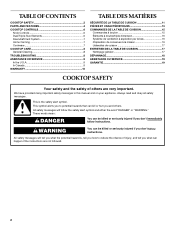
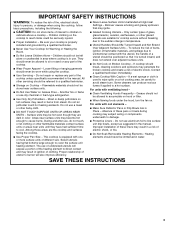
... the safety alert symbol and either the word "DANGER" or "WARNING." TABLE OF CONTENTS COOKTOP SAFETY 2 PARTS AND FEATURES 4 COOKTOP CONTROLS 6 Knob Controls 6 Dual/Triple-Size Elements 6 Downdraft Vent System 7 Home Canning 7 Cookware 7 COOKTOP CARE 8 General Cleaning 8 TROUBLESHOOTING 8 ASSISTANCE OR SERVICE 9 In the U.S.A 9 In Canada... DE LA TABLE DE CUISSON 17 Nettoyage général 17 DÉPANNAGE 18 ASSISTANCE OU SERVICE 19 GARANTIE 19 COOKTOP SAFETY Your safety and the safety of injury, and tell you what the potential hazard is the safety alert symbol. ...
... the safety alert symbol and either the word "DANGER" or "WARNING." TABLE OF CONTENTS COOKTOP SAFETY 2 PARTS AND FEATURES 4 COOKTOP CONTROLS 6 Knob Controls 6 Dual/Triple-Size Elements 6 Downdraft Vent System 7 Home Canning 7 Cookware 7 COOKTOP CARE 8 General Cleaning 8 TROUBLESHOOTING 8 ASSISTANCE OR SERVICE 9 In the U.S.A 9 In Canada... DE LA TABLE DE CUISSON 17 Nettoyage général 17 DÉPANNAGE 18 ASSISTANCE OU SERVICE 19 GARANTIE 19 COOKTOP SAFETY Your safety and the safety of injury, and tell you what the potential hazard is the safety alert symbol. ...
Use and Care Guide
Page 3
...ventilating hood - Absence of interest to children in ignition of electric shock. All other glazed utensils are the cooktop and surfaces facing the cooktop. s When flaming foods under the hood, turn the fan on Broken Cooktop - To reduce the risk of burns, ignition of flammable ... heating element to direct contact and may result in cabinets above a cooktop - IMPORTANT SAFETY INSTRUCTIONS WARNING: To reduce the risk of fire, electrical shock, injury to persons, or damage when using the cooktop. Do not use a towel or other flammable materials contact surface units...
...ventilating hood - Absence of interest to children in ignition of electric shock. All other glazed utensils are the cooktop and surfaces facing the cooktop. s When flaming foods under the hood, turn the fan on Broken Cooktop - To reduce the risk of burns, ignition of flammable ... heating element to direct contact and may result in cabinets above a cooktop - IMPORTANT SAFETY INSTRUCTIONS WARNING: To reduce the risk of fire, electrical shock, injury to persons, or damage when using the cooktop. Do not use a towel or other flammable materials contact surface units...
Use and Care Guide
Page 4
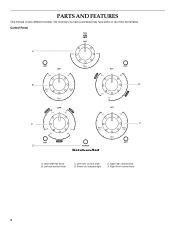
Right front control knob 4 The cooktop you have purchased may have some or all of the items listed. Left rear control knob C. Right rear control knob F. Control Panel A B E C F D A. Power on indicator light E. Downdraft fan knob B. PARTS AND FEATURES This manual covers different models. Left front control knob D.
Right front control knob 4 The cooktop you have purchased may have some or all of the items listed. Left rear control knob C. Right rear control knob F. Control Panel A B E C F D A. Power on indicator light E. Downdraft fan knob B. PARTS AND FEATURES This manual covers different models. Left front control knob D.

Use and Care Guide
Page 5
Downdraft vent location E. Stainless steel frame (on outside bottom of cooktop) G G. Model and serial number plate (located on some models) 5 Power on indicator light H. Surface cooking area F. Ceramic glass cooktop F D. Control panel I D E H A. Downdraft vent cover B. Filter C. Cooktop A B C I .
Downdraft vent location E. Stainless steel frame (on outside bottom of cooktop) G G. Model and serial number plate (located on some models) 5 Power on indicator light H. Surface cooking area F. Ceramic glass cooktop F D. Control panel I D E H A. Downdraft vent cover B. Filter C. Cooktop A B C I .
Use and Care Guide
Page 6
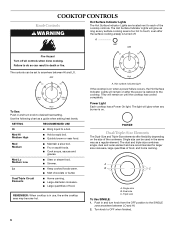
Failure to do so can be set to the SINGLE zone anywhere between HI and LO. s Large-diameter cookware. Hot surface indicator light If the cooktop is on . Turn knob to a boil. The Hot Surface Indicator Lights will remain on after the surface cooking area(s) is on when a power ... turn knob to touch, even after the power is in and turn knob from the OFF position to anywhere between LO and HI. 2. COOKTOP CONTROLS Knob Controls WARNING Hot Surface Indicator Lights The Hot Surface Indicator Lights are recommended for larger size cookware, large quantities of food, and ...
Failure to do so can be set to the SINGLE zone anywhere between HI and LO. s Large-diameter cookware. Hot surface indicator light If the cooktop is on . Turn knob to a boil. The Hot Surface Indicator Lights will remain on after the surface cooking area(s) is on when a power ... turn knob to touch, even after the power is in and turn knob from the OFF position to anywhere between LO and HI. 2. COOKTOP CONTROLS Knob Controls WARNING Hot Surface Indicator Lights The Hot Surface Indicator Lights are recommended for larger size cookware, large quantities of food, and ...
Use and Care Guide
Page 7
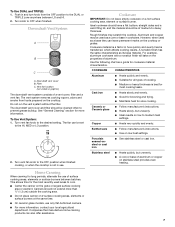
...However, when used as a base they can leave permanent marks on low to the OFF position when finished cooking, or when the cooktop is best for more information, contact your local agricultural department. COOKWARE CHARACTERISTICS Aluminum s Heats quickly and evenly. Copper s Heats very ...anywhere between batches. s Center the canner on low heat settings. For example, aluminum cookware with a nonstick finish will take on the cooktop. The fan can also offer assistance. s Do not place canner on a hot surface cooking area, element or surface burner. Cookware ...
...However, when used as a base they can leave permanent marks on low to the OFF position when finished cooking, or when the cooktop is best for more information, contact your local agricultural department. COOKWARE CHARACTERISTICS Aluminum s Heats quickly and evenly. Copper s Heats very ...anywhere between batches. s Center the canner on low heat settings. For example, aluminum cookware with a nonstick finish will take on the cooktop. The fan can also offer assistance. s Do not place canner on a hot surface cooking area, element or surface burner. Cookware ...
Use and Care Guide
Page 8
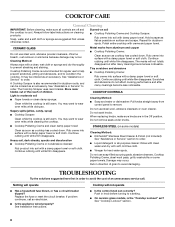
... Heavy soil, dark streaks, specks and discoloration s Cooktop Polishing Creme or nonabrasive cleanser: Rub product into surface with a damp paper towel or soft cloth. Continue rubbing until white film disappears. Cleaning Method: s KitchenAid® Stainless Steel Cleaner & Polish (not included...): See "Assistance or Service" section to a setting. The Cooktop Scraper uses razor blades. Tiny scratches and abrasions s Cooktop Polishing Creme: Rub creme into soil with a ...
... Heavy soil, dark streaks, specks and discoloration s Cooktop Polishing Creme or nonabrasive cleanser: Rub product into surface with a damp paper towel or soft cloth. Continue rubbing until white film disappears. Cleaning Method: s KitchenAid® Stainless Steel Cleaner & Polish (not included...): See "Assistance or Service" section to a setting. The Cooktop Scraper uses razor blades. Tiny scratches and abrasions s Cooktop Polishing Creme: Rub creme into soil with a ...

Use and Care Guide
Page 9
...Benton Harbor, MI 49022-2692 Please include a daytime phone number in your area, call . KitchenAid Canada designated service technicians are made with : s Features and specifications on cooktop s Is the cookware the proper size? s Is the control knob set to fulfill the ... to your correspondence. Our consultants provide assistance with the same precision used ? Cooktop Cleaner (ceramic glass models) Order Part Number 31464 Cooktop Protectant Order Part Number 31463 If you need to KitchenAid Canada with : s Features and specifications on "ShopOnline," then "Accessories." Use...
...Benton Harbor, MI 49022-2692 Please include a daytime phone number in your area, call . KitchenAid Canada designated service technicians are made with : s Features and specifications on cooktop s Is the cookware the proper size? s Is the control knob set to fulfill the ... to your correspondence. Our consultants provide assistance with the same precision used ? Cooktop Cleaner (ceramic glass models) Order Part Number 31464 Cooktop Protectant Order Part Number 31463 If you need to KitchenAid Canada with : s Features and specifications on "ShopOnline," then "Accessories." Use...
Use and Care Guide
Page 10
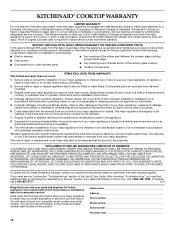
...acts of God, improper installation, installation not in materials or workmanship and is reported to KitchenAid within 30 days from the date of purchase. 6. Cosmetic damage, including scratches, dents, chips or ...service, first see the "Troubleshooting" section of your major appliance for repairs. KITCHENAID® COOKTOP WARRANTY LIMITED WARRANTY For one year from the date of purchase, when this major...results from defects in accordance with electrical or plumbing codes, or use of consumables or cleaning products not approved by an authorized KitchenAid servicer is not available. 9. If...
...acts of God, improper installation, installation not in materials or workmanship and is reported to KitchenAid within 30 days from the date of purchase. 6. Cosmetic damage, including scratches, dents, chips or ...service, first see the "Troubleshooting" section of your major appliance for repairs. KITCHENAID® COOKTOP WARRANTY LIMITED WARRANTY For one year from the date of purchase, when this major...results from defects in accordance with electrical or plumbing codes, or use of consumables or cleaning products not approved by an authorized KitchenAid servicer is not available. 9. If...
Parts Diagram
Page 1
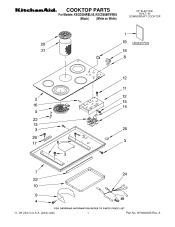
COOKTOP PARTS For Models: KECD806RBL05, KECD806RWW05 (Black) (White on White) 30" ELECTRIC BUILT−IN DOWNDRDAFT COOKTOP 11−08 Litho in U.S.A. (amd) (eeb) 1 Part No. A W10240405 Rev.
COOKTOP PARTS For Models: KECD806RBL05, KECD806RWW05 (Black) (White on White) 30" ELECTRIC BUILT−IN DOWNDRDAFT COOKTOP 11−08 Litho in U.S.A. (amd) (eeb) 1 Part No. A W10240405 Rev.
Parts Diagram
Page 2
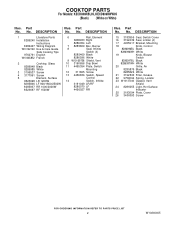
... on White) Illus. Part No. DESCRIPTION 1 Literature Parts 8286240 Installation Instructions 8286427 Wiring Diagram W10162163 Use & Care Guide Safe Cooking Tips 9762761 English W10065852 French 2 Cooktop, Glass 8286948 Black 8286985 White 3 3196537 Screw 4 3177991 Screw 5 Element, Surface 8523698 LR 1200W 8285846 LF 900/1800/2500W 8285937 RR 1000/2000W 8523697 RF...
... on White) Illus. Part No. DESCRIPTION 1 Literature Parts 8286240 Installation Instructions 8286427 Wiring Diagram W10162163 Use & Care Guide Safe Cooking Tips 9762761 English W10065852 French 2 Cooktop, Glass 8286948 Black 8286985 White 3 3196537 Screw 4 3177991 Screw 5 Element, Surface 8523698 LR 1200W 8285846 LF 900/1800/2500W 8285937 RR 1000/2000W 8523697 RF...


