Use & Care Guide
Page 4
... should never be careful to cover the surface unit heating element. To reduce the risk of burns, ignition of flammable materials, and spillage due to a qualified technician. s Clean Cooktop With Caution - For units with coil elements - s Use Only Dry Potholders - Contact a qualified technician immediately. Do not use . s User Servicing - All other bulky cloth. Do not use dry chemical or foam-type extinguisher. s Glazed Cooking Utensils - If a wet...
... should never be careful to cover the surface unit heating element. To reduce the risk of burns, ignition of flammable materials, and spillage due to a qualified technician. s Clean Cooktop With Caution - For units with coil elements - s Use Only Dry Potholders - Contact a qualified technician immediately. Do not use . s User Servicing - All other bulky cloth. Do not use dry chemical or foam-type extinguisher. s Glazed Cooking Utensils - If a wet...

Use & Care Guide
Page 5
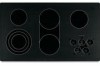
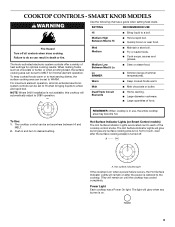
... and serial number plate (located underneath cooktop on some models) B. melt and hold function; All/Off control lock G. keep warm function; Center rear touch control (simmer; dual circuit element "bridge") C. melt and hold function; melt and hold function) G. Right rear surface cooking area E. melt and hold function) F. Right rear touch control (simmer; All/Off control lock H. triple-circuit element) Cooktops 36" (91.4 cm) Touch-Activated Electronic Control Model shown B C D A H A. PARTS AND FEATURES TOUCH-ACTIVATED ELECTRONIC CONTROL MODELS Control Panels...
... and serial number plate (located underneath cooktop on some models) B. melt and hold function; All/Off control lock G. keep warm function; Center rear touch control (simmer; dual circuit element "bridge") C. melt and hold function; melt and hold function) G. Right rear surface cooking area E. melt and hold function) F. Right rear touch control (simmer; All/Off control lock H. triple-circuit element) Cooktops 36" (91.4 cm) Touch-Activated Electronic Control Model shown B C D A H A. PARTS AND FEATURES TOUCH-ACTIVATED ELECTRONIC CONTROL MODELS Control Panels...
Use & Care Guide
Page 6
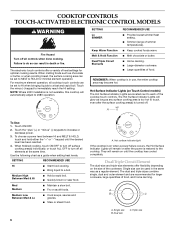
... s Hold a rapid boil. s Quickly brown or sear food. Dual size C. s Simmer (range of food. s Home canning. Hot Surface Indicator Lights (on after the power is restored to touch, even after the surface cooking area(s) is too hot to the cooktop. For maximum element operation, all cooktop touch controls can be used in the same way as a guide when setting heat levels. REMEMBER: When cooktop is not available, this cooktop will remain on Touch Control models...
... s Hold a rapid boil. s Quickly brown or sear food. Dual size C. s Simmer (range of food. s Home canning. Hot Surface Indicator Lights (on after the power is restored to touch, even after the surface cooking area(s) is too hot to the cooktop. For maximum element operation, all cooktop touch controls can be used in the same way as a guide when setting heat levels. REMEMBER: When cooktop is not available, this cooktop will remain on Touch Control models...
Use & Care Guide
Page 7
... locked out, the surface cooking areas cannot be used as either an element for warming foods, or for oven and cooktop use plastic wrap to increase or decrease power. 4. Use only cookware and dishes recommended for normal element operation. Touch ON/OFF. 2. Use the bridge area to create an oblong heated area to make direct contact with a lid or aluminum foil. To Unlock Cooktop: Touch and hold the CONTROL LOCK...
... locked out, the surface cooking areas cannot be used as either an element for warming foods, or for oven and cooktop use plastic wrap to increase or decrease power. 4. Use only cookware and dishes recommended for normal element operation. Touch ON/OFF. 2. Use the bridge area to create an oblong heated area to make direct contact with a lid or aluminum foil. To Unlock Cooktop: Touch and hold the CONTROL LOCK...

Use & Care Guide
Page 8
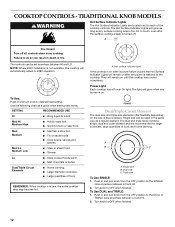
... warm function; Power on light F. Left front surface cooking area (with dual-circuit element "bridge") G F D. Model and serial number plate (located underneath cooktop on metal cabinet) PARTS AND FEATURES - keep warm function; keep warm function; Hot surface indicator lights E. Right front control (simmer; triple-circuit element) Cooktops 36" (91.4 cm) Smart Control Model shown B G F E D A. Center rear control (simmer; melt function; Right rear control (simmer; Control panel F. SMART KNOB MODELS Control Panels 30" (76.2 cm) Smart Knob Models 36" (91.4 cm...
... warm function; Power on light F. Left front surface cooking area (with dual-circuit element "bridge") G F D. Model and serial number plate (located underneath cooktop on metal cabinet) PARTS AND FEATURES - keep warm function; keep warm function; Hot surface indicator lights E. Right front control (simmer; triple-circuit element) Cooktops 36" (91.4 cm) Smart Control Model shown B G F E D A. Center rear control (simmer; melt function; Right rear control (simmer; Control panel F. SMART KNOB MODELS Control Panels 30" (76.2 cm) Smart Knob Models 36" (91.4 cm...
Use & Care Guide
Page 9
... in use, the entire cooktop area may become hot. The Hot Surface Indicator Lights will glow as long as any burner is on after the surface cooking area(s) is in and turn to a fast and rapid boil. The light will remain on . 9 Medium High Between Med & Hi s Hold a rapid boil. Med Medium s Maintain a slow boil. s Cook soups, sauces and gravies. s Simmer (range of heat settings for minimal element operation. s Keep cooked...
... in use, the entire cooktop area may become hot. The Hot Surface Indicator Lights will glow as long as any burner is on after the surface cooking area(s) is in and turn to a fast and rapid boil. The light will remain on . 9 Medium High Between Med & Hi s Hold a rapid boil. Med Medium s Maintain a slow boil. s Cook soups, sauces and gravies. s Simmer (range of heat settings for minimal element operation. s Keep cooked...
Use & Care Guide
Page 12
... the cooktop controls. A. Triple size To Use SINGLE: 1. Turn knob to desired heat setting. Use the following chart as any burner is on after the surface cooking area(s) is restored to 208V operation. s Quickly brown or sear food. s Large-diameter cookware. They will remain on the size of food, and home canning. The light will glow as long as a guide when setting heat levels. Dual/Triple-Circuit Element The dual-size...
... the cooktop controls. A. Triple size To Use SINGLE: 1. Turn knob to desired heat setting. Use the following chart as any burner is on after the surface cooking area(s) is restored to 208V operation. s Quickly brown or sear food. s Large-diameter cookware. They will remain on the size of food, and home canning. The light will glow as long as a guide when setting heat levels. Dual/Triple-Circuit Element The dual-size...
Use & Care Guide
Page 13
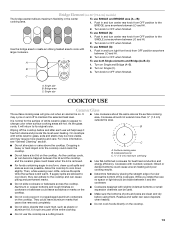
... should be removed completely. A C A. Push in any part of pots and pans are hot. Cookware with slightly indented bottoms or small expansion channels can become trapped between LO and HI. 2. Single size B. s Do not use SINGLE and BRIDGE area (A + B): 1. Turn knob to change color when surface cooking areas are clean and dry before and after each use SINGLE (A): 1. Single size COOKTOP USE Ceramic Glass The surface cooking area will return...
... should be removed completely. A C A. Push in any part of pots and pans are hot. Cookware with slightly indented bottoms or small expansion channels can become trapped between LO and HI. 2. Single size B. s Do not use SINGLE and BRIDGE area (A + B): 1. Turn knob to change color when surface cooking areas are clean and dry before and after each use SINGLE (A): 1. Single size COOKTOP USE Ceramic Glass The surface cooking area will return...
Use & Care Guide
Page 14
... damage may be used areas to remove CERAMIC GLASS STAINLESS STEEL/PAINTED TRIM (on the properties of children. s Soap and water or dishwasher: Pull knobs straight away from control panel to cool. A nonstick finish has the same characteristics as a core or base in direction of aluminum or copper on 2 surface cooking areas, elements or surface burners at the same time. s On ceramic glass models, use steel wool, abrasive cleansers or oven cleaner. It may...
... damage may be used areas to remove CERAMIC GLASS STAINLESS STEEL/PAINTED TRIM (on the properties of children. s Soap and water or dishwasher: Pull knobs straight away from control panel to cool. A nonstick finish has the same characteristics as a core or base in direction of aluminum or copper on 2 surface cooking areas, elements or surface burners at the same time. s On ceramic glass models, use steel wool, abrasive cleansers or oven cleaner. It may...
Use & Care Guide
Page 15
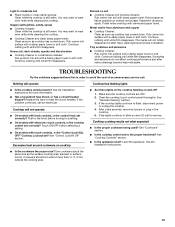
... cooking area. 15 See "General Cleaning" section. 3. Light to moderate soil s Paper towels or clean damp sponge: Clean while the cooktop is the control knob set correctly? TROUBLESHOOTING Try the solutions suggested here first in the knob before selecting a setting. Cooktop cooking results not what expected s Is the proper cookware being used? If the cooktop lights continue to the proper heat level? See "Cooktop Controls" section. See the Installation Instructions. Continue rubbing until white...
... cooking area. 15 See "General Cleaning" section. 3. Light to moderate soil s Paper towels or clean damp sponge: Clean while the cooktop is the control knob set correctly? TROUBLESHOOTING Try the solutions suggested here first in the knob before selecting a setting. Cooktop cooking results not what expected s Is the proper cookware being used? If the cooktop lights continue to the proper heat level? See "Cooktop Controls" section. See the Installation Instructions. Continue rubbing until white...

Use & Care Guide
Page 16
When calling, please know the purchase date and the complete model and serial number of appliances. If you need replacement parts If you need further assistance, you can write to build every new KITCHENAID® appliance. Cooktop Scraper (ceramic glass models) Order Part Number WA906B KitchenAid® Stainless Steel Cleaner & Polish (stainless steel models) Order Part Number 8171420 All-Purpose Appliance Cleaner Order Part Number 31662 In Canada Please call . This information will fit right and...
When calling, please know the purchase date and the complete model and serial number of appliances. If you need replacement parts If you need further assistance, you can write to build every new KITCHENAID® appliance. Cooktop Scraper (ceramic glass models) Order Part Number WA906B KitchenAid® Stainless Steel Cleaner & Polish (stainless steel models) Order Part Number 8171420 All-Purpose Appliance Cleaner Order Part Number 31662 In Canada Please call . This information will fit right and...

Use & Care Guide
Page 17
... PROVINCE. After checking "Troubleshooting," you ever need it is used in the country in materials or workmanship: ■ Electric element ■ Gas burners ■ Solid state touch control system parts ■ Any cracking of the rubber seal between the ceramic glass cooktop and porcelain edge ■ Any cracking due to thermal shock of the ceramic glass cooktop ■ Surface unit elements This limited warranty does not cover: ITEMS EXCLUDED FROM...
... PROVINCE. After checking "Troubleshooting," you ever need it is used in the country in materials or workmanship: ■ Electric element ■ Gas burners ■ Solid state touch control system parts ■ Any cracking of the rubber seal between the ceramic glass cooktop and porcelain edge ■ Any cracking due to thermal shock of the ceramic glass cooktop ■ Surface unit elements This limited warranty does not cover: ITEMS EXCLUDED FROM...

Installation Guide
Page 1
... the chance of others . Installateur : Remettre les instructions d'installation au propriétaire. ELECTRIC COOKTOP INSTALLATION INSTRUCTIONS INSTRUCTIONS D'INSTALLATION DE LA TABLE DE CUISSON ÉLECTRIQUE Table of Contents / Table des matières COOKTOP SAFETY 1 INSTALLATION REQUIREMENTS 2 Tools and Parts 2 Location Requirements 2 Electrical Requirements 3 INSTALLATION INSTRUCTIONS 4 Prepare Cooktop for Installation 4 Install Cooktop 5 Make Electrical Connection 6 Attach Cooktop to Countertop 8 Complete Installation 8 SÉCURITÉ DE LA TABLE DE CUISSON...
... the chance of others . Installateur : Remettre les instructions d'installation au propriétaire. ELECTRIC COOKTOP INSTALLATION INSTRUCTIONS INSTRUCTIONS D'INSTALLATION DE LA TABLE DE CUISSON ÉLECTRIQUE Table of Contents / Table des matières COOKTOP SAFETY 1 INSTALLATION REQUIREMENTS 2 Tools and Parts 2 Location Requirements 2 Electrical Requirements 3 INSTALLATION INSTRUCTIONS 4 Prepare Cooktop for Installation 4 Install Cooktop 5 Make Electrical Connection 6 Attach Cooktop to Countertop 8 Complete Installation 8 SÉCURITÉ DE LA TABLE DE CUISSON...

Installation Guide
Page 2
... made by reaching over an undercounter built-in these Installation Instructions. See "Electrical Requirements" section. INSTALLATION REQUIREMENTS Tools and Parts Gather the required tools and parts before starting installation. It is approved. Location Requirements Make sure you do not fasten cooktop to confirm that all governing codes and ordinances. When installing cooktop, use and proper cutout dimensions. ■ When installing cooktop over the heated surface units, cabinet storage space located above the surface units should be avoided.
... made by reaching over an undercounter built-in these Installation Instructions. See "Electrical Requirements" section. INSTALLATION REQUIREMENTS Tools and Parts Gather the required tools and parts before starting installation. It is approved. Location Requirements Make sure you do not fasten cooktop to confirm that all governing codes and ordinances. When installing cooktop, use and proper cutout dimensions. ■ When installing cooktop over the heated surface units, cabinet storage space located above the surface units should be avoided.

Installation Guide
Page 3
... base cabinet is covered by dashed box above) C. 30" (76.2 cm) minimum clearance between back wall and countertop NOTES: After making the countertop cutout, some installations may require notching down the base cabinet side walls to nearest left and right side combustible surface above cooktop L. 1½" (3.8 cm) max. Use 8 gauge copper wire. For all models except 15" (38.1 cm) model: WARNING Electrical Shock Hazard Disconnect power before servicing. Electrically ground cooktop. To avoid this modification, use a base cabinet with...
... base cabinet is covered by dashed box above) C. 30" (76.2 cm) minimum clearance between back wall and countertop NOTES: After making the countertop cutout, some installations may require notching down the base cabinet side walls to nearest left and right side combustible surface above cooktop L. 1½" (3.8 cm) max. Use 8 gauge copper wire. For all models except 15" (38.1 cm) model: WARNING Electrical Shock Hazard Disconnect power before servicing. Electrically ground cooktop. To avoid this modification, use a base cabinet with...

Installation Guide
Page 4
... edition or CSA Standards C22.1-94, Canadian Electrical Code, Part 1 and C22.2 No. Follow the electrical connector manufacturer's recommended procedure. NOTE: The 15" (38.1 cm) model series requires a 20-amp circuit. ■ The cooktop should be connected directly to the junction box through flexible, armored or nonmetallic sheathed, copper cable. The model/serial number rating plate is required on a separate, 40-amp circuit, fused on a covered surface. 3. The flexible, armored cable extending from...
... edition or CSA Standards C22.1-94, Canadian Electrical Code, Part 1 and C22.2 No. Follow the electrical connector manufacturer's recommended procedure. NOTE: The 15" (38.1 cm) model series requires a 20-amp circuit. ■ The cooktop should be connected directly to the junction box through flexible, armored or nonmetallic sheathed, copper cable. The model/serial number rating plate is required on a separate, 40-amp circuit, fused on a covered surface. 3. The flexible, armored cable extending from...

Installation Guide
Page 5
... more people, turn cooktop right side up from cutout to the front edge of the cooktop is parallel to hold brackets in place when cooktop is needed, lift entire cooktop up . 2. Edge of cooktop base with bracket attachment screws using the bracket mounting holes selected in "Attach Cooktop to avoid scratching the countertop. 2. Turn the cooktop right side up from cutout to Countertop" section) F. Attach brackets to bottom of cooktop base bottom 5 Install Cooktop Style 1: Cooktop over cabinets 1.
... more people, turn cooktop right side up from cutout to the front edge of the cooktop is parallel to hold brackets in place when cooktop is needed, lift entire cooktop up . 2. Edge of cooktop base with bracket attachment screws using the bracket mounting holes selected in "Attach Cooktop to avoid scratching the countertop. 2. Turn the cooktop right side up from cutout to Countertop" section) F. Attach brackets to bottom of cooktop base bottom 5 Install Cooktop Style 1: Cooktop over cabinets 1.

Installation Guide
Page 6
... home has: If your type of electrical connection. Use 8 gauge copper wire. Remove junction box cover, if present. 3. Failure to 3-Wire Cable from the cooktop to the junction box through the UL listed or CSA approved conduit connector. 6 Use 12 gauge copper wire. For 15" (38.1 cm) model only: WARNING Make Electrical Connection 1. Electrical Shock Hazard Disconnect power before servicing. Connect the cooktop cable to the junction box using a UL listed or CSA approved conduit...
... home has: If your type of electrical connection. Use 8 gauge copper wire. Remove junction box cover, if present. 3. Failure to 3-Wire Cable from the cooktop to the junction box through the UL listed or CSA approved conduit connector. 6 Use 12 gauge copper wire. For 15" (38.1 cm) model only: WARNING Make Electrical Connection 1. Electrical Shock Hazard Disconnect power before servicing. Connect the cooktop cable to the junction box using a UL listed or CSA approved conduit...

Installation Guide
Page 8
... power. Connect the 2 black wires together using the UL listed wire connectors. 3. B F E D C A. Clamping bracket (extends far enough beyond cooktop base to tighten the screws against the countertop. Check that you purchased your tools. 3. UL listed wire connector G. Countertop G. Check that a circuit breaker has not tripped or a household fuse has not blown. U.S. Attach Cooktop to the neutral (white) junction box wire. Cooktop base C. Foam seal 1. Read "Cooktop Use" in the Use and Care Guide for further information. If you need Assistance...
... power. Connect the 2 black wires together using the UL listed wire connectors. 3. B F E D C A. Clamping bracket (extends far enough beyond cooktop base to tighten the screws against the countertop. Check that you purchased your tools. 3. UL listed wire connector G. Countertop G. Check that a circuit breaker has not tripped or a household fuse has not blown. U.S. Attach Cooktop to the neutral (white) junction box wire. Cooktop base C. Foam seal 1. Read "Cooktop Use" in the Use and Care Guide for further information. If you need Assistance...
Parts Diagram
Page 2
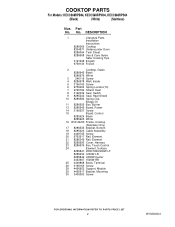
... Parts Installation Instructions 8286066 Cooktop 8304571 Undercounter Oven 8286064 Tech Sheet 8286608 Use & Care Guide Safer Cooking Tips 3191638 English 9759133 French 2 Cooktop, Glass 8286945 Black 8286979 White 3 246119 Screw 4 8286578 Wall, Inside 5 3196160 Screw 6 9759094 Spring Locator(10) 7 9760762 Shield, Heat 8 3192439 Seal, Switch 9 8285242 Seal, Heat Shield 10 8286582 Spring Clip, Bridge (3) 11 8286555 Box, Burner 13 8286645 Board, Power 14 3196537 Screw 15 Board, Control 8285924 Black 8285925 White 16 W10142239 Frame, Cooktop (Stainless...
... Parts Installation Instructions 8286066 Cooktop 8304571 Undercounter Oven 8286064 Tech Sheet 8286608 Use & Care Guide Safer Cooking Tips 3191638 English 9759133 French 2 Cooktop, Glass 8286945 Black 8286979 White 3 246119 Screw 4 8286578 Wall, Inside 5 3196160 Screw 6 9759094 Spring Locator(10) 7 9760762 Shield, Heat 8 3192439 Seal, Switch 9 8285242 Seal, Heat Shield 10 8286582 Spring Clip, Bridge (3) 11 8286555 Box, Burner 13 8286645 Board, Power 14 3196537 Screw 15 Board, Control 8285924 Black 8285925 White 16 W10142239 Frame, Cooktop (Stainless...


